Herunterladen Inhalt Inhalt Diese Seite drucken
Silvercrest WD1610 Bedienungsanleitung Und Serviceinformationen

Silvercrest WD1610 Bedienungsanleitung Und Serviceinformationen

Vorschau ausblenden Andere Handbücher für WD1610:
Inhaltsverzeichnis

Werbung

Verfügbare Sprachen
  • DE

Verfügbare Sprachen

  • DEUTSCH, seite 98
H O M E T E C H
Timbre inalámbrico
Campanello senza fili
Timbre inalámbrico
ES
Manual del usuario e
información de servicio
Campainha sem fios
PT
Manual do Utilizador e
Informação Relativa a Assistência
Funktürklingel
AT
Bedienungsanleitung und
CH
Serviceinformationen
Campanello senza fili
IT
MT
Istruzioni per l'uso e
informationi di servizio
Wireless Doorbell
GB
MT
User manual and
service information
WD1610

Werbung

Inhaltsverzeichnis
loading

Inhaltszusammenfassung für Silvercrest WD1610

  • Seite 1 Campanello senza fili Timbre inalámbrico Istruzioni per l’uso e Manual del usuario e información de servicio informationi di servizio Campainha sem fios Wireless Doorbell Manual do Utilizador e User manual and Informação Relativa a Assistência service information Funktürklingel Bedienungsanleitung und Serviceinformationen WD1610...
  • Seite 2: Inhaltsverzeichnis

    Timbre inalámbrico WD1610 Índice Contenido del embalaje..........2 Instrucciones de seguridad importantes....4 Primeros pasos............13 Insertar las pilas ..........13 Pilas para el receptor........13 Pilas para el transmisor ........14 Instalar los dispositivos........15 Instalar el transmisor ........15 Instalar el receptor...........16 Rellenar la etiqueta del nombre ......17 Funcionamiento ............18...
  • Seite 3: Contenido Del Embalaje

    Timbre inalámbrico WD1610 Contenido del embalaje Receptor Transmisor 2 - Español...
  • Seite 4 Timbre inalámbrico WD1610 Sin ilustración: 3 pilas del tipo AA 1 pila del tipo A23 3 tacos, 6 mm 3 tornillos de montaje 5 etiquetas para el nombre Descripción de las figuras: Altavoz Botón de selección de la melodía Señal óptica...
  • Seite 5: Instrucciones De Seguridad Importantes

    Timbre inalámbrico WD1610 Instrucciones de seguridad importantes Antes de usar este dispositivo por primera vez, detenidamente instrucciones correspondientes en este manual y siga todas las advertencias, incluso si está acostumbrado a manejar aparatos electrónicos. Conserve este manual para cualquier referencia futura. Si vende o traspasa el aparato, asegúrese de...
  • Seite 6: Niños Y Personas Discapacitadas

    Timbre inalámbrico WD1610 Niños y personas discapacitadas Los equipos eléctricos no son para los niños. También las personas discapacitadas deberían usar equipos eléctricos con precaución. No permita niños personas discapacitadas utilicen equipos eléctricos sin supervisión. Estas personas no suelen ser conscientes de los posibles riesgos y peligros.
  • Seite 7 Timbre inalámbrico WD1610 Pilas Inserte las pilas respetando la polaridad. No intente nunca recargar las pilas ni arrojarlas al fuego. No cortocircuite las pilas. Retire las pilas cuando no vaya a utilizar el equipo durante un tiempo prolongado. El empleo de modelos no compatibles puede causar explosión y muerte.
  • Seite 8 Timbre inalámbrico WD1610 Interfaz RF Instale el dispositivo por lo menos a una distancia de 20 cm de un marcapasos, dado que las señales de radiofrecuencia pueden interferir la funcionalidad del marcapasos. Las señales de radiofrecuencia pueden ocasionar interferencias en equipos de ayuda auditiva.
  • Seite 9: Condiciones Ambientales

    Timbre inalámbrico WD1610 Condiciones ambientales Este equipo no ha sido diseñado para entornos con altas temperaturas o humedad (p. ej. cuartos de baño) y debe mantenerse libre de polvo. Temperatura humedad funcionamiento: 5°C a 40°C, 90% de humedad relativa máx.
  • Seite 10 Timbre inalámbrico WD1610 Siempre garantice lo siguiente: No exponga los dispositivos a fuentes de calor (p. ej. radiadores). No deje que la luz solar o una luz artificial incidan sobre los equipos. No coloque los dispositivos en campos magnéticos (p. ej. altavoces).
  • Seite 11 Timbre inalámbrico WD1610 Reparación y mantenimiento Una reparación o un mantenimiento serán necesarios cuando esta unidad sufra problemas como, por ejemplo, haya entrado líquido en la unidad, si el aparato ha sido expuesto lluvia, funciona normalmente o si se ha caído. Si observa humo, ruidos u olores extraños, apague el...
  • Seite 12 Timbre inalámbrico WD1610 Copyright Todo el contenido del presente Manual del usuario está sujeto a derechos de autor y se ofrece lector fines informativos exclusivamente. Queda totalmente prohibida cualquier reproducción o copia de datos o información sin el previo consentimiento escrito del autor.
  • Seite 13 Timbre inalámbrico WD1610 Nota sobre la Conformidad Este producto ha sido revisado y aprobado respecto al cumplimiento de los requisitos básicos y otras normas relevantes de la Directiva R&TTE 1999/5/EC. Encontrará la Declaración de Conformidad correspondiente al final de este manual del usuario.
  • Seite 14: Primeros Pasos

    Timbre inalámbrico WD1610 Primeros pasos Gracias por haber adquirido este timbre inalámbrico. Este producto le permite instalar un timbre de portería fácilmente. ejemplo, podrá emplearlo para la puerta de entrada de su casa. No es necesario sincronizar la señal inalámbrica manualmente entre el transmisor y el receptor.
  • Seite 15: Pilas Para El Transmisor

    Timbre inalámbrico WD1610 Inserte las pilas incluidas (tamaño AA) en el receptor. Asegúrese de que las pilas queden debidamente alineadas según la polaridad (+ y -) indicada en las pilas y en el interior del compartimento. Coloque nuevo tapa compartimento en la carcasa del receptor.
  • Seite 16: Instalar Los Dispositivos

    Timbre inalámbrico WD1610 Reinstale la pieza superior de la carcasa sobre la pieza inferior del transmisor. Si desea instalar el transmisor en la pared, deje la pieza inferior separada de la superiora. Instalar los dispositivos El paquete incluye todo el material necesario...
  • Seite 17: Instalar El Receptor

    Timbre inalámbrico WD1610 Abra la carcasa del transmisor insertando un destornillador plano en el agujero lateral de la carcasa. Empuje la pestaña (8) cuidadosamente hacia dentro. Después podrá retirar la parte superior de la carcasa. Taladre dos agujeros de 6 mm a una distancia de 50 mm en la pared.
  • Seite 18: Rellenar La Etiqueta Del Nombre

    Timbre inalámbrico WD1610 Inserte uno de los tornillos suministrados en el taco y atorníllelo hasta que su cabeza quede aproximadamente a unos 2 mm de la pared. Coloque el receptor sobre la cabeza del tornillo. La cabeza del tornillo debe salir completamente del agujero ubicado en la parte posterior de la carcasa.
  • Seite 19: Funcionamiento

    Timbre inalámbrico WD1610 Funcionamiento Tan pronto como haya insertado las pilas en ambos dispositivos, éstos quedarán listos para ser utilizados. Pulse el botón del timbre (6) del transmisor. El receptor advierte la llamada a la puerta bien con una señal sonora, con una señal óptica o con una señal acústica y óptica...
  • Seite 20: Seleccionar La Melodía Del Timbre

    Timbre inalámbrico WD1610 Seleccionar la melodía del timbre Pulse el botón de selección de melodía (2) para escuchar la siguiente melodía disponible. Repita este procedimiento hasta que haya encontrado la melodía deseada. La última melodía seleccionada se guardará automáticamente. Ajustar el volumen El selector de volumen sirve para ajustar el volumen en tres niveles.
  • Seite 21: Apéndice

    Timbre inalámbrico WD1610 Apéndice Desecho de equipos usados Los dispositivos señalizados con este símbolo están sujetos a la Directiva Europea 2002/96/EC. Todos los aparatos eléctricos y electrónicos usados deben depositar centros habilitados, y no se deben verter en ningún caso con los residuos domésticos. Participe activamente en la protección del medio...
  • Seite 22 Timbre inalámbrico WD1610 las pilas usadas a la basura doméstica. Debe depositarlas en un centro de recogida especial. Recicle también el material de embalaje. Los cartones pueden depositarse contenedores correspondientes depositados en los centros de recogida públicos para su reciclaje. Los materiales plásticos contenidos en este embalaje deben...
  • Seite 23: Datos Técnicos

    Timbre inalámbrico WD1610 Datos técnicos Frecuencia de 433 MHz transmisión Alcance hasta 100 m dependiendo del entorno Transmisor Pila 1 pila de 12 V del tipo A23 Dimensiones 9,3 x 3,5 x 2,2 cm (L x An x Al) Peso...
  • Seite 24: Garantía

    Timbre inalámbrico WD1610 Garantía El periodo de garantía es de 3 años a partir de la fecha de compra. Para cualquier reparación o sustitución dentro del periodo de garantía, tenga la factura de compra a mano y llame a nuestra Línea Directa.
  • Seite 25 Timbre inalámbrico WD1610 24 - Español...
  • Seite 26 Campanello Wireless WD1610 Indice Contenuto della confezione ........26 Importanti istruzioni per la sicurezza .......28 Introduzione.............37 Inserire le batterie..........37 Batterie per il ricevitore........37 Batterie per il trasmettitore ......38 Montare i dispositivi ..........39 Montare il trasmettitore........39 Montare il ricevitore .........40 Compilare l’etichetta per il nome ......41 Funzionamento............42...
  • Seite 27: Contenuto Della Confezione

    Campanello Wireless WD1610 Contenuto della confezione Ricevitore Trasmettitore 26 - Italiano...
  • Seite 28 Campanello Wireless WD1610 Non raffigurati: 3 batterie di tipo AA 1 batteria di tipo A23 3 tasselli a espansione, 6mm 3 viti di fissaggio 5 etichette per i nomi Descrizione delle figure: Altoparlante Pulsante di selezione della melodia Display ottico Interruttore di selezione della modalità...
  • Seite 29: Importanti Istruzioni Per La Sicurezza

    Campanello Wireless WD1610 Importanti istruzioni per la sicurezza Quando si utilizza questo dispositivo per la prima volta, leggere attentamente le note di questo manuale e seguire tutti gli avvertimenti, anche se si è abituati a utilizzare dispositivi elettronici. Conservare questo manuale per successive consultazioni.
  • Seite 30: Bambini E Persone Diversamente Abili

    Campanello Wireless WD1610 Bambini e persone diversamente abili I dispositivi elettrici non devono essere lasciati alla portata dei bambini. Va posta particolare attenzione anche nell’utilizzo dei dispositivi elettrici da parte di persone diversamente abili. Non consentire ai bambini o a persone diversamente abili l’utilizzo dei dispositivi...
  • Seite 31 Campanello Wireless WD1610 persone diversamente abili, in quanto possono causare soffocamento. Batterie Inserire le batterie prestando attenzione alla polarità. Non tentare di ricaricare le batterie e non gettarle nel fuoco. Non mandare in corto circuito le batterie. Rimuovere le batterie quando non si utilizza il dispositivo per lunghi periodi di tempo.
  • Seite 32 Campanello Wireless WD1610 Interfaccia RF Posizionare il dispositivo ad almeno 20 cm di distanza da pacemaker, in quanto i segnali RF possono interferire con la sua funzionalità I segnali trasmessi possono causare interferenze con le apparecchiature acustiche non posizionare il dispositivo con l’adattatore...
  • Seite 33: Ambiente Operativo

    Campanello Wireless WD1610 Ambiente operativo Non utilizzare il dispositivo in ambienti con alte temperature o un alto tasso d’umidità (es. Stanze da bagno) e tenerlo sempre libero dalla polvere. Temperatura umidità funzionamento: Da 5°C a 40°C, max. 90% RH. 32 - Italiano...
  • Seite 34 Campanello Wireless WD1610 Accertarsi sempre che: Il dispositivo non si trovi nelle vicinanze di fonti di calore diretto (es. termosifoni); nessuna luce diretta sole illuminazione artificiale raggiunga dispositivo; non posizionare il dispositivo in prossimità di campi magnetici (es. altoparlanti); sopra o vicino al dispositivo non vengano...
  • Seite 35: Conservazione E Manutenzione

    Campanello Wireless WD1610 Conservazione e manutenzione È necessario rivolgersi all'assistenza nel caso in cui il dispositivo abbia subito danni come per esempio quando sono penetrati oggetti nel prodotto, quando il prodotto non funziona normalmente o quando il prodotto è caduto. In...
  • Seite 36 Campanello Wireless WD1610 Copyright L’intero contenuto presente Manuale dell’utente è protetto dalle leggi sul diritto d’autore ed è fornito al lettore a puro scopo informativo. È severamente vietata riproduzione dei dati e delle informazioni senza previo esplicito consenso scritto dell’autore. Ciò vale anche per eventuali utilizzi commerciali dei contenuti e delle informazioni.
  • Seite 37 Campanello Wireless WD1610 Nota di conformità Questo dispositivo è stato testato per conformità con i requisiti di base altri importanti requisiti della Direttiva EMC 1999/5/EC. La Dichiarazione di conformità è reperibile alla fine di questo Manuale dell'utente. 36 - Italiano...
  • Seite 38: Introduzione

    Campanello Wireless WD1610 Introduzione Grazie per aver acquistato questo campanello wireless. Questo dispositivo consente installare rapidamente un sistema di campanello da utilizzare per esempio per la porta d'entrata della propria abitazione. Non è necessaria alcuna sincronizzazione manuale trasmettitore e ricevitore.
  • Seite 39: Batterie Per Il Trasmettitore

    Campanello Wireless WD1610 Inserire le batterie in dotazione (AA) nel ricevitore. Assicurarsi che le batterie siano inserite correttamente secondo la polarità indicata (+ e -). La polarità corretta è indicata sulle batterie all'interno dell’alloggiamento. Far scivolare il coperchio dell’alloggiamento delle batterie nuovamente nel ricevitore.
  • Seite 40: Montare I Dispositivi

    Campanello Wireless WD1610 Riposizionare la parte superiore del case sull’unità base. È anche possibile tenere separata l’unità base nel caso si voglia montare il trasmettitore sulla parete. Montare i dispositivi confezione include tutto materiale necessario a montare entrambi i dispositivi. In alternativa, è...
  • Seite 41: Montare Il Ricevitore

    Campanello Wireless WD1610 Aprire il case del trasmettitore con un cacciavite piatto inserendolo nel lato del trasmettitore. Premere delicatamente verso l’interno del sistema di chiusura (8). È quindi possibile rimuovere parte superiore del case. Praticare sulla parete due fori da 6mm a una distanza di 50mm tra loro.
  • Seite 42: Compilare L'etichetta Per Il Nome

    Campanello Wireless WD1610 Avvitare una delle viti fornite, nel tassello a espansione fino a quando la testa della vita non si trova a circa 2mm dalla parete. Collocare il ricevitore sulla testa della vite. Il foro di montaggio a parete collocato sul...
  • Seite 43: Funzionamento

    Campanello Wireless WD1610 Funzionamento Non appena inserite le batterie in entrambi i dispositivi, questi sono pronti all’uso. Premere il pulsante (6) sul trasmettitore. Il ricevitore emette un segnale acustico oppure uno visivo o entrambi. Ciò consente di personalizzare il prodotto secondo le proprie esigenze.
  • Seite 44: Selezionare La Melodia

    Campanello Wireless WD1610 Selezionare la melodia Premere il pulsante di selezione della melodia (2) per ascoltare la prossima melodia per il campanello. Ripetere la procedura fino a quando non si è trovata la melodia desiderata. Verrà salvata l’ultima melodia selezionata.
  • Seite 45: Appendice

    Campanello Wireless WD1610 Appendice Smaltimento dei dispositivi usati I dispositivi contrassegnati da questo simbolo sono soggetti alla Direttiva europea 2002/96/EC. Tutti i dispositivi elettrici ed elettronici devono essere smaltiti separatamente rifiuti domestici, presso gli enti preposti. Evitare rischi per l’ambiente e pericoli per le persone smaltendo il dispositivo in maniera appropriata.
  • Seite 46 Campanello Wireless WD1610 Riciclare correttamente materiale d’imballaggio. L’imballaggio in cartone può essere portato presso punti pubblici di raccolta o gettato negli appositi contenitori per la raccolta differenziata. Eventuali pellicole o plastiche contenute nell’imballaggio vanno gettati negli appositi contenitori per la raccolta differenziata.
  • Seite 47: Specifiche Tecniche

    Campanello Wireless WD1610 Specifiche Tecniche Frequenza di 433 MHz trasmissione Intervallo fino a 100m a seconda dell’ambiente Trasmettitore Batteria 1 batteria da 12V di tipo A23 Dimensioni 9,3 x 3,5 x 2,2 cm (Lu x La x H) Peso 31 g (senza batteria)
  • Seite 48: Informazioni Sulla Garanzia

    Campanello Wireless WD1610 Informazioni sulla garanzia Il periodo di garanzia copre 3 anni a partire dalla dati di acquisto. Per eventuali reclami, tenere pronto il numero di serie e la prova di acquisto chiamare nostro servizio telefonico. TARGA GmbH Postfach 22 44...
  • Seite 49 Campanello Wireless WD1610 48 - Italiano...
  • Seite 50 Campainha de Porta sem Fios WD1610 Índice Conteúdo da Embalagem........50 Importantes Instruções Relativas a Segurança..52 Introdução..............61 Inserir as Pilhas ...........61 Pilhas para o Receptor ........61 Pilha para o Transmissor.........62 Montar os Dispositivos ........63 Montar o Transmissor........63 Montar o Receptor...........64 Preencher a Etiqueta...........65 Utilização ..............66...
  • Seite 51: Conteúdo Da Embalagem

    Campainha de Porta sem Fios WD1610 Conteúdo da Embalagem Receptor Transmissor 50 - Português...
  • Seite 52 Campainha de Porta sem Fios WD1610 Não ilustrado: 3 pilhas tamanho AA 1 pilha tamanho A23 3 buchas de 6 mm 3 parafusos de fixação 5 etiquetas Descrição das figuras: Altifalante Botão de selecção da melodia Visor óptico Interruptor de selecção do modo Interruptor de selecção do volume...
  • Seite 53: Importantes Instruções Relativas A Segurança

    Campainha de Porta sem Fios WD1610 Importantes Instruções Relativas a Segurança Antes de utilizar este dispositivo pela primeira vez, leia as notas que se seguem e respeite todos os avisos, mesmo se estiver habituado a lidar com dispositivos electrónicos. Guarde este manual num local seguro, para futura referência.
  • Seite 54 Campainha de Porta sem Fios WD1610 Crianças e Pessoas com Deficiência As crianças não devem manusear dispositivos eléctricos. As pessoas com deficiência devem utilizar dispositivos eléctricos em conformidade com as regras. Não permita que crianças ou pessoas com deficiência utilizem dispositivos eléctricos...
  • Seite 55 Campainha de Porta sem Fios WD1610 Pilhas Insira as pilhas respeitando as marcas de polaridade. Nunca tente recarregar as pilhas e em circunstância alguma as atire ao fogo. Não curto-circuite as pilhas. Remova as pilhas se antecipar que o dispositivo não vai ser utilizado durante um longo período de tempo.
  • Seite 56 Campainha de Porta sem Fios WD1610 Interface de RF Afaste o dispositivo pelo menos 20 cm de pacemakers, pois os sinais de RF podem interferir com a funcionalidade do pacemaker. Os sinais de RF transmitidos podem interferir próteses auditivas. Não...
  • Seite 57: Ambiente De Utilização

    Campainha de Porta sem Fios WD1610 Ambiente de Utilização O dispositivo não deve ser utilizado em ambientes com temperatura ou humidade elevadas (por exemplo, casas de banho), e deve ser mantido livre de pó. Temperatura e humidade de utilização: 5 °C a 40 °C, máximo de 90% de humidade relativa.
  • Seite 58 Campainha de Porta sem Fios WD1610 Assegure-se que: Os dispositivos não estão directamente expostos fontes calor (como aquecedores); Os dispositivos não estão directamente expostos a luz solar ou artificial; Os dispositivos não se encontram na vizinhança imediata de campos magnéticos (como os criados por colunas de som);...
  • Seite 59: Reparação E Manutenção

    Campainha de Porta sem Fios WD1610 Reparação e Manutenção É necessária reparação sempre que este dispositivo estiver danificado, por exemplo, quando entrou líquido no produto, quando o produto foi exposta a chuva, quando o produto não funcionar devidamente, ou se deixou cair o produto.
  • Seite 60 Campainha de Porta sem Fios WD1610 Copyright O conteúdo deste Manual do Utilizador, na sua totalidade, está protegido por copyright e é fornecido leitor apenas para fins informativos. É expressamente proibido copiar dados e informação sem prévia autorização escrita e explícita por parte do autor. Tal também se aplica a qualquer fim comercial do...
  • Seite 61 Campainha de Porta sem Fios WD1610 Aviso de Conformidade Este produto testado demonstrou estar em conformidade com os requisitos básicos e outros requisitos relevantes da Directiva 1999/5/EC relativa equipamentos rádio equipamentos terminais telecomunicações. A respectiva Declaração de Conformidade pode ser encontrada no fim deste Manual do Utilizador.
  • Seite 62: Introdução

    Campainha de Porta sem Fios WD1610 Introdução Obrigado por ter adquirido esta campainha de porta sem fios. Este dispositivo permite-lhe configurar rapidamente um sistema de campainha. Por exemplo, pode utilizá-lo para a porta de entrada da sua casa. Não é necessário...
  • Seite 63: Pilha Para O Transmissor

    Campainha de Porta sem Fios WD1610 Insira as pilhas fornecidas (tamanho AA) no receptor. Assegure-se que as pilhas estão alinhadas de acordo com a polaridade (+ e -). A polaridade correcta está indicada nas pilhas e no interior do respectivo compartimento.
  • Seite 64: Montar Os Dispositivos

    Campainha de Porta sem Fios WD1610 Volte a colocar a parte do transmissor que deslizou para cima na unidade base do transmissor. Se quiser montar o transmissor na parede, pode deixar a unidade base do transmissor separada. Montar os Dispositivos A embalagem inclui todo o material necessário...
  • Seite 65: Montar O Receptor

    Campainha de Porta sem Fios WD1610 Abra o transmissor inserindo uma chave de parafusos na reentrância no lado do transmissor. Empurre cuidadosamente o encaixe (8) para dentro. De seguida, remova a parte superior do transmissor. Utilize um berbequim para fazer na parede dois buracos de 6 mm a uma distância de...
  • Seite 66: Preencher A Etiqueta

    Campainha de Porta sem Fios WD1610 afastada da parede aproximadamente 2 Coloque o receptor na cabeça do parafuso. O buraco para a montagem na parede na parte traseira do receptor deve encaixar completamente na cabeça do parafuso. Empurre o receptor para baixo com cuidado até...
  • Seite 67: Utilização

    Campainha de Porta sem Fios WD1610 Utilização Assim que as pilhas estiverem inseridas em ambos os dispositivos, eles estão prontos para ser utilizados. Prima o botão da campainha (6) no transmissor. O receptor emite ou um sinal acústico, ou óptico, ou acústico e óptico.
  • Seite 68: Seleccionar A Melodia Da Campainha

    Campainha de Porta sem Fios WD1610 Seleccionar a Melodia da Campainha Prima o botão de selecção da melodia (2) para ouvir próxima melodia campainha disponível. Repita este processo até encontrar a melodia desejada. A última melodia seleccionada é guardada. Ajustar o Volume interruptor selecção...
  • Seite 69: Apêndice

    Campainha de Porta sem Fios WD1610 Apêndice Descarte de Dispositivos Antigos Os dispositivos marcados com este símbolo estão sujeitos à Directiva Europeia 2002/96/EC. O descarte de todos os dispositivos eléctricos electrónicos deve efectuado separadamente do lixo residencial, em locais estabelecidos para o efeito. Evite contaminar o ambiente e colocar em perigo a sua saúde;...
  • Seite 70 Campainha de Porta sem Fios WD1610 lixo doméstico. Elas devem ser entregues num ponto de recolha criado para este efeito. Recicle devidamente material embalamento. O cartão da embalagem pode ser depositado em caixas de reciclagem de papel ou entregue em pontos de recolha públicos para reciclagem.
  • Seite 71: Especificações Técnicas

    Campainha de Porta sem Fios WD1610 Especificações Técnicas Frequência da 433 MHz transmissão Até 100 m, dependendo Alcance do ambiente Transmissor Pilha 1 pilha de 12 V tipo A23 9,3 x 3,5 x 2,2 cm Dimensões (C x P x A)
  • Seite 72: Informação Relativa À Garantia

    Campainha de Porta sem Fios WD1610 Informação Relativa à Garantia O período de garantia é 3 anos a partir da data de compra. Para qualquer reclamação sob garantia, tenha à mão a sua prova de compra, e contacte a nossa linha de apoio ao cliente:...
  • Seite 73 Campainha de Porta sem Fios WD1610 72 - Português...
  • Seite 74 Wireless Door Bell WD1610 Table of Contents Package Contents ...........74 Important Safety Instructions........76 Introduction..............85 Inserting the Batteries .........85 Batteries for the Receiver ........85 Battery for the Transmitter.......86 Mounting the Devices ..........87 Mounting the Transmitter.........87 Mounting the Receiver........88 Filling out the Name Label........89 Operation..............90...
  • Seite 75: Package Contents

    Wireless Door Bell WD1610 Package Contents Receiver Transmitter 74 - English...
  • Seite 76 Wireless Door Bell WD1610 Not illustrated: 3 AA-sized batteries 1 A23-sized battery 3 rawlplugs, 6mm 3 fixation screws 5 name labels Description of figures: Speaker Melody selection button Optical display Mode selection switch Volume selection switch Bell button Name label...
  • Seite 77: Important Safety Instructions

    Wireless Door Bell WD1610 Important Safety Instructions Before you use this device for the first time, please read the following notes in this manual and heed all warnings, even if you are familiar with handling electronic devices. Keep this manual safe for future reference. If you sell the device or pass it on, it is essential you hand over this manual also.
  • Seite 78: Children And Persons With Disabilities

    Wireless Door Bell WD1610 Children and Persons with Disabilities Electrical appliances do not belong in the hands of children. People with disabilities should only electrical devices appropriate circumstances. allow children or persons with disabilities to use electrical devices when not under supervision.
  • Seite 79 Wireless Door Bell WD1610 Batteries Insert the batteries with the correct polarity. Never try to recharge the batteries and under no circumstances throw them into fire. Do not short-circuit any batteries. Remove batteries when the device is not to be used for a long time.
  • Seite 80 Wireless Door Bell WD1610 RF Interface Place the device at least 20cm (8 inches) away from pacemakers, as the RF signals may interfere with functionality pacemaker. The transmitted RF signals can cause interference with hearing aids. Do not place the device with the wireless adapter turned on near flammable gases or in an explosion-sensitive area (e.g.
  • Seite 81: Operating Environment

    Wireless Door Bell WD1610 Operating Environment The device is not for use in environments with high temperatures humidity (e.g. bathrooms), and must be kept free of dust. Operating temperature and operating humidity: 5°C to 40°C, max. 90% RH. 80 - English...
  • Seite 82 Wireless Door Bell WD1610 Always make sure that: no direct heat sources (e.g. heating) can affect the devices; no direct sunlight or artificial light reaches the devices; the devices are never placed in the immediate vicinity of magnetic fields (e.g.
  • Seite 83 Wireless Door Bell WD1610 Repair and Maintenance Repairs are required when this device has been damaged in any way, for example, when liquid has entered the product, when the product has been exposed to rain, when the product does not work normally or if the product has been dropped.
  • Seite 84 Wireless Door Bell WD1610 Copyright The entire content of this User’s Manual is copyrighted and is provided to the reader for information purposes only. Copying data and information without the prior written and explicit authorization from author strictly forbidden. This also applies to any commercial use of the contents and information.
  • Seite 85: Conformity Notice

    Wireless Door Bell WD1610 Conformity Notice This product has been tested and approved for compliance with the basic other relevant requirements of the R&TTE Directive 1999/5/EC. The corresponding Declaration of Conformity can be found at the end of this User's Manual.
  • Seite 86: Introduction

    Wireless Door Bell WD1610 Introduction Thank you for purchasing this wireless door bell. This device allows you to quickly set up a bell- ring system. For instance, you can use it for the front door of your home. There is no need for a...
  • Seite 87: Battery For The Transmitter

    Wireless Door Bell WD1610 polarity (+ and -). The correct polarity is labelled on the batteries and inside the battery compartment. Slide the battery compartment cover onto the receiver housing. Battery for the Transmitter To open the transmitter housing, use a flat screwdriver.
  • Seite 88: Mounting The Devices

    Wireless Door Bell WD1610 Mounting the Devices The package includes all necessary material for mounting both devices. Alternatively you may simply leave the receiver for stand-up installation. Make sure that the distance between transmitter and receive does not exceed the maximum range. If...
  • Seite 89: Mounting The Receiver

    Wireless Door Bell WD1610 Drill two 6mm holes at a distance of 50mm in the wall. Insert two of the supplied rawlplugs into these holes. Insert two of the supplied screws through the holes located in the bottom piece of the transmitter housing and then screw them onto the rawlplugs.
  • Seite 90: Filling Out The Name Label

    Wireless Door Bell WD1610 screw head. By pulling it down carefully the receiver clicks into place on the screw head. Filling out the Name Label Remove the transparent plastic cover from the receiver. Underneath you can write on the name label (7). The package contains 5 labels for future replacement.
  • Seite 91: Operation

    Wireless Door Bell WD1610 Operation As soon as batteries are inserted into both devices, they are ready for use. Press the bell button (6) on the transmitter. The receiver signalises either acoustically, optically acoustically and optically. This allows you to customise the product according to your needs.
  • Seite 92: Selecting The Bell Melody

    Wireless Door Bell WD1610 Selecting the Bell Melody Press the melody selection button (2) to listen to the next available bell melody. Repeat this process until you have found the desired melody. The last selected melody will be saved. Adjusting the Volume The volume selection switch lets you adjust the volume on three levels.
  • Seite 93: Appendix

    Wireless Door Bell WD1610 Appendix Disposal of Old Devices Devices marked with this symbol are subject to the European Directive 2002/96/EC. All electric and electronic devices must be disposed of separately from household waste at established bodies. Avoid hazards to the environment and dangers to your personal health by disposing of the device properly.
  • Seite 94 Wireless Door Bell WD1610 recycling containers or public collection points for recycling. Any films or plastic contained in the packaging should be taken to your public collection points. English - 93...
  • Seite 95: Technical Specifications

    Wireless Door Bell WD1610 Technical Specifications Transmission 433 MHz frequency Range up to 100m (300ft) depending on the environment Transmitter Battery 1 battery 12V type A23 Dimensions 9.3 x 3.5 x 2.2 cm (L x W x H) Weight 31 g (without battery)
  • Seite 96: Warranty Information

    Wireless Door Bell WD1610 Warranty Information The guarantee period is for 3 years as of date of purchase. For any guarantee claims, please have your proof of purchase ready, and phone our hotline: TARGA GmbH Postfach 22 44 D-59482 Soest...
  • Seite 97 Wireless Door Bell WD1610 96 - English...
  • Seite 98 Funk-Türklingel WD1610 Inhalt Lieferumfang............98 Wichtige Sicherheitshinweise ........100 Einleitung...............109 Batterien einlegen ..........109 Die Batterien des Empfängers ......109 Die Batterie des Senders ......110 Die Geräte anbringen ........111 Den Sender befestigen........111 Den Empfänger befestigen......112 Das Namensschild beschriften......113 Die Bedienung ............114 Die Signalisierung auswählen ......114 Die Klingelmelodie auswählen ......115...
  • Seite 99: Lieferumfang

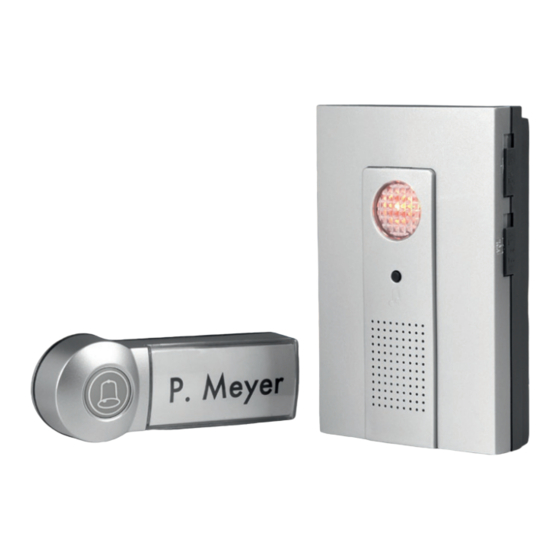
    Funk-Türklingel WD1610 Lieferumfang Empfänger Sender 98 - Deutsch...
  • Seite 100 Funk-Türklingel WD1610 Ohne Abbildung: 3 Stück Batterien vom Typ AA 1 Stück Batterie vom Typ A23 3 Stück Dübel, 6mm 3 Stück Befestigungsschrauben 5 Stück Namensschilder Beschreibung der Abbildungen: Lautsprecher Melodietaste Optische Anzeige Betriebsartenschalter Lautstärkeschalter Klingeltaster Namensschild Rastnase für Gehäuseoberteil...
  • Seite 101: Wichtige Sicherheitshinweise

    Funk-Türklingel WD1610 Wichtige Sicherheitshinweise Vor der ersten Verwendung des Gerätes lesen Sie bitte die folgenden Anweisungen genau durch und beachten Sie alle Warnhinweise, selbst wenn Ihnen der Umgang mit elek- tronischen Geräten vertraut ist. Bewahren Sie dieses Handbuch sorgfältig als zukünftige Referenz auf.
  • Seite 102: Kinder Und Personen Mit Einschränkungen

    Funk-Türklingel WD1610 Kinder und Personen mit Einschränkungen Elektrische Geräte gehören nicht in Kinder- hände. Auch Personen mit Einschränkungen sollten elektrische Geräte nur angemessen verwenden. Lassen Sie Kinder und Personen mit Einschränkungen niemals unbeaufsichtigt elektrische Geräte benutzen. Diese Personen- gruppen können mögliche Gefahren nicht immer richtig erkennen.
  • Seite 103 Funk-Türklingel WD1610 Batterien Legen Sie die Batterien stets polrichtig ein, versuchen nicht, Batterien wieder aufzuladen und werfen Sie sie unter keinen Umständen ins Feuer. Die Batterien dürfen nicht kurzgeschlossen werden. Entnehmen Sie die Batterien, wenn Sie das Gerät über einen längeren...
  • Seite 104 Funk-Türklingel WD1610 Funkschnittstelle Halten Sie das Gerät mindestens 20cm von einem Herzschrittmacher fern, da sonst die ordnungsgemäßen Funktionen Herz- schrittmachers durch Funkwellen beeinträchtigt werden können. Die übertragenen Funkwellen können Störgeräusche in Hörgeräten verur- sachen. Bringen Sie das Gerät nicht mit eingeschalteter Funkkomponente in die Nähe...
  • Seite 105: Betriebsumgebung

    Funk-Türklingel WD1610 Betriebsumgebung Das Gerät ist nicht für den Betrieb in Räumen mit hoher Temperatur oder Luftfeuchtigkeit (z.B. Badezimmer) oder übermäßigem Staub- aufkommen ausgelegt. Betriebstemperatur und Betriebsluftfeuchtigkeit: 5°C bis 40°C, max. 90% rel. Feuchte. 104 - Deutsch...
  • Seite 106 Funk-Türklingel WD1610 Achten Sie darauf, dass: keine direkten Wärmequellen (z.B. Heizungen) auf die Geräte wirken; kein direktes Sonnenlicht oder Kunstlicht auf die Geräte trifft; die Geräte nicht in unmittelbarer Nähe von Magnetfeldern (z.B. Lautsprechern) stehen; keine offenen Brandquellen (z.B. brennende Kerzen) auf oder neben den Geräte stehen;...
  • Seite 107: Reparatur Und Pflege

    Funk-Türklingel WD1610 Reparatur und Pflege Reparaturarbeiten sind erforderlich, wenn das Gerät beschädigt wurde, Flüssigkeit oder Gegenstände ins Innere des Gehäuses gelangt sind, es Regen ausgesetzt wurde oder wenn es nicht einwandfrei funktioniert oder herunter- gefallen ist. Falls Rauchentwicklung, ungewöhnliche Geräusche oder Gerüche...
  • Seite 108: Urheberrecht

    Funk-Türklingel WD1610 Urheberrecht Alle Inhalte dieser Bedienungsanleitung unterliegen dem Urheberrecht und werden dem Leser ausschließlich als Informationsquelle bereitgestellt. Jegliches Kopieren oder Ver- vielfältigen von Daten und Informationen ist ohne ausdrückliche schriftliche nehmigung durch den Autor verboten. Dies betrifft auch die gewerbliche Nutzung der Inhalte und Daten.
  • Seite 109 Funk-Türklingel WD1610 Hinweis zur Konformität Das Gerät wurde hinsichtlich Über- einstimmung mit den grundlegenden Anforderungen und den anderen relevanten Vorschriften der R&TTE Richtlinie 1999/5/EC geprüft und genehmigt. Die dazugehörige Konformitätserklärung finden Sie am Ende dieser Anleitung. 108 - Deutsch...
  • Seite 110: Einleitung

    Funk-Türklingel WD1610 Einleitung Vielen Dank für den Kauf dieser Funk- Türklingel. Dieses Gerät schafft schnell die Möglichkeit, eine Signalisierung einzurichten. Sie können z.B. eine Eingangstür dieser Funk- Türklingel ausstatten. Ein manueller Funk- abgleich zwischen Sender und Empfänger ist nicht erforderlich.
  • Seite 111: Die Batterie Des Senders

    Funk-Türklingel WD1610 Legen Sie die beiliegenden Batterien vom Typ AA polrichtig (+ und – beachten) in den Empfänger ein. Die Polung ist auf den Batterien und im Batteriefach gekenn- zeichnet. Schieben Sie den Deckel des Batteriefachs wieder auf das Empfängergehäuse.
  • Seite 112: Die Geräte Anbringen

    Funk-Türklingel WD1610 Sie können die Grundplatte auch getrennt lassen, wenn Sie den Sender an einer Wand montieren möchten. Die Geräte anbringen Im Lieferumfang ist Montagematerial enthalten, um beide Geräte zu befestigen. Wahlweise können Sie den Empfänger auch einfach aufstellen. Achten Sie darauf, dass der Abstand zwischen Sender und Empfänger nicht...
  • Seite 113: Den Empfänger Befestigen

    Funk-Türklingel WD1610 drücken. Drücken Sie damit die Ras- tnase (8) leicht nach innen. Sie können dann das Gehäuseoberteil abnehmen. Bohren zwei Löcher einem Durchmesser von 6 mm und einem Abstand von 50 mm. Stecken Sie zwei der mitgelieferten Dübel in die Löcher.
  • Seite 114: Das Namensschild Beschriften

    Funk-Türklingel WD1610 Schrauben Sie eine der mitgelieferten Schrauben Dübel, Schraubenkopf ungefähr zwei Millimeter vor der Wand steht. Stecken Sie den Empfänger auf den Schraubenkopf. Die Öse an der Gehäuse- rückseite muss dazu über den Schrauben- kopf greifen. Mit einem leichten Zug nach unten rastet der Empfänger auf dem...
  • Seite 115: Die Bedienung

    Funk-Türklingel WD1610 Die Bedienung Wenn beide Geräte mit Batterien versehen sind, sind sie sofort betriebsbereit. Drücken Sie auf den Klingeltaster (6) des Senders. Der Empfänger signalisiert wahlweise akustisch, optisch oder akustisch und optisch. Sie können das Gerät an Ihren persönlichen Bedarf anpassen.
  • Seite 116: Die Klingelmelodie Auswählen

    Funk-Türklingel WD1610 Die Klingelmelodie auswählen Drücken Sie auf die Melodietaste (2), um die jeweils nächste verfügbare Klingelmelodie anzuhören. Wiederholen Sie den Vorgang, bis Sie die Melodie Ihrer Wahl gefunden haben. Die zuletzt ausgewählte Klingelmelodie bleibt dauerhaft eingestellt. Die Lautstärke einstellen Mit dem Lautstärkeschalter (5) lässt sich die...
  • Seite 117: Anhang

    Funk-Türklingel WD1610 Anhang Entsorgung von Altgeräten Die mit diesem Symbol gekenn- zeichneten Geräte unterliegen der europäischen Richtlinie 2002/96/EC. Alle Elektro- und Elektronik-Altgeräte müssen getrennt vom Hausmüll über dafür staatlich vorgesehene Stellen entsorgt werden. Mit der ordnungsgemäßen Entsorgung alten Geräts vermeiden Sie Umweltschäden und eine Gefährdung Ihrer persönlichen Gesund-...
  • Seite 118 Funk-Türklingel WD1610 nicht in den Hausmüll. Sie müssen bei einer Sammelstelle für Altbatterien abgegeben werden. Führen auch Verpackung einer umweltgerechten Entsorgung zu. Kartonagen können bei Altpapiersammlungen oder an öffentlichen Sammelplätzen Wieder- verwertung abgegeben werden. Folien und Kunststoffe des Lieferumfangs werden über Ihr örtliches...
  • Seite 119: Technische Daten

    Funk-Türklingel WD1610 Technische Daten Übertragungsfrequenz 433 MHz Reichweite bis zu 100 m (abhängig von der Umgebung) Sender Batterie 1 Stück 12 V-Batterie vom Typ A23 Abmessungen 9,3 x 3,5 x 2,2 cm (L x B x H) Gewicht 31 g (ohne Batterie) Empfänger...
  • Seite 120: Garantiehinweise

    Funk-Türklingel WD1610 Garantiehinweise Die Garantiezeit beträgt 3 Jahre ab Kaufdatum. Bei Garantieansprüchen legen Sie den Kauf- beleg des Gerätes bereit und rufen Sie unsere Hotline an: TARGA GmbH Postfach 22 44 D-59482 Soest Telefon: 01805-043311 (0,14 €/Min., Festnetz der T-COM/...
  • Seite 121: Declaración De Conformidad

    Declaración de conformidad Dichiarazione di conformità Declaração de Conformidade Declaration of Conformity Konformitätserklärung...
  • Seite 122 TARGA GmbH Lange Wende 41 D-59494 Soest www.silvercrest.cc...

Inhaltsverzeichnis