Herunterladen Inhalt Inhalt Diese Seite drucken
BFT DEIMOS BT-MA Installations- Und Gebrauchsanleitung

BFT DEIMOS BT-MA Installations- Und Gebrauchsanleitung

Niederspannungsantrieb für zahnstangen-schiebetore

Werbung

Verfügbare Sprachen
  • DE

Verfügbare Sprachen

  • DEUTSCH, seite 31
ATTUATORE IN BASSA TENSIONE PER CANCELLI SCORREVOLI A CREMAGLIERA
I
LOW-VOLTAGE ACTUATOR FOR RACK SLIDING GATES
GB
ACTIONNEUR A BASSE TENSION POUR PORTAILS COULISSANTS A CREMAILLERE
F
NIEDERSPANNUNGSANTRIEB FÜR ZAHNSTANGEN-SCHIEBETORE
D
SERVOMOTOR DE BAJA TENSION PARA CANCELAS CORREDERAS DE CREMALLERA
E
ACCIONADOR DE BAIXA TENSÄO PARA PORTÖES DE CORRER A CREMALLERA
P
ISTRUZIONI D'USO E DI INSTALLAZIONE
INSTALLATION AND USER'S MANUAL
INSTRUCTIONS D'UTILISATION ET D'INSTALLATION
INSTALLATIONS-UND GEBRAUCHSANLEITUNG
INSTRUCCIONES DE USO Y DE INSTALACION
INSTRUÇÕES DE USO E DE INSTALAÇÃO
Via Lago di Vico, 44
36015 Schio (VI)
Tel.naz. 0445 696511
Tel.int. +39 0445 696533
Fax 0445 696522
Internet: www.bft.it
E-mail: sales@bft.it
D811495 ver. 04 09/03/07
8
027908
2 8 8 8 3 7
DEIMOS BT
NETTUNO S-MA

Werbung

Inhaltsverzeichnis
loading

Inhaltszusammenfassung für BFT DEIMOS BT-MA

  • Seite 1 INSTRUCTIONS D’UTILISATION ET D’INSTALLATION INSTALLATIONS-UND GEBRAUCHSANLEITUNG INSTRUCCIONES DE USO Y DE INSTALACION INSTRUÇÕES DE USO E DE INSTALAÇÃO Via Lago di Vico, 44 36015 Schio (VI) Tel.naz. 0445 696511 Tel.int. +39 0445 696533 Fax 0445 696522 Internet: www.bft.it E-mail: sales@bft.it...
  • Seite 2 DEIMOS BT - NETTUNO S-MA - Ver. 04...
  • Seite 3: Sblocco Manuale

    1) GENERALITÀ AVVERTENZE L’attuatore DEIMOS BT-MA offre un’ampia versatilità d’installazione, Il buon funzionamento dell’operatore è garantito solo se vengono rispettate grazie alla posizione estremamente bassa del pignone, alla compattezza i dati riportati in questo manuale. La Ditta non risponde dei danni causati dell’attuatore e alla regolazione dell’altezza e profondità...
  • Seite 4 1) GENERAL OUTLINE standards and the instructions contained in the present manual. The DEIMOS BT-MA actuator offers ample installation versatility thanks The descriptions and illustrations contained in the present manual are to its compactness, the extremely low position of its pinion as well as the not binding.
  • Seite 5: Manuel D'utilisation

    1) GÉNÉRALITÉS doivent être mis au rebut conformément aux normes en vigueur. Les piles L’actionneur DEIMOS BT-MA offre de grandes possibilités d’installation, constituent des déchets spéciaux. grâce à la position très basse du pignon, à la compacité de l’actionneur et au réglage de la hauteur et de la profondeur dont il dispose.
  • Seite 6: Instandhaltung Und Verschrottung

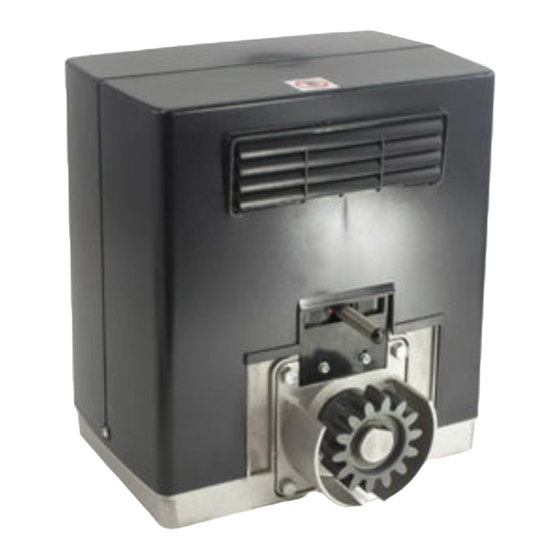
    1) ALLGEMEINES HINWEISE Der Antrieb DEIMOS BT-MA ist wegen der sehr niedrigen Ritzelposition, Der einwandfreie Betrieb des Antriebes ist nur dann garantiert, wenn die seiner Kompaktheit und wegen der verstellbaren Höhe und Tiefe extrem Angaben aus diesem Handbuch beachtet werden. Der Hersteller haftet vielseitig installierbar.
  • Seite 7: Manual De Uso

    Los materiales que constituyen el equipo y su embalaje deben eliminarse de conformidad con las normas vigentes. 1) GENERALIDADES El servomotor DEIMOS BT-MA ofrece una amplia versatilidad de instala- ADVERTENCIAS ción, gracias a la posición extremadamente baja del piñón, a la solidez del El buen funcionamiento del operador resulta garantizado únicamente si...
  • Seite 8 As 1) GENERALITÀ pilhas não devem ser abandonadas no ambiente. O accionador DEIMOS BT-MA oferece uma vasta versatilidade de instala- ção, graças à posição extremamente baixa do pinhão, à compacidade do AVISOS accionador e à...
  • Seite 9: Sicurezza Generale

    NET LAMP - Lampeggiante con ricevitore radio integrato 1) GENERALITÀ SC NET - Selettore a chiave solo START L’attuatore DEIMOS BT-MA offre un’ampia versatilità d’installazione, SC NET - Selettore a chiave START + PED grazie alla posizione estremamente bassa del pignone, alla compattezza dell’attuatore e alla regolazione dell’altezza e profondità...
  • Seite 10: Verifiche Preliminari

    ITALIANO MANUALE PER L’INSTALLAZIONE 3) DATI TECNICI • Controllare accuratamente: 3.1) Attuatore DEIMOS BT-MA Le quote di posizionamento. Alimentazione: .........monofase 230V~ ±10% 50Hz (*) Che la piastra base sia ben livellata. Motore:.................... 24V Che i 4 filetti dei prigionieri siano ben puliti dal cemento.
  • Seite 11 MANUALE PER L’INSTALLAZIONE ITALIANO 8) REGOLAZIONE PIGNONE 12-13 Morsetti FAST NET Terminato il fissaggio della cremagliera è necessario regolare il gioco crema- 14-15 Morsetti FAST NET gliera - pignone che deve essere di circa 2mm (fig.6): ciò si ottiene allentando 16-17 Secondario trasformatore per circa 2mm, i quattro dadi M10 sotto la base del motoriduttore e fissando 18-19 Alimentazione di rete monofase 230V~ ±10% (18=L) (19=N)
  • Seite 12 ITALIANO MANUALE PER L’INSTALLAZIONE Coppia motori chiusura in rallentamento (C. ch. rALL) [ 50% ] avanzate è possibile procedere alla memorizzazione manuale dei trasmettitori, (Parametri avanzati ⇒ indirizzo 9) facendo riferimento alla Fig.B per la programmazione base: Aggiungi Impostare numericamente il valore di coppia dei motori tra 1% e 99%. Tempo Veloce in Apertura (T vel ap, ) [ 15 s.
  • Seite 13: Manutenzione

    MANUALE PER L’INSTALLAZIONE ITALIANO = Test delle sicurezze fallito Attenzione: Non spingere violentemente l’anta del cancello, ma accom- CLOS = attivazione ingresso CLOSE pagnarla per tutta la sua corsa. OPEN = attivazione ingresso OPEN • Per ripristinare il comando motorizzato, ruotare la manopola in senso an- = attivazione ingresso finecorsa apertura tiorario per tutta la sua corsa, togliere la manopola e depositarla in luogo = attivazione ingresso finecorsa chiusura...
  • Seite 14: Accesso Ai Menu

    Fig. A LEGENDA ACCESSO AI MENU Premere simultaneamente i tasti + e -. Premere il tasto OK L a p r e s s i o n e s i m u l t a n e a d e i t a s t i + e - consente di uscire dal menu in cui si sta operando e tornare al precedente, se avviene a l l i ve l l o p r i n c i p a l e d e l m e nu e s c e d a l l a...
  • Seite 15 Fig. B T2 T1 MENU PRECEDENTI FIG. B Premere P1 del radioco- Rilasciare P1 del mando. radiocomando Premere T desiderato del radiocomando vedi Fig.B3 Premere P1 del radioco- Rilasciare P1 del mando. radiocomando Premere T desiderato del radiocomando vedi Fig.B3 Premere T desiderato del radiocomando vedi Fig.B3 MENU RADIO...
  • Seite 16: General Outline

    1) GENERAL OUTLINE SC NET - START only key selector The DEIMOS BT-MA actuator offers ample installation versatility thanks to its compactness, the extremely low position of its pinion as well as the SC NET - START + PED key selector height and depth adjustments available.
  • Seite 17: Preliminary Checks

    INSTALLATION MANUAL ENGLISH 5.2) Other positions Motor revolutions: ................3500min Absorbed power:.................. 70W The gearmotor can be positioned in different ways. As an example, fig.5 illustrates a particular type of installation. In the case where the gearmotor Max absorbed power: ........0,5A (230V~) - 1A (110V~) is not fixed on the level of the sliding track (Standard position), you must Reduction ratio: ..................
  • Seite 18 ENGLISH INSTALLATION MANUAL nuts under the gearmotor base by approximately 2mm, and then securing 14-15 FAST NET terminals the four upper nuts. Make sure that the rack and pinion are aligned and 16-17 Secondary for transformer centred (fig.10). 18-19 Single-phase mains power supply 230V~ ±10% (18=L) (19=N) WARNING - Remember that the rack and pinion life strictly depends 20-21 Primary for 230 V~ transfomer...
  • Seite 19 INSTALLATION MANUAL ENGLISH Slow-down closing motor torque (cls. t slow) [ 50% ] 15.3) RADIO MENU (RADIO) (Advanced parameters ⇒ address 9) Set the numerical value of the motor torque between 1% and 99%. Allows you to add one key of a radio control device to the receiver Fast Opening Time (op.
  • Seite 20: Maintenance

    ENGLISH INSTALLATION MANUAL SWO = Opening limit switch input activation In the case where a release knob with personalised key is fitted (fig.18), SWC = Closing limit switch input activation proceed as follows: Activation of software thermal protection • Insert the personalised key in the lock, and rotate the key anticlockwise. In the case where an obstacle is found, the NETTUNO S panel stops the •...
  • Seite 21: Access To Menus

    Fig. A LEGENDA ACCESS TO MENUS Simultaneously press the + and - keys. Press the OK key Simultaneous pressure of the + and – keys allows you to exit the active menu and return to the preceding menu; if this takes place at the main menu level, programming is exited and the display switched off.
  • Seite 22 Fig. B T2 T1 PRECEDING MENUS FIG. A Press P1 (pushbutton) on radio Release P1 on radio control device. control device Press the required T (key) on radio control device – see Fig. B3 Press P1 (pushbutton) on radio Release P1 on radio control device.
  • Seite 23: Manuel D'installation

    1) GÉNÉRALITÉS SC NET - Sélecteur à clé seulement START L’actionneur DEIMOS BT-MA offre de grandes possibilités d’installation, grâce à la position très basse du pignon, à la compacité de l’actionneur et au SC NET - Sélecteur à clé START+PED réglage de la hauteur et de la profondeur dont il dispose.
  • Seite 24: Verifications Preliminaires

    3) CARACTERISTIQUES TECHNIQUES • Pour maintenir dans la bonne position la plaque d’assise pendant la pose, 3.1) Actionneur DEIMOS BT-MA il peut être utile de souder deux plaques en fer sous le rail, sur lesquelles Alimentation: ........monophasée 230V~±10%, 50Hz (*) l’on soudera ensuite les tire-fonds (fig.3).
  • Seite 25 MANUEL D’INSTALLATION FRANÇAIS DANGER - L’opération de soudage doit être effectuée par une personne Fin de course fermeture SWC (8 marron - 9 noir commun) compétente et dotée de tous les dispositifs de protection individuels 10-11 Sortie témoin de portail ouvert (Contact N.O. (24V~/1A max)) ou prévus par les normes de sécurité...
  • Seite 26 FRANÇAIS MANUEL D’INSTALLATION Couple moteurs ouverture (c. OUV) [ 80% ] Le récepteur quitte la modalité programmation après 10s, pendant lesquelles il est possible d’introduire de nouveaux émetteurs. Introduire numériquement la valeur de couple des moteurs entre 1% et 99%. Couple moteurs fermeture (c.
  • Seite 27: Entretien

    MANUEL D’INSTALLATION FRANÇAIS Diagnostic: 17) DEBLOCAGE MANUEL En cas de mauvais fonctionnements, l’écran affiche un message indiquant Le déblocage manuel ou d’urgence doit être activé s’il se rend nécessaire quel est le dispositif qu’il faut vérifier: d’ouvrir manuellement le portail et en tous les cas de non fonctionnement ou = activation entrée piétons de mauvais fonctionnement de la motorisation.
  • Seite 28 FRANÇAIS MANUEL D’INSTALLATION AVERTISSEMENTS Le bon fonctionnement de l’actionneur n’est assuré que si les données fournies dans ce manuel sont respectées. Le constructeur ne répond pas pour les dommages provoqués par le non respect des normes d’installation et des indications fournies dans ce manuel. Les descriptions et les figures de ce manuel n’engagent pas le con- structeur.
  • Seite 29 Fig. A LEGENDA ACCES AUX MENUS Appuyer simultanément sur les touches + et -. Appuyer sur la L’appui simultané sur les touches + et – permet touche OK de sor tir du menu et de retour ner au menu précédent; si cela a lieu au niveau principal du menu, on sort de la programmation et l’écran s’éteint.
  • Seite 30 Fig. B T2 T1 MENUS PRECEDENTS FIG. A Appuyer sur P1 de la Relâcher P1 de la commande radio. commande radio Appuyer sur T désiré de la commande radio voir Fig. B3 Appuyer sur P1 de la Relâcher P1 de la commande radio.
  • Seite 31: Allgemeine Sicherheitshinweise

    NET LAMP-Blinkleuchte mit integriertem Funkempfänger 1) ALLGEMEINES SC NET-Abschließbarer Wählschalter nur START Der Antrieb DEIMOS BT-MA ist wegen der sehr niedrigen Ritzelposition, seiner Kompaktheit und wegen der verstellbaren Höhe und Tiefe extrem SC NET-Abschließbarer Wählschalter START+PED vielseitig installierbar. Die elektronische, regelbare Krafteinstellung SW NET –...
  • Seite 32: Verankerung Der Grundplatte

    MONTAGEANLEITUNG 3) TECHNISCHE DATEN • Lassen Sie die für den Durchgang der Stromanschlüsse vorgesehenen 3.1) Antrieb DEIMOS BT-MA Schläuche aus der Grundplatte herausragen. • Damit die Grundplatte während der Installation in der richtigen Position bleibt, Stromversorgung: ........Einphasig 230V~±10% 50Hz (*) kann es nützlich sein, zwei Eisenplatten unter die Schiene zu schweißen...
  • Seite 33 MONTAGEANLEITUNG DEUTSCH Fte, Fre Externes Photozellenpaar schnitt an den Verbindungsstellen der verschiedenen Zahnstangenstücke anbringen, um die korrekte Zahnteilung zu gewährleisten. Die Schrauben, 1-2-4-Kanal-Sender mit denen die Stange an den Paßstücken befestigt wird, ermöglichen die Zahnstange Höhenverstellung der Zahnstange. 7.4) Befestigung der Zahnstange 12) KLEMMBRETTANSCHLÜSSE Die Montage der Zahnstange geht folgendermaßen vonstatten: Wenn die Stromkabel durch die Kanäle geführt und die verschiedenen...
  • Seite 34: Menü Parameter

    DEUTSCH MONTAGEANLEITUNG Durch gleichzeitiges Drücken der Tasten + und - wird das jeweils aufgerufene Tür offen: .................Schließung Menü verlassen und das übergeordnete Menü aufgerufen. während der Schließung:..Torhalt und kein Einschalten von TCA (stop). Die vorgenommenen Änderungen werden nur dann als Einstellungen wirk- nach Stop: ................Öffnen sam, wenn sie durch OK bestätigt werden.
  • Seite 35: Diagnostik Und Überwachung

    MONTAGEANLEITUNG DEUTSCH Lesen Empfängercode (cod RX) Es wird deshalb empfohlen, das erreichte maximale Drehmoment bei Zeigt den Code an, der in den Empfänger eingegeben wurde. der Installation anhand einiger Arbeitsvorgänge zu prüfen (die ersten beidenZiffern), und im Parametermenü bei Bedarf einen etwa 15-20 Pro- WICHTIGE ANMERKUNG: DER ZUERST GESPEICHERTE SENDER zentpunkte darüber liegenden Wert einzustellen.
  • Seite 36 DEUTSCH MONTAGEANLEITUNG • Den persönlichen Schlüssel ins Schloß stecken und gegen den Uhrzei- gersinn umdrehen. • Den Entriegelungsgriff nehmen und im Uhrzeigersinn drehen (Abb.18) bis es nicht mehr geht. • Den Torflügel von Hand anschieben und dabei über die gesamte Strecke begleiten •...
  • Seite 37 Fig. A LEGENDA MENÜZUGRIFF Gleichzeitig die Tasten + und - drücken. Die gleichzeitige Betätigung der Tasten + und - Taste OK drücken gestattet das Verlassen des Menüs, mit dem man g e r a d e a r b e i t e t , u n d d i e R ü c k k e h r z u m voranggehenden Menü.
  • Seite 38 Fig. B T2 T1 VORANGEHENDE MENÜS FIG. A Auf Fernsteuerung P1 P1 auf Fersteuerung drücken. loslassen Gewünschtes T auf Fernsteuerung drücken, siehe Abb.B3 Auf Fernsteuerung P1 P1 auf Fersteuerung drücken. loslassen Gewünschtes T auf Fernsteuerung drücken, siehe Abb.B3 Gewünschtes T auf Fernsteuerung drücken, siehe Abb.B3 FUNKMENÜ...
  • Seite 39: Manual De Instalación

    1) GENERALIDADES NET LAMP - Luz intermitente con receptor radio integrado El servomotor DEIMOS BT-MA ofrece una amplia versatilidad de instalación, gracias a la posición extremadamente baja del piñón, a la solidez del servomotor SC NET - Selector de llave sólo START y a la regulación de la altura y la profundidad de que dispone.
  • Seite 40 3) DATOS TECNICOS • Dejar los tubos flexibles previstos para el paso de las conexiones eléctricas 3.1) Servomotor DEIMOS BT-MA de manera que sobresalgan de la placa base. Alimentación: ..........monofásica 230V ±10% 50Hz (*) • Para mantener en posición correcta la placa base durante la instalación, Motor: ....................
  • Seite 41 MANUAL DE INSTALACIÓN ESPAÑOL de carga máx. de 2.000 kg. Una vez fijados los distanciadores en el centro de Luz intermitente con antena sintonizada. cada ojete de las diversas piezas de la cremallera, se soldarán los distanciadores Servomotor con cuadro de mandos y receptor incorporado. a la cancela.
  • Seite 42 ESPAÑOL MANUAL DE INSTALACIÓN El programador dispone de tres teclas para la navegación por los menús y OFF Habilita la lógica de 4 pasos. la configuración de los parámetros de funcionamiento: Un impulso de start tiene los siguientes efectos: tecla corrimiento menús/incremento valor Cancela cerrada: ................abre tecla corrimiento menús/reducción valor En fase de apertura:..detiene y activa el TCA (si está...
  • Seite 43 MANUAL DE INSTALACIÓN ESPAÑOL Eliminar Lista (cancelar 64) Estos valores permiten corregir la configuración del par. Si el valor de par máximo alcanzado durante la maniobra se acerca sensi- ¡ATENCION! Elimina, completamente, de la memoria del receptor todos blemente al valor configurado en el menú parámetros, podrían producirse, los radiomandos memorizados.
  • Seite 44: Mantenimiento

    ESPAÑOL MANUAL DE INSTALACIÓN Atención: No empuje violentamente la hoja de la cancela; acompáñela por respetan los datos contenidos en este manual de instrucciones. La empresa toda su carrera. no responde de los daños causados por el incumplimiento de las normas •...
  • Seite 45 Fig. A LEGENDA ACCESO A LOS MENUS Presione simultáneamente las teclas + y -. L a p r e s i ó n s i m u l t á n e a d e l a s t e c l a s + y - Presione la tecla OK p e r m i t e s a l i r d e l m e n ú...
  • Seite 46 Fig. B MENU ANTERIORES T2 T1 FIG. A Suelte P1 del Presione P1 del radiomando. radiomando Presione Tecla deseada del radiomando (véase la Fig. B3). Suelte P1 del Presione P1 del radiomando. radiomando Presione Tecla deseada del radiomando (véase la Fig. B3). Presione Tecla deseada del radiomando (véase la Fig.
  • Seite 47: Segurança Geral

    NET LAMP - Lâmpada cintilante com radiorreceptor integrado 1) GENERALIDADES SC NET - Selector de chave somente START O accionador DEIMOS BT-MA o ferece uma vasta versatilidade de insta- lação, graças à posição extremamente baixa do pinhão, à compacidade do SC NET - Selector de chave START+PED accionador e à...
  • Seite 48: Verificações Preliminares

    3) DADOS TÉCNICOS • Para manter a placa base na posição correcta durante o assentamento, 3.1) Accionador DEIMOS BT-MA pode ser útil soldar duas placas de ferro por baixo do carril, sobre as Alimentação: ...........monofásica 230V~±10% 50Hz (*) quais soldar os tirafundos (fig.3).
  • Seite 49 MANUAL PARA A INSTALAÇÃO PORTUGUÊS Neste caso também, coloque um pedaço ao contrário nos pontos de Emissor 1-2-4 canais. junção para garantir o passo correcto dos dentes. Os parafusos que fixam Cremalheira. a cremalheira aos distanciadores, consentem regulações da altura da cremalheira.
  • Seite 50 PORTUGUÊS MANUAL PARA A INSTALAÇÃO As modificações efectuadas são definidas só se em seguida pressiona-se a ligação de dispositivos não equipados de contacto suplementar de a tecla OK. verificação. ° Com a primeira pressão da tecla OK entra-se no modo programação. Indicador luminoso de portão aberto ou II canal rádio (SCA 2ch) [ OFF ] Inicialmente no visor aparecem as seguintes informações:...
  • Seite 51 MANUAL PARA A INSTALAÇÃO PORTUGUÊS 15.4) MENU LíNGUA (lingua) manobra de abertura sem desaceleração, seguida por uma manobra de fecho sem desaceleração, durante a qual memoriza a duração do percurso; Consente de definir a língua do programador com visor. em seguida, a central comanda uma segunda manobra de abertura com - ITALIANO (ITA) desaceleração, seguida por uma manobra de fecho com desaceleração, - FRANCÊS (FRA)
  • Seite 52 PORTUGUÊS MANUAL PARA A INSTALAÇÃO 18) DIAGRAMA CONEXÃO BATERIAS (Fig.19) 19) CONTROLO DA AUTOMATIZAÇÃO Antes de tornar a automatização definitivamente operativa, controle escrupu- losamente o seguinte: • Controle o funcionamento correcto de todos os dispositivos de segurança (micro-comutadores de limitação, fotocélulas, perfis sensíveis, etc.). •...
  • Seite 53: Acesso Aos Menus

    Fig. A LEGENDA ACESSO AOS MENUS Pressionar simultaneamente as teclas + e -. Pressionar Pressionando-se ao mesmo tempo as teclas + e – pode-se sair do menu em que se está a operar e voltar para o precedente; se isto acontece no nível principal do menu sai-se da programação e desliga-se o visor.
  • Seite 54 Fig. B T2 T1 MENUS PRECEDENTES FIG. A Suelte P1 del Presione P1 del radiomando. radiomando. Presione Tecla deseada del radiomando (véase la Fig. B3). Suelte P1 del Presione P1 del radiomando. radiomando. Presione Tecla deseada del radiomando (véase la Fig. B3). Presione Tecla deseada del radiomando (véase la Fig.
  • Seite 55 Fig. 1 NETTUNO S Fig. 2 Fig. 3 Fig.4 Fig. 5 CENTRO PIGNONE - PIGNON CENTER AXI PIGNON - RITZELACHSE - CENTRO PINON DEIMOS BT - NETTUNO S-MA - Ver. 04 -...
  • Seite 56 Fig. 6 Fig. 7 Fig. 8 Fig. 9 Fig. 10 Fig. 11 Fig. 12 Min. 50mm 56 - DEIMOS BT - NETTUNO S-MA - Ver. 04...
  • Seite 57 Fig. 13 Fig. 16 24 V~ Fig. 14 SCA / II CH.R 24V~/1A max FAST NET FAST NET FAST WIRE 24V~ 230V~ 3x1.5mm Fig. 15 Solo per i modelli dove previsto, For pre-arranged models only, Seulement pour les modèles que l’on prévoit, Nur für entsprechend ausgestattete Modelle, Únicamente para los modelos donde esté...
  • Seite 58 Fig. 4 Fig. 17 NETTUNO S Programmatore palmare universale Universal palmtop programmer Programmateur de poche universel Universellen Palmtop-Programmierer Programador de bolsillo universal Programador palmar universal UNIFLAT UNIDA F 1AT F 0,63AT (230V) F 1AT (110V) Contatti Contatti Contacts Contacts Contacts Contacts UNIFLAT Kontakte...
  • Seite 59 Fig. 18 Fig. 19 NETTUNO S DEIMOS BT - NETTUNO S-MA - Ver. 04 -...

Diese Anleitung auch für:

Nettuno sNettuno s-maDeimos bt

Inhaltsverzeichnis