Inhaltsverzeichnis
Werbung
Verfügbare Sprachen
Verfügbare Sprachen
Quicklinks
Brad Nailer
Stiftnagler
Cloueur pointe tête homme
Groppinatrice
Spijkerapparaat
Clavadora de Brad
òÚËÙÚoÇêÈ ÖÇoÁÀeÁaÄËÇaÚeÎë
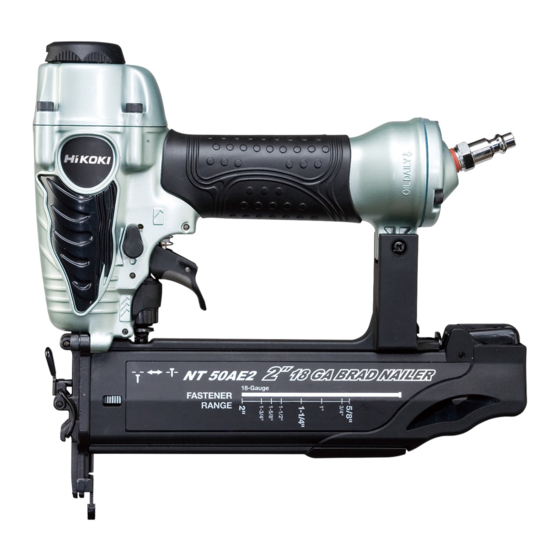
NT 50AE2
Read through carefully and understand these instructions before use.
Keep this Manual available for others before they use the Nailer.
Diese Anleitung vor Benutzung des Werkzeugs sorgfältig durchlesen und verstehen.
Halten Sie dieses Handbuch für andere Personen zur Verfügung, bevor diese den Nagler verwenden.
Lire soigneusement et bien assimiler ces instructions avant usage.
Laisser ce manuel disponible pour que les autres personnes puissent le consulter avant d'utiliser le cloueur.
Prima dell'uso leggere attentamente e comprendere queste instuzioni.
Rendere disponibile il presente manuale alle altre persone, prima che utilizzino la chiodatrice.
Deze gebruiksaanwijzing s.v.p voor gebruik zorgvuldig doorlezen.
Zorg dat deze gebruiksaanwijzing beschikbaar is voor iedereen die het spijkerapparaat gaat gebruiken.
Leer cuidadosamente y comprender estas instucciones antes del uso.
Este manual deberá estar a disposición de todas las personas que van a utilizar el martillo neumático,
para su lectura previa.
èepeÀ ËcÔoÎëÁoÇaÌËeÏ ÀaÌÌoÖo ÖÇoÁÀeÁaÄËÇÌoÖo cÚaÌÍa, oÁÌaÍoÏëÚe ÔoÎëÁoÇaÚeÎÓ c íÚoÈ
ËÌcÚpyÍáËeÈ.
BÌËÏaÚeÎëÌo ÔpoäÚËÚe ÀaÌÌyï ËÌcÚpyÍáËï Ôo íÍcÔÎyaÚaáËË ÔpeÊÀe äeÏ ÔoÎëÁoÇaÚëcÓ ËÌcÚpyÏeÌÚoÏ.
Handling instructions
Bedienungsanleitung
Mode d'emploi
Instruzioni per l'uso
Gebruiksaanwijzing
Instrucciones de manejo
àÌcÚpyÍáËÓ Ôo íÍcÔÎyaÚaáËË
Werbung
Inhaltsverzeichnis

Verwandte Anleitungen für Hitachi Koki NT 50AE2


Inhaltszusammenfassung für Hitachi Koki NT 50AE2
- Seite 1 Groppinatrice Spijkerapparaat Clavadora de Brad òÚËÙÚoÇêÈ ÖÇoÁÀeÁaÄËÇaÚeÎë NT 50AE2 Read through carefully and understand these instructions before use. Keep this Manual available for others before they use the Nailer. Diese Anleitung vor Benutzung des Werkzeugs sorgfältig durchlesen und verstehen. Halten Sie dieses Handbuch für andere Personen zur Verfügung, bevor diese den Nagler verwenden.
- Seite 5 English Deutsch Français Italiano Top cover Obere Abdeckung Couvercle supérieur Coperchio superiore Exhaust cover Entlüftungsdeckel Chapeau d’aération Copertura scarico Body Körper Corps Corpo Kappe Capuchon Coperchio Air-plug Luftanschluss Bouchon d’air Maschio per l’aria Piston O-ring Kolben-O-Ring Joint torique de piston O-ring del pistone Piston Kolben...
- Seite 6 Nederlands Español PyccÍËÈ Bovenkap Cubierta superior BepxÌÓÓ ÍpêåÍa Uitlaatdeksel Cubierta de escape KpêåÍa ÇêxÎoÔa Behuizing Cuerpo KopÔyc Tapa KpêåÍa Luchtplug Toma de aire BoÁÀyåÌaÓ ÔpoÄÍa KoÎëáeÇaÓ ÔpoÍÎaÀÍa O-ring van zuiger Anillo O del pistón ÔopåÌÓ Zuiger Pistón èopåeÌë Aandrijfblad Cuchilla impulsora ãeÁÇËe ÔpËÇoÀ...
- Seite 7 English GENERAL OPERATIONAL PRECAUTIONS PRECAUTIONS ON USING NAILER 1. Operate the power tool safely for correct uses. 1. Safe operation through correct usage Do not use the power tool for uses other than those This tool was designed for driving nails into wood specified in this instructions.
- Seite 8 English at all, it is dangerous to discharge the tool while 17. Simultaneous nailing on both sides of the same wall pointing it at someone, so never attempt to do so. No is dangerous. horseplay. Respect the tool as a working implement. Under no circumstances should nailing be performed 9.
-
Seite 9: Specifications
English SPECIFICATIONS Type of power Piston reciprocating Air pressure (Gauge) 4.9 – 8.3 bar (70 – 120 psi.) Applicable nails ref. Fig. Numbers of loadable nails 100 nails (1 strip) 254 mm (L) × 233 mm (H) × 60 mm (W) (10” × 9-3/16” × 2-3/8”) Size Weight 1.0 kg (2.2 lbs) - Seite 10 English (2) It is recommended using the recommended oil (SHELL 1. Nailing procedures TONNA). Other applicable oils are listed. Never mix This Hitachi nailer is equipped with a nailer operation two or more types of different oils. switching device. 3. Load nails Use SINGLE ACTUATION MECHANISM or CONTACT CAUTIONS ACTUATION MECHANISM in accordance with the...
-
Seite 11: Inspection And Maintenance
English If nails are driven too shallow, turn the adjuster to 6. Service parts list the deep side. A: Item No. 3 Stop turning the adjuster when a suitable position B: Code No. is reached for a nailing test. C: No. Used 4 Connect the air hose. - Seite 12 English Noise Information Noise characteristic values in accordance with EN 792- 13, JUNE, 2000: The typical A-weighted single-event sound power level ,1s,d = 97 dB The typical A-weighted single-event emission sound pressure level at work station ,1s,d = 87 dB. These values are tool-related characteristic values and do not represent the noise development at the point of use.
-
Seite 13: Generelle Vorsichtsmassnahmen
Deutsch der Reichweite von Kindern verwendet werden.Füllen GENERELLE VORSICHTSMASSNAHMEN Sie 5 bis 10 Tropfen Öl durch den Schlauchanschluß in den Körper des Werkzeugs ein, um das Gerät vor 1. Benutzen Sie das Gerät sicher und für die richtige Rost zu schützen. Verwendung. - Seite 14 Deutsch 7. Achten Sie auf Personen, die in Ihrer Nähe arbeiten. 14. Halten Sie Hände und Füsse während des Arbeitens Es kann gefährlich werde wenn Nägel, die nicht richtig von der Mündung entfernt. eingetrieben wurden andere Personen verletzen. Es ist sehr gefährlich, wenn ein Nagel durch einen Achten Sie aus diesem Grunde auf die Sicherheit der Fehler in die Hände oder Füsse eindringt.
-
Seite 15: Spezifikationen
Deutsch 23. Trennen Sie den Schlauch ab, bevor Sie die Nasenkappe anbringen oder entfernen. Trennen Sie den Schlauch ab, bevor Sie die Nasenkappe des Zubehörs an der Spitze des Druckhebels anbringen oder sie davon entfernen. Versehentliches Schießen eines Nagels kann sehr gefährlich sein. - Seite 16 Deutsch Der Nagler ist nun betriebsbereit. VOR INBETRIEBNAHME Entfernen der Nägel: 1. Prüfen Sie den Luftdruck 1 Drücken Sie den Stopphebel leicht, und ziehen Sie ACHTUNG ihn vorsichtig aus der Magazinabdeckung. Der Luftdruck muss konstant zwischen 4,9–8,3 bar 2 Entfernen Sie die Nägel aus dem Nagler. gehalten werden.
-
Seite 17: Inspektion Und Wartung
Deutsch HINWEIS INSPEKTION UND WARTUNG Vorsichtsmassnahmen gegen Leerschüsse Gelegentlich wird weiter genagelt, obwohl alle Nägel ACHTUNG im Magazin verschossen sind. Klemmen Sie den Druckschlauch bei der Reinigung, Dies nennt man “Leerschüsse”. Leerschüsse können Inspektion und Wartung ab. den Dämpfer, das Magazin und die Nagelzuführung 1. - Seite 18 Deutsch KOMPRESSOR Lärminformation Lärmkennwerte entsprechend EN 792-13, Juni 2000: ACHTUNG Typischer A-bewerterer Schallpegel für ein einzelnes Wenn die maximale Arbeitsleistung des Kompressors Ereignis: ,1s,d = 97 dB 8,3 bar übersteigt, benutzen Sie ein Reduzier-Ventil Typischer A-bewerterer Schallpegel am Arbeitsplatz: zwischem dem Kompressor und dem Gerät. Regeln ,1s,d = 87 dB Sie anschliessend den Luftdruck innerhalb des Arbeitsbereiches von 4,9–8,3 bar.
-
Seite 19: Avertissements Generaux
Français 13. La vue éclatee contenue dans ce manuel AVERTISSEMENTS GENERAUX d’instructions doit être utilisée seulement dans un centre de réparation agrée. 1. Utilisez l’appareil soigneusement et uniquement pour les applications prévues dans ce manuel. 2. Employez l’appareil correctement afin d’assurer un PRECAUTIONS A PRENDRE LORS DE fonctionnement en sécurité. - Seite 20 Français si vous pressez la détente. En branchant ou 16. Soyez prudents en clouant des planches minces ou débranchant le tuyau, en chargeant les clous etc., les bords du bois. évitez de pointer l’orifice de décharge en direction En clouant des planches minces ou les bords du bois, d’une personne (vous-même inclus).
-
Seite 21: Accessoires Standards
Français SELECTION DES CLOUS Seuls les clous indiqués dans le tableau ci-dessous pourront être utilisés avec ce cloueur. Clous à tête perdue de Min. Max. calibre 18 1,9 mm 1 mm 1,25 mm Dimensions ACCESSOIRES STANDARDS AVANT USAGE (1) Boîtier ................1 1. - Seite 22 Français REMARQUE (2) Bras de contact Les clous représentés à la page 20 peuvent être En pressant l’orifice de décharge vers le bas, assurez- chargés sur l’encoche guide latérale du magasin sans vous que le bras de contact est leve sufisamment réglage.
- Seite 23 Français 3. Modifier la direction d’aération Il sera utile de présenter cette liste de pièces à un La direction de l’évent d’aération peut être modifiée centre de service après-vente Hitachi agréé lorsqu’on en tournant le couvercle supérieur (Voir Fig. 10). apporte un outil nécessitant des réparations ou tout 4.
- Seite 24 Français Information sur le bruit Valeurs des caractéristiques de bruit conformément à EN 792-13, juin 2000 : Niveau type de puissance sonore de l’enfoncement d’un clou, pondéré A : , A,s,d = 97 dB Niveau type de pression sonore d’émission de l’enfoncement d’un clou, pondéré...
-
Seite 25: Precauzioni Generali
Italiano attraverso il tubo in modo da proteggere l’utensile PRECAUZIONI GENERALI dalla ruggine. 13. Gli esplosi per l’assemblaggio contenuti in queste 1. Utilizzate l’utensile pneumatico in sicurezza e in modo istruzioni devono essere usati solo da un centro appropriato. assistenza autorizzato. Non usatelo per scopi diversi da quelli specificati in queste istruzioni. - Seite 26 Italiano persone. In ogni caso, fate sempre attenzione alla 15. State attenti al contraccolpo. sicurezza delle persone attorno a voi quando state Non avvicinatevi all’estremità dell’utensile con il capo usando la chiodatrice. Assicuratevi che non ci sia il durante le operazioni. Sarebbe molto pericoloso corpo di qualcuno, mani o piedi vicino all’uscita dei perché...
- Seite 27 Italiano SPECIFICHE Tipo di potenza Pistone alternativo Pressione dell’aria 4,9 – 8,3 bar Chiodi applicabili ref. Fig. Quantità chiodi caricabili 100 chiodi (1 stecca) 254 mm (Lu) × 233 mm (A) × 60 mm (La) Misure Peso 1,0 kg Metodo di alimentazione Tipo di molla Foro (diametro interno) 6 mm...
- Seite 28 Italiano La lubrificazione attraverso questo kit offre un utilizzo della leva di espulsione su un piano di lavoro o su un scorrevole, di lunga durata, e protetto dal rischio di pavimento. Inoltre non puntate mai il chiodo esterno corrosione. in direzione di persone. Regolate l’oliatore in modo che una singola goccia di olio sia fornita ad intervalli di 5 –...
-
Seite 29: Ispezione E Manutenzione
Italiano Trattare sempre con cautela i chiodi e il nastro. Se si (3) Rilasciare la leva di blocco e aprire la piastra guida fanno cadere i chiodi, il legame che li tiene insieme si (Vedere Fig. 13). potrebbe rompere. (4) Rimuovere il chiodo inceppato con un cacciavite a Dopo l’inchiodatura: testa fessa (Vedere Fig. - Seite 30 Italiano OLIATORE-FILTRO-VALVOLA DI RIDUZIONE (Set aria) Con una estesa durata della vita, è necessario usare un set aria. Limitate la lunghezza del tubo tra l’unità e il set aria entro 10 mt. durante L’uso (Vedere Fig. 15). LUBRIFICANTI APPLICABILI Tipo di lubrificante Nome del lubrificante Olio raccomandato SHELL TONNA...
- Seite 31 Nederlands 11. Raadpleeg een officiële service-vertegenwoordiger ALGEMENE VOORZORGEN VOOR HET wanneer reparatie of vervanging van onderdelen GEBRUIK noodzakelijk zijn. Let er op dat het pneumatisch gereedschap alleen 1. Gebruik dit pneumatisch gereedschap op een veilige door een erkende service-vertegenwoordiger wordt manier en alleen voor geëiende doelen.
- Seite 32 Nederlands Oogbescherming verkrijgbaar elke Raak de trekker niet aan. gereedschapswinkel. Draag altijd een vorm van Laat de kop van het apparaat niet in contact komen oogbescherming wanneer u met dit apparaat werkt. met enig oppervlak. Er zijn speciale maskers of veiligheidsbrillen die over Houd de kop van het apparaat naar beneden uw bril passen.
-
Seite 33: Technische Gegevens
Nederlands 20. Koppel de slang af en verwijder alle spijkers die nog 22. Een ‘vrouwelijke’ aansluiting (pneumatische in het magazijn zitten na gebruik. koppeling) mag niet in dit apparaat gebruikt worden. Koppel het pneumatisch gereedschap van de Als een dergelijke aansluiting is geînstalleerd, is het luchtdruk af voor u onderhoudswerkzaamheden uit soms niet mogelijk om de gecomprimeerde lucht in gaat voeren, een vastzittende spijker gaat verwijderen,... -
Seite 34: Voorbereidingen Voor Het Gebruik
Nederlands (1) Druk de stophendel licht in en verwijder voorzichtig VOORBEREIDINGEN VOOR HET GEBRUIK de magazijnkap (Zie Afb. 2). (2) Plaats de spijkerstrip in het magazijn en zorg ervoor 1. Leg de slang klaar. dat de spijkerpunten in contact staan met de groef. Let er op dat de gebruikte slang een minimum binnen (Zie Afb. -
Seite 35: Inspectie En Onderhoud
Nederlands 1 MAAK DE LUCHTSLANG LOS. Druk de spijker-openening op de de plek waar de 2 Als de spijkers te diep worden ingedreven, draait spijker moet komen; haal vervolgens de trekker over om een enkele spijker af te vuren (Zie Afb. 6). u de afsteller naar de “ondiep”... - Seite 36 Nederlands smeren zorg u ervoor dat de veiligheidshendel soepel GESCHIKTE SMEERMIDDELEN blijft functioneren en gaat u de vorming van roest tegen. Type smeermiddel Naam van het smeermiddel 5. Opslag Wanneer u het apparaat voor langere tijd niet zult Aanbevolen olie SHELL TONNA gebruiken, kunt u het beste een dunne laag machineolie aanbrengen op de stalen onderdelen...
- Seite 37 Español 11. Lleve la herramienta a un agente de servicio PRECAUCIONES PARA LAS OPERACIONES EN autorizado si es necesario efectuar alguna reparación GENERAL o reemplazo de alguna parte. Asegúrese de que la herramienta eléctrica es revisada 1. Opere la herramienta eléctrica de forma segura y solamente por un agente de servicio autorizado y correctamente.
- Seite 38 Español para los ojos. Protéjase siempre los ojos mientras No toque el gatillo. opera la herramienta. Puede protegerse los ojos con No permita que el cabezal de disparo se ponga en unas gafas protectoras o también ponerse una contacto con ninguna superficie. máscara de visión amplia encima de gafas graduadas Mantenga el cabezal de disparo hacia abajo.
-
Seite 39: Especificaciones
Español abandonar el lugar de trabajo, mover la herramienta ser dirigido cuando la manguera está desconectada, a otro lugar o después de usarla. Es muy peligroso por lo tanto evítelo. dejar clavos en la herramienta puesto que podrían La herramienta y la manguera de suministro de aire ser disparos por accidente. -
Seite 40: Antes Del Empleo
Español (1) Presione levemente la palanca de paro y quite PREPARACIÓN PARA ANTES DE LA cuidadosamente la tapa del depósito. (Véase Fig. 2) OPERACIÓN (2) Coloque la ristra de puntas en el cargador y mantenga los extremos de las puntas en contacto con la ranura. 1. -
Seite 41: Inspección Y Mantenimiento
Español (1) Clavado intermitente (2) la clavadora está firmemente sujetada contra la Ajuste el dispositivo de conmutación a la posición pieza de trabajo. superior (para ajustar a MECANISMO DE ACTUACIÓN Si los clavos penetran de forma excesiva o insuficiente SIMPLE) (Véase Fig. 5). en la pieza de trabajo, ajuste el clavado en el orden Presione la boca de salida de clavos sobre el punto siguiente. - Seite 42 Español Limpie el área deslizante de la palanca de empuje y LUBRICANTES APLICABLES emplee el aceite proporcionado para lubricarla de tanto en tanto. La lubricación permitirá un deslizamiento suave Tipo de lubricante Nombre del lubricante sirviendo a la vez como medida de prevención contra Aceite recomendado SELL TONNA el óxido.
- Seite 43 PyccÍËÈ èpoÇepÓÈÚe íÎeÍÚpoÔpËÄop peÖyÎÓpÌo c áeÎëï ÉãABHõE MEPõ èPEÑOCTOPOÜHOCTà oÄecÔeäeÌËÓ ÄeÁoÔacÌoÈ paÄoÚê íÎeÍÚpoÔpËÄopa Ë èPà PAÅOTE eÖo íÙÙeÍÚËÇÌocÚË Ç ÎïÄoe ÇpeÏÓ. 1. ÑÎÓ ÔpaÇËÎëÌoÖo ËcÔoÎëÁoÇaÌËÓ 11. B cÎyäae ÌeoÄxoÀËÏocÚË ÔpoÇeÀeÌËÓ peÏoÌÚa íÎeÍÚpoÔpËÄopa coÄÎïÀaÈÚe ocÚopoÊÌocÚë ÔpË ËÎË ÁaÏeÌê ÀeÚaÎeÈ, oÄpaÚËÚecë Í paÄoÚe c ÌËÏ.
- Seite 44 PyccÍËÈ BepoÓÚÌocÚë ÚoÖo, äÚo äacÚËáê ÖÇoÁÀeÈ, Ôo ÍoÚopêÏ He ÔpËÚpaÖËÇaÈÚecë Í ÍypÍy. ÔpoËÁÇoÀËÚcÓ ÌeÇepÌêÈ yÀap, ÔoÔaÀyÚ Ç ÖÎaÁ, He ÀoÔycÍaÈÚe ÍoÌÚaÍÚa coÔÎa c ÍaÍoÈ-ÎËÄo coÁÀaÕÚ yÖpoÁy ÁpeÌËï. ÂaçËÚÌêe oäÍË ÏoÊÌo ÔoÇepxÌocÚëï. ÔpËoÄpecÚË Ç ÎïÄoÏ xoÁÓÈcÚÇeÌÌoÏ ÏaÖaÁËÌe. ÑepÊËÚe coÔÎo ÖoÎoÇÍoÈ ÇÌËÁ. BceÖÀa oÀeÇaÈÚe ÁaçËÚÌêe oäÍË...
- Seite 45 PyccÍËÈ caÏoÔpoËÁÇoÎëÌo ÇêcÚpeÎËÚ ÖÇoÁÀÕÏ ËÎË ÄyÀeÚ 22. OxÇaÚêÇaïçËÈ ÁaÊËÏ (ÖÌeÁÀo ÔoÀcoeÀËÌeÌËÓ ÌeÔpaÇËÎëÌo paÄoÚaÚë. ÇoÁÀyxa) ÌeÎëÁÓ ÌaÀeÇaÚë Ìa ÍopÔyc. 20. èocÎe paÄoÚê, oÚcoeÀËÌËÚe åÎaÌÖ Ë ÇêÌëÚe EcÎË Ìa ÍopÔyc ÌaÀeÚ oxÇaÚêÇaïçËÈ ÁaÊËÏ, ÚoÖÀa ocÚaÇåËecÓ ÖÇoÁÀË ËÁ ÏaÖaÁËÌa. cÊaÚêÈ ÇoÁÀyx ÏoÊeÚ ËÌoÖÀa Ìe ÔocÚyÔaÚë, ÍoÖÀa OÚcoeÀËÌËÚe ËÌcÚpyÏeÌÚ...
- Seite 46 PyccÍËÈ (3) Ço ÇpeÏÓ paÄoÚê Ë ÔepeÌocÍË ËÌcÚpyÏeÌÚa, Ìe èPàMEHEHàE ÔoÀcÚaÇÎÓÈÚe cÇoÕ ÎËáo, pyÍË Ë ÌoÖË, a ÚaÍÊe KoÏÔoÌoÇÍa ÍopÔyca Ë ÍapÚËÌÍË, oÚÀeÎÍa ÏeÄeÎË. ÀpyÖËx ÎïÀeÈ ÔoÀ ÌacaÀÍË coÔÎa ÇoËÁÄeÊaÌËË MecÚÌaÓ Ë ÔepeÀÇËÊÌaÓ ÀoÏaåÌÓÓ oÚÀeÎÍa Ë ÇoÁÏoÊÌoÖo ÚpaÇÏËpoÇaÌËÓ. pacÍÎaÀÍa. (1) CÎeÖÍa ÌaÊÏËÚe Ìa cÚoÔop Ë aÍÍypaÚÌo oÚÍpoÈÚe ÍpêåÍy ÏaÖaÁËÌa.
- Seite 47 PyccÍËÈ B ÁaÇËcËÏocÚË oÚ ÔÎaÌËpyeÏoÈ paÄoÚê, ÇêÄepËÚe 2. HacÚpoÈÍa ÖÎyÄËÌê ÁaÄËÇaÌËÓ ÖÇoÁÀeÈ (CÏ. MEXAHàÂM OÑàHOóHOÉO ÑEâCTBàü ËÎË PËc. 9) MEXAHàÂM KOHTAKTHOÉO èìCKA. ÑÎÓ ÚoÖo, äÚoÄê oÄecÔeäËÚë ÁaÄËÇaÌËe ÖÇoÁÀeÈ Ìa (1) èepËoÀËäecÍoe ÁaÄËÇaÌËe ÖÇoÁÀeÈ oÀËÌaÍoÇyï ÖÎyÄËÌy, ÔpoÇepëÚe, äÚoÄê: èocÚaÇëÚe ÔepeÍÎïäaÚeÎë Ç ÇepxÌee ÔoÎoÊeÌËe (1) ÀaÇÎeÌËe ÇoÁÀyxa Ìa ÖÇoÁÀeÁaÄËÇÌoÈ...
- Seite 48 PyccÍËÈ 3. èpoÇepëÚe ÍpeÔÕÊÌêe ÇËÌÚê ÍaÊÀoÈ äacÚË CMAõBAûôàâ-îàãúTPAñàOHHõâ- èocÚoÓÌÌo ÔpoÇepÓÈÚe ÍaÊÀyï ÀeÚaÎë Ìa ÔpeÀÏeÚ PEÑìKñàOHHõâ KãAèAH (BoÁÀyåÌaÓ ocÎaÄÎeÌËÓ ÍpeÔÕÊÌêx ÇËÌÚoÇ, a ÚaÍÊe ÇepoÓÚÌyï KoÏÔoÌoÇÍa) yÚeäÍy. ÂaÍpeÔÎÓÈÚe ocÎaÄÎeÌÌêe ÇËÌÚê. PaÄoÚa ËÌcÚpyÏeÌÚoÏ c ocÎaÄÎeÌÌêÏË ÇËÌÚaÏË ÏoÊeÚ C ÚeÏ, äÚoÄê íÚo oÄopyÀoÇaÌËe ÏoÖÎo paÄoÚaÚë Ç ÔpËÇecÚË...
- Seite 51 885-866 949-685 D3×20 949-757 M5×20 885-894 885-867 885-895 878-600 885-896 880-190 880-413 M4×10 880-410 885-960 M4×25 885-868 885-897 885-869 P22.4 885-898 885-870 885-899 885-871 I.D 44.7 885-900 885-872 885-901 301-684 S-30 — — — — — 986-374 P-32 875-769 885-873 885-902 885-874 944-458...
- Seite 54 Representative office in Europe Hitachi Power Tools Europe GmbH 31. 8. 2006 Siemensring 34, 47877 Willich 1, F. R. Germany Head office in Japan Hitachi Koki Co., Ltd. K. Kato Shinagawa Intercity Tower A, 15-1, Konan 2-chome, Board Director Minato-ku, Tokyo, Japan Hitachi Koki Co., Ltd.