Singer 7424 Gebrauchsanleitung
Inhaltsverzeichnis
Inhaltsverzeichnis

Verwandte Anleitungen für Singer 7424


Inhaltszusammenfassung für Singer 7424
- Seite 1 7424 /7426 MaNuaLE Di iSTRuZiONi haNDLEiDiNG GEBRauchSaNLEiTuNG...
-
Seite 2: Conservate Queste Istruzioni
Paese in materia di riciclaggio relativa ai prodotti elettrici/ elettronici. In caso di dubbi contattare il proprio rivenditore autorizzato. SINGER è un marchio registrato di The Singer Company Limited o le sue consociate. ©2009 The Singer Company Limited o sue consociate. Tutti i diritti riservati. -
Seite 3: Belangrijke Veiligheidsinstructies
Let op! Dit product moet op een veilige manier gerecycled worden volgens de geldende nationale wetgeving voor elektrische/ elektronische producten. Raadpleeg bij twijfel uw leverancier voor advies. SINGER is een geregistreerd handelsmerk van The Singer Company Limited of partners. ©2009 The Singer Company Limited of partners. Alle rechten voorbehouden. -
Seite 4: Wichtige Sicherheitshinweise
Gesetzgebung für elektrische/elektronische Produkte, recycelt werden muss. Bei Zweifel setzen Sie sich bitte mit Ihrem Fachhändler in Verbindung. SINGER ist ein eingetragenes Warenzeichen von The Singer Company Limited oder zugehörigen Tochterunternehmen. ©2009 The Singer Company Limited oder zugehörige Tochterunternehmen. Alle Rechte vorbehalten. -
Seite 5: Inhaltsverzeichnis
iNDicE 1. PRESENTaZiONE DELLa MacchiNa PER cuciRE Zig-zag a tre punti, Punto conchiglia -------------------------- 50 - 51 Parti e componenti ----------------------------------------------------6 - 7 Punto elastici -------------------------------------------------------- 52 - 61 Accessori-----------------------------------------------------------------8 - 9 Diritto elastico, Punto overlock, Punto piuma, Punto ric-rac, Collegamento della macchina -----------------------------------10 - 11 Punto spillo, Punto coperta, Punto a nido d’ape, Portarocchetti,... - Seite 6 iNhOuD 1. uw NaaiMachiNE STELT Zich VOOR Zigzag met meerdere steken, Lingeriesteek ---------------- 50 - 51 Benaming van de onderdelen --------------------------------------6 - 7 Stretchsteken ------------------------------------------------------- 52 - 61 Accessoires -------------------------------------------------------------8 - 9 Rechte stretchsteek, Overlocksteek, Veersteek, Instellen van uw machine -----------------------------------------10 - 11 Drievoudige zigzagsteek, Picotsteek, Festonneersteek, Garenpennen ------------------------------------------------------- 12 - 13 Smocksteek, Entredeux-steek, Trapsteek,...
-
Seite 7: Europäische Ausführung
iNhaLTSVERZEichNiS 1. ihRE NÄhMaSchiNE STELLT Sich VOR Blindstich ------------------------------------------------------------- 48 - 49 Teile der Maschine ----------------------------------------------------6 - 7 Mehrfacher Zickzackstich, Muschelstich --------------------- 50 - 51 Zubehör ------------------------------------------------------------------8 - 9 Stretchstiche -------------------------------------------------------- 52 - 61 Inbetriebnahme der Maschine -----------------------------------10 - 11 Stretch-Geradstich, Overlockstich, Federstich, Garnrollenhalter ---------------------------------------------------- 12 - 13 Stretch-Zickzackstich, Pikotstich, Kantenstich, Wabenstich,... -
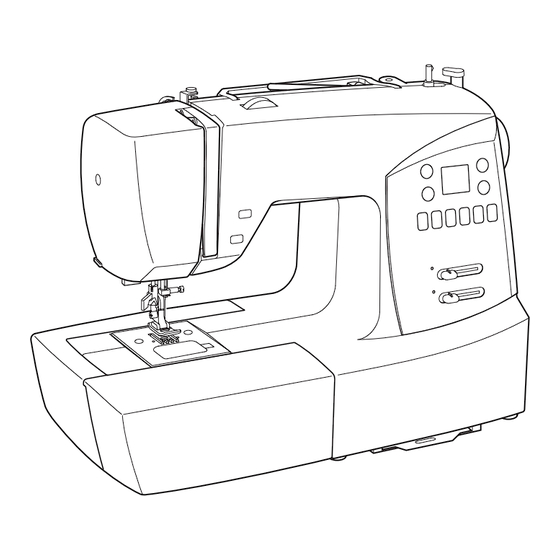
Seite 8: Presentazione Della Macchina Per Cucire Parti E Componenti
1. PRESENTaZiONE DELLa MacchiNa PER cuciRE PaRTi E cOMPONENTi 1. Guidafilo 2. Leva tendi-filo 3. Controllo di tensione del filo 4. Coperchio anteriore 5. Tagliafilo 6. Piano estraibile (vano accessori) 7. Albero di avvolgimento bobina 8. Fermo di avvolgimento bobina 9. -
Seite 9: Uw Naaimachine Stelt Zich Voor Benaming Van De Onderdelen
1. uw NaaiMachiNE STELT 1. ihRE NÄhMaSchiNE STELLT Zich VOOR Sich VOR BENaMiNG VaN DE ONDERDELEN TEiLE DER MaSchiNE 1. Draadgeleider 1. Fadenführung 2. Fadenhebel 2. Draadopname 3. Draadspanningsregelaar 3. Fadenspannungs-Einstellrad 4. Frontkapje 4. Kopfdeckel 5. Fadenabschneider 5. Draadafsnijmesje 6. Aaanschuiftafel (toebehorenbox) 6. -
Seite 10: Accessori
accESSORi PER MACCHINA PER CUCIRE 1. Aghi 2. Bobine (4 in totale, 1 nella macchina) 3. Portarocchetto ausiliario 4. Dischi di feltro per rocchetti (2) 5. Fermarocchetto (mini) 6. Fermarocchetto (piccolo) 7. Fermarocchetto (grande) 8. Taglia-asole/Spazzola/Scucitore 9. Cacciavite per placca d’ago 10. -
Seite 11: Accessoires
accESSOiRES ZuBEhÖR VOOR NAAIMACHINE NÄHMASCHINE 1. Set naalden 1. Nadelsatz 2. 4 spoelen (1 zit in de machine) 2. 4 x Spulen (1 in der Maschine) 3. Tweede garenpen 3. Zweiter Garnrollenhalter 4. 2 garenpenviltjes 4. Unterlegscheiben (2 x) 5. Garenschotel (klein) 5. -
Seite 12: Collegamento Della Macchina
cOLLEGaMENTO DELLa MacchiNa Prima di utilizzare la vostra macchina per Spegnete (“OFF”) l’interruttore di cucire per la prima volta, ricordate di pulire la alimentazione / illuminazione placca d’ago da eventuali presenze di olio. Aan/uit-schakelaar “OFF” caVO Di aLiMENTaZiONE / Hauptschalter auf OFF/AUS REOSTaTO I n s e r i t e i l c o n n e t t o r e d e l c a v o d i alimentazione nella presa sul lato della... -
Seite 13: Instellen Van Uw Machine
iNSTELLEN VaN uw MachiNE iNBETRiEBNahME DER MaSchiNE Verwijder de eventuele olievlekken van de naaldplaat voordat Bevor Sie die Maschine zum ersten Mal benutzen, wischen u met het gebruik van de machine begint. Sie bitte überschüssiges Öl ab, das sich während des Transports im Stichplattenbereich ansammeln kann. -
Seite 14: Portarocchetti
PORTaROcchETTi Rocchetto PORTAROCCHETTO ORIZZONTALE, per Garenklos rocchetti normali Garnrolle Dischetti di feltro Mettete il rocchetto di filo sul portarocchetto e fissatelo con il Garenpenvilt fermarocchetto, controllando che il filo scorra con facilità. Se Unterlegscheibe il rocchetto ha una tacca ferma-filo, questa deve trovarsi a destra. -
Seite 15: Garenpennen
GaRENPENNEN GaRNROLLENhaLTER HORIZONTALE GARENPEN voor normale HORIZONTALER GARNROLLENHALTER garenklosen für normale Garnrollen Plaats de garenklos op de garenpen en zet deze vast met een Stecken Sie die Garnrolle auf den Garnrollenhalter und garenschotel om er voor te zorgen dat de draad soepel loopt. sichern Sie sie mit einer Fadenablaufscheibe, damit der Wanneer de garenklos met een draadvoorspanning uitgerust Faden gut abläuft. -
Seite 16: Conversione A Braccio Libero
cONVERSiONE a BRacciO LiBERO La vostra macchina per cucire può essere utilizzata anche come modello a braccio libero. Quando il piano estraibile è in posizione, si tratta di un modello convenzionale dotato di un’ampia superficie di lavoro. Per togliere il piano estraibile, prendetelo saldamente con entrambi le mani e tirate verso sinistra, come indicato dalla figura. -
Seite 17: Vrije-Arm Naaien
VRiJE-aRM NaaiEN FREiaRM VERwENDEN Uw machine is eenvoudig om te zetten naar een vrije-arm Sie können Ihre Maschine sowohl als Freiarm- als auch als uitvoering. Flachbett-Maschine benutzen. Bij ingebouwde uitschuiftafel beschikt u over een grotere Bei eingebautem Anschiebetisch haben Sie eine größere werkoppervlakte dan bij een vlakbed-model. -
Seite 18: Avvolgimento Della Bobina
aVVOLGiMENTO DELLa BOBiNa 1. Mettete un rocchetto di filo sul portarocchetto e fissatelo con un fermarocchetto. Estraete il filo dal rocchetto e passatelo nelle guide del filo, come indicato dalla figura. 2. Fate passare l’estremità del filo all’interno del foro nella bobina, come indicato. -
Seite 19: Spoelen
SPOELEN uNTERFaDEN SPuLEN 1. Plaats een garenklos op de garenpen en zet deze met 1. Stecken Sie eine Garnrolle auf den Garnrollenhalter behulp van de garenschotel vast. Trek de draad via de und sichern Sie sie mit der kleinen Fadenablaufscheibe. draadgeleider uit de garenklos, zoals afgebeeld is. -
Seite 20: Come Infilare Il Filo Della Bobina
cOME iNFiLaRE iL FiLO DELLa BOBiNa 1. Ruotate verso di voi il volantino, per sollevare l’ago il più in alto possibile. 2. Per togliere il coperchio della bobina, premete verso destra il tasto di apertura. Il coperchio si solleverà quanto basta per poterlo estrarre. -
Seite 21: Inrijgen Van De Onderdraad
iNRiJGEN VaN DE ONDERDRaaD EiNLEGEN DER VOLLEN SPuLE 1. Draai het handwiel naar u toe tot de naald in zijn hoogste 1. Bringen Sie die Nadel in die höchste Stellung, indem Sie positie staat. das Handrad entgegen dem Uhrzeigersinn drehen. 2. -
Seite 22: Come Infilare Il Filo Superiore
cOME iNFiLaRE iL FiLO SuPERiORE A. Sollevate la leva alza-piedino. Ricordate sempre di sollevare la leva alza-piedino prima di infilare il filo superiore. (Se la leva alza-piedino non è sollevata non è possibile ottenere la corretta tensione del filo.) B. Ruotate il volantino verso di voi per portare l’ago nella sua posizione più... -
Seite 23: Inrijgen Van De Bovendraad
iNRiJGEN VaN DE BOVENDRaaD OBERFaDEN EiNFÄDELN A. Zet de persvoethevel omhoog. Zet de persvoethevel A. Stellen Sie den Nähfußheber hoch. Vor dem Einfädeln altijd omhoog alvorens de bovendraad in te rijgen. (Als ist immer zu prüfen, dass der Nähfußheber „oben” steht. de persvoethevel niet omhoog gezet wordt, kan de juiste (Wenn der Nähfußheber nicht angehoben wird, kann keine draadspanning niet worden verkregen.) -
Seite 24: Infilatura Automatica Dell'ago
iNFiLaTuRa auTOMaTica DELL’aGO Ruotate il volantino verso di voi per portare l’ago nella sua posizione più alta. 1. Agganciate il filo alla guida, come nella figura. 2. Tirate verso il basso la leva, tenendo l’estremità del filo. 3. Ruotate completamente la leva. 4. -
Seite 25: Gebruik Van De Automatische Draadinrijger
GEBRuiK VaN DE auTOMaTiSchE GEBRauch DES NaDELEiNFÄDLERS DRaaDiNRiJGER Bringen Sie die Nadel in die höchste Stellung, indem Sie das Zet de naald in de hoogste stand door het handwiel naar u toe Handrad entgegen dem Uhrzeigersinn drehen. te draaien. 1. Haken Sie den Faden in den Einfädlerhaken ein, wie in der Abbildung gezeigt. -
Seite 26: Come Raccogliere Il Filo Della Bobina
cOME RaccOGLiERE iL FiLO DELLa BOBiNa 1. Sollevate la leva alza-piedino. 2. Tenendo delicatamente il filo dell’ago con la vostra mano sinistra, ruotate verso di voi il volantino con la mano destra, fino a portare l’ago nella sua posizione più elevata. NOTA: Vi è... -
Seite 27: Ophalen Van De Onderdraad
OPhaLEN VaN DE ONDERDRaaD uNTERFaDEN hERauFhOLEN 1. Zet het voetje omhoog. 1. Stellen Sie den Nähfußheber nach oben. 2. Houdt de draad losjes in de linkerhand en draai het 2. Halten Sie den Oberfaden leicht mit der linken Hand, und handwiel naar u toe tot de naald weer in zijn hoogste stand drehen Sie das Handrad entgegen dem Uhrzeigersinn, staat. -
Seite 28: Tabella Guida Dei Tessuti, Dei Filati E Degli Aghi
* Da non utilizzare su tessuti elastici. * Per i migliori risultati, utilizzate sempre aghi marca Singer. S c o l l e g a t e s e m p r e l ’ a l i m e n t a z i o n e d e l l a macchina, staccando la spina dalla presa di rete. -
Seite 29: Naald-Garen-Stoftabel
* Nicht empfohlen für Stretchwaren merk Singer. * Verwenden Sie nur Singer Markennadeln für bessere Ergebnisse M a a k d e m a c h i n e s t e e d s l o s v a n d e... -
Seite 30: Come Regolare La Tensione Del Filo Superiore
cOME REGOLaRE La TENSiONE DEL FiLO SuPERiORE Rovescio Onderkant Il 90% delle vostre cuciture verrà effettuato tenendo impostata Unterseite su AUTO la manopola di regolazione della tensione del filo, Bilanciamento corretto posta sul lato superiore della macchina. Goede balans indicazioni utili: una leggera regolazione del lato + o – korrekt rispetto ad auTO migliorerà... -
Seite 31: Afstellen Van De Bovendraadspanning
aFSTELLEN VaN DE FaDENSPaNNuNG EiNSTELLEN BOVENDRaaDSPaNNiNG F ü r 9 0 % I h r e r N ä h a r b e i t e n b r a u c h e n S i e n u r d a s V o o r 9 0 % v a n u w n a a i w e r k h o e f t u a l l e e n d e Fadenspannungs-Einstellrad auf „AUTO”... -
Seite 32: Funzioni Pannello Di Controllo
Pulsanti selezione numerico Numerieke keuzetoetsen Zahlenauswahltasten Display numerico Nummerdisplay Zahlenanzeige Pulsanti selezione diretta Direct keuzetoetsen Direktauswahltasten Controllo di lunghezza del punto* Steeklengte regelaar * Stichlängenschieber * Spia LED LED indicator LED-Anzeige Controllo di ampiezza del punto/ posizione dell’ago * Steekbreedte/naaldpositie regelaar * Stichbreiten/ Nadelpositionsschieber *... -
Seite 33: Bedieningspaneelfuncties
BEDiENiNGSPaNEELFuNcTiES BEDiENuNGSFELDFuNKTiONEN Direct keuzetoetsen Direktauswahltasten Veelvuldig gebruikte patronen zijn beschikbaar met behulp H ä u f i g v e r w e n d e t e M u s t e r l a s s e n s i c h m i t d e n van de direct keuzetoetsen. - Seite 34 Motivi rosa scuro – lunghezza e ampiezza punto sono fissi Motivi neri scuro – occhielli I motivi con il n° cerchiato non possono essere cuciti con l’ago gemello (Opzionale). Solo modello 7424 Solo modello 7426 Alleen model 7424 Alleen model 7426...
-
Seite 35: Stichlängen-, Stichbreiten- Und Nadelpositionsschieber
Regelaars voor steeklengte en breedte/ Stichlängen-, Stichbreiten- und naaldpositie Nadelpositionsschieber * auto/standaardinstellingen * auto/Voreinstellungen Voor de meeste naaiwerkzaamheden zijn de automatische Für die meisten Näharbeiten reichen die automatischen steekbreedte- en steeklengteïnstellingen van uw naaimachine S t i c h b r e i t e n - u n d S t i c h l ä n g e n e i n s t e l l u n g e n I h r e r voldoende. -
Seite 36: Cucitura All'indietro
cuciTuRa aLL’iNDiETRO Tasto a doppia funzione: cucitura all’indietro e travettatura Tasto per cucitura all’ indietro Achterwaartsknop Rückwärtsschalter * cucitura all’indietro per punto diritto e zig-zag ( La cucitura all’indietro viene effettuata fino a che si mantiene premuto il tasto. La macchina continuerà a cucire all’indietro fino a che il tasto rimarrà... -
Seite 37: Achterwaartsknop
achTERwaaRTSKNOP RÜcKwÄRTSSchaLTER Dubbele functie knop voor het achterwaarts naaien Doppelfunktionsschalter zum Rückwärtsnähen en afhechten und Vernähen * achterwaarts naaien voor rechte steken en * Rückwärtsfunktion für Geradstiche und zigzag steken ( Zickzackstiche ( Voor het achterwaarts naaien houdt u de achterwaartsknop Zum Rückwärtsnähen betätigen Sie den Rückwärtsschalter. - Seite 38 Selettore ago gemello ( Selettore ago gemello Dubbele naald-toets Zwillingsnadeltaste Se volete usare l’ago gemello, premete l’interruttore ago gemello riguardante il punto selezionato. Così facendo l’ampiezza del punto si ridurrà automaticamente ed eviterete rottura di aghi e possibili danni alla macchina. Se l’interruttore viene premuto e lampeggia rosso, i motivi con il numero cerchiato nella guida dei punti, vengono saltati e non possono essere selezionati con i pulsanti numerici, quando...
- Seite 39 Dubbele naald-toets ( Zwillingsnadeltaste ( Voor het naaien met de dubbele naalden drukt u altijd op de Zum Nähen mit den Zwillingsnadeln drücken Sie immer auf dubbele naald-toets, onafhankelijk van het gekozen patroon. die Zwillingsnadeltaste, unabhängig von dem gewählten De bediening van de dubbele naald-toets bewerkstelligt een Stichmuster.
-
Seite 40: Iniziamo A Cucire
2. iNiZiaMO a cuciRE TaBELLa GuiDa PER aMPiEZZa E LuNGhEZZa DEi PuNTi 2. BEGiNNEN MET NaaiEN SNELZOEKTaBEL VOOR STEEKLENGTE EN BREEDTE 2. NÄhBEGiNN NachSchLaGTaBELLE FÜR STichLÄNGEN uND STichBREiTEN... - Seite 41 LUNGHEZZA AMPIEZZA PUNTO LENGTE BREEDTE GEMELLO STICHLÄNGE STICHBREITE DUBBELE STEEK NAALD MANUALE MANUALE AUTO AUTO AUTO MANUAL AUTO MANUAL STICH ZwiLLiNGSNADELN AUTO AUTO MANUELL MANUELL CENTRO SINISTRO - DESTRO CENTER LINKS - RECHTS MITTE LINKS - RECHTS 0.5 - 4.75 ...
- Seite 42 LUNGHEZZA AMPIEZZA LUNGHEZZA AMPIEZZA PUNTO PUNTO LENGTE BREEDTE LENGTE BREEDTE GEMELLO GEMELLO STICHLÄNGE STICHBREITE STICHLÄNGE STICHBREITE DUBBELE DUBBELE STEEK STEEK NAALD NAALD AUTO MANUALE AUTO MANUALE AUTO MANUALE AUTO MANUALE AUTO MANUAL AUTO MANUAL AUTO MANUAL AUTO MANUAL STICH STICH ZwiLLiNGSNADELN ZwiLLiNGSNADELN AUTO...
- Seite 43 LUNGHEZZA AMPIEZZA LUNGHEZZA AMPIEZZA PUNTO PUNTO LENGTE BREEDTE LENGTE BREEDTE GEMELLO GEMELLO STICHLÄNGE STICHBREITE STICHLÄNGE STICHBREITE DUBBELE DUBBELE STEEK STEEK NAALD NAALD AUTO MANUALE AUTO MANUALE AUTO MANUALE AUTO MANUALE AUTO MANUAL AUTO MANUAL AUTO MANUAL AUTO MANUAL STICH STICH ZwiLLiNGSNADELN ZwiLLiNGSNADELN AUTO...
-
Seite 44: Cucitura Diritta
cuciTuRa DiRiTTa Il punto diritto è quello utilizzato più di frequente nelle diverse fasi del cucito. Impariamo ad usarlo, seguendo i passaggi indicati: 1. IMPOSTAZIONI Piedino – Piedino standard Tensione del filo - AUTO NOTa: in base al peso del tessuto potrebbe essere necessaria una leggera “regolazione fine”... -
Seite 45: Rechte Steek
REchTE STEEK GERaDSTich Bij elke aspect van het naaien wordt de rechte steek het meest Der Geradstich ist der am häufigsten gebrauchte Stich. veelvuldig gebruikt. Laten we aan de hand van onderstaande Machen Sie sich daher mit den folgenden Arbeitsschritten stappen leren te naaien. -
Seite 46: Inserimento Di Cerniere Ecordoncini
INSERIMENTO DI CERNIERE E CORDONCINI Utilizzate il piedino per cerniere per cucire il lato sinistro e destro della cerniera e per preparare il cordoncino. Ago a sinistra del piedino Ago a destra del piedino Naald links van de voet Naald rechts van de voet Nadel links vom Nähfuß... -
Seite 47: Ritssluiting Aanbrengen En Koorden Naaien
RITSSLUITING AANBRENGEN EN REIßVERSCHLUSS EINNÄHEN / KOORDEN NAAIEN KORDONIEREN Gebruik de ritssluitingvoet voor het naaien van de linker- of Verwenden Sie den Reißverschlussfuß zum Nähen der rechterkant van een ritssluiting resp. voor het aanbrengen van linken oder rechten Seiten eines Reißverschlusses bzw. zum een piping of een koordje. -
Seite 48: Cucitura Zig-Zag
cuciTuRa ZiG-ZaG Rovescio onderkant IMPOSTAZIONI: Piedino - Piedino standard Unterseite Controllo di tensione del filo - AUTO Il filo superiore può apparire sul rovescio del tessuto a seconda del filo, del tessuto, del tipo di punto e della velocità di cucitura. Il filo della bobina, invece, non deve mai apparire sul diritto del tessuto. -
Seite 49: Zigzagsteek
ZiGZaGSTEEK ZicKZacKSTich INSTELLINGEN : Voetje: Standaardvoet EINSTELLUNGEN : Nähfuß - Standardfuß : Spanningsregelaar - AUTO : Oberfadenspannung - AUTO De bovendraad mag aan de onderzijde verschijnen afhankelijk Je nach Faden, Stoff, Stich und Nähgeschwindigkeit kann van de draad, het material, het type steek en de naaisnelheid, der Oberfaden eventuell auf der Unterseite sichtbar sein. -
Seite 50: Punto Invisibile
PuNTO iNViSiBiLE Il punto invisibile viene utilizzato principalmente per orlare tende, pantaloni, gonne, ecc. Tessuto medio-pesante IMPOSTAZIONI: Piedino – piedino per punto invisibile Middelzware tot zware stof Controllo di tensione del filo - AUTO Mittelschwere bis schwere Stoffe - Punto invisibile regolare per tessuti normali Rovescio Rovescio - Punto invisibile elastico per tessuti elastici e delicati... -
Seite 51: Blindzomen
BLiNDZOMEN BLiNDSTich De blindzoomsteek is geschikt als houdbare zoombevestiging Der Blindstich wird hauptsächlich für die unsichtbare voor een reeks van textielsoorten, b.v. tafelkleden, broeken, Saumbefestigung von Haustextilen, Hosen, Röcken usw. rokken. verwendet. INSTELLINGEN : Voetje - Blindsteekvoet EINSTELLUNGEN : Nähfuß - Blindstichfuß : Spanningsregelaar - AUTO : Oberfadenspannung - AUTO einfacher Blindstich für normale, feste Stoffe... -
Seite 52: Zig-Zag A Tre Punti, Punto Conchiglia
ZiG-ZaG a TRE PuNTi IMPOSTAZIONI: Piedino – piedino standard Controllo di tensione del filo - AUTO Questo è un punto rinforzato perchè, come indica il nome, è composto da tre piccoli punti mentre il normale zig-zag ne presenta uno solo. Per questa ragione è... -
Seite 53: Zigzag Met Meerdere Steken, Lingeriesteek
ZiGZaG MET MEERDERE STEKEN MEhRFachER ZicKZacKSTich INSTELLINGEN : Voetje - Standaardvoet EINSTELLUNGEN : Nähfuß - Standardfuß : Spanningsregelaar - AUTO : Oberfadenspannung - AUTO Deze steek is sterker dan een normale zigzag steek omdat de Der Mehrfacher Zickzackstich ist viel stärker als der normale steek uit 3 zigzagstappen bestaat. -
Seite 54: Punti Elastici
PuNTi ELaSTici IMPOSTAZIONI: Piedino – Piedino standard o per punto pieno (satin) Controllo di tensione del filo - AUTO I punti elastici vengono utilizzati principalmente per la maglieria o per i tessuti elasticizzati, anche se possono essere utilizzati su tessuti normali. DIRITTO ELASTICO Il punto elastico diritto è... -
Seite 55: Stretchsteken
STRETchSTEKEN STRETch-STichE EINSTELLUNGEN : Nähfuß - Standardfuß oder Raupenfuß INSTELLINGEN : Voetje - Standardvoet of Cordonvoet : Oberfadenspannung - AUTO : Spanningsregelaar - AUTO De stretchsteken worden meestal gebruikt voor gebreide of Die Stretch-Stiche sind besonders vorteilhaft für elastische zeer rekbare stoffen maar kunnen ook voor de gewone stoffen Materialien und Strickstoffe. - Seite 56 PUNTO ENTREDEUX Utilizzato per cuciture decorative sui bordi e anche per orli a giorno. L’entredeux è spesso cucito con l’ago a lancia (Singer cat. 2040) per creare buchi nel motivo cucito. indicazioni utili: una piccola regolazione + della tensione,...
- Seite 57 Dieser Stich wird für Kantenverzierung und traditionelle steekpatronen gebruikt. Voor de open zoom-techniek heeft u Stickmuster verwendet. Für die Hohlsaumtechnik benötigen een Wing-naald nodig (Singer Style 2040). Sie eine Wing-Nadel (Singer Style 2040). Tip: door de draadspanning licht te verhogen kan men Tipp: Durch leichtes Erhöhen der Fadenspannung kann...
- Seite 58 PUNTO SCALA Il punto scala è usato principalmente per orli a giorno. Può anche essere usata per cucire nastri con lo stesso colore del filo o con colori diversi. Posizionate il punto al centro e otterrete un effetto speciale di decorazione. Un altro uso è...
- Seite 59 TRAPSTEEK LEITERSTICH De trapsteek wordt hoofdzakelijk voor open zoom-naaiwerk Der Leiterstich wird hauptsächlich für Hohlsaumarbeiten gebruikt. Hij wordt echter ook voor het opstikken van smalle verwendet. Er wird aber auch zum Aufsteppen von schmalen biezen, ook met contrasterende kleuren gebruikt. Door Bändern, auch mit kontrastierenden Farben, eingesetzt.
- Seite 60 SOPRAGGITTO INCLINATO Un punto che cuce e sopraggitta al tempo stesso, per ottenere una cucitura stretta e flessibile, particolarmente indicata per costumi da bagno, tute, T shirt, tutine elastiche in nylon, asciugamani elastici, jersey e jersey di cotone. SPILLO INCLINATO Eccellente per orlare in modo raffinato tovaglie e lenzuola.
- Seite 61 ELASTISCHE OVERLOCKSTEEK STRETCH-OVERLOCKSTICH Met de elastische overlocksteek naait en afwerkt u in één Mit dem elastischen Overlockstich nähen und versäubern bewerking en u krijgt een smalle, soepele naad. Bijzonder Sie in einem Arbeitsgang und erhalten eine schmale, geschikt voor zwem- en sportkleding alsmede voor t-shirts, geschmeidige Naht.
- Seite 62 PUNTO SPINA E’ un punto versatile usato per giuntare pezzi di tessuto e per dare un tocco decorativo. PUNTO SOPRAGGITTO RINFORZATO Entrambe questi punti sono perfetti per attaccare elastici piatti quando si crea o si ripara biancheria. Possono essere utilizzati per grembiuli e cuciture di rifinitura.
-
Seite 63: Doppelter Overlockstich
DOORNSTEEK DORNSTICH Dit is een veelzijdige steek die gebruikt wordt voor het aan Vielseitiger Stich, der hauptsächlich für Schließnähte und elkaar naaien van lappen stof en voor een decoratief effect. Verzierungen verwendet wird. VERSTERKTE OVERLOCKSTEEK DOPPELTER OVERLOCKSTICH Beide van deze steken zijn perfect voor het bevestigen B e i d e S t i c h m u s t e r s i n d z u m A u f n ä... -
Seite 64: Disegni Decorativi Per Il Ricamo
DiSEGNi DEcORaTiVi PER iL RicaMO IMPOSTAZIONI: Piedino - Piedino per punto pieno (satin) Controllo di tensione del filo - AUTO Sono disponibili diversi tipi di punti decorativi. Di seguito viene spiegato come usare e cucire questi punti. Si possono utilizzare anche altri punti con lo stesso sistema. -
Seite 65: Decoratieve Steken
DEcORaTiEVE STEKEN DEKORaTiVE STichMuSTER INSTELLINGEN : Voetje - Cordonvoet EINSTELLUNGEN : Nähfuß - Raupenfuß : Spanningsregelaar - AUTO : Oberfadenspannung - AUTO Er zijn v e rs c hille nde soorte n de coratieve steken Es stehen verschiedene Zierstiche zur Verfügung. beschikbaar. -
Seite 66: Disegni Continui
DiSEGNi cONTiNui IMPOSTAZIONI: Piedino - Piedino standard o per punto pieno (satin) Controllo di tensione del filo - AUTO Questi motivi sono stati studiati per la cucitura continua di disegni. Utilizzate quello che preferite. *: Solo modello 7426 *: Alleen model 7426 *: Nur Modell 7426... -
Seite 67: Doorlopende Patronen
DOORLOPENDE PaTRONEN ENDLOS-STichMuSTER INSTELLINGEN : Voetje - Standardvoet of Cordonvoet EINSTELLUNGEN : Nähfuß - Standardfuß oder Raupenfuß : Spanningsregelaar - AUTO : Oberfadenspannung - AUTO De patronen die rechts staan afgebeeld zijn doorlopende Diese Muster eignen sich am besten für durchlaufende patronen. -
Seite 68: Motivi Novita', Cucire Un Bottone
MOTiVi NOViTa’ IMPOSTAZIONI: Piedino - Piedino per punto pieno (satin) Controllo di tensione del filo - AUTO Possono essere utilizzati sia per cucire un singolo motivo o un motivo continuo. cuciRE uN BOTTONE IMPOSTAZIONI: Piedino - Piedino standard Leva abbassa griffa - Posiziona il tessuto e il bottone sotto il piedino. -
Seite 69: Knopf Annähen
MODiEuZE PaTRONEN SONDERMuSTER INSTELLINGEN : Voetje - Cordonvoet EINSTELLUNGEN : Nähfuß - Raupenfuß : Spanningsregelaar - AUTO : Oberfadenspannung - AUTO D e z e k u n n e n w o r d e n g e b r u i k t v o o r h e t n a a i e n v a n Die Sondermuster können als Einzelmuster oder als Endlos- enkelvoudige en doorlopende patronen. -
Seite 70: Come Cucire Un Occhiello
(stabilizer) o in stoffa. * Fate un’asola di prova su un ritaglio del tessuto che state utilizzando. Controllate l’occhiello con il bottone scelto. Solo modello 7424 Solo modello 7426 Alleen model 7424 Alleen model 7426 1. -
Seite 71: Knoopsgaten Maken
KNOOPSGaTEN MaKEN KNOPFLÖchER GEBRUIK VAN DE KNOOPSGATVOET GEBRAUCH DES KNOPFLOCHFUßES Uw naaimachine biedt patronen aan voor knoopsgatcordons Ihre Nähmaschine bietet Muster für Knopflochraupen in in verschillende breedten alsmede voor oogknoopsgaten verschiedenen Breiten sowie für Augenknopflöcher und ist mit en is uitgerust met een systeem voor het meten van einem System zur Messung der Knopfgröße und Ermittlung de knoopgrootte en voor de bepaling van de vereiste der erforderlichen Knopflochlänge ausgestattet. - Seite 72 5. Segnate con precisione la posizione dell’occhiello sul vostro indumento. 6. Mettete il tessuto sotto il piedino. Estraete da sotto il tessuto il filo della bobina, per una lunghezza di circa 10 cm e guidatelo verso il lato posteriore. 7. Allineate il segno dell’occhiello sul tessuto con il segno sul piedino per occhielli, quindi abbassate il piedino per occhielli.
- Seite 73 5. Markeer de positie van het knoopsgat op de stof. 5. Markieren Sie die Position des Knopflochs sorgfältig auf Ihrem Stoff. 6. Plaats de stof onder de voet. Trek de spoeldraad onder de stof over een lengte van ongeveer 10 centimeters naar 6.
-
Seite 74: Asole Cordonate
ASOLE CORDONATE Gancio Agganciare il cappio del cordoncino sul gancio posteriore e Pinnetje tirare verso di voi le due estremità sotto al piedino. Nocke Cucire l'asola in modo che lo zig-zag copra il cordoncino. Quando terminato, sganciare il cordoncino dal piedino e tirare le due estremità... -
Seite 75: Knoopsgat Met Koordinleg
KNOOPSGAT MET KOORDINLEG KNOPFLOCH MIT EINLAUFFADEN Haak de koordinleg (haakgaren of knoopsgatgaren) aan de H ä n g e n S i e d e n E i n l a u f f a d e n ( H ä k e l g a r n o d e r nok van het voetje vast, trek de beide draadeinden onder het Knopflochzwirn) an der Nocke des Nähfußes ein, ziehen Sie voetje en knoop ze aan de voorkant vast, zoals afgebeeld is. -
Seite 76: Manutenzione Della Vostra Macchina Per
Mettete una goccia di olio da macchina per cucire sul percorso del crochet, nei punti indicati dalle frecce. (A, B) NOTa: Vi consigliamo Olio da Macchine per cucire Marca Singer. NON UTILIZZATE un lubrificante “generico” in quando non adatto alle macchine per cucire. -
Seite 77: Onderhoud Van De Machine Schoonmaken Van Grijperruimte En Transporteur
3. ONDERhOuD VaN DE MachiNE 3. PFLEGE uND REiNiGuNG ihRER MaSchiNE SchOONMaKEN VaN GRiJPERRuiMTE REiNiGuNG DES TRaNSPORTEuRS EN TRaNSPORTEuR uND DES GREiFERRauMS M a a k d e m a c h i n e s t e e d s l o s v a n d e Maschine immer durch Herausziehen des stroomvoorziening door de stekker uit het Netzsteckers aus der Steckdose vom Netz... -
Seite 78: Altre Informazioni
In caso contrario, potrebbero rompersi gli aghi e danneggiarsi la vostra macchina per cucire. Vi raccomandiamo di utilizzare un ago gemello marca Singer da 3mm (Style 2025) COME INFILARE UN AGO GEMELLO 1. Mettete un rocchetto su ogni portarocchetto. Infilateli insieme. -
Seite 79: Overige Informaties
Anders zullen de naalden breken en de Andernfalls werden die Nadeln brechen und die Nähmaschine naaimachine zal kunnen worden beschadigd. könnte beschädigt werden. Wij adviseren om uitsluitend Singer 3mm-dubbele naalden Wir empfehlen, ausschließlich Singer 3mm-Zwillingsnadeln (style 2025) te gebruiken. (Style 2025) zu verwenden. -
Seite 80: Posizione Dell'ago Nella Cucitura Diritta
POSiZiONE DELL’aGO NELLa cuciTuRa DiRiTTa Il Controllo di ampiezza del punto permette di regolare la posizione dell’ago su 13 differenti impostazioni, come mostra la figura. Verso destra Verso sinistra naar rechts naar links nach rechts nach links Controllo di ampiezza Steekbreedte regelaar Stichbreite... -
Seite 81: Naaldpositie Voor De Rechte Steek
NaaLDPOSiTiE VOOR DE REchTE STEEK NaDELPOSiTiONEN FÜR DEN GERaDSTich Bij de rechte steek zijn 13 verschillende naaldposities B e i d e m G e r a d s t i c h s t e h e n 1 3 u n t e r s c h i e d l i c h e n b e s c h i k b a a r . -
Seite 82: In Caso Di Problema
5. iN caSO Di PROBLEMa PROBLEMi GENERaLi La macchina non cuce * L’interruttore di accensione è spento. - Accendetelo * La leva per occhielli non è alzata quando si cuciono i motivi. - Alzare la leva. * La leva per occhielli non è abbassata quando si cuciono gli occhielli. -
Seite 83: Probleemoplossingen
5. PROBLEEMOPLOSSiNGEN 5. NÜTZLichE TiPPS BEi STÖRuNGEN aLGEMEEN aLLGEMEiNE STÖRuNGEN MACHINE NAAIT NIET Maschine näht nicht. * Schakelaar staat uit. Schakel de stroom in. * Der Hauptschalter ist nicht eingeschaltet. - Hauptschalter * Knoopsgat hendel staat niet in de bovenste stand bij het einschalten. - Seite 84 iTaLiaNO / NEDERLaNDS / DEuTSch © Part No. 77289 4/07 (1)