Herunterladen Inhalt Inhalt Diese Seite drucken
Inhaltsverzeichnis

Werbung

Verfügbare Sprachen

Verfügbare Sprachen

Leica DMi1
Instructions for use
Gebrauchsanweisung
Mode d'emploi
Leica Microsystems CMS GmbH. Handbuch, 11934049, Revision 1.0, 2014-04-15
M I C R O S Y S T E M S

Werbung

Inhaltsverzeichnis
loading

Inhaltszusammenfassung für Leica DMi1

  • Seite 1 Leica DMi1 Instructions for use Gebrauchsanweisung Mode d’emploi Leica Microsystems CMS GmbH. Handbuch, 11934049, Revision 1.0, 2014-04-15 M I C R O S Y S T E M S...
  • Seite 2 Revision 1.0, published 2014-04-15 by: Revision 1.0, veröffentlicht 2014-04-15 von: Édition révisée 1.1, Édition révisée 1.0 2014-04-15 par: Leica Microsystems CMS GmbH Ernst-Leitz-Straße 17-37 D-35578 Wetzlar http://www.leica-microsystems.com Responsible for contents: Verantwortlich für den Inhalt: Responsable du contenu rédactionnel : Marketing CMS...
  • Seite 3 Leica DMi1 Instructions for use Leica Microsystems CMS GmbH. Instructions for use, 11934049, Revision 1.0, 2014-04-15 M I C R O S Y S T E M S...
  • Seite 4 (in whole or in part) by print, photocopy, microfilm or other method (including electronic systems) is not allowed without express written permission from Leica Microsystems CMS GmbH. The term Windows may appear in the following text without further identification.
  • Seite 5: Inhaltsverzeichnis

    Contents Contents Important Notes about this Assembling the Options ......27 Instructions for use ........6 Inserting the phase contrast slider on the transmitted light illumination carrier* ..27 Intended Purpose of Microscopes ... 8 Mount the camera system ......27 Safety Notes ..........
  • Seite 6: Important Notes About This Instructions For Use

    1. Important Notes about this Instructions for use 1. Important Notes about this Instructions for use Caution! This instructions for use contains important in- This Instructions for use is an essential com- structions and information for the operational ponent of the product; it must be read care- safety and maintenance of the microscope and fully before the product is assembled, put into accessories.
  • Seite 7 1. Important Notes about this Instructions for use Warning of hazardous electrical voltage! Risk of electrical shock! Warning of optical radiation! Never look directly into the light beam! Wear safety goggles! Warning of electromagnetic field Instructions for disposing of the instrument, its accessories and consumables.
  • Seite 8: Intended Purpose Of Microscopes

    2. Intended Purpose of Microscopes 2. Intended Purpose of Microscopes All microscopy methods and the necessary ac- The Leica DMi1 microscope is an inverted light cessories for the Leica DMi1 are described and microscope and is intended for use as a general...
  • Seite 9 • For unauthorized personnel to open the instru- connected to a medical instrument in accor- ments. dance with EN 60601-1, the requirements de- • To use cables that Leica has not provided or fined in EN 60601-1-1 shall apply. permitted. Not suitable for examining potentially infec- • To clean the microscope in a way other than...
  • Seite 10: Safety Notes

    This product is classi- safety and potential hazards. fied according to this into the exempt level (no The responsible Leica affiliate or the main risk). plant in Wetzlar must be consulted whenever the device is altered, modified or used in con-...
  • Seite 11: Electrical Safety

    3. Safety Notes 3.2 Electrical Safety WARNING General specifications Microscope By definition, the main circuit breaker of this instrument is the connection between the For indoor use only. power cable and device port. The user must Input: ensure unobstructed access to the main cir- Supply voltage: 100-240V AC cuit breaker at all times.
  • Seite 12: Type Labels

    Wa- ter can cause electric shock. Fig. 3 Type label – 11526203 Leica DMi1 without eyepieces with MC170 HD Caution! Protect the microscope from excessive tem- perature fluctuations. Such fluctuations can lead to the accumulation of condensation, which can damage the electrical and optical components.
  • Seite 13: Notes On Handling Light Sources

    3.4 Notes on Handling Light Sources 3.7 Disposal After the end of the product’s life, please contact CAUTION Leica Service or Leica Sales on how to dispose of it. Light sources pose a potential irradiation risk, therefore never look directly into the light...
  • Seite 14: Overview Of The Instrument

    • Height adjustment • Stroke distance is 9mm • Min. Adjustment 2 µm Camera optionally with • Leica MC120 HD (2.5 M pixel) or MC170 HD (5 M pixel) camera • HDMI port • SD card • Independent On/off button for Camera...
  • Seite 15 Important assembly groups The following overall views illustrate and list im- portant assembly groups of the microscopes and its accessory components. Fig. 5 Right side of the Leica DMi1 stand Insert for filter, Ø 43 mm Binocular tube upper part Condenser Eyepieces...
  • Seite 16 4. Overview of the Instrument Fig. 6 Left side of the Leica DMi1 stand Brightness control Integrated LED lamp housing Aperture diaphragm Condenser Coarse and fine focusing Fixed stage Stage insert Object guide...
  • Seite 17 4. Overview of the Instrument Fig. 7 Front view of the Leica DMi1 stand Binocular tube upper part Eyepieces Fig. 8 Rear view of the Leica DMi1 stand Integrated C-Mount Power supply connection Connection to earth/ground! Camera USB power supply port...
  • Seite 18 4. Overview of the Instrument Stand Main power switch The Leica DMi1 stand offers high stability due to The illuminated main power switch is used to the low center of gravity. It offers solid design switch the power supply of the microscope on and simple ergo controls and off.
  • Seite 19 4. Overview of the Instrument Aperture diaphragm Stop screw for condenser height adjustment The aperture diaphragm defines the resolution, The stop screw is used for fixing condenser focus depth and contrast of the microscopic im- height adjustment by moving the transmitted light age.
  • Seite 20 Description" chapter or the respective objective different sliders are used for the phase contrast, lists. each condenser can use 2 different sliders. In (www.leica-microsystems.com ->Products-> each case, there are one or three phase rings Light Microscopes->Accessories->Objectives) are integrated on the sliders.
  • Seite 21: Unpacking

    5. Unpacking First, carefully remove all components from the The following parts can be included in the deliv- transportation and packaging materials. ery: • Leica DMi1 stand, including fixed stage, illumi- nation and condenser holder • Tube Note: • Eyepieces If at all possible, avoid touching the lens surfaces • Objectives...
  • Seite 22 5. Unpacking the Microscope Installation location Transport Work with the microscope should be performed For shipping or transporting the microscope and in a dust-free room, which is free of oil vapors its accessory components, the original packag- and other chemical vapors, as well as extreme ing should be used.
  • Seite 23: Assembling The Microscope

    6. Assembling the Microscope 6. Assembling the Microscope 6.1 Attaching the condensers • Screw the S80/0.30 (Fig. 11.2) or S40/0.45 (Fig. Caution! 11.1) condenser from below into the condenser A screw on the transmitted light illumination holder (Fig. 12) of the transmitted light illumina- column tight the condenser not fall off.
  • Seite 24: Eyepieces And Graticules

    6. Assembling the Microscope 6.3 Eyepieces and graticules* Positioning the graticules* Basically, graticules can be used only with eye- Inserting the eyepieces pieces with adjustable eyelens = Type M. The eyepieces are inserted into the eyepiece tubes. Important: The following eyepieces are offered: • Eyepieces 10x Non Focusing Be extremely careful to maintain cleanliness.
  • Seite 25: Objectives

    6. Assembling the Microscope HC PLAN 10x/20 M and HC PLAN 12.5x/16 M: 6.5 Inserting the filter • Unscrew the retainer sleeve from the lower • Insert the filter (Fig. 15) into the filter slot (Fig. part of the eyepiece 12.5x/16M, remove the 15.1) on the transmitted light illumination car- plastic part of the eyepiece 10x/20M.
  • Seite 26: Light Source For The Transmitted Light Axis

    6. Assembling the Microscope 6.7 Light source for the transmitted light axis Note: The Leica DMi1 is equipped with integrated LED illumination. The service life of the LED is about above 35000 hours. If, despite this, it should be necessary to change the LED, this task must be carried out by Technical Service only.
  • Seite 27: Assembling The Options

    7. Assembling the Options 7. Assembling the Options 7.2 Mount the camera system • Loosen the screw of the camera mount on the Note: rear side of the microscope. These assembly tasks are omitted if no additional • Position the camera and tight the screw of the accessory components were purchased with the camera mount.
  • Seite 28: Mount The Camera Ir Reflection Shield

    7. Assembling the Options • Camera position should face upright, if not will Fig. 20 Camera mount cause the image has certain angle. Loosen the ring on the camera to adjust the position of camera, and tight the ring afterwards Note: The port on the rear side of the stand is for power supply for the camera, not for data transmission...
  • Seite 29: Operation

    1.0 mm below the stage surface to 8 after switching on the microscope) from the zero mm above it. position to maximum brightness and back, you Fig. 23 Left side of the Leica DMi1 Brightness control Caution! Focus drive Depending on the objective used, the objec- tive nosepiece must be lowered before turn- ing over the objective.
  • Seite 30 8. Operation Adjusting the tubes and eyepieces For microscopy work with glasses, the protec- Note: tion screen on the eyepieces must be removed Eyeglasses with multifocal lenses (bifocals and or inverted, but it should always be used when smooth view glasses) must be removed while op- observing without glasses.
  • Seite 31: Objectives

    8. Operation 8.2 Objectives Caution! Immersion objectives When you use the immersion objective again, be • F or immersion objectives use the appropriate absolutely certain to release the lock, as other- immersion medium. wise the spring action to protect the specimen OIL: only use optical immersion oil and objective is disabled and, furthermore, the according to DIN/ISO standards other objectives are no longer parfocal to the im-...
  • Seite 32: Transmitted Light

    8. Operation 8.3 Transmitted light Adjusting the aperture diaphragm The aperture diaphragm (Fig. 25.5) determines Bright field illumination the resolution, the focus depth and the contrast Illumination methods in which the empty areas of of the microscope image. The best resolution is the specimen make up the brightest areas of the obtained when the apertures of the objective and image are called bright field.
  • Seite 33 8. Operation • Adjust the aperture diaphragm subjectively, according to your opinion of the image. Caution! • In principle, you can carry out a calibration The aperture diaphragm in the illumination light yourself by comparing with the apertures of path is not for setting the image brightness. Only different objectives.
  • Seite 34: Phase Contrast

    8. Operation 8.4 Phase contrast Possible faults Phase contrast is for contrasting unstained spec- Specimen too thick, too thin or too brightly imens. stained; refractive indexes of the mounting me- • Adjust the condenser height. dium and specimen are identical, so that there is • Insert the phase contrast light ring slide into no phase jump.
  • Seite 35: Trouble Shooting

    9. Trouble Shooting 9. Trouble Shooting Problem Cause/remedy Stand The microscope does not respond. Ensure that the AC outlet has power. Make sure that the stand is connected to the power supply. Check the cable connections. Illumination The image is completely dark. Make sure that the LED in the built-in transmit- ted light illuminator is not defective.
  • Seite 36 9. Trouble Shooting Problem Cause/remedy Phase contrast Phase contrast cannot be adjusted. The specimen is too thick, too thin or too brightly stained. Refractive indexes of the mounting medium and specimen are identical, so that there is no phase jump. The cover slip is not placed uniformly.
  • Seite 37: Care Of The Microscope

    10. Care of the Microscope 10. Care of the Microscope 10.2 Cleaning Cleaning Coated Parts Caution! Dust and loose dirt particles can be removed Unplug the power supply before performing with a soft brush or lint-free cotton cloth. cleaning and maintenance work! Protect electrical components from moisture! Clinging dirt can be cleaned with a little soapy water or alcohol.
  • Seite 38: Handling Acids And Bases

    “Cleaning of Microscope Optics”. You can download the information from Caution: http://www.leica-microsystems.com/products/ Be absolutely certain to prevent the optics light-microscopes/life-science-research/upright- and mechanical parts from coming into con- microscopes tact with these chemicals.
  • Seite 39: Technical Description

    0.17 mm Performance data of the objectives only. If the cover slip is missing or the The Leica DMi1 microscope is based on the tube thickness of the cover slip deviates length ∞ (infinity) and a tube lens focal length of greatly, significantly decreased perfor- f = 200 mm.
  • Seite 40 Oil or Imm (= universal objective Black for oil, water, glycerin) White Water Orange Glycerin Performance data of the eyepieces The following eyepieces are in the product line for the Leica DMi1: Leica eyepiece type Magnification/ Characteristics Field number HC PLAN 10x/20 HC PLAN 10x/20 HC PLAN 12.5x/16...
  • Seite 41 This FOV is specified on the eyepiece after the culated by multiplying the eyepiece magnifica- magnification, e.g. 10x/20. tion by the magnification of the objective and the For the Leica DMi1 microscope, the recommend- magnification factor of the stand optics. ed maximum is FOV 20. Example:...
  • Seite 42 11. Technical Description Performance data of the filters Filter Application Contrast enhancement for black/white images Green or yellow filters for filter slot Day light filter for bright field position of the Change the color of the image to a more blue slider Performance data of the tube Fig.
  • Seite 43 11. Technical Description 262 mm 418 mm 408 mm 535 mm 606 mm 212 mm 485-543 mm (depending on condenser) Weight: approx. 8.5 kg (without lenses and camera): 196 mm 248 mm...
  • Seite 44: Eu Declaration Of Conformity

    16. EU Declaration of Conformity 12. EU Declaration of Conformity To download the EU Declaration of Conformity for your product use the link http://www.leica-microsystems.com/products/light-microscopes/clinical/inverted-microscopes/ Select the type of your microscope and switch to the "Download" page.
  • Seite 46 Leica DMi1 Gebrauchsanweisung Leica Microsystems CMS GmbH. Handbuch, 11934049, Revision 1.0, 2014-04-15 M I C R O S Y S T E M S...
  • Seite 47 Copyrights Copyrights Alle Rechte an dieser Dokumentation liegen bei der Leica Microsystems CMS GmbH. Eine Ver- vielfältigung von Text und Abbildungen – auch von Teilen daraus – durch Druck, Fotokopie, Mik- rofilm oder andere Verfahren, inklusive elektroni- scher Systeme, ist nur mit ausdrücklicher schrift- licher Genehmigung der Leica Microsystems CMS GmbH gestattet.
  • Seite 48 Inhalt Inhalt Wichtige Hinweise zu dieser Montage der Zubehöroptionen ....27 Gebrauchsanweisung ......... 6 Einsetzen des Phasenkontrastschiebers am Durchlicht-Beleuchtungsträger* ..27 Verwendungszweck der Mikroskope..8 Montieren des Kamerasystems ....27 Sicherheitshinweise ......... 10 Montieren des Allgemeine Sicherheitshinweise ..... 10 Kamera-IR-Reflexionsschild ....28 Elektrische Sicherheit .......
  • Seite 49: Wichtige Hinweise Zu Dieser Gebrauchsanweisung

    1. Wichtige Hinweise zu dieser Gebrauchsanweisung 1. Wichtige Hinweise zu dieser Gebrauchsanweisung Achtung! Die Gebrauchsanweisung enthält wichtige An- Diese Gebrauchsanweisung ist ein wesentli- weisungen und Informationen zur sicheren Be- cher Bestandteil des Produkts. Sie sollte vor dienung und Wartung des Mikroskops und Zube- der Montage, Inbetriebnahme und Anwen- hörs.
  • Seite 50 1. Wichtige Hinweise zu dieser Gebrauchsanweisung Warnung vor gefährlicher elektrischer Span- nung! Risiko eines Stromschlags! Warnung vor optischer Strahlung! Nie direkt in den Lichtstrahl schauen! Schutzbrille tragen! Warnung vor elektromagnetischem Feld Hinweise zur Entsorgung des Gerätes, von Zubehörkomponenten und Verbrauchsmate- rial.
  • Seite 51: Verwendungszweck Der Mikroskope

    2. Verwendungszweck der Mikroskope 2. Verwendungszweck der Mikroskope Alle Mikroskopiemethoden sowie das erforder- Das Leica DMi1 ist ein inverses Lichtmikroskop liche Zubehör zum Leica DMi1, einschließlich und ist für den Einsatz als allgemeines Labormi- Funktion und Bedienung, werden im Bedienteil kroskop für Routineuntersuchungen an biologi-...
  • Seite 52 Mikroskops für nicht vorgesehene Laseranschlüsse erfordern entsprechende Zwecke oder seiner Nutzung außerhalb der Sicherheitseinrichtungen, die von Fachper- von der Leica Microsystems CMS GmbH an- sonal geprüft und installiert werden müssen. gegebenen Spezifikationen ergeben. Weitere Informationen erhalten Sie bei Ihrem In diesen Fällen verliert die Konformitätser-...
  • Seite 53: Sicherheitshinweise

    Lampensystemen. Dementsprechend ist dieses fahren geprüft. Produkt als risikofrei eingestuft. Wenn das Gerät verändert oder mit nicht von Leica hergestellten, nicht durch dieses Hand- buch abgedeckten Komponenten betrieben wird, ist die zuständige Leica Niederlassung oder das Hauptwerk in Wetzlar zu kontaktie- ren.
  • Seite 54: Elektrische Sicherheit

    3. Sicherheitshinweise 3.2 Elektrische Sicherheit WARNUNG Allgemeine Spezifikationen Mikroskop Die Hauptsicherung dieses Geräts ist per definitionem die Verbindung zwischen Netz- Nur zur Verwendung in geschlossenen Räumen. kabel und Geräteanschluss. Der Anwender Eingang: muss gewährleisten, dass jederzeit ungehin- Netzspannung: 100-240V AC derter Zugang zur Hauptsicherung besteht.
  • Seite 55: Typenschilder

    Das elektrische Zubehör des Mikroskops ist nicht vor Wasser geschützt. Wassereintritt kann zu einem Stromschlag führen. Abb. 3 Typenschild - 11526203 Leica DMi1 ohne Okulare mit MC170 HD Achtung! Schützen Sie das Mikroskop vor zu hohen Temperaturschwankungen. Es kann zur Kon- densatbildung und Beschädigung elektri- scher und optischer Komponenten kommen.
  • Seite 56: Hinweise Zum Umgang Mit Lichtquellen

    3. Sicherheitshinweise 3.4 Hinweise zum Umgang mit Lichtquellen 3.7 Entsorgung Am Ende der Produktlebensdauer bitte beim ACHTUNG Leica Kundendienst oder Leica Vertrieb erfragen, wie das Produkt zu entsorgen ist. Lichtquellen stellen potenzielles Strahlungsrisiko dar. Darum nie direkt in den Bitte die nationalen Gesetze und Vorschriften...
  • Seite 57: Das Gerät Im Überblick

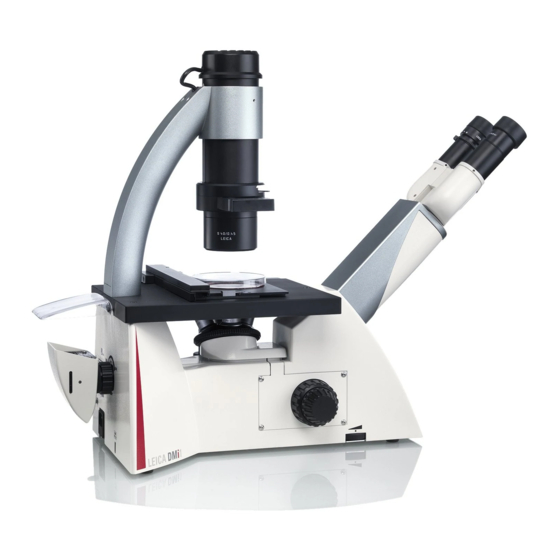
    • Fokusscheibe für Grob- und Feineinstellung • Höhenverstellung • Hubweg ist 9 mm • Mindestverstellung 2 µm Kamera wahlweise mit • Kamera Leica MC120 HD (2.5 M Pixel) oder MC170 HD (5 M Pixel) • HDMI Anschluss • SD Karte • Unabhängiger Ein-/Ausschalter für Kamera...
  • Seite 58 4. Das Gerät im Überblick Wichtige Baugruppen In den folgenden Gesamtansichten werden wichtige Baugruppen des Mikroskops und seiner Zubehörkomponenten dargestellt und benannt. Abb. 5 Rechte Seite des Leica DMi1 Stativs Einschub für Filter, Ø 43 mm Binokulartubus, Oberteil Kondensor Okulare 10 Durchlicht-Beleuchtungsarm Okularstutzen 11 Anschlagschraube für Kondensor-Höhenverstellung...
  • Seite 59 4. Das Gerät im Überblick Abb. 6 Linke Seite des Leica DMi1 Stativs Helligkeitsregelung Integriertes LED-Lampengehäuse Aperturblende Kondensor Grob- und Feinfokussierung Fester Tisch Tischeinsatz Objektführer...
  • Seite 60 4. Das Gerät im Überblick Abb. 7 Vorderansicht des Leica DMi1 Stativs Binokulartubus, Oberteil Okulare Abb. 8 Rückansicht des Leica DMi1 Stativs Integrierte C-Fassung Netzteilanschluss Erdung! USB-Netzanschluss für Kamera Typenschild Befestigungspunkte für Kamera-Schutzschild...
  • Seite 61 Der Tubus enthält eine Tubuslinse 1x, die in Ver- denschieber, eine Halterung für einen Lichtfilter, bindung mit dem Objektiv das Primärbild erzeugt. einen Kondensor und eine Aperturblende. Der Tubus für das Leica DMi1 ist zusammen mit dem Stativ erhältlich. Tubus ist nicht austausch- bar. Filter Der grüne und der gelbe Filter werden im Allge-...
  • Seite 62 4. Das Gerät im Überblick Aperturblende Anschlagschraube für Kondensor-Höhenverstel- lung Die Aperturblende bestimmt Auflösung, Tiefen- schärfe und Kontrast des mikroskopischen Bil- Die Anschlagschraube dient zum Fixieren der des. Die beste Auflösung erreicht man, wenn Kondensor-Höhenverstellung durch Verschieben die Aperturen von Objektiv und Kondensor etwa der Durchlicht-Beleuchtungssäule.
  • Seite 63 „Technische Beschreibung“ oder in den jeweils den vier verschiedene Schieber für den Phasen- gültigen Objektivlisten. kontrast verwendet; jeder Kondensor ist mit 2 (www.leica-microsystems.com ->Products-> verschiedenen Schiebern verwendbar. Es sind Light Microscopes->Accessories->Objectives) jeweils ein oder drei Phasenringe in die Schieber integriert.
  • Seite 64: Auspacken

    5. Auspacken des Mikroskops 5. Auspacken Entnehmen Sie zunächst vorsichtig alle Kompo- Folgende Teile können zum Lieferumfang gehö- nenten dem Transport- und Verpackungsmateri- ren: • Leica DMi1 Stativ, einschließlich festem Tisch, Beleuchtung und Kondensoraufnahme • Tubus • Okulare Hinweis: • Objektive Das Berühren der Linsenoberfläche der Objek-...
  • Seite 65 5. Auspacken des Mikroskops Aufstellungsort Transport Die Arbeit mit dem Mikroskop sollte in einem Für den Versand oder Transport des Mikroskops staubfreien Raum stattfinden, der frei von Öl- und seines Zubehörs ist die Originalverpackung dämpfen und anderen chemischen Dämpfen ist zu verwenden.
  • Seite 66: Zusammenbau Des Mikroskops

    6. Zusammenbau des Mikroskops 6. Zusammenbau des Mikroskops 6.1 Ansetzen der Kondensoren • Schrauben Sie den Kondensor S80/0.30 (Abb. Achtung! 11.2) oder S40/0.45 (Abb. 11.1) von unten in die Eine Schraube an der Durchlicht-Beleuch- Kondensoraufnahme (Abb. 12) der Durchlicht- tungssäule ist anzuziehen, damit der Konden- Beleuchtungssäule.
  • Seite 67: Okulare Und Strichplatten

    6. Zusammenbau des Mikroskops 6.3 Okulare und Strichplatten* Einsetzen der Strichplatten* Grundsätzlich können Strichplatten nur bei Oku- Einsetzen der Okulare laren mit verstellbarer Linse (= Typ M) verwendet Die Okulare werden in die Okularstutzen einge- werden. setzt. Folgende Okulare werden angeboten: Wichtig: • Okular 10x Nicht fokussierend • Okular 10x Fokussierend...
  • Seite 68: Objektive

    6. Zusammenbau des Mikroskops HC PLAN 10x/20 M und HC PLAN 12.5x/16 M: 6.5 Einsetzen des Filters • Haltehülse vom unteren Teil des Okulars • Den Filter (Abb. 15) in den Filter-Aufnahme- 12.5x/16M abschrauben bzw. Kunststoffteil des schlitz (Abb. 15.1) am Durchlicht-Beleuch- Okulars 10x/20M abnehmen.
  • Seite 69: Lichtquelle Für Durchlichtachse

    6. Zusammenbau des Mikroskops 6.7 Lichtquelle für Durchlichtachse Hinweis: Das Leica DMi1 ist mit einer integrierten LED- Beleuchtung ausgestattet. Die Lebensdauer der LED beträgt etwa 35000 Stunden. Sollte dennoch ein Wechsel der LED nötig sein, darf dieser nur vom Technischen Service durchgeführt werden.
  • Seite 70: Montage Der Zubehöroptionen

    7. Montage der Zubehöroptionen 7. Montage der Zubehöroptionen 7.2 Montieren des Kamerasystems • Die Schraube der Kameraaufnahme an der Hinweis: Rückseite des Mikroskops lösen. Diese Montagearbeiten entfallen, wenn mit dem • Die Kamera aufstecken und die Schraube der Mikroskop keine weiteren Zubehörkomponenten Kameraaufnahme festziehen.
  • Seite 71: Montieren Des Kamera-Ir-Reflexionsschild

    7. Montage der Zubehöroptionen • Die Kamera sollte eine aufrechte Position ha- Abb. 20 Kameraaufnahme ben, da andernfalls das Bild schräg ist. Zum Justieren der Kameraposition den Ring an der Kamera lösen und anschließend wieder fest- schrauben. Hinweis: Der Anschluss an der Rückseite des Stativs ist für die Stromversorgung der Kamera vorgese- hen, nicht für Datenübertragungszwecke.
  • Seite 72: Bedienung

    Durch einmaliges Drehen der Hellig- tivrevolvers eingestellt wird. Das Niveau des Tisches bleibt unverändert. Der Gesamttrieb Abb. 23 Linke Seite des Leica DMi1 Stativs beträgt 9 mm. Der Fokussierbereich reicht (in Helligkeitsregelung Luft) von 1.0 mm unter bis 8 mm über der Tisch- Fokustrieb oberfläche.
  • Seite 73 8. Bedienung Einstellen der Tuben und Okulare Der Blendschutz an den Okularen muss beim Hinweis: Mikroskopieren mit Brille abgenommen bzw. zu- Brillen mit Mehrbereichgläsern (Bifocal- und rückgestülpt werden, er sollte aber unbedingt Gleitsichtgläser) müssen beim Mikroskopieren beim Beobachten ohne Brille benutzt werden. abgesetzt werden.
  • Seite 74: Objektive

    8. Bedienung 8.2 Objektive Achtung! Immersionsobjektive Bei erneuter Verwendung des Immersionsob- • F ür Immersionsobjektive ein geeignetes Im- jektivs muss die Verriegelung unbedingt gelöst mersionsmedium verwenden. werden, da andernfalls die Federwirkung zum OIL: nur Optik-Immersionsöl Schutz von Präparat und Objektiv deaktiviert ist nach DIN/ISO verwenden und außerdem die anderen Objektive nicht mehr Wasserimmersion parfokal zum Immersionsobjektiv sind.
  • Seite 75: Durchlicht

    8. Bedienung 8.3 Durchlicht Einstellen der Aperturblende Die Aperturblende (Abb. 25.5) beeinflusst Auflö- Hellfeldbeleuchtung sung, Schärfentiefe und Kontrast des Mikroskop- Beleuchtungsverfahren, bei welchen die objekt- bildes. Die beste Auflösung erreicht man, wenn freien Präparatbereiche die hellsten Bildteile die Aperturen von Objektiv und Kondensor etwa darstellen, werden Hellfeld genannt.
  • Seite 76 8. Bedienung • Stellen Sie die Aperturblende entsprechend Ihrer subjektiven Beurteilung des Bildes ein. Achtung! • Prinzipiell können Sie die Kalibrierung selbst Die Aperturblende im Beleuchtungsstrahlen- vornehmen, indem Sie die Aperturen verschie- gang dient nicht zur Einstellung der Bildhelligkeit. dener Objektive miteinander vergleichen. Hierfür ist ausschließlich der Drehknopf zur Hel- • Sie können die Aperturen von Objektiv und ligkeitsregulierung bzw.
  • Seite 77: Phasenkontrast

    8. Bedienung 8.4 Phasenkontrast Mögliche Fehler Phasenkontrast dient zur Kontrastierung unge- Präparat zu dick, zu dünn oder zu stark gefärbt; färbter Präparate. Brechungsindexe des Eindeckmediums und des • Kondensorhöhe einstellen. Präparats sind identisch, so dass kein Phasen- • Phasenkontrast-Lichtringschieber in die Halte- sprung stattfindet.
  • Seite 78: Problembehebung

    9. Problembehebung 9. Problembehebung Problem Ursache/Abhilfe Stativ Das Mikroskop reagiert nicht. Sicherstellen, dass Strom auf der Steckdose ist. Sicherstellen, dass das Stativ mit der Stromver- sorgung verbunden ist. Kabelanschlüsse prüfen. Beleuchtung Das Bild ist absolut dunkel. Prüfen, ob die LED im integrierten Durchlicht- Illuminator defekt ist.
  • Seite 79 9. Problembehebung Problem Ursache/Abhilfe Phasenkontrast Es lässt sich kein Phasenkontrast einstellen. Präparat ist zu dick, zu dünn oder zu stark gefärbt. Brechungsindexe des Eindeckmediums und des Präparats sind identisch, so dass kein Phasen- sprung stattfindet. Deckglas ist nicht gleichmäßig aufgelegt. Prüfen, ob der richtige Lichtring verwendet wird.
  • Seite 80: Pflege Des Mikroskops

    10. Pflege des Mikroskops 10. Pflege des Mikroskops 10.2 Reinigung Reinigung lackierter Teile Achtung! Staub und lose Schmutzpartikel können mit ei- Vor Reinigungs- und Wartungsarbeiten Netz- nem weichen Pinsel oder fusselfreien Baumwoll- stecker ziehen! tuch entfernt werden. Elektrische Komponenten vor Feuchtigkeit schützen! Anhaftender Schmutz kann mit etwas Seifen- wasser oder Alkohol entfernt werden.
  • Seite 81: Umgang Mit Säuren Und Basen

    Chemikalien ist “Reinigen der Mikroskopoptik” zu reinigen. Diese besondere Vorsicht geboten. Informationen können unter folgender Adresse heruntergeladen werden: Achtung: http://www.leica-microsystems.com/products/ Optik und mechanische Teile dürfen auf kei- light-microscopes/life-science-research/upright- nen Fall mit diesen Chemikalien in Kontakt microscopes kommen.
  • Seite 82: Technische Beschreibung

    Standarddicke 0.17 mm benutzt wer- den. Fehlendes Deckglas oder stark ab- Leistungsdaten der Objektive weichende Deckglasdicke führt vor al- Das Mikroskop Leica DMi1 ist für die Tubuslänge lem bei hohen Objektivaperturen (s.u.) ∞ (unendlich) und eine Tubuslinsen-Brennweite zu deutlichem Leistungsabfall.
  • Seite 83 Farbring markiert: Schwarz Öl oder Imm (= Universalobjektiv für Öl, Wasser, Glyzerin) weiß Wasser orange Glyzerin Leistungsdaten der Okulare Folgende Okulare gehören zur Produktlinie des Leica DMi1: Leica Okulartyp Vergrößerung/ Merkmale Sehfeldzahl HC PLAN 10x/20 HC PLAN 10x/20 HC PLAN 12.5x/16...
  • Seite 84 Diese SFZ wird auf dem Okular nach der Vergrö- größerung mit der Vergrößerung des Objektivs ßerung angegeben, z.B. 10x/20. und dem Vergrößerungsfaktor der Stativoptik. Beim Leica DMi1 ist der empfohlene Maximal- wert FOV 20. Beispiel: Okular 10x/20 Objektiv PLAN 4/0.10 Hinweis: Vergrößerungsfaktor 1x...
  • Seite 85 11. Technische Beschreibung Leistungsdaten der Filter Filter Anwendung Kontrastverbesserung bei Schwarzweißbildern Grün- oder Gelbfilter für Filter-Aufnahmeschlitz Tageslichtfilter für Hellfeldposition des Schiebers Farbe des Bildes in Richtung Blau verändern Leistungsdaten des Tubus Abb. 27 Kondensoren Binokulartubus mit festem Okular Kondensor S40/0.45 Der Binokulartubus besteht aus einem Grund- Kondensor S80/0.30 körper, der an der Unterseite den Tubuswech-...
  • Seite 86 11. Technische Beschreibung 262 mm 418 mm 408 mm 535 mm 606 mm 212 mm 485-543 mm (je nach Kondensor) Gewicht: ca. 8,5 kg (ohne Linsen und Kamera): 196 mm 248 mm...
  • Seite 87: Eu-Konformitätserklärung

    16. EU-Konformitätserklärung 12. EU-Konformitätserklärung Verwenden Sie zum Herunterladen der EU-Konformitätserklärung folgenden Link: http://www.leica-microsystems.com/products/light-microscopes/clinical/inverted-microscopes/ Mikroskoptyp auswählen und zur Seite "Download" wechseln.
  • Seite 89 Leica DMi1 Mode d'emploi Leica Microsystems CMS GmbH. Manuel, 11934049, révision 1.0, 15/04/2014 M I C R O S Y S T E M S...
  • Seite 90 Copyrights Copyrights Leica Microsystems CMS GmbH est détenteur de tous les droits d’auteur de la présente docu- mentation. Sauf autorisation expresse écrite de Leica Microsystems CMS GmbH, la reproduction de tout ou partie des textes et illustrations par impression, photocopie, microfilm ou toute autre procédure, dont celles impliquant des systèmes...
  • Seite 91 Sommaire Sommaire Consignes importantes relatives au pré- Assemblage des accessoires en option 27 sent mode d'emploi ........6 Montage du coulisseau pour contraste de phase sur le support d'éclairage en Fonction des microscopes ......8 diascopie* ........... 27 Consignes de sécurité ......10 Montage de la caméra ......
  • Seite 92: Consignes Importantes Relatives Au Présent Mode D'emploi

    1. Consignes importantes relatives au présent mode d'emploi 1. Consignes importantes relatives au présent mode d'emploi Attention ! Le présent mode d'emploi contient des instruc- Ce mode d'emploi est un composant essen- tions et informations importantes pour la sécurité tiel du produit. À ce titre, il doit faire l'objet de fonctionnement et la maintenance du micros- d'une lecture attentive avant l'assemblage et cope et de ses accessoires.
  • Seite 93 1. Consignes importantes relatives au présent mode d'emploi Mise en garde contre une tension électrique dangereuse ! Risque de choc électrique ! Mise en garde contre le rayonnement optique ! Ne jamais regarder directement le faisceau lumi- neux ! Porter des lunettes de protection ! Mise en garde contre un champ électromagné- tique Remarques relatives à...
  • Seite 94: Fonction Des Microscopes

    2. Fonction des microscopes 2. Fonction des microscopes Toutes les méthodes microscopiques et tous les Le Leica DMi1 est un microscope optique inversé accessoires nécessaires au Leica DMi1, ainsi destiné à être utilisé comme microscope de labo- que leur fonction et utilisation, sont décrits et ratoire général pour les examens de routine des...
  • Seite 95 être combiné à des dispositifs • L'utilisation de combinaisons avec des compo- médicaux, selon la définition de la norme EN sants n'étant pas d'origine Leica et dépassant 60601-1. Si un microscope est connecté à le cadre du présent mode d'emploi.
  • Seite 96: Consignes De Sécurité

    À cet égard, ce produit est classé dans le fabricant que Leica et sortant du cadre de ce niveau exempt de risque. mode d’emploi, contactez votre représentant Leica local ou l’usine-mère à...
  • Seite 97: Sécurité Électrique

    3. Consignes de sécurité 3.2 Sécurité électrique AVERTISSEMENT Caractéristiques techniques générales Microscope Par définition, l'interrupteur principal de cet instrument fait office de connexion entre le Utilisation uniquement à l’intérieur. câble secteur et le port du dispositif. L'utilisa- Entrée : teur doit veiller à ce que l'interrupteur princi- Tension : 100-240 V CA pale soit librement accessible à...
  • Seite 98: Étiquettes "Type

    La pénétration d'eau peut entraîner un Fig. 3 Étiquette "Type" - 11526203 Leica DMi1 sans oculaires avec MC170 HD risque de choc électrique. Attention ! Protéger le microscope contre des varia- tions excessives de température. Celles-ci peuvent provoquer de la condensation et donc endommager les composants élec-...
  • Seite 99: Consignes Relatives À La Manipulation Des Sources De Lumière

    Après la fin de vie du produit, veuillez contacter le service après-vente ou le service commercial ATTENTION Leica pour obtenir les informations requises sur la mise au rebut. Les sources de lumière comportent un risque d'irradiation potentiel, il est donc important Veillez au respect de la conformité...
  • Seite 100: Vue D'ensemble

    • Réglage en hauteur • Course 9 mm • Réglage min. 2 µm Caméra au choix avec • Caméra Leica MC120 HD (2,5 mégapixels) ou MC170 HD (5 méga- pixels) • Port HDMI • Carte SD • Bouton marche/arrêt indépendant pour la caméra...
  • Seite 101 Dans les vues d‘ensemble suivantes, les en- sembles principaux du microscope et ses acces- soires sont montrés et désignés. Fig. 5 Côté droit du statif Leica DMi1 Fente d'insertion du filtre, Ø 43 mm Partie supérieure du tube binoculaire Condenseur Oculaires 10 Bras d'éclairage á...
  • Seite 102 4. Vue d'ensemble Fig. 6 Côté gauche du statif Leica DMi1 Réglage de luminosité Boîtier de LED intégré Diaphragme d'ouverture Condenseur Mise au point grossière et fine Platine fixe Fente d'insertion de la platine Guide-objet...
  • Seite 103 4. Vue d'ensemble Fig. 7 Vue de face du statif Leica DMi1 Partie supérieure du tube binoculaire Oculaires Fig. 8 Vue arrière du statif Leica DMi1 Filetage C intégré Port de connexion à l'alimentation Connexion à la terre ! Port d'alimentation USB de la caméra Etiquette signalétique...
  • Seite 104 Le tube contient une lentille de tube 1x qui, avec à diaphragme, une fixation pour un filtre de lu- l‘objectif, crée l‘image primaire. mière, un condenseur et un diaphragme d'ouver- Le tube du Leica DMi1 est fourni avec le statif. ture. Les tubes ne sont pas interchangeables. Filtres Oculaires Les filtres vert et jaune sont généralement utili-...
  • Seite 105 4. Vue d'ensemble Diaphragme d‘ouverture Vis d'arrêt pour réglage en hauteur du conden- seur Le diaphragme d'ouverture définit la résolu- tion, la profondeur de champ et le contraste de La vis d'arrêt sert à fixer le réglage en hauteur du l'image microscopique.
  • Seite 106 "Description technique" ou les seur pouvant utiliser 2 coulisseaux différents. listes d'objectifs correspondantes en vigueur. Dans chaque cas, il y a un ou trois anneaux de (www.leica-microsystems.com ->Products-> phase intégrés aux coulisseaux. Light Microscopes->Accessories->Objectives) Le coulisseau à 2 positions contient un fond clair (BF) et un anneau de phase Ph1, le coulisseau à...
  • Seite 107: Déballage

    5. Déballage du microscope 5. Déballage Commencer par sortir avec précaution tous les La livraison peut comporter les pièces suivantes : composants du matériel de transport et d’embal- • Statif Leica DMi1, comprenant platine fixe, lage. éclairage et porte-condenseur • Tube • Oculaires • Objectifs...
  • Seite 108 5. Déballage du microscope Site d’installation Transport Le travail au microscope doit avoir lieu dans une Pour l’expédition ou le transport du microscope pièce non poussiéreuse, exempte de vapeurs et de ses accessoires, utiliser l’emballage d’ori- (d’huile ou de produits chimiques) et protégée de gine.
  • Seite 109: Assemblage Du Microscope

    6. Assemblage du microscope 6. Assemblage du microscope 6.1 Fixation des condenseurs • Visser le condenseur S80/0.30 (fig. 11.2) ou Attention ! S40/0.45 (fig. 11.1) par le bas dans le support de Une vis sur la colonne d'éclairage en diasco- condenseur (fig.
  • Seite 110: Oculaires Et Réticules

    6. Assemblage du microscope 6.3 Oculaires et réticules Montage de réticules* En général, le montage des réticules n‘est pos- Montage des oculaires sible qu‘avec les oculaires disposant de lentilles Les oculaires sont installés dans les tubes ocu- oculaires réglables de type M. laires.
  • Seite 111: Objectifs

    • Le guide-objet destiné à la réception de sup- l‘endroit pour en faciliter la lecture ultérieure. ports pour différents récipients de cultures est • Voir le mode d'emploi Leica DM IL LED, fixé au choix soit sur le côté droit, soit sur le page 28.
  • Seite 112: Source De Lumière Pour L'axe De Diascopie

    6. Assemblage du microscope 6.7 Source de lumière pour l'axe de diascopie Remarque : Le Leica DMi1 dispose d’un éclairage par LED intégré. La durée de vie de la LED est d’environ 35000 heures. Si un changement de diode est cependant nécessaire, il doit être effectué...
  • Seite 113: Assemblage Des Accessoires En Option

    7. Assemblage des accessoires en option 7. Assemblage des accessoires en option 7.2 Montage de la caméra • Desserrer la vis du support de la caméra sur la Remarque : face arrière du microscope. Ces travaux de montage ne sont pas à effectuer • Positionner la caméra, puis serrer la vis du si aucun autre accessoire n'a été...
  • Seite 114: Montage De L'écran De Réflexion Infrarouge De La Caméra

    7. Assemblage des accessoires en option • La caméra doit être positionnée verticalement. Fig. 20 Support caméra Dans le cas contraire, l'image sera représen- tée sous un certain angle. Desserrer l'anneau de la caméra afin d'ajuster la position de la caméra, puis resserrer l'anneau Remarque : Le port situé...
  • Seite 115: Utilisation

    9 mm. L'amplitude de mise au point (dans l‘air) s'étend de 1,0 mm au-dessous Fig. 23 Côté gauche du Leica DMi1 à 8 mm au-dessus de la surface de la platine. Réglage de luminosité Mise au point Attention ! En fonction de l'objectif utilisé, la tourelle...
  • Seite 116 8. Utilisation Réglage des tubes et des oculaires Si l'utilisateur porte des lunettes lors de l'examen Remarque microscopique, il doit retirer ou rétracter les œil- Ne pas porter de lunettes à foyers multiples lères sur les oculaires. Toutefois, si l'utilisateur (double foyer ou verres progressifs) lors de l‘exa- ne porte pas de lunettes, les œillères doivent être men microscopique.
  • Seite 117: Objectifs

    8. Utilisation 8.2 Objectifs Attention ! Objectifs d'immersion Si l'objectif à immersion est réutilisé, il faut le • P our les objectifs à immersion, utiliser le déverrouiller sans quoi le dispositif à ressort milieu à immersion approprié. servant à protéger la préparation et l‘objectif est OIL : n'utiliser que l'huile à...
  • Seite 118: Diascopie

    8. Utilisation 8.3 Diascopie Réglage du diaphragme d'ouverture Le diaphragme d‘ouverture (fig. 25.5) déter- Éclairage en fond clair mine la résolution, la profondeur de champ et le Le procédé d‘éclairage dans lequel les zones contraste de l‘image microscopique. On obtient sans structure de la préparation sont les parties la meilleure résolution lorsque les ouvertures de les plus claires s‘appelle le fond clair.
  • Seite 119 8. Utilisation • Régler le diaphragme d‘ouverture de manière subjective en fonction de l‘image. Attention ! • En principe, il est possible de procéder soi- Le diaphragme d‘ouverture dans le trajet d‘éclai- même à un étalonnage en comparant ces rage ne sert pas à régler la luminosité de l‘image. valeurs avec les ouvertures des différents Pour ce faire, il faut utiliser le bouton de réglage objectifs.
  • Seite 120: Contraste De Phase

    8. Utilisation 8.4 Contraste de phase Erreurs possibles Le contraste de phase sert à donner des images L'échantillon est trop épais, trop fin ou doté d'une contrastées de préparations incolores. coloration trop brillante ; les indices de réfrac- • Régler la hauteur du condenseur. tion du milieu de montage sont identiques, il n'y a • Introduire le coulisseau de l'anneau de donc pas de saut de phase.
  • Seite 121: Dépannage

    9. Dépannage 9. Dépannage Problème Cause/Remède Statif Le microscope ne réagit pas. Vérifier que la prise fonctionne (brancher un autre appareil). Vérifier que le statif est relié à l'alimentation secteur. Vérifier les connexions du câble. Éclairage L'image est complètement sombre. Vérifier que la LED de l'éclairage en diascopie intégré...
  • Seite 122 9. Dépannage Problème Cause/Remède Contraste de phase Il n’est pas possible de régler le contraste de L'échantillon est trop épais, trop fin ou doté phase. d'une coloration trop brillante. Les indices de réfraction du milieu de montage sont identiques, il n'y a donc pas de saut de phase.
  • Seite 123: Entretien Du Microscope

    10. Entretien du microscope 10. Entretien du microscope 10.2 Nettoyage Nettoyage des parties peintes Attention ! Éliminer les particules poussiéreuses et les sale- Débrancher la fiche d'alimentation réseau tés détachées avec un pinceau doux ou un chif- avant de procéder au nettoyage et à l'entre- fon de coton non pelucheux.
  • Seite 124: Manipulation Des Acides Et Des Bases

    "Cleaning of Microscope Optics". Cliquer sur le lien suivant pour télécharger les informa- Attention : tions : Veiller impérativement à ce que l’optique http://www.leica-microsystems.com/products/ et les pièces mécaniques n’entrent pas en light-microscopes/life-science-research/upright- contact avec ces produits chimiques. microscopes Sélectionner le type de microscope et aller à la page "Download".
  • Seite 125: Description Technique

    Caractéristiques des objectifs de 0,17 mm. En l'absence de couvre- Le microscope Leica DMi1 est basé sur la lon- objet ou si l'épaisseur du couvre-objet gueur de tube ∞ (infinie) pour une distance fo- diverge fortement, on notera des pertes cale de la lentille de tube de f = 200 mm.
  • Seite 126 Imm (= objectif universel pour noir l'huile, l'eau, la glycérine) blanc orange glycérine Caractéristiques des oculaires Les oculaires suivants sont destinés à la série Leica DMi1 : Type d'oculaire Leica grossissement/ viseur oculaire Indice de champ HC PLAN 10x/20 HC PLAN...
  • Seite 127 Le grossissement total du microscope se calcule le grossissement, par ex. 10x/20. en multipliant le grossissement de l‘oculaire par Pour le microscope Leica DMi1, l'indice de le grossissement de l‘objectif et le coefficient de champ 20 est conseillé comme maximum.
  • Seite 128 11. Description technique Caractéristiques des filtres Filtre Application prévue Augmentation du contraste pour les prises de Filtre vert ou jaune pour le porte-filtre vue en noir et blanc Bleuissement de la couleur de l'image Filtre de lumière du jour pour la position en fond clair du coulisseau Caractéristiques du tube Fig.
  • Seite 129 11. Description technique 262 mm 418 mm 408 mm 535 mm 606 mm 212 mm 485-543 mm (selon le condenseur) Poids : env. 8,5 kg (sans lentilles ni caméra) : 196 mm 248 mm...
  • Seite 130: Déclaration De Conformité Ue

    16. Déclaration de conformité UE 12. Déclaration de conformité UE Cliquer sur le lien suivant pour télécharger la déclaration de conformité EU du produit correspondant http://www.leica-microsystems.com/products/light-microscopes/clinical/inverted-microscopes/ Sélectionner le type de microscope et aller à la page "Download".
  • Seite 132 www.leica-microsystems.com...

Inhaltsverzeichnis