Inhaltsverzeichnis
Werbung
Verfügbare Sprachen
Verfügbare Sprachen
Quicklinks
Welcome:
Thank you kindly for purchasing this fine product.
Much investment in time and effort has gone into its development, and it is our hope
that it will give you many years of trouble-free service.
Safety Notice:
1. Do not drop, puncture or disassemble the device; otherwise the warranty will be voided.
2. Avoid all contact with water, and dry hands before using.
3. Do not expose the device to high temperature or leave it in direct sunlight. Doing so may
damage the device.
4. Use the device with care. Avoid pressing hard on the device body.
5. For your own safety, avoid using the device when there is a storm or lightning.
6. Do not use batteries of different specifications. Doing so may lead to the potential for serious
damage.
7. Remove the battery during long periods between usage, as a deteriorated battery may affect
the functionality of the device.
8. Remove the battery if it shows signs of leaking or distortion.
9. Use only the accessories supplied by the manufacturer.
10. Keep the device out of the reach of infants.
11. Risk of explosion if battery is replaced by an incorrect type.
12. Dispose of used batteries according to the instructions.
FCC Compliance Statement:
This device complies with Part 15 of the FCC Rules. Operation is
subjected to the following two conditions: (1) this device may not cause
harmful interference, and (2) this device must accept any interference
received, including interference that may cause undesired operation.
This equipment has been tested and found to comply with limits for a
Class B digital device, pursuant to Part 15 of the FCC rules. These limits
are designed to provide reasonable protection against harmful interference in residential
installations. This equipment generates, uses, and can radiate radio frequency energy, and if
not installed and used in accordance with the instructions, may cause harmful interference to
radio communications.
However, there is no guarantee that interference will not occur in a particular installation. If this
equipment does cause interference to radio or television equipment reception, which can be
determined by turning the equipment off and on, the user is encouraged to try to correct the
interference by one or more of the following measures:
-Reorient or relocate the receiving antenna.
-Move the equipment away from the receiver.
-Plug the equipment into an outlet on a circuit different from that to which the receiver is
connected.
-Consult the dealer or an experienced radio/television technician for additional suggestions.
You are cautioned that any change or modifications to the equipment not expressly approved
by the party responsible for compliance could void Your authority to operate such equipment.
If the time arises to throw away your product, please
recycle all the components possible.
Batteries and rechargeable batteries are not to be
disposed in your domestic waste! Please recycle
them at your local recycling point.
Together we can help to protect the environment.
Werbung
Kapitel
Inhaltsverzeichnis
Fehlerbehebung

Verwandte Anleitungen für AIPTEK PocketCinema V20


Inhaltszusammenfassung für AIPTEK PocketCinema V20
- Seite 1 Welcome: Thank you kindly for purchasing this fine product. Much investment in time and effort has gone into its development, and it is our hope that it will give you many years of trouble-free service. Safety Notice: 1. Do not drop, puncture or disassemble the device; otherwise the warranty will be voided. 2.
-
Seite 2: Usage Notice
Care and Safety Information: Please follow all warnings, precautions and maintenance as recommended in this user’s guide. Warning- Keep away from liquid to avoid electric fires. Warning- Do not disassemble the projector. Warning- Avoid facing directly into projector’s lens. Eye Safety Warnings Avoid Hearing Damage: Avoid staring/facing directly into Listening at high volume for a the projector beam at all time. -
Seite 3: Inhaltsverzeichnis
Table of Contents Getting Started ..............1 The Projector ..................1 Package Content .................. 2 Remote Controller................. 2 Reading LED indicators ................ 3 Installing the battery................3 Charging the battery ................3 Inserting a memory card (optional) ............4 Turning on/off your projector ..............4 Adjusting the Focus ................ -
Seite 4: Getting Started
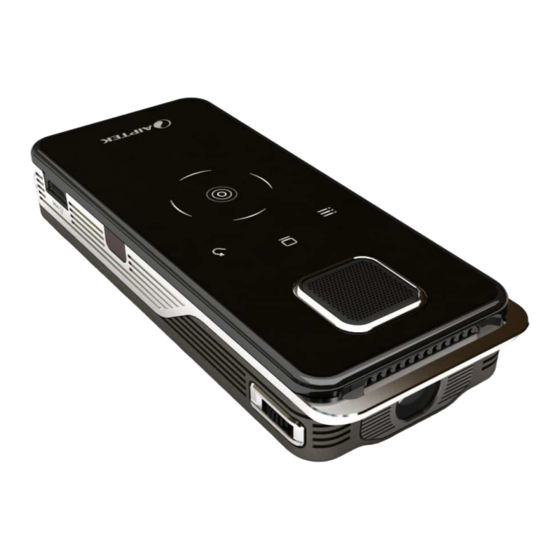
Getting Started The Projector Up button Menu button Return Button OK button Left button Right button Power/Charging Down button Focus switch Speaker USB connector IR receiver VGA Connector Strap holder Tripod socket Battery cover Power ON/OFF Lens SD/MMC card slot AV input / Headphone output... -
Seite 5: Package Content
Package Content Projector Pouch Manual Tripod AV cable AV cable AC power adapter (RCA female to mini jack) USB cable VGA cable Remote Control Battery Remote Controller Up button Memory change Photo folder Video folder OK/Play/Pause button Left button Right button Return Button Menu button Down button... -
Seite 6: Reading Led Indicators
Reading LED indicators The Power LED is lighting orange when projector is charged. The Power LED is lighting green when connected with AC power adapter in standby mode or the battery is fully charged. Installing the battery 1. Slide the battery cover open. 2. -
Seite 7: Inserting A Memory Card (Optional)
Inserting a memory card (optional) To insert a memory card, do the following: 1. Open the SD card cover. 2. Gently push the card as indicated until the card reaches the bottom of the slot. To remove the memory card, gently push it down and it will pop up. Then pull the card out of the slot. - Seite 8 Adjusting the Projected Image Projection Distance Screen size - Width Screen Size - Height Screen Diagonal (cm) (inch) (cm) (inch) (cm) (inch) (cm) (inch) 19.0 12.2 15.2 38.1 24.4 18.3 30.5 12.0 63.5 40.6 16.0 30.5 12.0 50.8 20.0 101.3 39.9 65.0 25.6...
-
Seite 9: Functions And Operations
Functions and Operations Main menu After turn on the projector, you will see opening screen first then main menu as below. l VIDEO: This function allows users to select video file to project on screen. l PHOTO: This function allows users to select JPEG image file to project on screen. l MUSIC: This function allows users to select MP3 files to play on the projector. l SETTING: This function allows users to set some preference settings such as Lan- guage, Format, Beep sound and Default. l FILE: The File Navigator is a fast and convenient way of moving between tracks, files and folders. l CARD CHANGE: This function allows users to select the storage devices between internal memory and SD Card. -
Seite 10: Playing Video
Playing Video 1. Use the Left/Right button to select “Video” and then press OK button. 2. Use the Up/Down button to select target folder or video files. 3. When selecting one Video file, press OK to play it. (Some larger files may require more time to load) Please convert all videos with the bundled Arcsoft Media Converter to have the right file format which can be displayed by the projector. - Seite 11 During playback 1. Press Left/Right button to move to previous/next file Long press Left/Right button to fast forward and fast rewind 2. Use Up/Down button to control volume. 3. Press OK to pause the video (OK again the continue). The following status information will pop up. Icon Item Description...
-
Seite 12: Playing Photo
Playing Photo 1. Use the Left/Right button to select “Photo” and then press OK button. 2. Use the Up/Down button to select target folder or a photo displayed in preview mode. 3. After a photo is selected, press OK to display full size of this photo. 4. - Seite 13 Photo Mode Application Photo Single Display Press Up/Down to enlarge/ In the order of 1X, Enlargement mode reduce 2X, 3X, 4X, 1X… mode Circular Display 1. Press OK to pause the In the order of 1X, mode circular display 2X, 3X, 4X, 1X… 2.
-
Seite 14: Card Change
Card Change This function is to select which memory to use for playback. 1. Use the Left/Right button to select “Memory” and then press OK button. 2. The Memory Check box will display as above. Use the Up/Down button to select the memory type. -
Seite 15: Playing Files In Other Devices
Playing files in other devices Connecting the projector to your media players Before connecting your media player to projector, you need to have media player dedicated composite AV-out cable and projector AV cable ready. DVD Player/ Projector AV cable Composite AV-out cable SAT- Receiver (red) (red) - Seite 16 Connecting the Projector to your Notebook/PC Before connecting your laptop PC to projector, you need to have VGA cable ready. Once you want to use notebook power take this cable shown here. You have three options to supply the projector with power: 1.
-
Seite 17: File Management With A Pc
File management with a PC Follow the procedures below to manage files in either built-in memory or memory card by using a PC or Notebook. 1. Make sure the projector is powered off. 2. Connect one end of the bundled USB cable to the USB port of the projector and the other end to a powered PC. 3. - Seite 18 How to download YouTube video for projection During installing ArcSoft Media Converter (AMC), you are recommended to install ArcSoft Video Downloader as well. It will bring you more convenience to download the videos from the Internet and convert them as mp4 format to be played back in your projector. Then you can share them with your family and friends.
-
Seite 19: Specifications
Specifications Item Description Optical Technology LCoS Light Source RGB LEDs Aspect Ratio 15 Lumens (AC Mode); 12 Lumens (Battery Luminous Flux Mode) Resolution 640 x 480 (VGA) Pixels Projection Image Size 15 cm ~ 165.1 cm (6” ~ 65” Diagonal) Projection Distance 19 cm ~ 206 cm Zoom &... - Seite 20 Item Description Working mode: 5 Watts Power consumption Standby mode (Projector light off): 3.5W Operation temperature 0°C ~ 35°C Dimension 131mm x 55mm x 25mm AV cable(RCA female to mini jack), AV cable(mini jack to mini jack),Pouch, Manual, Package Content Tripod, AC Power Adapter, VGA cable, USB cable, NP-120 battery, CD Note: Specifications are subject to change without notification.
-
Seite 21: Troubleshooting
Troubleshooting If your projector does not seem to be functioning properly, check the items below before you contact an authorized service center. Symptom Check Point The projector can not be turned • Ensure the battery is loaded or the AC power adapter is in use. - Seite 22 Symptom Check Point No power is supplied with the The USB Power on VGA Cable is an USB Power on the VGA Cable. optional function. As the power supply is different on the USB port of each computer, sometimes there may not be enough power supply for projection.
-
Seite 23: Sicherheitshinweise
Herzlich willkommen! Lieber Benutzer, vielen Dank für den Kauf dieses Produkts. In die Entwicklung dieses Geräts wurde viel Zeit und Mühe investiert, und wir hoffen, es wird Ihnen viele Jahre störungsfreien Betrieb und Freude bescheren. Sicherheitshinweise: 1. Lassen Sie das Gerät nicht fallen und beschädigen und zerlegen Sie das Gerät nicht, andernfalls erlischt die Gewährleistung. -
Seite 24: Vorsichts- Und Sicherheitsinformationen
Vorsichts- und Sicherheitsinformationen: Bitte befolgen Sie sämtliche in dieser Bedienungsanleitung empfohlenen Warnungen, Vorsichtsmaßnahmen und Wartungshinweise. Warnung - Halten Sie das Gerät zur Vermeidung von Brandgefahr von Flüssigkeiten fern. Warnung - Demontieren Sie den Projektor nicht. Warnung - Blicken Sie nicht direkt in das Objektiv des Projektors. Gehörschäden vermeiden: Längeres Hören bei hoher Lautstärke kann Ihr Gehör... - Seite 25 Inhalt Erste Schritte ..............1 Der Projektor..................1 Paketinhalt .................... 2 Fernbedienung..................2 LCD-Anzeigen ablesen ................. 3 Akku einlegen ..................3 Akku laden .................... 3 Speicherkarte einlegen (optional) ............4 Projektor ein- und ausschalten ............. 4 Scharfstellen ..................4 Funktionen und Bedienung ........... 6 Hauptmenü...
-
Seite 26: Erste Schritte
Erste Schritte Der Projektor Aufwärtstaste Menütaste Zurück-Taste OK-Taste Linkstaste Rechtstaste Betrieb-/Laden-LED Abwärtstaste Fokusregler Lautsprecher USB-Anschluss IR Empfänger VGA-Anschluss Trageriemenöse Stativgewinde Akkufachdeckel Strom EIN/AUS Objektiv SD-/MMC-Kartensteckplatz AV Eingang/Kopfhörerausgang... -
Seite 27: Paketinhalt
Paketinhalt Projektor Tragetasche Handbuch Stativ AV Kabel AV-Kabel Netzteil (RCA Buchse auf Minibuchse) USB-Kabel VGA-Kabel Fernbedienung Akku Fernbedienung Aufwärtstaste Speicher wechseln Foto Ordner Video Ordner OK-/Wiedergabe-/Pause-Taste Linkstaste Rechtstaste Zurück-Taste Menütaste Abwärtstaste Lautstärketasten... -
Seite 28: Lcd-Anzeigen Ablesen
LCD-Anzeigen ablesen Die Betrieb-LED leuchtet beim Laden orange. Die Betrieb-LED leuchtet grün, wenn das Netzteil im Stand-by-Modus angeschlossen oder wenn der Akku vollständig aufgeladen ist. Akku einlegen 1. Schieben Sie den Akkufachdeckel auf. 2. Legen Sie den Lithium-Ionen-Akku in das Akkufach ein. Achten Sie darauf, dass die Metallkontakte des Akkus zu den Kontakten im Akkufach zeigen. -
Seite 29: Speicherkarte Einlegen (Optional)
Speicherkarte einlegen (optional) So legen Sie eine Speicherkarte ein: 1. Öffnen Sie den SD-Speicherkartenfachdeckel. 2. Schieben Sie die Karte behutsam hinein, bis sie das Ende des Einschubs erreicht. Zum Entnehmen drücken Sie die Speicherkarte sanft etwas hinein; die Karte springt ein Stückchen heraus. Ziehen Sie die Karte anschließend aus dem Steckplatz heraus. - Seite 30 Einstellen des projizierten Bildes Projektionsabstand Bildschirmgröße - Bildschirmgröße - Bildschirmdiagonale Breite (B) Höhe (C) - (D) (cm) (zoll) (cm) (zoll) (cm) (zoll) (cm) (zoll) 19.0 12.2 15.2 38.1 24.4 18.3 30.5 12.0 63.5 40.6 16.0 30.5 12.0 50.8 20.0 101.3 39.9 65.0 25.6...
-
Seite 31: Funktionen Und Bedienung
Funktionen und Bedienung Hauptmenü Nach dem Einschalten des Projektors wird zuerst ein Startbildschirm angezeigt, anschließend erscheint das nachstehend gezeigte Hauptmenü. l VIDEO: Mit dieser Funktion können Sie eine Videodatei zur Projektion auf der Lein- wand auswählen. l FOTO: Mit dieser Funktion können Sie eine JPEG-Datei zur Projektion auf der Lein- wand auswählen. -
Seite 32: Videos Abspielen
Videos abspielen 1. Wählen Sie mit den Links-/Rechtstasten die Option „Video“, drücken Sie anschließend die OK-Taste. 2. Wählen Sie mit den Aufwärts-/Abwärts- Tasten den Zielordner oder Videodateien aus. 3. Wenn Sie eine Videodatei auswählen, drücken Sie OK, um sie abzuspielen. (Große Dateien könnten etwas Zeit zum Laden benötigen) Bitte konvertieren Sie alle Videos mit dem beiliegenden Arcsoft Media Converter, um das richtige Dateiformat für die Anzeige auf dem Projektor zu erhalten. -
Seite 33: Während Der Wiedergabe
Während der Wiedergabe 1. Drücken Sie die Links/Rechts Taste, um zur vorherigen/zur nächsten Datei zu gehen. Drücken Sie die Links/Rechts Taste lang für schnellen Vorlauf und schnellen Rücklauf. 2. Benutzen Sie die Aufwärts-/Abwärts- Taste, um die Lautstärke einzustellen. 3. Drücken Sie OK, um das Video zu unterbrechen (nochmals OK, um fortzufahren). Die folgende Statusinformation wird erscheinen. -
Seite 34: Wiedergabe Von Fotos
Wiedergabe von Fotos 1. Wählen Sie mit den Links-/Rechtstasten die Option „Foto“, drücken Sie anschließend die OK-Taste. 2. Wählen mit den Aufwärts-/Abwärts- Tasten den Zielordner oder ein im Vorschaumodus angezeigtes Foto. 3. Nachdem Sie ein Foto ausgewählt haben, können Sie es mit der OK-Taste in voller Größe anzeigen lassen. -
Seite 35: Foto Modusanwendung
Foto Modusanwendung Foto Einzelanzeigemodus Zum Vergrößern/Verkleinern Oben/ In der Reihenfolge von Vergrößerungsmodus Unten drücken 1X, 2X, 3X, 4X, 1X… Kreisanzeigemodus 1. OK drücken, um die Kreisanzeige In der Reihenfolge von zu unterbrechen 1X, 2X, 3X, 4X, 1X… 2. Zum Vergrößern/Verkleinern Oben/Unten drücken 3. -
Seite 36: Kartenwechsel
KARTENWECHSEL Diese Funktion dient zur Auswahl, welcher Speicher für die Wiedergabe verwendet werden soll. 1. Wählen Sie mit den Links-/Rechtstasten die Option „Speicher“, drücken Sie an- schließend die OK-Taste. 2. Das oben abgebildete Speicher auswählen-Fenster wird angezeigt. Wählen Sie den gewünschten Speichertyp mit den Aufwärts-/Abwärtstasten. -
Seite 37: Auf Anderen Geräten Gespeicherte Dateien Wiedergeben
Auf anderen Geräten gespeicherte Dateien wiedergeben Verbinden des Projektors mit Medienplayern Um beispielsweise einen Medienplayer an den Projektor anzuschließen, benötigen Sie einen Medienplayer mit einem speziellen AV-Ausgang und ein passendes AV-Kabel. Composite-AV-Aus- DVD Player/ Projektor-AV-Kabel gabekabel SAT-Receiver (rot) (rot) (gelb) AV-Ausgang (weiβ) Tragbarer... -
Seite 38: Verbinden Des Projektors Mit Einem Notebook/Pc
Verbinden des Projektors mit einem Notebook/PC Bevor Sie Ihren Laptop/PC mit dem Projektor verbinden, müssen Sie das VGA Kabel bereitlegen. Wenn Sie die Stromversorgung des Notebooks nutzen möchten, benutzen Sie diese beiden Kabel. Sie haben drei Möglichkeiten den Projektor mit Strom zu versorgen. 1. -
Seite 39: Dateiverwaltung Mit Einem Pc
Dateiverwaltung mit einem PC Folgen Sie den unten stehenden Schritten, um Dateien des internen Speichers oder der Speicherkarte auf einem PC oder Notebook zu verwalten. 1. Stellen Sie sicher, dass der Projektor ausgeschaltet ist. 2. Verbinden Sie ein Ende des beigelegten USB-Kabels mit dem USB-Anschluss am Projektor und das andere Ende mit einem eingeschalteten PC. -
Seite 40: So Laden Sie Youtube-Videos Zur Projektion Herunter
So laden Sie YouTube-Videos zur Projektion herunter Bei der Installation des ArcSoft Media Converters (AMC) sollten Sie zudem den ArcSoft Video Downloader installieren. Dieser bietet zusätzlichen Komfort beim Herunterladen der Videos aus dem Internet und dem Konvertieren dieser in das MP4-Format, sodass sie über Ihren Projektor wiedergegeben werden können. -
Seite 41: Technische Daten
Technische Daten Element Beschreibung Optische Technologie LCoS Lichtquelle RGB LEDs Anzeigeformat 15 Lumen (AC Modus); 12 Lumen Lichtstärke (Akkumodus) Auflösung 640 x 480 (VGA) Pixel Projizierte Bildgröße 15 cm ~ 165.1 cm (6” ~ 65” Diagonale) Projektionsabstand 19 cm bis 206 cm Zoom und Fokus Manuell Kontrastverhältnis... - Seite 42 Element Beschreibung Betriebsmodus: 5 Watt Stromverbrauch Stand-by-Modus (Projektorlampe aus): 3,5W Betriebstemperatur 0°C bis 35°C Abmessungen 131mm x 55mm x 25mm AV Kabel (RCA Buchse auf Minibuchse), AV Kabel (Minibuchse auf Minibuchse), Paketinhalt Tragetasche, Handbuch, Stativ, Netzteil, VGA Kabel, USB Kabel, NP-120 Akku, CD Hinweis: Technische Daten können sich ohne Vorankündigung ändern.
-
Seite 43: Fehlerbehebung
Fehlerbehebung Falls Ihr Projektor nicht richtig zu funktionieren scheint, prüfen Sie die folgenden Punkte, bevor Sie sich mit einem autorisierten Servicezentrum in Verbindung setzen. Symptom Zu prüfende Punkte Der Projektor kann nicht • Prüfen Sie, dass der Akku geladen ist eingeschaltet werden. - Seite 44 Symptom Zu prüfende Punkte Es wird kein Bild angezeigt, • Prüfen Sie, dass das VGA-Kabel richtig wenn ein Computer angeschlossen ist. angeschlossen ist. • Stellen Sie sicher, dass der PC auf die Projektoranzeige gestellt wurde. • Stellen Sie sicher, dass die Anzeigeauflösung des PC Bildschirms wie empfohlen 640 x 680, 800 x 600 oder 1024 x 768 beträgt.
- Seite 45 Bienvenue: Cher utilisateur, nous vous remercions pour l’achat de ce produit. Beaucoup d’investissements en temps et en efforts ont été réalisés pour son développement, et nous espérons qu’il vous procurera des années de bons et loyaux services. Notice de sécurité: 1.
-
Seite 46: A Ne Pas Faire
Informations de sécurité et d’entretien Veuillez suivre tous les avertissements, les mises en garde et les consi- gnes recommandés dans ce guide d’utilisation. Avertissement – Garder à l’abri des liquides pour réduire le risque d’incendie. Avertissement - Ne démontez pas le projecteur. Avertissement –... - Seite 47 Table des matières Pour commencer ............1 Le Projecteur ..................1 Contenu de l’emballage ................ 2 Télécommande ..................2 Comprendre les voyants LED ............... 3 Installation de la batterie ............... 3 Chargement de la batterie ..............3 Insertion d’une carte mémoire (optionnel) ..........4 Allumer/éteindre votre projecteur............
-
Seite 48: Pour Commencer
Pour commencer Le Projecteur Bouton Haut Bouton Menu Bouton de retour Bouton OK Bouton Gauche Bouton Droit Voyant LED Alimentation/ Bouton Bas Chargement Sélecteur mise au point Haut-parleur Connecteur USB Récepteur IR Connecteur VGA Point d’attache pour dragonne Interface trépied Couvercle du compartiment de la batterie... -
Seite 49: Contenu De L'emballage
Contenu de l’emballage Projecteur Étui Manuel Trépied Câble AV Câble AV Adaptateur (RCA femelle à mini jack) d’alimentation AC Câble USB Câble VGA Télécommande Batterie Télécommande Bouton Haut Changement de mémoire Dossier des photos Dossier des vidéos Bouton OK/Lecture/Pause Bouton Gauche Bouton Droit Bouton retour Bouton Menu... -
Seite 50: Comprendre Les Voyants Led
Comprendre les voyants LED Le voyant LED d’alimentation s’allume en orange quand le projecteur est chargé. La LED d’alimentation s’allume en vert quand connecté avec adaptateur CA en mode veille ou la batterie est totalement chargée. Installation de la batterie 1. -
Seite 51: Insertion D'une Carte Mémoire (Optionnel)
Insertion d’une carte mémoire (optionnel) Pour insérer une carte mémoire, procédez comme suit : 1. Ouvrez le couvercle du compartiment de carte SD. 2. Poussez doucement la carte comme indiqué jusqu’à ce que la carte touche le fond du logement. Pour retirer la carte mémoire, appuyez doucement dessus et elle sortira. - Seite 52 Ajustement de l’image projetée Distance de projection Taille d’écran - Taille d’écran - Diagonale d’écran (D) Largeur (B) Hauteur (C) (cm) (pouces) (cm) (pouces) (cm) (pouces) (cm) (pouces) 19.0 12.2 15.2 38.1 24.4 18.3 30.5 12.0 63.5 40.6 16.0 30.5 12.0 50.8 20.0...
-
Seite 53: Fonctions Et Opérations
Fonctions et opérations Menu principal Après la mise en marche du projecteur, vous verrez d’abord apparaître un écran d’accueil puis le menu principal comme ci-dessous. l VIDÉO : Cette fonction permet aux utilisateurs de sélectionner le fichier vidéo à projeter sur l’écran. l PHOTO : Cette fonction permet aux utilisateurs de sélectionner le fichier image JPEG à projeter sur l’écran. l MUSIQUE : Cette fonction permet aux utilisateurs de sélectionner les fichiers MP3 à lire sur le projecteur. -
Seite 54: Lecture Vidéo
Lecture vidéo 1. Utilisez le bouton Gauche/Droit pour sélectionner « Vidéo » puis appuyez sur le bouton 2. Utilisez le bouton Haut/Bas pour sélectionner le dossier cible ou les fichiers vidéo. 3. Lorsque vous sélectionnez un fichier vidéo, pressez OK pour le lire. (Il faut plus de temps pour lire certains fichiers plus conséquents) Veuillez convertir toutes les vidéos avec le lot convertisseur de media d’Arcsoft pour avoir le format de fichier correct qui peut être affiché par le projecteur. - Seite 55 En cours de la lecture 1. Pressez le bouton Gauche/Droit pour vous déplacer vers le fichier précédent/suivant. Pressez longuement le bouton Gauche/Droit pour avancer rapidement et faire un retour rapide. 2. Utilisez le bouton Haut/Bas pour contrôler le volume. 3. Pressez OK pour mettre la vidéo en pause (pressez OK à nouveau pour continuer). Le statut d’information suivant apparaîtra à...
-
Seite 56: Lire La Photo
Lire la photo 1. Utilisez le bouton Gauche/Droit pour sélectionner « Photo » puis appuyez sur le bouton 2. Utilisez le bouton Haut/Bas pour sélectionner le dossier cible ou une photo affichée en mode de visionnage. 3. Après la sélection d’une photo, appuyez sur OK pour afficher la photo tout entière. 4. Utilisez le bouton Gauche/Droit pour afficher la précédente photo ou la photo suivante. 5. - Seite 57 Utiliser le Mode Photo Mode Mode d'affichage Appuyer sur Haut/Bas pour Dans l'ordre, 1X, Élargissement simple Agrandir/Réduire la photo 2X, 3X, 4X, 1X… Photo Mode dáffichage 1. Appuyer sur OK pour sus- Dans l'ordre, 1X, circulaire pendre l’affichage circulaire 2X, 3X, 4X, 1X… 2. Appuyer sur Haut/Bas pour agrandir/réduire 3.
-
Seite 58: Changement De Carte
Changement de Carte Cette fonction sert à sélectionner la mémoire concernée par la lecture. 1. Utilisez le bouton Gauche/Droit pour sélectionner « Mémoire » puis appuyez sur le bouton 2. Les options de « Mémoire » s’afficheront comme ci-dessus. Utilisez le bouton Haut/Bas pour sélec tionner le type de mémoire. 3. Appuyez sur le bouton OK après la sélection pour revenir au menu principal. S’il n’y a aucune carte mémoire insérée, l’écran affichera uniquement l’état de la mémoire interne intégrée. -
Seite 59: Lire Les Fichiers Sur D'autres Appareils
Lire les fichiers sur d’autres appareils Connexion du projecteur à vos lecteurs média Avant de connecter votre lecteur média au projecteur, munissez-vous d’un câble de sortie pour le lecteur média et d’un câble AV pour le projecteur. Lecteur DVD/ Câble AV du projecteur Câble AV-out composite Récepteur SAT (rouge) (rouge) - Seite 60 Connexion du projecteur à votre PC portable/PC Avant de connecter votre ordinateur portable au projecteur, vous avez besoin que le câble VGA soit prêt. Une fois que vous voulez utiliser l’ordinateur portable sur alimentation électrique, prenez le câble montré ici. Vous disposez de trois options pour alimenter le projecteur électriquement : 1.
-
Seite 61: La Gestion De Fichiers Avec Un Pc
La gestion de fichiers avec un PC Suivez les procédures ci-dessous pour gérer les fichiers soit dans la mémoire intégrée soit dans la carte mémoire en utilisant un PC ou un ordinateur portable. 1. Assurez-vous que le projecteur est bien éteint. 2. Connectez l’autre extrémité du câble USB fourni au port USB du projecteur et l’autre extrémité... - Seite 62 Comment télécharger des vidéos YouTube pour la projection Pendant l’installation de ArcSoft Media Converter (AMC), il est recommandé d’installer aussi ArcSoft Video Downloader. Ceci facilitera le téléchargement des clips vidéo d’Internet et les convertira au format mp4 pour pouvoir les regarder avec votre projecteur. Vous pourrez alors les partager avec vos amis et votre famille.
-
Seite 63: Spécifications
Spécifications Elément Description Technologie optique LCoS Source lumineuse LEDs RGB Format d’écran 15 Lumens (Mode CA); 12 Lumens (Mode Flux lumineux batterie) Résolution 640 x 480 (VGA) Pixels 15cm ~ 165.1cm (6 pouces ~ 65 pouces) Dimension de l’image projetée (Diagonale) Distance de projection 19 cm ~ 206 cm... - Seite 64 Elément Description Mode de fonctionnement: 5 Watts Consommation électrique Mode veille (lumière du projecteur éteinte): 3.5W Température de fonctionnement 0°C ~ 35°C Dimensions 131mm x 55mm x 25mm Câble AV (femelle RCA vers mini jack), câble AV (mini jack vers mini jack), Étui, Contenu de l’emballage manuel, trépied, adaptateur d’alimentation CA, câble VGA, câble USB, batterie NP-...
-
Seite 65: Dépannage
Dépannage Si votre projecteur ne semble pas fonctionner correctement, vérifiez les éléments ci-dessous avant de contacter un centre de service après vente agréé. Symptôme Point de contrôle Le projecteur ne peut pas être • Assurez-vous que la batterie est bien mis en marche. chargée ou que l’adaptateur est en cours d’utilisation. •... - Seite 66 Symptôme Point de contrôle Aucune image n’est projetée • Vérifiez si le câble VGA est quand un ordinateur est correctement branché. connecté. • Assurez-vous que le PC soit prêt pour l’affichage de projecteur. • Assurez-vous que la résolution d’affichage de l’écran du PC est de 640 x 680, 800 x 600 ou 1024 x 768 comme suggéré.
- Seite 67 Benvenuto: Vi ringraziano per avere acquistato questo prodotto. Abbiamo investito molto tempo ed energie in questo progetto e speriamo che vi procuri molti anni di servizio senza problemi. Avviso per la sicurezza: 1. Non far cadere, forare o smontare il dispositivo diversamente si annullerà la garanzia. 2.
-
Seite 68: Avvertenze Per L'uso
Cura ed Informazioni sulla sicurezza: Attenersi a tutte le avvertenze, precauzioni ed istruzioni per la manutenzione raccomandate in questa guida. Avviso - Tenere lontano da liquidi per evitare scariche elettriche. Avviso - Non smontare il proiettore. Avviso - Evitare di guardare direttamente nell’obiettivo del proiettore. Evitare danni all'udito: L’ascolto a volume alto per periodi prolungati... - Seite 69 Contenuti Preparazione ..............1 Proiettore ....................1 Contenuto della confezione ..............2 Telecomando ..................2 Lettura degli indicatori LED..............3 Inserimento della batteria ..............3 Caricamento della batteria ..............3 Inserimento di una scheda di memoria (opzionale) ......4 Accendere/spegnere il proiettore ............4 Regolare la messa a fuoco ..............
-
Seite 70: Preparazione
Preparazione Proiettore Tasto Su Tasto Menu Tasto Return Tasto OK Tasto sinistro Tasto destro alimentazione/ Tasto giù caricamento Interruttore messa a fuoco Cassa Connettore USB Ricevitore ad infrarossi (IR) Connettore VGA Passante cinturino Aggancio treppiede Coperchio scomparto batterie Power ON/OFF Obiettivo Alloggio scheda SD/MMC Entrata AV/Uscita cuffie... -
Seite 71: Contenuto Della Confezione
Contenuto della confezione Proiettore Custodia Manuale Treppiede Cavo AV Cavo AV Adattatore di (RCA femmina e mini jack) corrente CA Cavo USB Cavo VGA Telecomando Batteria Telecomando Tasto Su Cambio Memoria Cartella foto Cartella video Tasto OK/Esegui/Pausa Tasto destro Tasto sinistro Tasto Return Tasto Menu Tasto giù... -
Seite 72: Lettura Degli Indicatori Led
Lettura degli indicatori LED Il LED alimentazione si illumina di colore arancione quando il proiettore si sta caricando. Il LED dell’alimentazione si illumina di colore verde quando viene connesso all’adattatore di corrente CA in modalità standby oppure quando la batteria è completamente carica. -
Seite 73: Inserimento Di Una Scheda Di Memoria (Opzionale)
Inserimento di una scheda di memoria (opzionale) Attenersi alle istruzioni che seguono per inserire una scheda memoria: 1. Aprire il coperchio alloggio scheda SD. 2. Spingere con delicatezza la scheda, come mostrato, finché raggiunge il fondo dell’alloggio. Per rimuovere la scheda memoria, spingerla con delicatezza ed uscirà. - Seite 74 Regolare l’immagine proiettata Distanza di proiezione Dimensione dello Dimensione dello Diagonale dello schermo - larghezza schermo - altezza schermo (cm) (Pollici) (cm) (Pollici) (cm) (Pollici) (cm) (Pollici) 19.0 12.2 15.2 38.1 24.4 18.3 30.5 12.0 63.5 40.6 16.0 30.5 12.0 50.8 20.0 101.3...
-
Seite 75: Funzioni Ed Operazioni
Funzioni ed Operazioni Menu Principale Dopo aver acceso il proiettore, verrà visualizzata prima la schermata di apertura e poi il menu principale come rappresentato sotto. l VIDEO (Video): Questa funzione permette all’utente di selezionare il file video da proiettare sullo schermo. l FOTO (Photo): Questa funzione permette all’utente di selezionare il file JPEG da proiettare sullo schermo. -
Seite 76: Riproduzione Video
Riproduzione video 1. Usare il tasto Sinistra/Destra per selezionare la voce “Video” e poi premere il tasto OK. 2. Usare il tasto Su/Giù per selezionare la cartella o il file video desiderato. 3. Una volta selezionato il file video, premere OK per riprodurlo. (Alcuni file più grandi potreb- bero richiedere un maggiore tempo di caricamento) Convertire tutti i video con il pacchetto Arcsoft Media Converter in modo da avere il formato file corretto che può... - Seite 77 Durante la riproduzione 1. Premere i tasti Sinistra/Destra per spostarsi al file successivo/precedente. Premere a lungo i tasti Sinistra/Destra per far avanzare o riavvolgere velocemente. 2. Usare i tasti Su/Giù per il controllo volume. 3. Premere OK per mettere in pausa il video (OK nuovamente per riprendere la riproduzione). Compariranno le seguenti informazioni sullo status.
-
Seite 78: Riproduzione Foto
Riproduzione Foto 1. Usare il tasto Sinistra/Destra per selezionare la voce “Foto” e poi premere il tasto OK. 2. Usare il tasto Su/Giù per selezionare la cartella desiderata oppure la foto visualizzata in modalità anteprima. 3. Dopo avere selezionato una foto, premere OK per visualizzare la foto a dimensioni normali. 4. - Seite 79 Applicazione della modalità fotografica Modalità Modalità Premere i tasti Su/Giù per Nell’ordine di 1X, ingrandimento visualizzazione ingrandire/ridurre l’immagine 2X, 3X, 4X, 1X foto singola Modalità 1. Premere il tasto OK per Nell’ordine di 1X, visualizzazione mettere in pausa la visualiz- 2X, 3X, 4X, 1X circolare zazione circolare...
-
Seite 80: Cambiare Scheda
Cambiare Scheda Questa funzione permette di selezionare la memoria da utilizzare per la riproduzione. 1. Usare il tasto Sinistra/Destra per selezionare la voce “Memoria” e poi premere il tasto 2. Sarà visualizzata la casella di Controllo Memoria, come sopra. Usare il tasto Su/Giù per selezionare il tipo di memoria. -
Seite 81: Riprodurre Le File Da Altri Dispositivi
Riprodurre le file da altri dispositivi Collegamento del proiettore ai lettori multimediali Prima di collegare il lettore multimediale al lettore, è necessario avere un cavo composito AV dedicato al lettore ed un cavo AV per il proiettore. Lettore DVD/ Cavo AV del proiettore Cavo composito uscita AV Ricevitore SAT- (Rosso) (Rosso) - Seite 82 Collegamento del proiettore ai portatili/PC Prima di connettere il proprio PC portatile al proiettore, procurarsi il cavo VGA. Se si desidera utilizzare l’alimentazione del portatile, prendere il cavo mostrato qui. Ci sono tre opzioni per alimentare il proiettore: 1. Utilizzare i due cavi USB inclusi nel cavo VGA. 2.
-
Seite 83: Gestione Dei File Con Il Pc
Gestione dei file con il PC Seguire le procedure indicate in seguito per gestire i file sia con una memoria integrata sia con una scheda di memoria usando un PC oppure un portatile. 1. Assicurarsi che il proiettore sia spento. 2. - Seite 84 Come si scaricano i video YouTube e la sua proiezione Durante l’installazione di ArcSoft Media Converter (AMC), si raccomanda di installare anche ArcSoft Video Downloader, che renderà più comodo il download dei video da Internet e la loro conversione in formato mp4 per la riproduzione col proiettore. In seguito possono essere condivisi con famigliari ed amici.
-
Seite 85: Specifiche
Specifiche Voce Descrizione Tecnologia ottica LCoS Sorgente luminosa LED RGB Rapporto d’immagine 15 Lumen (Modalità CA); 12 Lumen Flusso Luminoso (Modalità Batteria) Risoluzione 640 x 480 (VGA) Pixel Dimensioni imagine proiettata 15 cm ~ 165.1 cm (6” ~ 65” diagonale) Distanza di proiezione 19 cm ~ 206 cm Zoom e Fuoco... - Seite 86 Voce Descrizione In modalità lavoro: 5 Watts Comsumo elettrico Modalità Standby (luci del proiettore spente) 3,5W Temperatura operativa 0°C ~ 35°C Dimensioni 131mm x 55mm x 25mm Cavo AV (RCA femmina e mini jack), Cavo AV (mini jack e mini jack), Custodia, Contenuto della confezione Manuale, Treppiede, Adattatore di corrente CA, Cavo VGA, Cavo USB, Batteria NP-...
-
Seite 87: Risoluzione Dei Problemi
Risoluzione dei problemi Se il proiettore sembra non funzionare correttamente, controllare le voci sottostanti prima di contattare un centro servizi autorizzato. Sintomi Punti di controllo Il proiettore non si accende. • Assicurarsi che la batteria sia carica o che l’adattatore di corrente CA sia collegato. - Seite 88 Sintomi Punti di controllo Nessuna immagine viene • Controllare che il cavo VGA sia proiettata quando si è connessi connesso correttamente. ad un computer. • Assicurarsi che il PC sia in modalità visualizzazione proiettore. • Assicurarsi che la risoluzione del monitor del PC sia 640 x 680, 800 x 600 oppure 1024 x 768 come consigliato.
- Seite 89 Bienvenido: Querido usuario, gracias por adquirir este producto. Se ha invertido una gran cantidad de tiempo y mucho esfuerzo en desarrollar este producto, por lo que esperamos que lo pueda disfrutar durante muchos años. Aviso de seguridad: 1. No deje caer, perfore ni desmonte el dispositivo; si lo hace, la garantía quedará invalidada. 2.
- Seite 90 Información de mantenimiento y seguridad: Siga todas las advertencias, precauciones y procedimientos de manteni- miento recomendados en esta guía del usuario. Advertencia: mantener alejado de líquidos para evitar descargas eléctricas. Advertencia: no desmonte el proyector. Advertencia: no mire directamente a la lente del proyector. Evitar daños en los oídos: Escuchar el sonido con un nivel elevado de volumen durante un...
- Seite 91 Tabla de contenido Introducción ..............1 El proyector................... 1 Contenido del paquete ................. 2 Mando a distancia................. 2 Leer los indicadores LED..............3 Instalar la batería .................. 3 Cargar la batería ................... 3 Insertar una tarjeta de memoria (opcional) ........... 4 Encender y apagar el proyector............
-
Seite 92: Introducción
Introducción El proyector Botón Arriba Botón Menú Botón Regresar Botón Aceptar Botón Izquierda Botón Derecha LED de alimentación y Botón Abajo carga Selector de enfoque Altavoz Conector USB Receptor Infrarojos (IR) Conector VGA Gancho para la correa Toma para trípode Tapa de la batería Encendido/Apagado Objetivo... -
Seite 93: Contenido Del Paquete
Contenido del paquete Proyector Bolsa Manual Trípode Cable AV Cable de AV Adaptador de la fuente de alimentación CA (Hembra RCA a conexión mini) Cable de USB Cable de VGA Mando a distancia Batería Mando a distancia Botón Arriba Cambio de memoria Carpeta de fotografías Carpeta de vídeos Botón OK/Reproducir/Pausa... -
Seite 94: Leer Los Indicadores Led
Leer los indicadores LED El indicador LED de alimentación se ilumina en color naranja cuando el proyector está cargado. La luz LED de encendido se enciende de color verde cuando se conecta con el adaptador de la fuente de alimentación CA en el modo standby (en espera) o cuando está... -
Seite 95: Insertar Una Tarjeta De Memoria (Opcional)
Insertar una tarjeta de memoria (opcional) Para insertar la tarjeta de memoria, realice el siguiente procedimiento: 1. Abra la tapa de la tarjeta SD. 2. Empuje suavemente la tarjeta tal y como se indica hasta que alcance la parte inferior de la ranura. Para extraer la tarjeta de memoria, empújela suavemente y ella misma se expulsará. - Seite 96 Ajuste la imagen proyectada Distancia de Tamaño de la pantalla Tamaño de la pantalla Diagonal de la proyección (A) - Ancho (B) - Altura (C) pantalla (D) (cm) (inch) (cm) (inch) (cm) (inch) (cm) (inch) 19.0 12.2 15.2 38.1 24.4 18.3 30.5 12.0...
-
Seite 97: Funciones Y Funcionamiento
Funciones y funcionamiento Menú Principal Una vez encendido el proyector, verá en primer lugar la pantalla de bienvenida seguido del menú principal, tal y como se observa a continuación: l VÍDEO (Video): Esta función permite a los usuarios seleccionar el archivo de vídeo que deseen proyectar en la pantalla. -
Seite 98: Reproducción De Vídeo
Reproducción de vídeo 1. Utilice el botón Izquierda/Derecha para seleccionar “Vídeo” y, a continuación, presione el botón OK. 2. Utilice el botón Arriba/Abajo para seleccionar la carpeta de destino o los archivos de vídeo. 3. Cuando seleccione un archivo de vídeo, pulse OK para reproducirlo. (Algunos archivos más grandes necesitarán más tiempo para cargarse). - Seite 99 Durante la reproducción 1. Pulse el botón Izqda./Dcha. para ir al archivo anterior/siguiente. Deje pulsado el botón Izqda./Dcha. para avanzar o retroceder. 2. Utilice el botón Arriba/Abajo para controlar el volumen. 3. Pulse Aceptar para pausar el vídeo (Pulse Aceptar de nuevo para continuar la reproduc- ción).
-
Seite 100: Reproducción De Fotografías
Reproducción de fotografías 1. Utilice el botón Izquierda/Derecha para seleccionar “Foto” y, a continuación, presione el botón OK. 2. Utilice el botón Arriba/Abajo para seleccionar la carpeta de destino o la fotografía que desee visualizar en el modo de previsualización. 3. - Seite 101 Aplicación Modo Foto Modo Modo de Pulse Arriba/Abajo para En el orden de 1X, Ampliación de Visualización ampliar/reducir 2X. 3X. 4X, 1X Foto Sencillo Modo de 1. Pulse OK para pausar la En el orden de 1X, Visualización visualización circular 2X.
-
Seite 102: Cambiar Tarjeta
Cambiar tarjeta Esta función le permite seleccionar el tipo de memoria que desea utilizar para la reproducción. 1. Utilice el botón Izquierda/Derecha para seleccionar “Memoria” y, a continuación, presione el botón OK. 2. Aparecerá la marca para la casilla de memoria como se indica arriba. Utilice el botón Arriba/Abajo para seleccionar el tipo de memoria. -
Seite 103: Reproducción De Archivos Desde Otros Dispositivos
Reproducción de archivos desde otros dispositivos Conectar el proyector a los reproductores multimedia Antes de conectar el reproductor multimedia al proyector, es necesario tener el cable de salida de AV compuesta dedicado del reproductor multimedia y el cable de AV del proyector preparados. - Seite 104 Conexión del proyector a un portátil / ordenador Antes de conectar su portátil al proyector, necesitará preparar el cable VGA. Cuando desee utilizar la fuente de alimentación del portátil, utilice el cable que se muestra a continuación. Tiene tres opciones para conectar el proyector a una fuente de alimentación: 1.
-
Seite 105: Administración De Archivos Con El Ordenador
Administración de archivos con el ordenador Siga el siguiente procedimiento para administrar los archivos en la memoria interna o en la tarjeta de memoria utilizando el ordenador / portátil. 1. Asegúrese de que el proyector esté apagado. 2. Conecte un extremo del cable USB incluido al puerto USB del proyector y el otro extremo a un equipo conectado a la alimentación. - Seite 106 Cómo descargar vídeos y YouTube proyectarlos Durante la instalación de ArcSoft Media Converter (AMC), también se le recomendará que instale la utilidad ArcSoft Video Downloader. Con esta utilidad le resultará mucho más cómodo descargar vídeos de Internet y convertirlos en formato mp4 para reproducirlos en el proyector.
-
Seite 107: Especificaciones
Especificaciones Elemento Descripción Tecnología óptica LCoS Fuente luminosa LEDs RGB Relación de aspecto 15 Lumens (Modo CA); 12 Lumens (modo Flujo luminoso batería) Resolución 640 x 480 (VGA) Píxeles Tamaño de la imagen de 15cm ~ 165.1cm (6” ~ 65”) (diagonal) proyección Distancia de proyección 19 cm ~ 206 cm... - Seite 108 Item Description 20 segundos inactivo (Apaga todas las LED excepto el LED del botón OK). Apagado Automático 3 minutos inactivo (Apaga la luz del proyector y solo el botón OK seguirá encendido). Modo de funcionamiento: 5 W Consumo eléctrico Modo Standby (Luz del Proyector apagada): 3.5W Temperatura de funcionamiento 0°C ~ 35°C...
-
Seite 109: Resolución De Problemas Más Frecuentes
Resolución de problemas más frecuentes Si parece que su proyector no funciona correctamente, compruebe los siguientes elementos antes de contactar con el centro de servicio autorizado. Síntoma Comprobación No se enciende el proyector. • Asegúrese de que la batería esté colocada o que el adaptador de la fuente de alimentación esté... - Seite 110 Síntoma Comprobación No se proyecta ninguna • Asegúrese de que el dispositivo imagen cuando se conecta un conectado esté equipado con la función dispositivo AV. AV-out. • Compruebe que el cable AV esté conectado y que el proyector esté configurado en la función AV-in. •...
- Seite 111 Welkom: Beste gebruiker, bedankt voor de aankoop van dit product. We hebben heel wat tijd en moeite gestopt in de ontwikkeling ervan en we hopen dat u jarenlang zorgeloos zult kunnen genieten van uw nieuwe aankoop. Veiligheidsmaatregelen: 1. Laat het toestel niet vallen. Doorboor en demonteer hem niet. U zou de garantie ermee ongeldig maken.
- Seite 112 Verzorgings- en veiligheidsinformatie: Volg alle waarschuwingen, voorzorgsmaatregelen en onderhouds- voorschriften die in deze gebruiksaanwijzing zijn aanbevolen. Waarschuwing: uit de buurt houden van vloeistof om elektrische kortsluitingen te voorkomen. Waarschuwing- De projector niet demonteren. Waarschuwing- Kijk niet direct in de lens van de projector. Gehoorschade voorkomen: Het langdurig beluisteren aan een hoog volume kan...
- Seite 113 Inhoudsopgave Aan de slag ..............1 De projector ..................1 Verpakkingsinhoud ................2 Afstandsbediening ................2 Led-indicatoren aflezen ................ 3 De batterij plaatsen ................3 De batterij opladen................3 Een geheugenkaart plaatsen (optie) ............ 4 De projector in/uitschakelen ..............4 De focus aanpassen ................
-
Seite 114: Aan De Slag
Aan de slag De projector Omhoog-knop Menuknop Terugkeer-knop OK-knop Links-knop Rechts-knop Aan/uit/opladen-led Omlaag-knop Focusknop Luidspreker Usb-aansluiting IR ontvanger VGA connector Riemoogje Statiefaansluiting Batterijklep Stroom AAN/UIT Lens SD/MMC-kaartsleuf AV ingang/ koptelefoon uitgang... -
Seite 115: Verpakkingsinhoud
Verpakkingsinhoud Projector Tasje Handleiding Statief AV kabel AV-kabel AC stroom adapter (RCA vrouwelijk naar mini stopcontact) Usb-kabel VGA-kabel Afstandsbediening Batterij Afstandsbediening Omhoog knop Geheugen vwisselen Foto map Video map OK/afspelen/pauze-knop Links-knop Rechts-knop Terugkeer knop Menuknop Omlaag knop Volumeknoppen... -
Seite 116: Led-Indicatoren Aflezen
Led-indicatoren aflezen De Aan/uit-led brandt oranje als de batterinj wordt opgeladen. De Aan/uit-led licht groen op indien verbonden met de AC stroom adapter in standby mode of wanneer de batterij volledig is opgeladen. De batterij plaatsen 1. Schuif de batterij rak open. 2. -
Seite 117: Een Geheugenkaart Plaatsen (Optie)
Een geheugenkaart plaatsen (optie) Ga als volgt te werk om een geheugenkaart te plaatsen: 1. Open de sd-kaartklep. 2. Duw zachtjes op de kaart zoals aangegeven totdat de kaart de onderkant van de sleuf bereikt. Verwijder de kaart door zachtjes op de kaart te duwen zodat deze naar buiten springt. - Seite 118 Het geprojecteerde beeld aanpassen. Projectieafstand Scherm grootte - Scherm grootte - Scherm diagonaal breedte (B) Hoogte (C) (cm) (duim) (cm) (duim) (cm) (duim) (cm) (duim) 19.0 12.2 15.2 38.1 24.4 18.3 30.5 12.0 63.5 40.6 16.0 30.5 12.0 50.8 20.0 101.3 39.9 65.0...
-
Seite 119: Functies En Gebruik
Functies en gebruik Hoofdmenu Nadat u de projector aanschakelt, dan zult u het openingsscherm zien en daarna het hoofdmenu, zoals hier beneden weergegeven. l VIDEO: Met deze functie kunnen gebruikers videobestanden kiezen om op het scherm te projecteren. l FOTO: Met deze functie kunnen gebruikers jpeg-beeldbestanden kiezen om op het scherm te projecteren. -
Seite 120: Video Afspelen
Video afspelen 1. Gebruik de Links/rechts-knop om “Video” te kiezen en druk vervolgens op OK. 2. Gebruik de Omhoog/Omlaag knop om de doel map of video bestanden te selecteren. 3. Indien u een video bestand kiest, druk dan op OK om het af te spelen. (Sommige grotere bestanden kunnen meer tijd nodig hebben om het op te laden). - Seite 121 Tijdens het afspelen 1. Druk op de Links/Rechts knop om te bewegen tussen het vorige/volgende bestand Druk geruime tijd op de Links/Rechts knop om snel vooruit en terug te spoelen. 2. Gebruik de Omhoog/Omlaag knop om het volume aan te passen. 3.
-
Seite 122: Foto Afspelen
Foto afspelen 1. Gebruik de Links/rechts-knop om “Foto” te kiezen en druk vervolgens op OK. 2. Gebruik de Omhoog/Omlaag knop om de doelmap of een foto in voorbeschouwingsmodus te selecteren. 3. Zodra een foto is geselecteerd, drukt u op OK om de foto op volledig formaat te zien. 4. - Seite 123 Foto modus toepassing Foto Enkele Druk op Omhoog/Omlaag om In de volgorde vergrotingsmodus weergavemodus te vergroten/verkleinen van 1X, 2X, 3X, 4X, 1X… Circulaire 1. Druk op OK om de circu- In de volgorde weergavemodus laire weergave te pauzeren van 1X, 2X, 3X, 4X, 1X…...
-
Seite 124: Kaart Wisselen
Kaart wisselen Deze functie is er om te selecteren welk geheugen u kunt gebruiken voor het weergave. 1. Gebruik de Links/rechts-knop om “Geheugen” te kiezen en druk vervolgens op OK. 2. Het vak Geheugen controleren wordt weergegeven zoals hieronder is aangegeven. Gebruik de Omhoog/omlaag-knop om het geheugentype te kiezen. -
Seite 125: Bestanden Afspelen Van Andere Toestellen
Bestanden afspelen van andere toestellen De projector aansluiten op mediaspelers Voordat u een mediaspeler aansluit op de projector heeft u een composiet av-uit-kabel voor de mediaspeler en de av-kabel van de projector nodig. DVD speller/ Composiet av-uit-kabel Av-kabel van de projector SAT ontvanger (rood) (rood) - Seite 126 De projector op uw Notebook/PC aansluiten Vooraleer u uw laptop PC aansluit op uw projector, moet u de VGA kabel reeds klaar hebben. Als u notebook stroom wilt gebruiken, neem dan deze kabel, hier weergegeven. U heeft drie opties om de projector van stroom te voorzien: 1.
-
Seite 127: Bestandbeheer Met Een Computer
Bestandbeheer met een computer Volg de procedures hier beneden op om bestanden te beheren in zowel het ingebouwde geheugen of geheugenkaart door een PC of notebook te gebruiken. 1. Zorg ervoor dat de projector staat uitgeschakeld. 2. Sluit het ene eind van de meegeleverde usb-kabel aan op de usb-poort van de projector en het andere eind op een ingeschakelde pc. - Seite 128 Een YouTube-video downloaden voor projectie Tijdens het installeren van ArcSoft Media Converter (AMC), raden wij u aan ook ArcSoft Video Downloader te installeren. U zult meer gebruiksgemak ervaren bij het downloaden van de video’s van het internet en ze te converteren naar MP4-formaat om ze op uw projector weer te geven.
-
Seite 129: Specificaties
Specificaties Item Beschrijving Optische technologie LCoS Lichtbron RGB led’s Beeldverhouding 15 lumens (ac mode); 12 lumens (batterij Lichtsterkte mode) Resolutie 640 x 480 (VGA) pixels Formaat van geprojecteerd beeld 15 cm ~ 165.1 cm (6” ~ 65” diagonaal) Projectieafstand 19 cm ~ 206 cm Zoom &... - Seite 130 Item Beschrijving Werkmodus: 5 Watts Stroomverbruik Standby mode (Projector licht uit): 3,5W Gebruikstemperatuur 0°C ~ 35°C Afmetingen 131mm x 55mm x 25mm AV kabel (RCA vrouwelijke naar een mini stopcontact), AV kabel (mini stopcontact Verpakkingsinhoud naar mini stopcontact), tasje, handleiding, statief, ac stroom adapter, VGA kabel, usb kabel, NP-120 batterij, CD Opmerking: Specificaties kunnen zonder kennisgeving worden gewijzigd.
-
Seite 131: Problemen Oplossen
Problemen oplossen Als uw projector niet naar behoren schijnt te werken, controleer dan de onderstaande items vooraleer uw een toegelaten dienstencenter contacteert. Symptoom Controlepunt De projector kan niet • Zorg ervoor dat de batterij is opgeladen aangeschakeld worden. of dat de ac stroom adapter wordt gebruikt. - Seite 132 Symptoom Controlepunt Geen beeld wordt geprojecteerd • Controleer of de VGA kabel is indien een computer wordt ingestoken op de juiste manier. verbonden. • Zorg ervoor dat de PC staat ingeschakeld op projector weergave. • Zorg ervoor dat de weergave resolutie van het PC scherm 640 x 480, 800 x 600 of 1024 x 768 zoals wordt voorgesteld is.
-
Seite 133: Normas De Segurança
Bem-vindo: Caro utilizador, obrigado por ter comprado este produto. Investimos muito tempo e esforço no seu desenvolvimento e esperamos que o mesmo o sirva durante muitos anos sem problemas. Normas de Segurança: 1. Não deixe cair, não fure e não desmonte o dispositivo, pois caso contrário a garantia perderá... - Seite 134 Informações de precaução e segurança: Siga todos os avisos, precauções e manutenções recomendados neste manual do utilizador. Aviso – Mantenha o equipamento afastado de líquidos para evitar choques eléctricos. Aviso – Não desmonte o projector. Aviso – Evite olhar directamente para a lente do projector. Evite danificar a sua audição: O volume elevado durante um longo período poderá...
- Seite 135 Índice Introdução ............... 1 O Projector.................... 1 Conteúdo do Pacote ................2 Controlo remoto ..................2 Significado dos indicadores LED ............3 Instalar a bateria ................... 3 Carregar a bateria................. 3 Introduzir um cartão de memória (opcional) ......... 4 Ligar/desligar o seu projector ............... 4 Ajuste a focagem ..................
-
Seite 136: Introdução
Introdução O Projector Botão para cima Botão Menu Botão Retornar Botão OK Botão para a Botão para a direita esquerda LED Energia/ Carga Botão para baixo Comutador de focagem Altifalante Conector USB Receptor IV Conector VGA Fixação da correia Entrada do tripé Tampa da bateria Ligar/Desligar Lente... -
Seite 137: Conteúdo Do Pacote
Conteúdo do Pacote Projector Bolsa Manual Tripé Cabo AV Cabo AV Transformador AC (RCA femêa à mini ficha) Cabo USB Cabo VGA Controlo Remoto Bateria Controlo remoto Botão para cima Alteração da memória Pasta de Foto Pasta de Vídeo Botão OK/Reproduzir/Pausa Botão para a esquerda Botão para a direita Botão Retornar... -
Seite 138: Significado Dos Indicadores Led
Significado dos indicadores LED O LED de Energia fica laranja quando o projector está a carregar. O LED de Energia se acende em verde quando ligado com o transformador AC no modo de espera ou quando a bateria está completamente carregada. Instalar a bateria 1. -
Seite 139: Introduzir Um Cartão De Memória (Opcional)
Introduzir um cartão de memória (opcional) Para introduzir um cartão de memória, faça o seguinte: 1. Abra a tampa do compartimento para cartões SD. 2. Com cuidado, empurre o cartão de memória, tal como indicado, até o cartão atingir o fim da ranhura. Para remover o cartão de memória, exerça uma ligeira pressão para que este seja ejectado. - Seite 140 Ajuste da Imagem Projectada Distância de Tamanho do ecrã - Tamanho do ecrã - Ecrã Diagonal projecção (A) Largura (B) Altura (C) (cm) (polegada) (cm) (polegada) (cm) (polegada) (cm) (polegada) 19.0 12.2 15.2 38.1 24.4 18.3 30.5 12.0 63.5 40.6 16.0 30.5 12.0...
-
Seite 141: Funções E Operações
Funções e Operações Menu principal Depois de ligar o projector, você verá um ecrã de abertura primeiro e de seguida o menu principal como mostrado abaixo. l VÍDEO: Esta função permite seleccionar o ficheiro de vídeo a projectar no ecrã. l FOTO: Esta função permite seleccionar o ficheiro de imagem JPEG a projectar no ecrã. -
Seite 142: Reproduzir Vídeo
Reproduzir vídeo 1. Utilize o botão Esquerda/Direita para seleccionar “Vídeo” e depois prima o botão OK. 2. Utilize o botão Cima/Baixo para seleccionar pasta de destino ou ficheiros de vídeo. 3. Ao seleccionar um ficheiro de Vídeo, prima OK para reproduzi-lo. (Alguns ficheiros maiores podem precisar de mais tempo para carregar) Converta todos os vídeos com o Convertedor de Media Arcsoft incorporado para ter o formato de ficheiro correcto que possa ser apresentado pelo projector. - Seite 143 Durante a reprodução 1. Prima o botão Esquerda/Direita para mover ao ficheiro anterior/seguinte Prima o botão Esquerda/Direita por mais tempo para avançar ou retroceder rapidamente 2. Utilize o botão Cima/Baixo para controlar o volume. 3. Prima OK para pausar o vídeo (OK novamente para continuar). A seguinte informação de estado aparecerá.
-
Seite 144: A Reproduzir Foto
A Reproduzir Foto 1. Utilize o botão Esquerda/Direita para seleccionar “Foto” e depois prima o botão OK. 2. Utilize o botão Cima/Baixo para seleccionar a pasta de destino ou uma foto apresentada em modo de pré-visualização. 3. Depois de seleccionar a foto, prima OK para a exibir em tamanho real. 4. - Seite 145 Aplicação do Modo de Foto Modo de Modo de Exibição Prima Cima/Baixo para Na seqüência de Ampliação de Única ampliar/reduzir 1X, 2X, 3X, 4X, Foto 1X… Modo de Exibição 1. Prima OK para pausar a Na seqüência de Circulante exibição circulante 1X, 2X, 3X, 4X, 1X…...
-
Seite 146: Substituir Cartão
Substituir cartão Esta função é para seleccionar a memória a utilizar para a reprodução. 1. Utilize o botão Esquerda/Direita para seleccionar “Memória” e depois prima o botão OK. 2. A Caixa de Verificação da Memória será exibida como a ilustração acima. Utilize o botão Cima/Baixo para seleccionar o tipo de memória. -
Seite 147: A Reproduzir Ficheiros Em Outros Dispositivos
A reproduzir ficheiros em outros dispositivos Ligar o projector aos seus leitores multimédia Antes de ligar o seu leitor multimédia ao projector, precisa de um cabo de saída AV composto para o leitor multimédia e do cabo AV do projector. Cabo de saída AV Leitor de DVD/ Cabo AV do projector... - Seite 148 Ligar o projector ao seu Computador Portátil Antes de ligar o seu Computador Portátil ao projector, é necessário ter um cabo VGA pronto. Se quiser utilizar a energia do computador portátil, tome este cabo mostrado aqui. Existem três opções para alimentar o projector: 1.
-
Seite 149: Gestão De Ficheiro Com Um Pc
Gestão de ficheiro com um PC Siga os procedimentos abaixo para gerenciar os ficheiros na memória incorporada ou cartão de memória com a utilização de um PC ou Computador Portátil. 1. Certifique-se de que o projector está desligado. 2. Ligue uma das extremidades do cabo USB fornecido à porta USB do projector e a outra extremidade a um PC. - Seite 150 Como transferir vídeos do YouTube para projecção Durante a instalação do ArcSoft Media Converter (AMC), ser-lhe-á recomendado que instale também o ArcSoft Vídeo Downloader. Esse programa irá facilitar-lhe a transferência de vídeos da Internet e a sua conversão para o formato mp4 para serem reproduzidos no seu projector.
-
Seite 151: Especificações
Especificações Item Descrição Tecnologia óptica LCoS Fonte de luz LEDs RGB Proporção da imagem 15 Lumens (Modo AC); 12 Lumens (Modo Fluxo luminoso de Bateria) Resolução 640 x 480 (VGA) Pixéis Tamanho da imagem de 15 cm ~ 165.1 cm (6” ~ 65” Diagonal) projecção Distância de projecção 19 cm ~ 206 cm... - Seite 152 Item Descrição 20 seg inactivo (Desliga todo LED exceto LED do botão OK) Auto desligamento 3 minutos inactivo (Desliga a luz do projector (somente botão ok se acenderá) Modo de Funcionamento: 5 Watts Consumo de Energia Modo de espera (Projector apagado): 3.5W Temperatura em funcionamento 0°C ~ 35°C Dimensões...
-
Seite 153: Resolução De Problemas
Resolução de Problemas Se o seu projector não parece estar funcionando apropriadamente, verifique os itens abaixo antes de contactar um centro de serviço autorizado. Sintoma Ponto de Verificação Impossível ligar o projector. • Certifique-se de que a bateria esteja carregada ou o transformador AC esteja em uso. - Seite 154 Sintoma Ponto de Verificação Nenhuma imagem é projectada • Verifique se o Cabo VGA está ligado ao ligar um computador. correctamente. • Certifique-se de que o PC tenha sido comutado para a visualização do projector. • Certifique-se de que a resolução da visualização do ecrã...