ELAC IC1010 Bedienungsanleitung
Inhaltsverzeichnis
Verfügbare Sprachen
Verfügbare Sprachen
Quicklinks
Bedienungsanleitung
Operating Instructions
In-Ceiling-Lautsprecher
In-Ceiling Loudspeaker
Wir beglückwünschen Sie zum Kauf Ihres ELAC Lautsprechers, der unter strengen Qualitäts- und
Umweltauflagen hergestellt wurde. Um die Leistung des Gerätes voll auszunutzen, lesen Sie bitte diese
Bedienungsanleitung gründlich durch. Wir raten Ihnen, diese Anleitung für späteres Nachschlagen gut
aufzubewahren.
Bitte beachten Sie, die separaten Sicherheitshinweise, die der Verpackung Ihres neuen Lautsprechers
beigepackt sind. Bitte lesen, beachten und befolgen Sie alle diese Sicherheitshinweise. Bewahren Sie diese
Sicherheitshinweise auf. Beachten Sie bitte alle Warnungen, die auf dem Gerät und in der Bedienungsanleitung
aufgeführt sind.
Congratulations on the purchase of your ELAC loudspeaker which has been designed in accordance with strict
quality and environmental requirements.
Please note the enclosed safety instructions. Please follow the instructions and keep the safety
instructions. Heed all warnings on the appliance and in the manual.
This manual will help you make the most of your home theatre system. We recommend keeping this manual in a safe
place for future reference.
Inhaltsverzeichnis

Verwandte Anleitungen für ELAC IC1010


Inhaltszusammenfassung für ELAC IC1010
- Seite 1 Sicherheitshinweise auf. Beachten Sie bitte alle Warnungen, die auf dem Gerät und in der Bedienungsanleitung aufgeführt sind. Congratulations on the purchase of your ELAC loudspeaker which has been designed in accordance with strict quality and environmental requirements. Please note the enclosed safety instructions. Please follow the instructions and keep the safety instructions.
-
Seite 3: Inhaltsverzeichnis
Seite / page Inhalt / Contents Funktion Lieferumfang Voraussetzungen Anschluss Wahl des optimalen Einbauortes Vorbereitung zur Installation Installation Deinstallation Function What is included with the product Requirements Connecting Find the appropriate place for installation Preparations for installation Installation Deinstallation Technische Daten / Specifications... -
Seite 4: Funktion
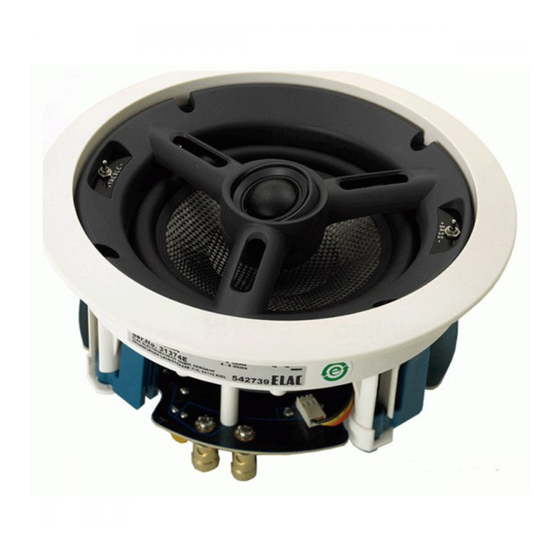
Funktion Bei der ELAC In-Ceiling Serie handelt es sich um hochwertige Einbau-Lautsprecher, die ideal für den Einbau in abgehängte Decken, aber auch für den Einbau in Leichtbauwände geeignet sind. Der Einbaurahmen und das Abdeckgitter lassen sich in ihrer Farbe dem persönlichen Geschmack durch einfaches Lackieren mit Hilfe einer Sprühdose anpassen (aber bitte nicht im eingebauten Zustand!). -
Seite 5: Wahl Des Optimalen Einbauortes
Wahl des optimalen Einbauortes Generell sollten Sie sich im Vornherein klar darüber sein, dass die Entscheidung, an welchem Ort Sie die In-Ceiling- Lautsprecher installieren, eine relativ endgültige ist. ACHTUNG: Wählen Sie diesen Ort sorgfältig aus, denn ein Rückgängigmachen eines bereits getätigten Decken- (oder Wand-) Ausschnitts ist nicht nur schwierig, sondern auch mit hohem Kosten- und Zeitaufwand verbunden. -
Seite 6: Vorbereitung Zur Installation
Vorbereitung zur Installation 1.) Der In-Ceiling Lautsprecher wird komplett montiert geliefert. Um ihn in Ihrer Decke oder Wand einbauen zu können, ist es erforderlich, dass Sie das Gitter aus der Lautsprecher-Einheit ausbauen. Sie finden hierzu im Beipack einen kleinen Haken, der als Ausziehhilfe geeignet ist. - Seite 7 Installation 5.) Wenn Sie zum Ausschneiden des Kreises eine Stichsäge verwenden möchten, sollten Sie zunächst ein ausreichend großes Loch bohren, in welches das Stichsägeblatt bequem hineinpasst. Achten Sie darauf, dass sich das Loch im Inneren des angezeichneten Kreises befindet. 6.) Schneiden Sie nun exakt der Linie folgend den Deckenausschnitt aus.
- Seite 8 Installation 9.) Nun können Sie den In-Ceiling Lautsprecher in den Decken- Ausschnitt einsetzen. Schrauben Sie die 4 Kreuzschlitzschrauben nun im Uhrzeigersinn soweit fest, bis Sie einen starken Widerstand verspüren. Hierfür können durchaus bis zu 20 Umdrehungen nötig sein, da durch das Schrauben im Uhrzeigersinn die Befestigungsklammern hinaufgefahren werden und somit im Endeffekt für festen Halt des In-Ceiling Lautsprechers in der Einbauöffnung sorgen.
-
Seite 9: Deinstallation
Installation 12.) Zum Abschluss braucht nur noch das Gitter passgenau mit leichtem Druck eingesetzt zu werden. Das Ergebnis sollte nun in etwa so aussehen: Fertig! Deinstallation 13.) Sollten Sie einmal das Gitter entfernen wollen - dies ist z.B. auch erforderlich, wenn Sie die Pegel-Wahlschalter umschalten möchten -, so verwenden Sie bitte den kleinen Haken aus dem Beipack, der als Ausziehhilfe vorgesehen ist. -
Seite 16: Technische Daten / Specifications
Technische Daten / Specifications ELAC ELECTROACUSTIC GMBH Rendsburger Landstraße 215 24113 Kiel www.elac.com 02 1005 5201 483339...