Sharp PG-A10S-SL Anleitung
Inhaltsverzeichnis
Verfügbare Sprachen
Verfügbare Sprachen
Quicklinks
In the interests of user-safety (Required by safety regulations in some countries) the set should be restored
to its original condition and only parts identical to those specified should be used.
Im lnteresse der Benutzersicherheit (erforderliche Sicherheitsregeln in einigen Ländern) muß das Gerät in seinen
Originalzustand gebracht werden. Außerdem dürfen für die spezifizierten Bauteile nur identische Teile verwendet
werden.
SHARP CORPORATION
SERVICE MANUAL
SERVICE-ANLEITUNG
LCD PROJECTOR
LCD PROJEKTOR
CEILING MOUNT BRACKET
DECKENMONTAGEHALTERUNG
MODELS
AN-A10T
MODELLE
This document has been published to be used for
after sales service only.
1
The contents are subject to change without notice.
S53A9PG-A10SU
PG-A10S
PG-A10S-SL
PG-A10S
PG-A10S-SL
AN-A10T
Inhaltsverzeichnis

Verwandte Anleitungen für Sharp PG-A10S-SL


Inhaltszusammenfassung für Sharp PG-A10S-SL
-
Seite 38: Technische Daten
(PFILDA008WJZZ), Projektorhandbuch-und-technische Referenz-CD-ROM (UDSKAA022WJN1), “QUICK GUIDE (Schnellanleitung)”-Aufkleber (TLABZA191WJZZ), Bedienungsanleitung (TiNS- A505WJN1) Dieser SHARP-Projektor verwendet eine LCD (Liquid Crystal Display)- Dieses Ger ä t hat einige inaktive,innerhalb akzeptierter Toleranzgrenzen Anzeige. Diese hochmoderne Anzeige enth ä lt 480,00 Pixel (x RGB) liegende Bildpunkte,die als leuchtende oder als nicht aktive Punkte auf TFTs (Thin Film Transistors). -
Seite 39: Hinweise Für Das Wartungspersonal
PG-A10S PG-A10S-SL AN-A10T HINWEISE FÜR DAS WARTUNGSPERSONAL 1 2 3 4 5 6 7 8 9 0 1 2 3 4 5 6 7 8 9 0 1 2 3 4 5 6 7 8 9 0 1 2 1 2 3 4 5 6 7 8 9 0 1 2 3 4 5... -
Seite 40: Vorsichtsmaßregeln Für Bleifreien Lötzinn
PG-A10S PG-A10S-SL AN-A10T Vorsichtsmaßregeln für bleifreien Lötzinn 1 Verwendung von bleifreiem Lötzinn Bei den Platinen für Haupt und Fernbedienungsempfänger dieses Modells wird bleifreies Lot verwendet. Das Symbol LF kennzeichnet bleifreies Lot und findet sich an den Platinen und in den Wartungshandbüchern. Der Buchstabe hinter LF bezieht sich auf die Art des bleifreien Lots. -
Seite 41: Bedienungsanleitung
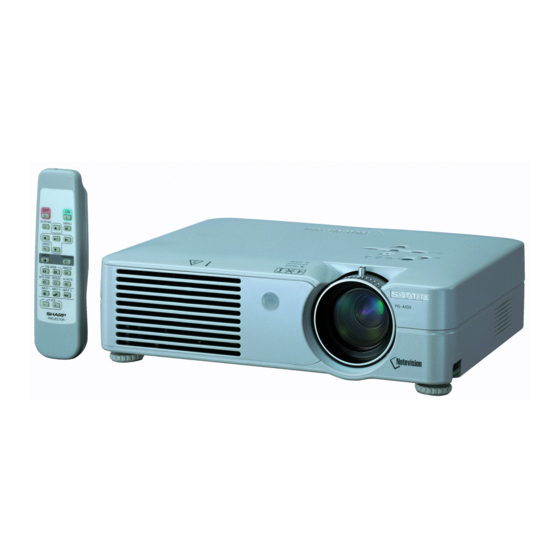
PG-A10S PG-A10S-SL AN-A10T Bedienungsanleitung Projektor (Vorderansicht- und Draufsicht) Lampenaustausch- Netz-Anzeige Anzeige Leuchtet rot, wenn sich der Bei vorschriftsmäßiger Funktion Projektor im Bereitschaftsbetrieb leuchtet diese Anzeige grün. Die befindet. Wenn die Lampe austauschen, wenn die Stromversorgung eingeschaltet Anzeige rot leuchtet. ist, leuchtet diese Anzeige grün. -
Seite 42: Projektor (Hintersicht)
PG-A10S PG-A10S-SL AN-A10T Projektor (Hintersicht) INPUT 2-Anschluss Anschluss für ein INPUT 1-Anschluss Videogerät mit einem S- Anschluss für Computer- VIDEO-Anschluss. RGB- und Komponentensignale. INPUT 3-Anschluss RS-232C-Anschluss Anschluss für ein Für die Bedienung des Videogerät. Projektors unter Verwendung eines Computers. AUDIO INPUT-... -
Seite 43: Fernbedienung (Vordersicht)
PG-A10S PG-A10S-SL AN-A10T Fernbedienung (Vordersicht) Netz-Tasten (ON/OFF) MENU-Taste Für das Ein- und Ausschalten der Für die Anzeige des Justierungs- und Stromversorgung. Einstellungsbildschirms. KEYSTONE-Taste Für das Aktivieren des Trapezverzerrungs- Einstelltasten (', ", \ , |) Korrekturmodus. Für die Auswahl der Menüpunkte. -
Seite 44: Einlegen Der Batterien
PG-A10S PG-A10S-SL AN-A10T Reichweite Der Projektor kann mittels der Fernbedienung Fernbedienungssensor innerhalb der in der Abbildung dargestellten 45° Bereiche gesteuert werden. Hinweis • Das Signal von der Fernbedienung kann für eine 30° einfache Bedienung von der Bildwand reflektiert werden. Die tatsächliche Reichweite des Signals kann je nach Signalsender für... -
Seite 45: Rs-232C-Spezifikationen Und Befehlseinstellungen
PG-A10S PG-A10S-SL AN-A10T RS-232C-Spezifikationen und Befehlseinstellungen PC- Steuerung Der Projektor kann durch einen Anschluss an einen Computer über ein serielles RS-232C-Steuerkabel (im Handel erhältlich) über den Computer gesteuert werden. Kommunikationsbedingungen Legen Sie die seriellen Porteinstellungen des Computers so fest, dass sie denen der Tabelle entsprechen. -
Seite 46: Pin-Belegung
PG-A10S PG-A10S-SL AN-A10T Pin-Belegung INPUT-1-RGB-Signalanschluss: 15-Pin Mini-D-Sub weiblich RGB-Eingang Komponenteneingang 1. Videoeingang (rot) 1. P 2. Videoausgang (grün/Sync. auf grün) 2. Y 3. Videoausgabe (blau) 3. P 4. Nicht angeschlossen 4. Nicht angeschlossen 5. Nicht angeschlossen 5. Nicht angeschlossen 6. Erde (rot) 6. -
Seite 47: Abmessungen
PG-A10S PG-A10S-SL AN-A10T Abmessungen Ansicht von hinten Ansicht von oben Ansicht von Ansicht von (297) der Seite der Seite φ 66 (79,5) Ansicht von vorne (258,8) (19,1) (48,5) (169) Ansicht von unten (148,5) (195) Einheit:mm... -
Seite 48: Entfernen Der Hauptteile
PG-A10S PG-A10S-SL AN-A10T ENTFERNEN DER HAUPTTEILE 1. Ausbau der Lampen-Einheit. 1-1. Die Schraube lösen, dann die Lampenabdeckung abnehmen. 1-2. Die beiden Schrauben lösen. Die Lampen-Einheit am Griff anfassen, dann in Pfeilrichtung ziehen. Lampen-Einheit. Lamp Unit Lampenabdeckung Lamp Door 2. Ausbau des oberen Gehäuses. -
Seite 49: Ausbau Der Hauptleiterplatte
PG-A10S PG-A10S-SL AN-A10T 3. Ausbau der Hauptleiterplatte 3-1. Die sieben Schrauben entfernen. 3-2. Alle Stecker von der Hauptleiterplatte abziehen. 3-3. Die Hauptleiterplatte abnehmen. Bedienungstasten Operation Button 3-4. Die beiden Schrauben entfernen, dann die Bedienungstasten-Einheit abnehmen. [FC] [FA] [EA] [TF] [BP]... -
Seite 50: Ausbau Der Ac-Netzsteckdose, Netzgerät-/Vorschaltwiderstands-Einheit Und Des Kühlgebläses
PG-A10S PG-A10S-SL AN-A10T 5. Ausbau der AC-Netzsteckdose, Netzgerät-/Vorschaltwiderstands-Einheit und des Kühlgebläses 5-1. Die Schraube an der Rückseite des Geräts entfernen. 5-2. Die Schraube entfernen, dann die Netzgerät-/Vorschaltwiderstands-Einheit herausnehmen. 5-3. Die untere Abschirmung und die Abschirmungsabdeckung entfernen. 5-4. Den Stecker abziehen, dann die AC-Netzsteckdose abnehmen. -
Seite 51: Ausbau Der Einlaßluftführungs-Einheit
PG-A10S PG-A10S-SL AN-A10T 6. Ausbau der Einlaßluftführungs-Einheit 6-1. Die beiden Schrauben entfernen, dann die Einlaßluftführung herausnehmen. 6-2. Die Schraube entfernen, dann den Blattschalter abnehmen. 6-3. Die Schraube und die beiden Haken entfernen. Das Abstandsstück B abnehmen. Die Baugruppe Kühlgebläse- LCD R/G und die Einlaßluftführungs-Einheit B herausnehmen. -
Seite 52: Rückstellen Des Lampenbetriebszeit-Timers
• Den Projektor an einem besser blockiert. belüfteten Ort aufstellen. Die Temperatur Temperatur- Rot ein/ im Inneren des • Kühlventilator beschädigt • Den Projektor einem von Sharp warn- Strom aus Gerätes ist zu • Interne Schaltkreise autorisierten Händler für Projektoren Anzeige hoch. -
Seite 53: Beschreibung Der Optik-Einheit
PG-A10S PG-A10S-SL AN-A10T Beschreibung der Optik-Einheit Erläuterungen für das korrekte Setup der optischen Komponenten und Baugruppen (An- sicht von oben) Projektionsobjektiv Projection lens LIGHT SOURCE Beleuchtungsquelle (LAMP) (Lampe) Eingabe-polarisator B Input polarizer B Eingabe-polarisator R Input polarizer R LCD(R) LCD(R) -
Seite 54: Auswechseln Der Prismenhalter-Einheit
PG-A10S PG-A10S-SL AN-A10T Auswechseln der Prismenhalter-Einheit 1. Die beiden Halteschrauben entfernen, dann den Prismenhalter und die Projektionslinsen-Einheit aus der Optik- Einheit herausnehmen. 2. Die vier Halteschrauben entfernen, dann die Prismenhalter-Einheit und die Objektiv-Einheit trennen. 3. Die Prismenhalter-Einheit durch ein Neuteil ersetzen. Die obigen Schritte 1 und 2 in umgekehrter Reihenfolge ausführen. -
Seite 55: Elektrische Einstellung
PG-A10S PG-A10S-SL AN-A10T ELEKTRISCHE EINSTELLUNG Nr. Einstellgegenstand Einstellbedingungen Einstellverfahren » Die folgenden Einstellungen vornehmen: EEPROM wird 1. D e n N e t z s c h a l t e r initialisiert S2002 drücken, um den Bearbeitungsmodus einschalten und das Gerät aufzurufen und "SS2"... - Seite 56 PG-A10S PG-A10S-SL AN-A10T Nr. Einstellgegenstand Einstellbedingungen Einstellverfahren Einstellung der 1. Ein NTSC-Komposit-10- 1. Den Einstellwert überprüfen. Video-Helligkeit Stufensignal (ohne Setup) Contrast (Weißpegel): 5 und des mit einem Amplitudenpegel Bright (Schwarzpegel): 8 Kontrastes von 100% zuführen. 2. Die folgenden Gruppen und Positionen wählen:...
- Seite 57 PG-A10S PG-A10S-SL AN-A10T Nr. Einstellgegenstand Einstellbedingungen Einstellverfahren Einstellung der 1. Ein Gegenspannungs- 1.Den Steuerschalter des Geräts oder die Taste der RGB- Einstellsignal im SVGA- Fernbedienungseinheit verwenden, um die Gegenspannung Modus zuführen E i n s t e l l u n g s o v o r z u n e h m e n , d a ß d a s 2.
- Seite 58 PG-A10S PG-A10S-SL AN-A10T Nr. Einstellgegenstand Einstellbedingungen Einstellverfahren DTV- 1. Die folgenden Gruppen 1. Den Festwert überprüfen. Farbsättigungs- und Positionen wählen: Color : 13 einstellung Gruppe : DTV Position : Color DVD-Farbton- 1. Die folgenden Gruppen 1. Den Festwert überprüfen. einstellung und Positionen wählen:...
- Seite 59 PG-A10S PG-A10S-SL AN-A10T Adjusting point Adjusting conditions Adjusting procedure Funktion des 1. Im Prozeßmodus die Position OFF wählen. Ausschalt- Sich vergewissern, daß der Ausschalt-Timer mit Timers einem am Bildschirm angezeigten Wert von 5 Minuten beginnt; danach eine Minute in 1-Sekunden- Intervallen abzählen.
-
Seite 60: Rückstellung Des Lampen-Timers An Diesem Modell
PG-A10S PG-A10S-SL AN-A10T 1.Aktivieren und Deaktivieren des Prozeßmodus unter Verwendung der Steuertasten dieses Modells. 1-1. Aktivieren und Deaktivieren Wenn am Bildschirm kein Menü angezeigt wird, in der angegebenen Reihenfolge an der Fernbedienungseinheit die Tasten "UP", "UP", "DOWN", "DOWN", "RIGHT", "LEFT" und "ENTER" drücken (Fernbedienungseinheiten des Typs A10 oder der Serie C50/45 und P25/20). -
Seite 61: Prozeßmenü
PG-A10S PG-A10S-SL AN-A10T Prozeßmenü 1 Prozeßmenü für Einstellungen VIDEO CR-Offset Erste Schicht Pedestal Bright VERSION B-DRIVE VIDEO R-DRIVE TEMP EXIT OUTPUT1 PATTERN R-Bright OUTPUT2 LAMP G-Bright OUTPUT3 LINE B-Bright VIDEO1 EXIT R-Contrast G-Contrast Zweite Schicht Anfangswert B-Contrast Contrast EXIT Tint... - Seite 62 PG-A10S PG-A10S-SL AN-A10T Prozeßmenü 2 Pedestal R-Contrast G-Contrast B-Contrast EXIT VERSION Build Boot Code Config Rom Code EXIT SS3 EU SS4 US SS5 JPN SS6 CHIN EXIT TEMP Temp1 Parameter für Sensor 1 Temp2 Parameter für Sensor 2 Temp3 Nicht belegt...
-
Seite 63: Fehlersuchtabelle
PG-A10S PG-A10S-SL AN-A10T FEHLERSUCHTABELLE Überprüfung der grundlegenden Funktionen Ist die POWER LED NEIN eingeschaltet, oder blinkt sie rot oder grün? Mit dem Abschnitt "Überprüfung des Netzteils" fortfahren. Kann das Gerät mit der Einschalttaste oder über NEIN die Fernbedienungseinheit eingeschaltet werden? Mit dem Abschnitt "Überprüfung... - Seite 64 PG-A10S PG-A10S-SL AN-A10T Überprüfen des Netzteils Sind die Stecker CN701, NEIN CN702 und CN751 fest angeschlossen? Sind die Stecker CN701, CN702 und CN751 fest eingesteckt? Ist der Bimetall-Schalter NEIN ausgeschaltet? Den Bimetall-Schalter ersetzen. Liegt eine NEIN Wechselspannung (100 - 240 V) an C701 an? F701 ersetzen.
- Seite 65 PG-A10S PG-A10S-SL AN-A10T Überprüfung der Mikrocomputer- Peripherieschaltkreise Liegt eine Gleichspannung NEIN von ca. 3,3 V an den Stiften (3) und (5) von IC1703 und seine Peripherie- IC1703 an? Schaltkreise bzw. IC1702 und seine Peripherie-Schaltkreise überprüfen. Liegt eine Gleichspannung NEIN von ca. 2,5 V zwischen...
- Seite 66 PG-A10S PG-A10S-SL AN-A10T Überprüfung der Lampenfunktion Ist die Lampenfassung locker? NEIN Die Lampenfassung fest anschließen. Liegt eine Gleichspannung NEIN von 350 - 400 V zwischen den Stiften von CN703 an? Mit dem Abschnitt "Überprüfen des Netzteils" fortfahren. Sind die Zuleitungskabel für CN751 und CN752 fest...
- Seite 67 PG-A10S PG-A10S-SL AN-A10T Überprüfung des RGB- Signals Werden die RGB-Signale über die Stifte (9), (7) und (4) von IC3104 ausgegeben? IC3104 und seine Peripherie-Schaltkreise NEIN überprüfen. Werden die Signale RIN2 - NEIN RIN9, GIN2 - GIN9 und BIN2 - BIN9 zu IC2601 IC8003 und seine übermittelt?
- Seite 68 PG-A10S PG-A10S-SL AN-A10T Keine Farbe, oder abweichender Farbton (NTSC, PAL) Liegen RGB- NEIN Ausgangssignale an den Stiften (23) (R-Y) und (22) (B-Y) von IC3105 an? IC3105 und seine Peripherie-Schaltkreise überprüfen. C3126 und C3124 überprüfen. Überhaupt kein oder ein irreguläres Y-Signal...
- Seite 69 PG-A10S PG-A10S-SL AN-A10T Überprüfen des S-Video- Systems NEIN Leuchtet die Lampe auf? Mit dem Abschnitt "Überprüfung der Lampenfunktion" fortfahren. Liegt die spezifizierte NEIN Spannung an den EA-Steckern an? Den Leistungsschaltkreis und seine Komponenten überprüfen. Liegt an den Stiften (43) NEIN...
-
Seite 70: Chassis Layout
PG-A10S PG-A10S-SL AN-A10T CHASSIS LAYOUT / CHASSIS-ANORDNUNG... - Seite 71 PG-A10S PG-A10S-SL AN-A10T...
-
Seite 72: Block Diagram
PG-A10S PG-A10S-SL AN-A10T BLOCK DIAGRAM / BLOCKSCHALTBILD... - Seite 73 PG-A10S PG-A10S-SL AN-A10T...
-
Seite 74: Gesamtschaltplan
PG-A10S PG-A10S-SL AN-A10T OVERALL WIRING DIAGRAM / GESAMTSCHALTPLAN... - Seite 75 PG-A10S PG-A10S-SL AN-A10T...
-
Seite 76: Description Of Schematic Diagram
PG-A10S PG-A10S-SL AN-A10T DESCRIPTION OF BESCHREIBUNG DES SCHEMATIC DIAGRAM SCHEMATISCHEN SCHALTPLANS VOLTAGE MEASUREMENT CONDITION: SPANNUNGSMESSUNGEN: 1. Spannungen an den Prüfpunkten werden bei einer 1. Voltages at test points are measured at the Netzspannung von 220V gemessen, Signale werden supply voltage of AC 220V. Signals are fed by a für die Wartung mit einem Farbbalken-Signal generator... -
Seite 77: Waveforms
PG-A10S PG-A10S-SL AN-A10T WAVEFORMS / WELLENFORMEN 1 RTP(P1301-1) 2 GTP(P1301-2) 3 BTP(P1301-3) H:5µsec/div H:F5µsec/div H:5µsec/div V:2V/div V:2V/div V:2V/div 4 P-SIG(TP1101) 5 VST(IC2604-12) 6 HST10(IC2604-17) H:10µsec/div H:10µsec/div H:5µsec/div V:2V/div V:1V/div V:1V/div 7 Y(IC3506-25) 8 C(IC3506-27) 9 Video(J402-2) H:20µsec/div H:20µsec/div H:20µsec/div V:0.2V/div V:0.2V/div... -
Seite 78: Ë Main Unit / Haupteinheit-1
PG-A10S PG-A10S-SL AN-A10T Ë MAIN UNIT / HAUPTEINHEIT-1/12... - Seite 79 PG-A10S PG-A10S-SL AN-A10T...
-
Seite 80: Ë Main Unit / Haupteinheit-2
PG-A10S PG-A10S-SL AN-A10T Ë MAIN UNIT / HAUPTEINHEIT-2/12... - Seite 81 PG-A10S PG-A10S-SL AN-A10T...
-
Seite 82: Ë Main Unit / Haupteinheit-3
PG-A10S PG-A10S-SL AN-A10T Ë MAIN UNIT / HAUPTEINHEIT-3/12... - Seite 83 PG-A10S PG-A10S-SL AN-A10T...
-
Seite 84: Ë Main Unit / Haupteinheit-4
PG-A10S PG-A10S-SL AN-A10T Ë MAIN UNIT / HAUPTEINHEIT-4/12... - Seite 85 PG-A10S PG-A10S-SL AN-A10T...
-
Seite 86: Ë Main Unit / Haupteinheit-5
PG-A10S PG-A10S-SL AN-A10T Ë MAIN UNIT / HAUPTEINHEIT-5/12... - Seite 87 PG-A10S PG-A10S-SL AN-A10T...
-
Seite 88: Ë Main Unit / Haupteinheit-6
PG-A10S PG-A10S-SL AN-A10T Ë MAIN UNIT / HAUPTEINHEIT-6/12... - Seite 89 PG-A10S PG-A10S-SL AN-A10T...
-
Seite 90: Ë Main Unit / Haupteinheit-7
PG-A10S PG-A10S-SL AN-A10T Ë MAIN UNIT / HAUPTEINHEIT-7/12... - Seite 91 PG-A10S PG-A10S-SL AN-A10T...
-
Seite 92: Ë Main Unit / Haupteinheit-8
PG-A10S PG-A10S-SL AN-A10T Ë MAIN UNIT / HAUPTEINHEIT-8/12... - Seite 93 PG-A10S PG-A10S-SL AN-A10T...
-
Seite 94: Ë Main Unit / Haupteinheit-9
PG-A10S PG-A10S-SL AN-A10T Ë MAIN UNIT / HAUPTEINHEIT-9/12... - Seite 95 PG-A10S PG-A10S-SL AN-A10T...
-
Seite 96: Ë Main Unit / Haupteinheit-10
PG-A10S PG-A10S-SL AN-A10T Ë MAIN UNIT / HAUPTEINHEIT-10/12... - Seite 97 PG-A10S PG-A10S-SL AN-A10T...
-
Seite 98: Ë Main Unit / Haupteinheit-11
PG-A10S PG-A10S-SL AN-A10T Ë MAIN UNIT / HAUPTEINHEIT-11/12... - Seite 99 PG-A10S PG-A10S-SL AN-A10T...
-
Seite 100: Ë Main Unit / Haupteinheit-12
PG-A10S PG-A10S-SL AN-A10T Ë MAIN UNIT / HAUPTEINHEIT-12/12... - Seite 101 PG-A10S PG-A10S-SL AN-A10T...
-
Seite 102: Ë Power Unit / Netzteileinheit
PG-A10S PG-A10S-SL AN-A10T Ë POWER UNIT / NETZTEILEINHEIT... - Seite 103 PG-A10S PG-A10S-SL AN-A10T...
-
Seite 104: Ë R/C Receiver Unit / Fernbedienungsempfängerseinheit
PG-A10S PG-A10S-SL AN-A10T Ë R/C RECEIVER UNIT / FERNBEDIENUNGSEMPFänGERSEINHEIT... -
Seite 105: Printed Wiring Board Assemblies
PG-A10S PG-A10S-SL AN-A10T PRINTED WIRING BOARD ASSEMBLIES LEITERPLATTENEINHEITEN Power Unit (Wiring Side) Netzteinheit (Leiterbahnseite) Power Unit (Component Side) Netzteinheit (Bestückungsseite) - Seite 106 PG-A10S PG-A10S-SL AN-A10T R/C Receiver Unit (Wiring Side) Fernbedienungsempfängerseinheit (Leiterbahnseite) Main Unit (Wiring Side) Haupt-einheit (Leiterbahnseite)
- Seite 107 PG-A10S PG-A10S-SL AN-A10T R/C ReceiverUnit (Component Side) Fernbedienungsempfängerseinheit (Bestückungsseite) Main Unit (Component Side) Haupt-einheit (Bestückungsseite)
-
Seite 108: Printed Wiring Board Assemblies
3. ERSATZTEIL NR. 4. BESCHREIBUNG For location of SHARP Parts Distributor, 5. KODE 6. QUANTITÄT Please call Toll-Free; 1-800-BE-SHARP in CANADA: Contact SHARP Electronics of Canada Limited Phone (416) 890-2100. MARK: SPARE PARTS-DELIVERY SECTION MARKIERUNG : ERSATZTEILE-LIEFERUNG Ref. No. Part No. - Seite 119 PG-A10S PG-A10S-SL AN-A10T MEMO...
-
Seite 126: Ceiling Mount Bracket (An-A10T)
Contact your nearest SHARP Parts Distributor. For location of SHARP Parts Distributor, 5. KODE 6. QUANTITÄT Please call Toll-Free; 1-800-BE-SHARP in CANADA: Contact SHARP Electronics of Canada Limited Phone (416) 890-2100. MARK: SPARE PARTS-DELIVERY SECTION MARKIERUNG : ERSATZTEILE-LIEFERUNG Ref. No. - Seite 128 PG-A10S PG-A10S-SL AN-A10T COPYRIGHT © 2003 BY SHARP CORPORATION ALL RIGHTS RESERVED. No part of this publication may be reproduced, stored in a retrieval system, or transmitted in any form or by any means, electronic, mechanical, photocopying, recording, or otherwise, without prior written permission of the publisher.