Herunterladen Inhalt Inhalt Diese Seite drucken
Inhaltsverzeichnis

Werbung

Verfügbare Sprachen

Verfügbare Sprachen

Bedienungsanleitung
User Manual
Kullanım Kılavuzu
WLAN Internet-Radio
WiFi Internet Radio
WLAN internet Radyosu
MEDION
P85096
®
®
(MD 87516)

Werbung

Inhaltsverzeichnis
loading

Inhaltszusammenfassung für Medion P85096

  • Seite 1 Bedienungsanleitung User Manual Kullanım Kılavuzu WLAN Internet-Radio WiFi Internet Radio WLAN internet Radyosu MEDION P85096 ® ® (MD 87516)
  • Seite 2: Inhaltsverzeichnis

    Inhaltsverzeichnis Hinweise zu dieser Anleitung ..............6 1.1. Verwendete Symbole und Signalwörter ............6 Bestimmungsgemäßer Gebrauch .............. 7 Sicherheitshinweise ..................7 3.1. Nicht zugelassener Personenkreis ..............7 3.2. Das Gerät sicher aufstellen ................... 8 3.3. Netzanschluss ......................9 3.4. Gewitter ........................9 3.5.
  • Seite 3 13.2. Verbindung zu einem Internetradiosender/ einem Podcast ....26 DAB-Radio hören ..................27 14.1. Hauptmenü im DAB-Radiomodus ..............28 FM-Radio hören ..................30 15.1. Radiosender einstellen ..................30 15.2. Radiosender speichern ..................31 15.3. Hauptmenü im FM-Radiomodus..............31 Audiodateien vom Netzwerk hören ............31 16.1. WLAN-Radio als Media Client nutzen .............31 16.2.
  • Seite 4 27.1. Audioprodukte zur Verwendung mit Internetradio .........48 Impressum ....................49...
  • Seite 5: Hinweise Zu Dieser Anleitung

    1. Hinweise zu dieser Anleitung Lesen Sie vor der ersten Inbetriebnahme diese Bedienungsanleitung gründlich durch und befolgen Sie vor allen Dingen die Sicherheitshin- weise! Bewahren Sie diese Bedienungsanleitung für den weiteren Gebrauch auf. Falls Sie das Gerät einmal weitergeben, legen Sie bitte auch diese Bedienungsanleitung dazu.
  • Seite 6: Bestimmungsgemäßer Gebrauch

     Auszuführende Handlungsanweisung 2. Bestimmungsgemäßer Gebrauch Das Gerät dient zum Abspielen von Audiodaten, die über das Internet bzw. ein Netzwerk empfangen werden. Außerdem können Sie mit dem Gerät Audiodateien von USB-Datenträgern sowie FM/DAB-Radiosignale wiedergeben. Benutzen Sie das Gerät zu keinem anderen Zweck. Betrieben Sie das Gerät nur in In- nenräumen.
  • Seite 7: Das Gerät Sicher Aufstellen

    3.2. Das Gerät sicher aufstellen • Stellen und betreiben Sie alle Komponenten auf einer stabi- len, ebenen und vibrationsfreien Unterlage, um Stürze des Gerätes zu vermeiden. • Setzen Sie das Gerät keinen Erschütterungen aus. Erschütte- rungen können der empfindlichen Elektronik schaden. •...
  • Seite 8: Netzanschluss

    3.3. Netzanschluss • Schließen Sie das Netzteil nur an eine gut erreichbare Steck- dose (AC 230 V ~ 50 Hz) an, die sich in der Nähe des Aufstell- orts befindet. Für den Fall, dass Sie das Gerät schnell vom Netz nehmen müssen, muss die Steckdose frei zugänglich sein.
  • Seite 9: Kopfhörer

    3.6. Kopfhörer WARNUNG! Hohe Lautstärke bei der Verwendung von Ohrhö- rern oder Kopfhörern kann zum Verlust des Hörsin- nes führen.  Bevor Sie einen Ohr-/Kopfhörer aufsetzen, stellen Sie die Lautstärke auf ein Minimum! Ihr Gehör kann Schaden nehmen, wenn es zu lange oder zu plötz- lich hohen Lautstärken ausgesetzt wird.
  • Seite 10: Systemvoraussetzungen

    Steuern des Internet-Radios bequem per Smartphone/Tablet-PC: − Smartphone/Tablet mit WLAN 802.11 a/b/g/n − Android™ Plattform 4.0 − Ab iOS 5.0 oder höher − Installierte frei erhältliche MEDION® Lifestream II App (siehe auch „21. Steue- rung über Lifestream II-Applikation“ auf Seite 41)
  • Seite 11: Vorbereitung

    5. Vorbereitung 5.1. Lieferumfang prüfen Entfernen Sie sämtliches Verpackungsmaterial, auch die Folie auf dem Display. GEFAHR! Lassen Sie kleine Kinder nicht mit Folie spielen. Es be- steht Erstickungsgefahr! Bitte überprüfen Sie die Vollständigkeit der Lieferung und benachrichtigen Sie uns bitte innerhalb von 14 Tagen nach dem Kauf, falls die Lieferung nicht komplett ist. Mit dem von Ihnen erworbenen Produkt haben Sie erhalten: •...
  • Seite 12: Anschlüsse

    5.3. Anschlüsse Bevor Sie Anschlüsse vornehmen, schalten Sie das Radio mit dem Netzschalter an der Geräterückseite aus.  Betrieb im WLAN-Modus: Richten Sie die Antenne an der Geräterückseite für den Empfang aus.  Betrieb im LAN-Modus: Schließen Sie ein Ethernet-Kabel an den RJ 45-Port an. ...
  • Seite 13: Übersicht Wlan-Radio

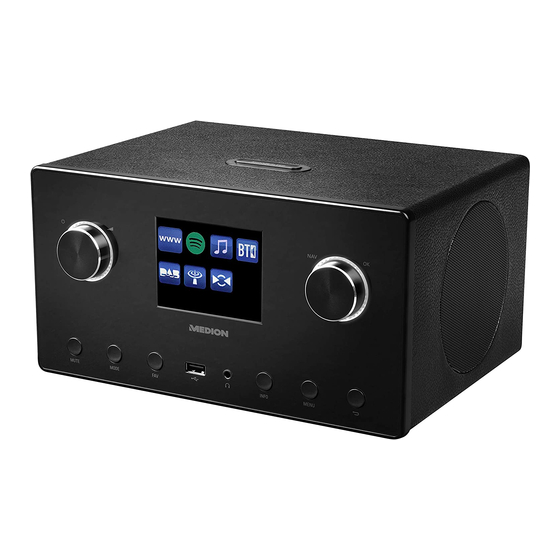
    6. Übersicht WLAN-Radio 6.1. Vorderseite Display N AV : durch Drehen im Menü navigieren; O K : durch Drücken Menüaus- wahl bestätigen; Favoriten hinzufügen (Internetradio) : Eine Menüebene zurück M E N U : Einstellmenü aufrufen I N F O : Displayanzeigen wechseln, WPS-Funktion : Kopfhöreranschluss 3,5 mm Stereoklinke : USB Anschluss FAV : Sender speichern/ gespeicherte Sender aufrufen...
  • Seite 14: Oberseite

    6.2. Oberseite S N O O Z E / S L E E P : Ausschaltzeit (Schlummer) einstellen 6.3. Rückseite WLAN-Antenne DAB/FM-Antenne P O W E R : Ein-/Ausschalter D C I N : Buchse für Steckernetzteil L A N : RJ45 Netzwerkbuchse L I N E O U T : Audioausgang 3,5 mm Stereobuchse A U X I N : Audioeingang 3,5 mm Stereobuchse...
  • Seite 15: Fernbedienung

    6.4. Fernbedienung S TA N D B Y : Gerät in den Standby Modus schalten M U T E : Stummschaltung Vorherigen Titel wiedergeben, FM-Sendersuchlauf rückwärts S T O P : Wiedergabe anhalten Nächsten Titel wiedergeben, FM-Sendersuchlauf vorwärts : Wiedergabe starten/unterbrechen I N F O : Displayanzeigen wechseln/ WPS-Funktion E Q : Equalizer einstellen M E N U : Hauptmenü...
  • Seite 16: Menüstruktur

    7. Menüstruktur Das Radio hat folgende Menüstruktur: HINWEIS! Die Menüs Hauptmenü und Systemeinstellungen können aus jeder Betriebsart heraus aufgerufen werden. Außerdem kann das Menü Sys- temeinstellungen aus dem Menü Hauptmenü aufgerufen werden. 7.1. Bedienung in den Menüs Bedienung über die Fernbedienung Alle Funktionen können sowohl über die Fernbedienung als auch über die Tasten am Gerät bedient werden.
  • Seite 17: Notwendige Netzwerkeigenschaften

    HINWEIS! Die Senderliste Ihres Internetradios wird Ihnen kostenlos über den Inter- netdienst von www.vTuner.com bereit gestellt und laufend aktualisiert. Sollte ein Radiosender nicht verfügbar sein, so kann dies unterschied- lichste Ursachen seitens des Betreibers des Radiosenders haben. Dies ist jedoch kein Fehler des Geräts. Bei der Verbindung zu Internetradiosendern kann es auch aufgrund von hohem Anfrageaufkommen zeitweilig zu Verzögerungen kommen.
  • Seite 18: Erstinbetriebnahme

    11. Erstinbetriebnahme  Bei der ersten Inbetriebnahme erscheint zunächst der Einrichtungsassistent.  Bestätigen Sie die Abfrage Einrichtungsass. Jetzt ausführen? mit JA, um den Einrichtungsassistenten zu starten.  Wählen Sie die Sprache aus, in der die Menüs angezeigt werden soll und drü- cken Sie dann den Drehregler O K zur Bestätigung.
  • Seite 19: Netzwerkverbindung Halten

    11.2. Netzwerkverbindung halten  Stellen Sie hier ein, ob das Internetradio auch im Standby-Modus die Netzwerk- verbindung halten soll (höherer Stromverbrauch im Standby-Modus). Wenn Sie die Einstellung mit JA bestätigen, stehen die Internet- und Netzwerkfunktionen nach dem Einschalten schneller zur Verfügung. 11.3.
  • Seite 20: Pin Eingeben

    WPS-Taste  Wählen Sie die Option Taste drücken, um die WPS-Funktion über die WPS-Taste des Routers nutzen zu können.  Drücken Sie anschliessend die WPS-Taste am Router und bestätigen Sie die Ver- bindung am Internetradio, indem Sie die den Drehregler drücken (O K ). Beachten Sie hierzu auch die Bedienungsanleitung des Routers.
  • Seite 21: Wlan-Radio Als Media Client Nutzen

    Geben Sie hier den Netzwerkschlüssel für den WLAN-Access Point mit den Ziffern-/ Zeichentasten auf der Fernbedienung ein. Sie können den Netzwerkschlüssel auch über die Tasten am Gerät eingeben:  Wählen Sie dazu mit dem Drehregler ein Zeichen aus und drücken Sie den Dreh- regler (O K ) zur Bestätigung.
  • Seite 22: Musik Hören

    sikdateien auswählen und abspielen. HINWEIS! Gegebenenfalls müssen Sie die Verbindung auf Ihrem PC bestätigen und freigeben! 12. Musik hören Sie können mit Ihrem Internetradio Musik von verschiedenen Quellen hören: Inter- netradio, FM-Radio, die Audio-Dateien auf Ihrem Computer und die Audio-Dateien auf tragbaren MP3-Playern.
  • Seite 23: Meine Favoriten

    Meine Favoriten Hier können Sie die gespeicherten Sender aufrufen. Region [Deutschland] Hier können Sie alle Sender anzeigen, die der Region (hier: Deutschland) zugeord- net sind, in der das Internetradio sich ins Internet eingewählt hat. Mein Wetter Das Internetradio verfügt über einem internetbasierten Wetterdienst, über den Sie Wetterdaten und –vorhersagen abrufen können.
  • Seite 24 Wählen Sie anschließend einen Podcast aus und bestätigen Sie mit O K . Suchen Podcasts: Podcasts nach Name suchen Meine hinzugefügten Radiosender Sie können sich kostenlos über die Webseite http://internetradio.medion.com an- melden. Dort können Sie Ihr Internetradio anhand des Zugriffscodes registrieren. Den Zugriffscode erhalten Sie wie folgt: Gehen Sie in den Internetradio Modus, wählen Sie dort Sonstiges/Zugriffscode er-...
  • Seite 25: Verbindung Zu Einem Internetradiosender/ Einem Podcast

    13.2. Verbindung zu einem Internetradiosender/ einem Podcast Nachdem Sie einen Sender/einen Podcast ausgewählt haben, wie oben beschrie- ben, wird das Radio wird mit dem Internetradioserver verbunden. Im Display er- scheinen folgende Anzeigen: Name der Radiostation Uhrzeit Weitere Informationen des Radiosenders Bild der Radiostation Das Radio wurde erfolgreich mit dem Internet-Server verbunden und empfängt die Internetradiosender.
  • Seite 26: Dab-Radio Hören

    um den Sender wiederzugeben. 14. DAB-Radio hören  Um DAB -Radio zu hören, wählen Sie im Hauptmenü die Funktion DAB Radio und bestätigen Sie mit dem Drehregler (O K ) oder drücken Sie mehrmals die Taste M O D E . Das DAB-Radio Display erscheint: 5 4 3 DAB Empfang...
  • Seite 27: Hauptmenü Im Dab-Radiomodus

    drücken Sie den Drehregler (O K ). Der Radiosender wird gespeichert.  Um den Radiosender wieder aufzurufen, drücken Sie die Taste an der Fernbe- dienung oder die Taste FAV am Gerät und wählen Sie mit den Pfeiltasten an der Fernbedienung oder dem Drehregler den Sender aus der Liste aus. Drü- cken Sie den Drehregler am Gerät O K /die Taste O K an der Fernbedienung, um den Sender wiederzugeben.
  • Seite 28 Alphabetisch Die Sender werden alphabetisch und numerisch sortiert. DAB-Ensemble Die Sender werden anhand ihrer Zugehörigkeit zu einem DAB-Ensemble sortiert. Nach Signalstärke Die Sender werden nach der Signalstärke, in der sie ausgestrahlt werden, sortiert.
  • Seite 29: Fm-Radio Hören

    15. FM-Radio hören 5 4 3  Um FM-Radio zu hören, wählen Sie den Eintrag FM Radio im Hauptmenü und bestätigen Sie mit O K oder drücken Sie die Taste M O D E und wählen Sie dann das Symbol FM RADIO aus und bestätigen Sie mit O K . Das FM-Radio Display erscheint: Sendername (bei RDS Empfang)/Frequenzanzeige Uhrzeit...
  • Seite 30: Radiosender Speichern

    15.2. Radiosender speichern  Halten Sie die Taste / FAV gedrückt, bis die Liste der Speicherplätze im Dis- play erscheint.  Wählen Sie mit den Zifferntasten an der Fernbedienung einen Speicherplatz von 1–40 aus und bestätigen Sie ihn mit O K . oder ...
  • Seite 31: Verbindung Zwischen Internetradio Und Einem Media Server

    Audiodateien auf Ihrem PC drahtlos an Ihr WLAN-Radio übertragen, wenn eine UP- nP-Software installiert ist. Das Internetradio unterstützt die Einbindung als Digital Media Renderer (DMR). So können Sie Musikdateien vom Computer aus auf dem Internetradio abspielen und auch die Lautstärke vom Computer aus einstellen. HINWEIS! Unter Windows 7 muss die UPnP-Verbindung zuvor am Computer bestä- tigt werden.
  • Seite 32: Über Spotify® Musik Hören

     Klicken Sie auf V E R F Ü G B A R E G E R Ä T E . Die verfügbaren Ausgabegeräte werden angezeigt.  Wählen Sie Ihr Internetradio (werkseitig wird MEDION und die MAC Adresse des Geräts angezeigt) aus.
  • Seite 33: Musikplayer Modus

     Der Musiktitel wird über die Lautsprecher des Internetradios wiedergegeben. 16.5. Musikplayer Modus Medienbibliothek(en) Bestätigen Sie den Eintrag, um direkt nach Audiodateien im Netzwerk zu suchen. Wenn ein Mediaserver gefunden wurde, wird ein Auswahlmenü angezeigt, dessen Einträge vom Mediaserver übermittelt werden. Dieses Auswahlmenü kann z. B. wie folgt angezeigt werden: JB-Laptop: Audio Bilder...
  • Seite 34: Wiedergabedisplay

    16.6. Wiedergabedisplay Titelname Uhrzeit ID3 Tag Anzeige (I N F O drücken, um weitere Informationen anzuzeigen) Zufallswiedergabe-Modus Repeat-Modus Medienwiedergabe über Server Albumcover (falls verfügbar) HINWEIS! Während der Wiedergabe können Sie die Wiedergabetasten wie bei ei- nem normalen CD-Player benutzen. Unterstützte Audioformate sind: *.mp3, *.wma, *.wav, *.flac.
  • Seite 35: Einstellungen Im Menü Systemeinstellungen

    17. Einstellungen im Menü Systemeinstellungen 17.1. Equalizer Hier können Sie vordefinierte Klangformate auswählen oder ein eigenes erstellen. Wählen Sie eines der Klangformate Normal, MITTIG, JAZZ, Rock, Soundtrack, Klassik, Pop, Nachrichten, Mein EQ oder Meine EQ Einstellung aus und bestätigen Sie mit dem Drehregler O K . Die Klangeinstellung wird sofort übernommen.
  • Seite 36: Zeiteinstellungen

    Wlan-Region  Wählen Sie hier die WLAN-Region aus, in der Sie das Gerät betreiben. Manuelle Einstellungen  Wählen Sie die Kabel (Ethernet) oder Drahtlos (WLAN) aus und stellen Sie jeweils die DHCP Funktion auf Ein oder Aus. NetRemote PIN-Setup In diesem Eintrag können Sie den vierstelligen Code Ihres Internetradio ändern. Netzwerkprofil Das Gerät speichert die letzten 4 WLAN Netzwerke, zu denen eine Verbindung auf- gebaut wurde.
  • Seite 37: Werkseinstellung

    17.5. Werkseinstellung Wählen Sie diesen Eintrag aus und bestätigen Sie die anschließende Abfrage mit JA, um das Gerät auf die Werkseinstellungen zurückzusetzen. Alle bestehenden Netzwerkinformationen werden gelöscht und müssen zur Erneu- ten Verbindung neu eingegeben werden. 17.6. Software Update Hier können Sie nach Softwareaktualisierungen suchen und sie ggf. installieren. Auto-Update Wählen Sie den Eintrag JA, um regelmäßig automatisch nach Softwareaktualisie- rungen zu suchen.
  • Seite 38: Multi-Room-Funktion

    Displayhelligkeit im Betrieb  Wählen Sie den Eintrag Helligkeit im Betrieb durch Drehen und anschließen- dem Drücken des Drehreglers O K und stellen die gewünschte Helligkeitsstufe Hell, MIttel, dunkel ein. 17.10. Multi-Room-Funktion Die Multi-Room-Funktion ermöglicht es Ihnen, mehrere in demselben Netzwerk an- gemeldeten Internetradios zu einer Gruppe zusammenzufassen und anzusteuern.
  • Seite 39: Schlummer

    18.1. Schlummer  Wählen Sie diesen Eintrag aus und wählen Sie mit dem Drehregler O K folgen- de Einstellungen für die automatische Abschaltung aus: Schlummer Aus – 15 MINuten – 30 MINuten – 45 Minuten – 60 Minuten In der Einstellung Schlummer Aus ist keine Ausschaltzeit eingestellt. Sie können die Ausschaltzeit auch durch mehrmaliges Drücken der Taste S L E E P / S N O O Z E an der Fernbedienung einstellen.
  • Seite 40: Einstellungen Speichern

    Die aktuelle IP-Adresse finden Sie unter Systemeinstellungen/ Interneteinst./Einstellungen anzeigen („Einstellungen anzeigen“ auf Seite 36). Hier können Sie den Friendly Name für ihr Internetradio neu vergeben (Werksein- stellung lautet [MEDION]+[MAC-Adresse]. 21. Steuerung über Lifestream II-Applikation Mit der Lifestream II-Applikation auf Ihrem Smartphone oder Tablet PC können Sie Ihr Internetradio steuern.
  • Seite 41: Installation Über Google Play Oder Den Apple App Store

     Öffnen Sie den Google Play oder den Apple App Store und suchen Sie nach dem Begriff MEDION Lifestream II.  Installieren Sie die Lifestream II App von Medion. Folgen Sie dabei den Anwei- sungen zur Installation auf dem Bildschirm.
  • Seite 42 Problem Mögliche Ursache Lösung Die Fernbedienung funk- Sind die Batterien richtig Batterien korrekt einle- tioniert nicht. eingelegt? gen. Sind Sie weiter als 7 Meter Distanz verringern. vom Radio entfernt? Ist der Weg zwischen Hindernis entfernen. Fernbedienung und Infra- rotsensor frei? Ist die Fernbedienung auf Fernbedienung richtig den Sensor gerichtet?
  • Seite 43 Problem Mögliche Ursache Lösung Kein Zugang vom PC als Radioverschlüsselung Geben Sie den Code ein. AP (Media Server) zum Ra- Beachten Sie hierzu auch die Freigabeeinstellungen auf dem PC. Wecker funktioniert nicht Funktion nicht aktiviert Überprüfen Sie die Weck- einstellung. Problem bei der Verbin- Es ist kein DHCP-Server Überprüfen Sie die Ein-...
  • Seite 44: Reinigung

    Problem Mögliche Ursache Lösung Das Internetradio hat nor- Kein DHCP-Server akti- Prüfen Sie die Router-Ein- mal gebootet, kann aber viert. stellungen. keine IP-Adresse empfan- Falscher WiFi-Verschlüsse- WiFi-Verschlüsselungsal- lungsalgorithmus einge- gorithmus erneut einge- geben. geben. Die Netzwerkschnittstel- Schnittstellen überprüfen. len sind nicht in Ordnung. Das Internetradio Internetradio und Smart- Überprüfen Sie den Netz-...
  • Seite 45: Technische Daten

    25. Technische Daten Netzadapter Modell: GFP451-1625BX-1 Hersteller: GME, China Eingangsspannung: 100 – 240 V ~ 50/60 Hz 1,2 A Ausgangsspannung: 16 V 2,5 A Fernbedienung Batterien für Fernbedienung: 2 x 1,5 V LR03/AAA Batterien Gerät Lautsprecher: 2 x 7 W + 1 x 15 W RMS Abmessungen: ca.
  • Seite 46: Konformitäts- Und Lizenzinformationen

    Wireless LAN Bedingt durch den 5 GHz-Frequenzbereich der eingebauten Wireless LAN Lösung ist der Gebrauch in allen EU-Ländern nur innerhalb von Gebäuden gestattet. Hiermit erklärt die Medion AG, dass das Produkt mit den folgenden europäischen Anforderungen übereinstimmt: • R&TTE Richtline 1999/5/EU •...
  • Seite 47: Lizenzvereinbarungen Für Endanwender

    27.1. Audioprodukte zur Verwendung mit Internetradio Dieses Dokument ist Eigentum von MEDION. Ohne die schriftliche Genehmigung von MEDION darf es weder kopiert noch darf sein Inhalt offengelegt werden. Sämt- liche Dritte, denen dieses Dokument ausgehändigt wird, müssen eine Geheimhal- tungsvereinbarung unterzeichnen.
  • Seite 48 Vervielfältigung in mechanischer, elektronischer und jeder an- deren Form ohne die schriftliche Genehmigung des Herstellers ist verboten Das Copyright liegt bei der Firma: Medion AG Am Zehnthof 77 45307 Essen Deutschland Die Anleitung kann über die Service Hotline nachbestellt werden und steht über das Serviceportal www.medionservice.de zum Download zur Verfügung.
  • Seite 50 Contents Notes on how to use these instructions ........... 55 1.1. Symbols and signal words used in these instructions ......55 Proper use ....................56 Safety information ..................56 3.1. People not permitted to use this device ............56 3.2. Setting up the device safely ................57 3.3.
  • Seite 51 13.2. Connection to an Internet radio station/podcast ........75 Listening to DAB radio ................76 14.1. Main menu in DAB radio mode ................77 Listening to FM radio................. 78 15.1. Selecting radio stations ..................78 15.2. Saving radio stations ....................79 15.3. Main menu in FM radio mode ................79 Listening to audio files from the network ..........
  • Seite 52 27.1. Audio products for use with Internet radio ..........96 Legal Notice....................97...
  • Seite 54: Notes On How To Use These Instructions

    1. Notes on how to use these instructions Before using the device for the first time, read these operating instruc- tions thoroughly and follow the safety advice! Please keep these operating instructions in a safe place for future refer- ence. Always include these operating instructions if you pass the device on to a new owner.
  • Seite 55: Proper Use

     Instructions to be carried out 2. Proper use This device is used for playing audio files streamed over the Internet or via a net- work. You can also use this device to play back audio files on USB storage media as well as FM/DAB radio signals.
  • Seite 56: Setting Up The Device Safely

    3.2. Setting up the device safely • Set up and operate all the components on a stable, level and vibration-free surface to prevent the device from falling. • Do not expose the device to any vibrations. Knocks and vibra- tions may damage the sensitive electronics. •...
  • Seite 57: Mains Connection

    3.3. Mains connection • Connect the mains adapter only to a power socket (AC 230 V~50 Hz) that is easy to reach and close to the place where you have set up the device. The socket outlet must be freely accessible so that you can unplug the device from the mains quickly if necessary.
  • Seite 58: Headphones

    3.6. Headphones WARNING! Listening to the device at a high volume with head- phones or earphones can damage your hearing.  Reduce the volume to a minimum before putting on headphones/earphones! Your hearing can be dam- aged if you listen at high volumes for too long or if the volume is increased too suddenly.
  • Seite 59: System Requirements

    − Windows 8/Microsoft® Windows® 7 (UPnP activated), Windows® 10 Conveniently controlling the Internet radio via smartphone/tablet PC: − Smartphone/tablet with WLAN 802.11 a/b/g/n − Android™ platform 4.0 − iOS 5.0 or higher − Installation of the freely available MEDION® Lifestream II app...
  • Seite 60: Getting Started

    5. Getting started 5.1. Check package contents Remove all packaging materials including the film on the display. DANGER! Do not let children play with the plastic film. There is a risk of suffocation! Please check your purchase to ensure that all items are included. If anything is miss- ing, please contact us within 14 days of purchase.
  • Seite 61: Connections

    5.3. Connections Before connecting up the radio, switch it off using the power switch at the back of the device.  Operation in WiFi mode: Arrange the aerial at the back of the device for recep- tion.  Operation in LAN mode: Connect an Ethernet cable to the RJ 45 port. ...
  • Seite 62: Overview Of Wifi Radio

    6. Overview of WiFi radio 6.1. Front Display NAV: Turn to navigate in the menu; OK: Press to confirm a menu selection; add favourites (Internet radio) : One menu level back MENU: Access the settings menu INFO: Change displays, WPS function : Headphone connection 3.5 mm stereo jack : USB connection FAV: Save station/call up saved station...
  • Seite 63: Top

    6.2. Top SNOOZE/SLEEP: Set snooze time (sleep) 6.3. Rear WiFi aerial DAB/FM aerial POWER: On/Off switch DC IN : Socket for power cable LAN: RJ45 network socket LINE OUT: Audio output, 3.5 mm stereo socket AUX IN: Audio input, 3.5 mm stereo socket...
  • Seite 64: Remote Control

    6.4. Remote control STANDBY: Switch the device into standby mode MUTE: Mute Play back previous track, FM station search backwards STOP: Stop playback Play back next track, FM station search forwards : Start/pause playback INFO: Change displays/WPS function EQ: Setting the equaliser MENU: Access the main menu Navigation buttons Increase volume...
  • Seite 65: Menu Structure

    7. Menu structure The radio has the following menu structure: NOTE! The menus Main menu and System settings can be accessed from any operating mode. You can also access the System settings menu from the Main menu. 7.1. Using the menus Remote control operation All functions can be operated using the remote control as well as the control but- tons on the device.
  • Seite 66: Network Requirements

    NOTE! The station list on your Internet radio is provided free of charge by the www.vTuner.com Internet service and is updated regularly. If a radio station is not available, this can be due to a variety of reasons on the part of the radio station operator. However, this is not a device fault.
  • Seite 67: Using The Device For The First Time

    11. Using the device for the fi rst time  When using the device for the first time, the setup wizard will be initially dis- played.  Confirm the Setup wizard. Start now? prompt with yes in order to start the set- up wizard.
  • Seite 68: Maintain Network Connection

    11.2. Maintain network connection  Set here whether the Internet radio should also maintain the network connec- tion in standby mode (higher power consumption in standby mode). If you con- firm the setting with yes, the Internet and network functions are available quick- er after you switch on the device.
  • Seite 69: Entering The Pin

    WPS button  Select the Push WPS button option in order to use the WPS function via the WPS button on the router.  Then press the WPS button on the router and confirm the connection on the In- ternet radio by pressing the rotary dial (OK). Please also refer here to the operating instructions for the router.
  • Seite 70: Using The Wifi Radio As A Media Client

    Enter the network key for the WiFi access point here using the number/character buttons on the remote control. You can also enter the network key using the but- tons on the device:  To do so, select a character using the rotary dial and then press the rotary dial (OK) to confirm.
  • Seite 71: Listening To Music

    NOTE! You may also need to confirm and authorise the connection on your PC! 12. Listening to music You can use your Internet radio to listen to music from a variety of sources: Internet radio, FM radio, audio files on your computer and audio files on portable MP3 play- ers.
  • Seite 72 My favorites Here you can call up the saved stations. Region [Deutschland] Here you can display all stations that are allocated to the region (here: Germany) in which the Internet radio has dialled into the Internet. My weather The Internet radio has an Internet-based weather service which you can use to re- trieve weather data and forecasts.
  • Seite 73 Seatch Podcasts: Search for podcasts by name MY stored podcasts You can register free of charge on the website http://intenetradio.medion.com. Here you can register your Internet radio using the access code. You will receive the ac- cess code as follows: Switch to Internet radio mode and select Help/Get access code.
  • Seite 74: Connection To An Internet Radio Station/Podcast

    13.2. Connection to an Internet radio station/podcast After you have selected a station/podcast as described above, the radio connects to the Internet radio server. The following will be displayed: Name of the radio station Time Additional information about the radio station Radio station icon The radio has successfully connected to the Internet server and is receiving the In- ternet radio station.
  • Seite 75: Listening To Dab Radio

    14. Listening to DAB radio  To listen to DAB radio, select the DAB Radio function in the main menu and con- firm with the rotary dial (OK) or press the MODE button several times. The DAB radio display will appear: 5 4 3 DAB reception Time...
  • Seite 76: Main Menu In Dab Radio Mode

    on the remote control or the rotary dial on the device. Press the OK keys rotary dial on the device or the OK button on the remote control to play back the station. 14.1. Main menu in DAB radio mode ...
  • Seite 77: Listening To Fm Radio

    15. Listening to FM radio 5 4 3  To listen to FM radio, select the entry FM radio in the main menu and confirm with OK or press the MODE button and then select the FM RADIO icon and confirm with OK.
  • Seite 78: Saving Radio Stations

    15.2. Saving radio stations  Press and hold down the / FAV button until the list of memory spaces appears in the display.  Select a memory space from 1-40 using the number keys on the remote control and confirm with OK. ...
  • Seite 79: Using The Wifi Radio As A Media Client

    16.1. Using the WiFi radio as a media client Your WiFi radio supports the UPnP (Universal Plug-and-Play) protocol. This means that you can wirelessly stream audio files from your PC to the WiFi radio if you have UPnP software installed. The Internet radio supports the connection as a digital media renderer (DMR).
  • Seite 80: Listening To Music Via Spotify

     Click on The available output devices will be displayed.  Select your Internet radio (the factory default of MEDION and the MAC address of the device are displayed).  The music track will be played back via the loudspeakers on the Internet radio.
  • Seite 81: Music Player Mode

    16.5. Music player mode Shared Media Confirm the entry to search directly for audio files on the network. Once a media server has been found, a selection menu appears on the display that allows you to select items that can be streamed from the media server. The selec- tion menu may look like this: JB-Laptop: Audio Pictures...
  • Seite 82: Playback Display

    16.6. Playback display Track name Time ID3 day display (Press INFO to display more information) Random playback mode Repeat mode Media playback via the server Album cover (if available) NOTE! You can use the playback buttons during playback as you would on a normal CD player.
  • Seite 83: Settings In The System Settings Menu

    17. Settings in the system settings menu 17.1. Equalizer Here you can select a default sound format or configure your own. Select one of the following sound formats Normal, Flat, JAZZ, Rock, Movie, Classic, Pop, News, My EQ or My EQ profile set- up and confirm with the OK rotary dial.
  • Seite 84: Manual Settings

    Manual settings  Select Cable (Ethernet) or Wireless (WiFi) and set the respective DHCP function to On or Off. NetRemote PIN-Setup You can change the four digit code for your Internet radio with this setting. Network profile The device stores the last 4 WiFi networks to which a connection was established. ...
  • Seite 85: Faktory Reset

    17.5. Faktory reset Select this entry and confirm the subsequent prompt with yes to reset the device to the factory settings. All existing network information will be deleted and will have to be re-entered to establish a network connection. 17.6. Software Update You can search for and, if need be, install software updates using this function.
  • Seite 86: Multi-Room Function

    17.10. Multi-room function The multi-room function enables you to link together and control multiple Internet radios that are registered to the same network in a group. One Internet radio acts as the master device and the other devices act as clients. This means that the settings on the master will be adopted by all other client devices.
  • Seite 87: Sleep

    18.1. Sleep  Select this entry and use the OK rotary dial to select the following automatic switch-off settings: Sleep OFF – 15 MINutes – 30 MINutes – 45 Minutes – 60 Minutes When Sleep off is activated, no sleep function is set. You can set the switch-off time by pressing the SLEEP/SNOOZE button on the remote control several times.
  • Seite 88: Playing Audio Signals From External Devices

    You will find the current IP address under System settings/Network./Settings. Here you can assign a new friendly name for your Internet radio (the factory setting is [MEDION]+[MAC-Adresse]. 21. Control using the Lifestream II app You can control your Internet radio using the Lifestream II application on your smartphone or tablet PC.
  • Seite 89: Installation Via Google Play Or The Apple App Store

    21.2. Installation via Google Play or the Apple App Store  Open Google Play or the Apple App Store and search for the term MEDION Lifestream II.  Install the Lifestream II app from Medion. Follow the installation instructions on the screen.
  • Seite 90 Problem Possible cause Solution The remote control is not Are the batteries inserted Correctly insert the bat- working. correctly? teries. Are you more than 7 me- Move closer. tres from the radio? Is the space between the Remove obstacles. remote control and the in- frared sensor clear of ob- structions? Is the remote control...
  • Seite 91 Problem Possible cause Solution No access from PC as AP Radio encryption. Enter the code. To do this, (Media Server) to the ra- note also the share media dio. settings on your PC. Alarm does not work. Function is not activated. Check the alarm settings.
  • Seite 92: Cleaning

    Problem Possible cause Solution The Internet radio booted There is no DHCP server Check the router settings. as normal but did not re- activated. ceive an IP address. Incorrect WiFi encryption Re-enter the WiFi encryp- algorithm entered. tion algorithm. There is a problem with Check the interfaces.
  • Seite 93: Technical Data

    25. Technical data Mains adapter Model: GFP451-1625BX-1 Manufacturer: GME, China Input voltage: 100 – 240 V~50/60 Hz 1.2 A Output voltage: 16 V 2.5 A Remote control Batteries for the remote control: 2 x 1.5 V LR03/AAA batteries Device Loudspeakers: 2 x 7 W + 1 x 15 W RMS Dimensions: approx.
  • Seite 94: Conformity And Licence Information

    Wireless LAN Due to the 5 GHz frequency range of the integrated wireless LAN solution, the de- vice may only be used inside buildings in the EU. Medion AG hereby declares that the product conforms to the following European requirements: •...
  • Seite 95: Licence Agreements For End Users

    MEDION shall not be liable for losses that have allegedly arisen from the use of this document or corresponding products. Audio coding technology MPEG Layer 3: li- censed by Fraunhofer IIS and by Thomson.
  • Seite 96: Legal Notice

    These operating instructions are protected by copyright. Mechanical, electronic and any other form of reproduction is prohibited without the written permission of the manufacturer. Copyright is owned by the company: Medion AG Am Zehnthof 77 45307 Essen Germany These operating instructions can be reordered via the Service Hotline and are also available for download from the Service web page www.medionservice.de.
  • Seite 98 İçindekiler Bu kılavuz ile ilgili açıklamalar ............... 103 1.1. Kullanılan semboller ve uyarı sözcükleri ............ 103 Amaca uygun kullanım ................104 Güvenlik uyarıları ..................104 3.1. Kullanım yetkisi bulunmayan kişiler ............104 3.2. Cihazın güvenli kurulumu ................105 3.3. Elektrik bağlantısı ....................106 3.4.
  • Seite 99 13.2. İnternet radyo istasyonuna veya Podcast yayına bağlanma ....123 DAB radyosunu dinleme ................. 124 14.1. DAB radyosu modunda ana menü ............... 125 FM radyo dinleme ..................126 15.1. Radyo istasyonunu ayarlama ................126 15.2. Radyo istasyonu kaydetme ................127 15.3.
  • Seite 100 27.1. İnternet radyosuyla birlikte kullanılacak ses ürünleri ......144 Künye ......................145...
  • Seite 102: Bu Kılavuz Ile Ilgili Açıklamalar

    1. Bu kılavuz ile ilgili açıklamalar İlk kez işletime almadan önce bu kullanım kılavuzunu dikkatli bir şekilde okuyun ve özellikle güvenlik uyarılarına uyun! Bu kullanım kılavuzunu bir başvuru kaynağı olarak muhafaza edin. Ciha- zı başka bir kullanıcıya vermek istediğinizde, lütfen beraberinde bu kul- lanım kılavuzunu da verin.
  • Seite 103: Amaca Uygun Kullanım

    2. Amaca uygun kullanım Cihazınız ile, internet veya bir ağ üzerinden alınan ses verilerini yürütebilirsiniz. Ayrı- ca cihazla, USB veri taşıyıcılarından ses dosyalarını ve FM/DAB radyo sinyallerini ça- labilirsiniz. Cihazı başka bir amaç için kullanmayın. Cihazı sadece iç mekanlarda çalıştırın. Cihaz, fiziksel, duyusal ve zihinsel kısıtlı...
  • Seite 104: Cihazın Güvenli Kurulumu

    3.2. Cihazın güvenli kurulumu • Cihazın düşmesini önlemek için tüm bileşenleri sağlam, düz ve titreşimsiz bir zemin üzerine koyup çalıştırın. • Cihazı sarsıntılara maruz bırakmayın. Sarsıntılar hassas elekt- ronik bileşenlere zarar verebilir. • Cihaz üzerine doğrudan ısı kaynaklarının (örn. ısıtıcılar) etki et- memesine dikkat edin.
  • Seite 105: Elektrik Bağlantısı

    3.3. Elektrik bağlantısı • Adaptörü sadece rahat erişilebilir ve kurulum yerinin yakının- da bulunan bir prize (AC 230 V ~ 50 Hz) takın. Cihazı hızlı bir şekilde şebekeden ayırmanız gerektiği durumlar için prize ser- bestçe erişebilmelisiniz. • Sadece teslimat kapsamında bulunan adaptörü kullanın. Adaptörü...
  • Seite 106: Kulaklık

    3.6. Kulaklık UYARI! Yüksek ses seviyesi, kulak içi veya kafa üstü kulak- lıklarda işitme kaybına yol açabilir.  Kulak içi veya kafa üstü kulaklık takmadan önce ses seviyesini minimum seviyeye getirin! Uzun süre veya aniden yüksek ses seviyesine maruz kalmak, işitme duyunuza zarar verebilir.
  • Seite 107: Sistem Gereksinimleri

    − Windows 8/Microsoft® Windows® 7 (UPnP etkin), Windows® 10 İnternet radyosunu rahat bir şekilde akıllı telefon/tablet PC üzerinden kumanda etme: − Akıllı telefon/tablet (WLAN 802.11 a/b/g/n destekli) − Android™ platform 4.0 − iOS 5.0 veya üstü − Ücretsiz MEDION® Lifestream II uygulama kurulumu...
  • Seite 108: Hazırlık

    5. Hazırlık 5.1. Teslimat kapsamının kontrolü Ekrandaki folyo dahil, tüm ambalaj malzemelerini çıkarın. TEHLİKE! Küçük çocukların folyoyla oynamasına izin vermeyin. Boğulma tehlikesi söz konusudur! Lütfen teslimatın eksiksiz olup olmadığını kontrol edin ve herhangi bir eksiklik du- rumunda, alış tarihinden itibaren 14 gün içinde, bizi haberdar edin. Satın aldığınız ürünle birlikte şunlar teslim edilmiştir: •...
  • Seite 109: Bağlantılar

    5.3. Bağlantılar Bağlantı kurmadan önce radyoyu, arkasındaki şebeke şalterinden kapatın.  WLAN modunda çalıştırma: Cihazın arkasındaki anteni yayın alımı için ayarlayın.  LAN modunda çalıştırma: RJ 45 portuna bir Ethernet kablosu bağlayın.  FM/DAB radyosunu çalıştırma: Cihazın arkasındaki anteni yayın alımı için ayarla- yın.
  • Seite 110: Wlan Radyoya Genel Bakış

    6. WLAN radyoya genel bakış 6.1. Ön taraf Ekran NAV: Çevirerek menüde dolaşma; OK: Basarak menü seçimini onaylama; fa- vori ekleme (internet radyosu) : Bir menü düzeyi geri gitme MENU: Ayar menüsünü açma Info: Ekran göstergeleri arasında geçiş, WPS fonksiyonu : Kulaklık bağlantısı...
  • Seite 111: Üst Taraf

    6.2. Üst taraf Snooze/SLEEP: Kapatma (uyku) saati ayarlama 6.3. Arka taraf WLAN anteni DAB/FM anteni POWER: Açma/kapatma düğmesi DC IN: Adaptör fişi soketi LAN: RJ45 ağ soketi LINE OUT: Ses çıkışı için 3,5 mm stereo soket AUX IN: Ses girişi için 3,5 mm stereo soket...
  • Seite 112: Uzaktan Kumanda

    6.4. Uzaktan kumanda Standby: Cihazı bekleme moduna alma Mute: Ses kapatma Önceki parçayı çalma, geriye doğru FM istasyonu arama STOP: Çalmayı durdurma Sonraki parçayı çalma, ileriye doğru FM istasyonu arama : Çalmayı başlatma/durdurma INFO: Ekran göstergeleri arasında geçiş/ WPS fonksiyonu EQ: Ekolayzer ayarlama MENU: Ana menüyü...
  • Seite 113: Menü Yapısı

    7. Menü yapısı Radyo şu menü yapısına sahiptir: AÇIKLAMA! Ana menü ve Sistem ayarı” menüleri her işletim türünden açılabilir. Ay- rıca, Sistem ayarı menüsü Ana menü menüsünden açılabilir. 7.1. Menüler üzerinden kumanda Uzaktan kumanda üzerinden kumanda Tüm fonksiyonlar hem uzaktan kumanda, hem de cihazdaki tuşlar üzerinden ku- manda edilebilir.
  • Seite 114: Gerekli Ağ Özellikleri

    AÇIKLAMA! İnternet radyonuzun istasyon listesi, www.vTuner.com'un internet hiz- meti tarafından size ücretsiz olarak sunulur ve sürekli güncellenir. Herhangi bir radyo istasyonu mevcut değilse, bunun radyo istasyonunu işletenlerle ilgili çeşitli nedenleri olabilir. Bu durum cihazdan kaynakla- nan bir hata değildir. İnternet radyo istasyonlarına bağlanırken ayrıca yoğun talep nedeniy- le bağlantıda zaman zaman gecikmeler yaşanabilir.
  • Seite 115: İlk Çalıştırma

    11. İlk çalıştırma  İlk çalıştırmada önce kurulum sihirbazı görüntülenir.  Sihirbazı kur Şimdi başlasın mı? sorusunu Evet ile onaylayarak kurulum sihir- bazını başlatın.  Menülerin hangi dilde görüntüleneceğini seçin ve ardından döner düğmeye (OK) basarak onaylayın. Kurulum sihirbazı ( ayarlanan dilde) görüntülenir: AÇIKLAMA! Nein seçtiğinizde, izleyen pencerede, cihazın bir sonraki açılışında sihir- bazın başlatılıp başlatılmayacağını...
  • Seite 116: Ağ Bağlantısını Tutma

    11.2. Ağ bağlantısını tutma  Ağ bağlantısının, internet radyosu bekleme modundayken de korunup korun- mayacağını buradan ayarlayabilirsiniz (bekleme modunda daha yüksek elektrik tüketimi oluşur). Ayarı Evet ile onaylarsanız, cihazı tekrar açtığınızda internet ve ağ fonksiyonlarını daha hızlı kullanabilirsiniz. 11.3. WLAN bölgesini seçme ...
  • Seite 117 WPS tuşu  WPS fonksiyonunu, yönlendiricinin WPS düğmesi üzerinden kullanmak için Bas- ma Düğmesi öğesini seçin.  Ardından yönlendiricideki WPS tuşuna basın ve bağlantıyı internet radyoda dö- ner düğmeye basarak onaylayın (OK). Bunun için yönlendiricinin kullanım kılavuzunu da dikkate alın. •...
  • Seite 118: Ağ Anahtarını Girme

    11.6. Ağ anahtarını girme WPS menüsünü atladıysanız, ağ anahtarı girişi görüntülenir. Burada, uzaktan kumandadaki rakam/karakter tuşlarıyla WLAN-Access Point için ağ anahtarını girin. Ağ anahtarını cihazdaki tuşlar üzerinden de girebilirsiniz:  Bunun için döner düğmeyle bir karakter seçin ve onaylamak için döner düğme- ye (OK) basın.
  • Seite 119: İnternet Radyosu Ile Medya Sunucusu Bağlantısı

    11.8. İnternet radyosu ile medya sunucusu bağlantısı Radyoyu medya sunucusuna şu şekilde bağlayabilirsiniz:  Ana menüdeki Müzik arşivi menüsünü açın (veya birden çok kez MODE tuşuna basın) ve Medya sunucusu öğesini seçin. Radyo, ağdaki kullanılabilir medya içeriklerini aramaya başlar. Birkaç saniye sonra, eğer sunucu bulunmuşsa, medya sunucusunun adı...
  • Seite 120: Radyo Hizmetlerini Seçme

    13.1. Radyo hizmetlerini seçme Aşağıdaki hizmetleri seçebilmek için, İstasyon listesi öğesini seçin: Station List Station List Podcasts My Favourites My added stations Germany My Weather My added Podcasts Change my location Help Stations Sık kullanılanlar Buradan daha önce kaydedilmiş istasyonları açabilirsiniz. Bölge [Almanya] Burada, internet radyosunun internete bağlandığı...
  • Seite 121 OK ile onaylayın. Podcastlar bul: Adına göre Podcast arama Kullanıcı tarafından eklenen radyo istasyonları Web sayfası http://internetradio.medion.com üzerinden ücretsiz kaydolabilirsiniz. Bu adresten internet radyonuzu erişim kodunu kullanarak kaydedebilirsiniz. Erişim kodunu şu şekilde elde edebilirsiniz: İnternet radyosu moduna geçin, oradan Help/Get accedd code ögelerini seçin.
  • Seite 122: İnternet Radyo Istasyonuna Veya Podcast Yayına Bağlanma

    Kullanıcı tarafından kaydedilmiş Podcastlar Buradan daha önce kaydedilmiş Podcast yayınlarını açabilirsiniz. Diğer Buradan internet radyonuz için erişim kodu talep edebilirsiniz. 13.2. İnternet radyo istasyonuna veya Podcast yayına bağlanma Yukarıda tarif edildiği gibi bir radyo istasyonu/Podcast seçtikten sonra radyo, inter- net radyosu sunucusuna bağlanır. Ekranda şu ögeler görüntülenir: Radyo istasyonunun adı...
  • Seite 123: Dab Radyosunu Dinleme

     Radyo istasyonunu tekrar açmak için uzaktan kumandada tuşuna veya cihaz- da FAV tuşuna basın ve uzaktan kumandadaki ok tuşlarıyla veya döner düğ- me ile listeden radyo istasyonunu seçin. İstasyonun yayınını çalmak için cihazda- ki döner düğmeye OK/uzaktan kumandadaki OK tuşuna basın. 14.
  • Seite 124: Dab Radyosu Modunda Ana Menü

     Döner düğmeyle (OK) 1–40 arası bir kayıt yeri seçin ve döner düğmeye basın (OK). Radyo istasyonu kaydedilir.  Radyo istasyonunu tekrar açmak için uzaktan kumandada tuşuna veya cihaz- da FAV tuşuna basın ve uzaktan kumandadaki ok tuşlarıyla veya döner düğ- me ile listeden radyo istasyonunu seçin.
  • Seite 125: Fm Radyo Dinleme

    Sinyal kuvveti İstasyonlar, yayınlarının sinyal kuvvetine göre düzenlenir. 15. FM radyo dinleme 5 4 3  FM radyo dinlemek için ana menüden FM Radio ögesini seçin ve OK ile onayla- yın veya MODE ve ardından FM RADIO simgesini seçin ve OK ile onaylayın. FM radyo ekranda görüntülenir: İstasyon adı...
  • Seite 126: Radyo Istasyonu Kaydetme

    15.2. Radyo istasyonu kaydetme  Kayıt yerlerinin listesi ekranda görüntülenene kadar / FAV tuşunu basılı tutun.  Uzaktan kumandadaki rakam tuşlarıyla 1–40 arası bir kayıt yeri seçin ve OK ile onaylayın. veya  Döner düğmeyle (OK) 1–40 arası bir kayıt yeri seçin ve döner düğmeye basın (OK).
  • Seite 127: İnternet Radyosu Ile Medya Sunucusu Bağlantısı

    destekler. Böylece müzik dosyalarını bilgisayardan yöneterek internet radyosunda çalabilir ve ses seviyesini bilgisayardan ayarlayabilirsiniz. AÇIKLAMA! Windows 7'de, UPnP bağlantısı önce bilgisayardan onaylanmalıdır. Bu- nun için ayrıca işletim sisteminizin ilgili dokümanlarını da okuyun! 16.2. İnternet radyosu ile medya sunucusu bağlantısı Radyoyu medya sunucusuna şu şekilde bağlayabilirsiniz: ...
  • Seite 128: Spotify® Üzerinden Müzik Dinleme

     Spotify uygulamasını akıllı telefonunuzda veya tablet PC'nizde başlatın ve otu- rum açın.  Dilediğiniz müzik parçasını seçin ve başlatın.  ögesini tıklayın. Kullanılabilir çıkış cihazları görüntülenir.  Kendi internet radyonuzu seçin (fabrika ayarında MEDION ve cihazın MAC adre- si görüntülenir).  Müzik parçası internet radyosunun hoparlörleri üzerinden çalınır.
  • Seite 129: Müzik Çalar Modu

    16.5. Müzik çalar modu Ortam kütüphanesi(leri) Ağda doğrudan ses dosyaları aramak için ögeyi onaylayın. Bir medya sunucusu bulunduğunda, girişleri medya sunucusu tarafından aktarılan bir seçim menüsü görüntülenir. Bu seçim menüsü örneğin şu şekilde görünebilir: JB-Laptop: Audio Pictures > Video > Music >...
  • Seite 130: Çalma Ekranı

    16.6. Çalma ekranı Parça adı Saat ID3 etiketi (daha fazla bilgi için INFO ögesine basın) Karışık çalma modu Yineleme modu Sunucu üzerinden medya çalma Albüm kapağı (mevcut ise) AÇIKLAMA! Çalma sırasında çalma tuşlarını normal bir CD çalardaki gibi kullanabilir- siniz. Desteklenen ses formatları: *.mp3, *.wma, *.wav, *.flac.
  • Seite 131: Sistem Ayarları Menüsünde Ayarlar

    17. Sistem ayarları menüsünde ayarlar 17.1. Ekolayzer Burada hazır tanımlanmış ses profilleri seçebilir veya kendiniz oluşturabilirsiniz. Ses profillerinden birini seçin Normal, DÜZ, CAZ, Rock, Film, Klasik, Pop, Haberler, Benim EQ veya EQ profil ayarlarım seçin ve döner düğmeyle (OK) onaylayın. Ses profili hemen uygulanır. ...
  • Seite 132: Zaman Ayarı

    NetRemote PIN kurulumu Bu öge üzerinden internet radyonuzun dört basamaklı kodunu değiştirebilirsiniz. Ağ profili Cihaz, bağlantı kurabildiğiniz son 4 WLAN ağını kaydeder.  Bir ağ seçin ve OK ile onaylayın. Ağı listeden silmek için görüntülenen soruyu Evet ile onaylayın. AÇIKLAMA! O an bağlı...
  • Seite 133: Fabrika Ayarları

    17.5. Fabrika ayarları Cihaza fabrika ayarlarını geri yüklemek için bu ögeyi seçin ve ardından Yes ile onay- layın. Tüm mevcut ağ bilgileri silinir ve tekrar bağlantı kurmak için yeniden girilmelidir. 17.6. Yazılım güncelleme Buradan yazılım güncellemelerini arayabilir ve varsa kurabilirsiniz. Otomatik güncelleme Düzenli aralıklarla otomatik olarak yazılım güncellemelerinin aranmasını...
  • Seite 134: Multi-Room Fonksiyonu

    17.10. Multi-Room fonksiyonu Multi-Room fonksiyonu, aynı ağda bulunan birden fazla internet radyosunu bir grupta birleştirme ve toplu olarak yönetme olanağı sunar. Bir internet radyosu ana cihaz (master), diğerleri ise istemci (client) görevi görür. Böylelikle ana cihazda yapı- lan ayarlar tüm diğer istemci cihazlar tarafından devralınır. Sadece ses seviyesi ayarı bunun dışında tutulur.
  • Seite 135: Alarm

    18.2. Alarm İnternet radyonuzla iki alarm ayarlayabilirsiniz. AÇIKLAMA! Bir alarm ayarlamadan önce, saati ayarlamanız gerekir.  Bir alarm seçin ve cihazdaki döner düğmeye (OK)/uzaktan kumandadaki OK tu- şuna basın.  Aşağıdaki ögelerden birini seçin ve ayarları yapmak için cihazdaki döner düğme- ye (OK)/uzaktan kumandadaki OK tuşuna basın.
  • Seite 136: Harici Cihazların Ses Sinyallerini Çalma

    Google Play veya Apple App Store'dan indirme noktası- na ulaşabilirsiniz: 21.2. Google Play veya Apple App Store üzerinden kurulum  Google Play veya Apple App Store'u açın ve MEDION Lifestream II sözcükleri- ni aratın.  Medion Lifestream II uygulamasını kurun. Kurulum için ekranda görüntülenen talimatları izleyin.
  • Seite 137: Uygulamayı Kullanma

    AÇIKLAMA! Lifestream II uygulamasını kurabilmeniz için internet bağlantısı mevcut olmalıdır. 21.3. Uygulamayı kullanma  Uygulamayı kurduktan sonra internet radyosunu akıllı telefonunuza/tablet PC'ye bağlamanız gerekir.  Bunun için uygulamayı başlatın ve internet radyosunu açın. Akıllı telefon/tablet PC ile internet radyosunun aynı WLAN ağına kayıtlı olmasına dikkat edin. ...
  • Seite 138 Sorun Olası neden Çözüm Ekran açılmıyor. Şebeke adaptörünün her Teslimat kapsamındaki iki ucu doğru bağlan- adaptörün güç besleme- dı mı? si fişini cihazdaki DC IN so- ketine takın. Şebeke fişi- ni AC 230 V ~ 50 Hz tipi bir prize takın. Seçilen istasyon duyul- İstasyon seçimini OK ile muyor.
  • Seite 139: Temizlik

    Sorun Olası neden Çözüm vTuner sunucusuna bağ- İnternet erişimi bloke. Tekrar deneyin. lantı yok. vTuner sunucusu çalışmı- vTuner sunucusunu kont- yor veya aşırı yoğun. rol edin. Oturum açma işlemi ba- Oturum açmayı tekrar de- şarısız. neyin. Radyo istasyonunun stre- Tekrar deneyin. amer'i mevcut değil veya aşırı...
  • Seite 140 Cihaz Cihazı, kullanım ömrü sona erdiğinde kesinlikle normal ev çöpleri ile bir- likte atmayın. Cihazı, çevreye zarar vermeyecek şekilde, eski aletler için öngörülen bir atık toplama merkezine teslim edin. Size yakın atık topla- ma merkezlerinin nerede bulunduğunu belediyenizden öğrenebilirsiniz. Piller Aküler/piller usulüne uygun olarak bertaraf edilmelidir.
  • Seite 141: Teknik Bilgiler

    25. Teknik bilgiler Şebeke adaptörü Model: GFP451-1625BX-1 Üretici: GME, Çin Giriş gerilimi: 100 – 240 V ~ 50/60 Hz 1,2 A Çıkış gerilimi: 16 V 2,5 A Uzaktan kumanda Uzaktan kumanda için piller: 2 x 1,5 V LR03/AAA tipi pil Cihaz Hoparlör: 2 x 7 W + 1 x 15 W RMS...
  • Seite 142: Uygunluk Ve Lisans Bilgileri

    Kablosuz LAN Entegre WLAN çözümünün 5 GHz frekans aralığı nedeniyle, cihazın tüm AB ülkele- rinde sadece iç mekanlarda kullanımına izin verilir. Medion AG, işbu belge ile cihazın aşağıdaki Avrupa yönergeleri ile uyumlu olduğu- nu beyan eder: • R&TTE Yönetmeliği 1999/5/AB •...
  • Seite 143: Son Kullanıcı Için Lisans Anlaşması

    Bu dokümanın teslim edildiği üçüncü kişi- ler bir gizlilik anlaşması imzalamalıdır. Bu doküman, daha önceki tüm versiyonların yerine geçer. MEDION ve çevrimiçi içe- rik ve portal hizmetleri sağlayıcıları, ürünleri, hizmetleri ve dokümanları sürekli iyi- leştirme ve geliştirme ilkeleri uyarınca önceden bildirmeksizin değişiklik yapma hak-...
  • Seite 144 Bu kullanım kılavuzu telif hakları uyarınca koruma altındadır. Üreticinin yazılı izni olmaksızın mekanik, elektronik veya her- hangi bir başka yolla çoğaltma yasaktır Telif hakkı, aşağıdaki firmaya aittir: Medion AG Am Zehnthof 77 45307 Essen Almanya Kılavuz, Servis Çağrı Merkezi üzerinden tekrar sipariş edilebilir ve www.medionservi- ce.de servis portalı...

Diese Anleitung auch für:

Md 87516

Inhaltsverzeichnis