Silvercrest SIKP 3400 A1 Bedienungsanleitung
Induktion
Vorschau ausblenden
Andere Handbücher für SIKP 3400 A1:
- Bedienungsanleitung (81 Seiten) ,
- Bedienungsanleitung (62 Seiten) ,
- Bedienungsanleitung (82 Seiten)
Inhaltsverzeichnis
Werbung
Verfügbare Sprachen
Verfügbare Sprachen
Quicklinks
KOMPERNASS GMBH
Burgstraße 21
D-44867 Bochum
www.kompernass.com
Last Information Update · Stav informací · Stand der Informationen:
07 / 2012 · Ident.-No.: SIKP3400A1042012-2
IAN 75467
INDUCTION HOB SIKP 3400 A1
INDUCTION HOB
Operating instructions
INDUKTIONSKOCHPLATTE
Bedienungsanleitung
IAN 75467
4
Before reading, unfold the page containing the illustrations and familiarise yourself with all functions of
the device.
Pred branjem odprite stran s slikami in se nato seznanite z vsemi funkcijami naprave.
Klappen Sie vor dem Lesen die Seite mit den Abbildungen aus und machen Sie sich anschließend mit allen
Funktionen des Gerätes vertraut.
GB
INDUKCIJSKA KUHALNA PLOŠČA
SI
Navodila za uporabo
DE / AT / CH
Operating instructions
Navodila za uporabo
Bedienungsanleitung
Page
1
Stran
21
Seite
41
Werbung
Kapitel
Inhaltsverzeichnis
Fehlerbehebung

Verwandte Anleitungen für Silvercrest SIKP 3400 A1


Inhaltszusammenfassung für Silvercrest SIKP 3400 A1
- Seite 1 Pred branjem odprite stran s slikami in se nato seznanite z vsemi funkcijami naprave. Klappen Sie vor dem Lesen die Seite mit den Abbildungen aus und machen Sie sich anschließend mit allen Funktionen des Gerätes vertraut. INDUCTION HOB SIKP 3400 A1 Operating instructions Page INDUCTION HOB INDUKCIJSKA KUHALNA PLOŠČA...
-
Seite 3: Inhaltsverzeichnis
Index Introduction ........... 2 Intended use . -
Seite 4: Introduction
Introduction Congratulations on the purchase of your new appliance! You have clearly decided in favour of a modern and high quality product. These operating instructions are a component of this product. They contain important information about the safety, operation and disposal of the appliance. Before using this product familiarise yourself with all of these operating and safety in- structions. -
Seite 5: Items Supplied
Items supplied The appliance is delivered with the following components as standard: ▯ Induction Hob ▯ Magnet ▯ Operating Instructions 1) Remove all parts of the appliance and the operating instructions from the carton. 2) Remove all packing material. NOTICE ►... -
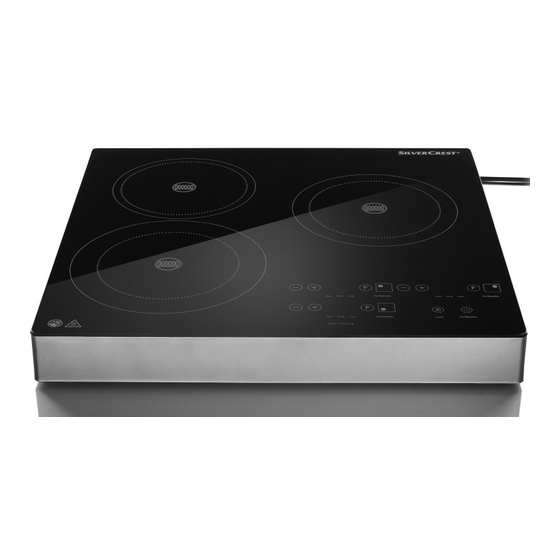
Seite 6: Description Of Appliance / Attachments
Description of appliance / attachments Illustration A: 1 Cooking area, rear (1000 W) 2 Cooking area, right (1400 W) 3 Control panel 4 Cooking area, front (2000 W) Illustration B: 5 Button “-” 6 Button “+” 7 Display 8 Control lamp power mode (“Heat”) 9 Control lamp temperature mode (“Temp.”) Control Lamp Timer q Button “F”... -
Seite 7: Safety Instructions
Safety instructions RISK OF ELECTRIC SHOCK Ensure that the power cable can never become ► wet or damp during operation. Lay the cable such that it cannot be pinched or otherwise damaged. Should the cable or the electric plug become ►... - Seite 8 RISK OF ELECTRIC SHOCK Ensure that the appliance, the cable and the plug are NEVER submersed in water or other fl uids. WARNING! RISK OF INJURY! Do not touch the area on which hot cookware ► has just been standing. Directly after cooking, this area could be very hot.
- Seite 9 WARNING! RISK OF INJURY! Caution! Hot surfaces! This symbol warns you not to touch the cooking area directly after use. Risk of Burns! WARNING! RISK OF FIRE! Overheated foodstuff s could begin to burn! Never ► let the appliance be in use without supervision. Additionally, NEVER position the appliance be- ►...
- Seite 10 WARNING! RISK OF FIRE! NEVER operate the appliance on a metal table ► or other metallic surface. This may heat up and thus cause a fi re. Or, the appliance could be- come irreparably damaged. Do not operate the appliance via an external ►...
-
Seite 11: Manner Of Operation
Manner of operation Whilst standard hotplates become warm themselves, in an induction cooker the heat is created in the base of the cookware. The cooking area itself does not heat up - it becomes hot itself only insofor as, when a pan is heated up on it, then some heat radiates back onto the cooking area. -
Seite 12: Setup
Setup So as not to overheat, the appliance requires unrestricted ventilation. Therefore, position the appliance such that ... – there is an all-round free space of minimum 10 cm, e.g. to the nearest wall, – a free space directly above of minimum 60 cm, e.g. to a suspended wall cabinet. -
Seite 13: Operation
Operation The induction cooking areas The front 4 and the right cooking areas 2 each have 10 power levels. The ■ right 2 cooking area runs independently of the other cooking areas, i.e. you can always set an output power level up of to level 10. The rear cooking area 1 has 5 power levels. -
Seite 14: Operation
Operation The operation of the individual cooking areas 1 2 4 is explained here by using the rear cooking area 1 as the example. The buttons and control lamps for the rear cooking area 1 are numbered on the fold-out page. However, the operation of all 3 cooking areas is identical with the respective operating ele- ments e i o. -
Seite 15: Safety Switch Off
5) To switch the cooking area 1 off , press the button “On / Standby” w. To switch all cooking areas 1 2 4 off at the same time, press the button “On / Standby” t. NOTICE When all 3 cooking areas 1 2 4 are off , after usage or adjustment, ►... -
Seite 16: Timer
NOTICE ► The appliance switches itself into the standby mode automatically after 120 minutes. Timer You can pre-select a time period from 0 - 180 mins., after the expiry of which the respective cooking area 1 2 4 should switch itself off . If you press the button “+”... -
Seite 17: Timer In The Temperature Mode
Timer in the Temperature Mode 1) First, start the heating in the temperature mode as previously described.. 2) Then press the button “F” q repeatedly until the control lamp Temperature Mode 9 and the control lamp Timer 0 glow simultaneously. 3) Use the buttons “-”... -
Seite 18: Cleaning
Cleaning WARNING - RISK OF ELECTRIC SHOCK! ► Always remove the plug from the mains power socket before you clean the appliance. ► UNDER NO CIRCUMSTANCES may the appliance or parts of it be submersed in liquids! This could result in you receiving a fatal electric shock and the appliance being damaged. -
Seite 19: Troubleshooting
Troubleshooting POSSIBLE PROBLEM POSSIBLE CAUSE SOLUTIONS Connect the appliance to The appliance does not The plug is not connected. a mains power socket. function. The control lamp On / Standby r does not In this case, contact The appliance is damaged. glow. -
Seite 20: Disposal Of The Appliance
Disconnect the plug from E08 appears in one of the The temperature sensor is the mains power socket displays. defective. and contact the Customer Services department. There is no cookware on Place suitable cookware on the respective cooking area the cooking area 1 2 4. -
Seite 21: Importer
Importer KOMPERNASS GMBH BURGSTRASSE 21 44867 BOCHUM, GERMANY www.kompernass.com Warranty With this appliance you receive a warranty of 3 years from the date of purchase. This appliance has been manufactured with care and meticulously examined before delivery. Please retain your receipt as proof of purchase. In the case of a warranty claim please make contact by telephone with our Customer Service department. - Seite 22 SKIP 3400 A1...
- Seite 23 Kazalo Uvod ............22 Predvidena uporaba .
-
Seite 24: Uvod
Uvod Iskrene čestitke ob nakupu vaše nove naprave! Odločili ste se za sodoben in zelo kakovosten izdelek. Navodila za uporabo so sestavni del tega izdelka. Vsebujejo pomembne napotke za varnost, uporabo in odstranitev izdelka. Preden začnete izdelek uporabljati, se seznanite z vsemi na- potki za njegovo uporabo in varnost. -
Seite 25: Vsebina Kompleta
Vsebina kompleta Naprava se standardno dobavi z naslednjimi komponentami: ▯ Indukcijska kuhalna plošča ▯ Magnet ▯ Navodila za uporabo 1) Sestavne dele naprave in navodila za uporabo vzemite iz škatle. 2) Odstranite ves embalažni material. NAPOTEK ► Preverite, ali komplet vsebuje vse dele in ali ni vidnih poškodb. ►... -
Seite 26: Opis Naprave/Pribor
Opis naprave/pribor Slika A: 1 zadnja kuhalna plošča (1000 W) 2 desna kuhalna plošča (1400 W) 3 upravljalno polje 4 prednja kuhalna plošča (2000 W) Slika B: 5 tipka “-“ 6 tipka “+“ 7 zaslon 8 kontrolna lučka nastavitve moči (“Heat“) 9 kontrolna lučka nastavitve temperature (“Temp.“) 0 kontrolna lučka časovnika q funkcijska tipka “F“... -
Seite 27: Varnostni Napotki
Varnostni napotki NEVARNOST ELEKTRIČNEGA UDARA Pazite, da se električni kabel med uporabo nikoli ► ne zmoči ali navlaži. Kabel speljite tako, da ne bo nikjer ukleščen in da ga ne bo mogoče drugače poškodovati. Če bi se električni kabel ali električni vtič poškodoval, ►... - Seite 28 NEVARNOST ELEKTRIČNEGA UDARA Preprečite, da bi kakor koli prišlo do potopi- tve naprave, električnega kabla ali električne- ga vtiča v vodo ali druge tekočine. OPOZORILO! NEVARNOST POŠKODB! Ne dotikajte se površine, na kateri je pred tem bila ► vroča posoda za pripravo hrane. Neposredno po premestitvi posode je lahko takšna površina zelo vroča.
- Seite 29 OPOZORILO! NEVARNOST POŠKODB! Pozor! Vroča površina! Ta simbol svari pred dotikanjem kuhalne plošče neposredno po uporabi naprave. Nevarnost opeklin! OPOZORILO! NEVARNOST POŽARA! Preveč segreta živila lahko začnejo goreti! Na- ► prave nikoli ne pustite delovati brez nadzora. Naprave tudi nikoli ne postavljajte pod vnetljive ►...
- Seite 30 OPOZORILO! NEVARNOST POŽARA! Naprave nikoli ne smete uporabljati na kovinski ► mizi ali na drugi kovinski podlagi. Taka podlaga se lahko hitro segreje in tako povzroči požar. Lahko pa se nepopravljivo poškoduje tudi naprava. Naprave ne uporabljajte z dodatno stikalno uro ►...
-
Seite 31: Način Delovanja
Način delovanja Medtem ko se običajne kuhalne plošče segrevajo same, toplota pri indukcijskih kuhalnih ploščah nastaja na dnu posode za pripravo hrane. Sama kuhalna plošča se ne segreva - segreje se le zaradi segrevanja jedi v posodi na plošči, ko toplota v loncu greje kuhalno ploščo (povratno segrevanje). Za to skrbi energijsko polje, ki toploto ustvarja le v materialih z magnetno prevo- dnostjo, npr. -
Seite 32: Postavitev
Postavitev Do naprave je potrebno zagotoviti prost dotok zraka, da se ne bo pregrela. Zaradi tega jo namestite tako, da: – bo okrog nje, npr. do najbližje stene, prosto najmanj 10 cm, – bo nad njo, npr. do kuhinjske viseče omarice, prosto najmanj 60 cm. ■... -
Seite 33: Uporaba
Uporaba Indukcijske kuhalne plošče Prednja 4 in desna kuhalna plošča 2 imata vsaka po 10 nastavitev moči. ■ Desna 2 kuhalna plošča deluje neodvisno od preostalih kuhalnih plošč, to omeni, da lahko moč kadarkoli nastavite do 10. Zadnja kuhalna plošča 1 ima 5 nastavitev moči. ■... -
Seite 34: Nastavljanje
Nastavljanje Nastavljanje kuhalnih plošč 1 2 4 je pojasnjeno na primeru zadnje kuhalne plošče 1. Tipke in kontrolne lučke so na zloženi strani za zadnjo kuhalno ploščo 1 označene s številkami. Uporaba pa je - z ustreznimi elementi za upravljanje e i o - enaka za vse 3 kuhalne plošče. -
Seite 35: Varnostni Izklop
5) Za izklop kuhalne plošče 1 pritisnite tipko za vklop/pripravljenost (“On/ Standby“) w. Za hkratni izklop vseh kuhalnih plošč 1 2 4 pritisnite tipko za vklop/pripravljenost (“On/Standby“) t. NAPOTEK Ko so po uporabi ali nastavljanju izklopljene vse 3 kuhalne plošče 1 2 ►... -
Seite 36: Časovnik (Timer)
NAPOTEK ► Naprava se po 120 minutah samodejno preklopi v pripravljenost. Časovnik (timer) Prednastavite lahko čas od 0 do 180 minut, po poteku katerega se naj posamezna kuhalna plošča 1 2 4 izklopi. Z vsakim pritiskom na tipko “+“ 6 se nastavljen čas podaljša za 5 minut. -
Seite 37: Časovnik In Nastavljanje Temperature
Časovnik in nastavljanje temperature 1) Najprej vklopite segrevanje z nastavitvijo temperature, kot je predhodno opisano. 2) Nato večkrat pritisnite tipko “F“ q, dokler hkrati ne zasvetita kontrolna lučka nastavljanja temperature 9 in kontrolna lučka časovnika 0. 3) S tipkama “-“ 5 in “+“ 6 nastavite želen čas, po katerem se naj kuhalna plošča 1 izklopi. -
Seite 38: Čiščenje
Čiščenje OPOZORILO – NEVARNOST ELEKTRIČNEGA UDARA! ► Pred čiščenjem naprave vedno prej potegnite električni vtič iz vtičnice. ► Naprave ali njenih delov v nobenem primeru ni dovoljeno polagati v kakršne koli tekočine! Tako ravnanje lahko povzroči smrtno nevarnost zaradi električnega udara ter privede do poškodb naprave. ►... -
Seite 39: Odprava Napak
Odprava napak PROBLEM MOŽNI VZROK MOŽNE REŠITVE Električni vtič ni priklopljen Napravo priklopite Naprava ne deluje. v električno vtičnico. v električno vtičnico. Kontrolna lučka za vklop/ Obrnite se na servisno pripravljenost r ne sveti. Naprava je poškodovana. službo. Na kuhalno ploščo 1 2 Na kuhalni plošči 1 2 4 4 postavite primerno ni posode za pripravo hrane. -
Seite 40: Odstranitev Naprave
Na kuhalno ploščo 1 2 Na kuhalni plošči 1 2 4 ni 4 postavite posodo za posode za pripravo hrane. pripravo hrane. Na kuhalni plošči 1 2 4 je Na kuhalno ploščo 1 Na enem od zaslonov je 2 4 postavite primerno neprimerna posoda za pripravo izpisano "- - -". -
Seite 41: Proizvajalec
Proizvajalec KOMPERNASS GMBH BURGSTRASSE 21 44867 BOCHUM, GERMANY www.kompernass.com Garancijski list 1. S tem garancijskim listom jamčimo Kompernass GmbH, da bo izdelek v garan- cijskem roku ob normalni in pravilni uporabi brezhibno deloval in se zavezu- jemo, da bomo ob izpolnjenih spodaj navedenih pogojih odpravili morebitne pomanjkljivosti in okvare zaradi napak v materialu ali izdelavi oz. - Seite 42 SKIP 3400 A1...
- Seite 43 Inhaltsverzeichnis Einleitung ........... . 42 Bestimmungsgemäße Verwendung .
-
Seite 44: Einleitung
Einleitung Herzlichen Glückwunsch zum Kauf Ihres neuen Gerätes! Sie haben sich damit für ein modernes und hochwertiges Produkt entschieden. Die Bedienungsanleitung ist Bestandteil dieses Produktes. Sie enthält wichtige Hinweise für Sicherheit, Gebrauch und Entsorgung. Machen Sie sich vor der Benutzung des Produkts mit allen Bedien- und Sicherheitshinweisen vertraut. Benutzen Sie dieses Produkt nur wie beschrieben und für die angegebenen Einsatzbereiche. -
Seite 45: Lieferumfang
Lieferumfang Das Gerät wird standardmäßig mit folgenden Komponenten geliefert: ▯ Induktionskochplatte ▯ Magnet ▯ Bedienungsanleitung 1) Entnehmen Sie alle Teile des Gerätes und die Bedienungsanleitung aus dem Karton. 2) Entfernen Sie sämtliches Verpackungsmaterial. HINWEIS ► Prüfen Sie die Lieferung auf Vollständigkeit und auf sichtbare Schäden. ►... -
Seite 46: Gerätebeschreibung / Zubehör
Gerätebeschreibung / Zubehör Abbildung A: 1 Kochfeld hinten (1000 W) 2 Kochfeld rechts (1400 W) 3 Bedienfeld 4 Kochfeld vorne (2000 W) Abbildung B: 5 Taste „-“ 6 Taste „+“ 7 Display 8 Kontrollleuchte Leistungsmodus („Heat“) 9 Kontrollleuchte Temperaturmodus („Temp.“) 0 Kontrollleuchte Timer q Taste „F“... -
Seite 47: Sicherheitshinweise
Sicherheitshinweise STROMSCHLAGGEFAHR Achten Sie darauf, dass im Betrieb das Netzka- ► bel niemals nass oder feucht wird. Führen Sie es so, dass es nicht eingeklemmt oder anderweitig beschädigt werden kann. Sollte das Netzkabel oder der Netzstecker be- ► schädigt sein, lassen Sie diese erst durch den Service (Kundendienst) ersetzen, bevor Sie das Gerät weiter verwenden. - Seite 48 STROMSCHLAGGEFAHR Stellen Sie sicher, dass das Gerät, das Netz- kabel oder der Netzstecker niemals in Was- ser oder andere Flüssigkeiten getaucht wird. WARNUNG! VERLETZUNGSGEFAHR! Berühren Sie nicht die Fläche, auf der zuvor ein ► heißes Kochgefäß gestanden hat. Direkt danach kann die Fläche sehr heiß...
- Seite 49 WARNUNG! VERLETZUNGSGEFAHR! Achtung! Heiße Oberfl äche! Dieses Symbol warnt Sie davor, direkt nach dem Gebrauch das Kochfeld zu berühren. Verbrennungsgefahr! WARNUNG! BRANDGEFAHR! Überhitzte Speisen können zu brennen beginnen! ► Lassen Sie das Gerät nie unbeaufsichtigt arbeiten. Stellen Sie es deshalb auch niemals unter brenn- ►...
-
Seite 50: Um Gefahren Durch Elektromagnetische Felder Zu Vermeiden
WARNUNG! BRANDGEFAHR! Betreiben Sie das Gerät niemals auf einem me- ► tallischen Tisch oder einer anderen metallischen Unterlage. Diese kann sich erhitzen und so zu einem Brand führen. Oder das Gerät kann irrepa- rabel beschädigt werden. Betreiben Sie das Gerät nicht mit einer externen ►... -
Seite 51: Funktionsweise
Funktionsweise Während normale Kochplatten selber heiß werden, entsteht die Hitze bei einer Induktionskochplatte im Boden des Kochgeschirrs. Das Kochfeld selber wird nicht erhitzt - es erhitzt sich, wenn Etwas in einem Topf darauf erhitzt wird und die Hitze im Topf auf das Kochfeld zurückstrahlt. (Rückerwärmung). Hierfür sorgt ein Energiefeld, das nur in magnetisch leitfähigen Materialien Hitze erzeugt, z.B. -
Seite 52: Aufstellen
Aufstellen Das Gerät benötigt freie Luftzufuhr, um nicht zu überhitzen. Stellen Sie das Gerät deshalb so auf, dass ... – min. 10 cm Abstand rundum frei bleibt, z.B. zur nächsten Wand, – min. 60 cm Abstand nach oben frei bleibt, z.B. zu einem Hängeschrank. ■... -
Seite 53: Betrieb
Betrieb Die Induktionskochfelder Das vordere 4 und das rechte Kochfeld 2 verfügen über je 10 Leistungs- ■ stufen. Das rechte 2 Kochfeld läuft unabhängig von den übrigen Kochfel- dern, d.h. Sie können jederzeit eine Leistungsstufe bis zu Leistungsstufe 10 einstellen. Das hintere Kochfeld 1 verfügt über 5 Leistungsstufen. -
Seite 54: Bedienen
Bedienen Die Bedienung der Kochfelder 1 2 4 wird hier exemplarisch für das hintere Kochfeld 1 erklärt. Die Tasten und Kontrollleuchten sind auf der Ausklappseite für die hintere Kochplatte 1 durchnummeriert. Die Bedienung ist jedoch bei allen 3 Kochfeldern mit Hilfe der jeweiligen Bedienelemente e i o identisch. 1) Stellen Sie mittig auf das hintere Kochfeld 1 das Kochgefäß... -
Seite 55: Sicherheitsabschaltung
5) Um das Kochfeld 1 auszuschalten, drücken Sie die Taste „On / Standby“ w. Um alle Kochfelder 1 2 4 gleichzeitig auszuschalten, drücken Sie die Taste „On / Standby“ t. HINWEIS Wenn alle 3 Kochfelder 1 2 4 nach einer Benutzung oder Einstellung ►... -
Seite 56: Timer
HINWEIS ► Das Gerät schaltet sich nach 120 Minuten automatisch in den Standby- Modus. Timer Sie können eine Zeit von 0 - 180 Min. vorwählen, nach deren Ablauf sich das je- weilige Kochfeld 1 2 4 ausschalten soll. Wenn Sie die Taste „+“ 6 drücken, erhöht sich die Zeit um jeweils 5 Minuten. -
Seite 57: Timer Im Temperaturmodus
Timer im Temperaturmodus 1) Starten Sie erst das Erhitzen im Temperaturmodus wie zuvor beschrieben. 2) Drücken Sie dann die Taste „F“ q so oft, bis die Kontrollleuchte Temperatur- modus 9 und die Kontrollleuchte Timer 0 gleichzeitig leuchten. 3) Stellen Sie mit Hilfe der Tasten „-“ 5 und „+“ 6 die gewünschte Zeit ein, nach deren Ablauf sich das Kochfeld 1 ausschalten soll. -
Seite 58: Reinigen
Reinigen WARNUNG - STROMSCHLAGGEFAHR! ► Bevor Sie das Gerät reinigen, ziehen Sie immer den Netzstecker aus der Netzsteckdose. ► Auf keinen Fall darf das Gerät oder Teile davon in Flüssigkeiten getaucht werden! Hierdurch kann Lebensgefahr durch elektrischen Schlag entstehen und das Gerät beschädigt werden. ►... -
Seite 59: Fehlerbehebung
Fehlerbehebung MÖGLICHE PROBLEM MÖGLICHE URSACHE LÖSUNGEN Der Netzstecker ist nicht ange- Schließen Sie das Gerät an Das Gerät funktioniert schlossen. eine Netzsteckdose an. nicht. Die Kontrollleuchte On / Standby r leuchtet Wenden Sie sich an den Das Gerät ist beschädigt. nicht. -
Seite 60: Gerät Entsorgen
Ziehen Sie den Netzstecker In einem der Displays wird Das Gerät ist überhitzt (im aus der Netzsteckdose und E07 angezeigt. Temperatur-Modus)! warten Sie, bis sich das Gerät abgekühlt hat. Ziehen Sie den Netzstecker In einem der Displays wird Der Temperatursensor ist aus der Netzsteckdose und E08 angezeigt. -
Seite 61: Importeur
Importeur KOMPERNASS GMBH BURGSTRASSE 21 44867 BOCHUM, GERMANY www.kompernass.com Garantie Sie erhalten auf dieses Gerät 3 Jahre Garantie ab Kaufdatum. Das Gerät wurde sorgfältig produziert und vor Anlieferung gewissenhaft geprüft. Bitte bewahren Sie den Kassenbon als Nachweis für den Kauf auf. Bitte setzen Sie sich im Garantiefall mit Ihrer Servicestelle telefonisch in Verbindung. -
Seite 62: Service
Service Service Deutschland Tel.: 01805 772 033 (0,14 EUR/Min. aus dem dt. Festnetz, Mobilfunk max. 0,42 EUR/Min.) E-Mail: kompernass@lidl.de IAN 75467 Service Österreich Tel.: 0820 201 222 (0,15 EUR/Min.) E-Mail: kompernass@lidl.at IAN 75467 Service Schweiz Tel.: 0842 665566 (0,08 CHF/Min., Mobilfunk max. 0,40 CHF/Min.) E-Mail: kompernass@lidl.ch IAN 75467 SKIP 3400 A1...