Ripmax Zephyr Anleitung
Flugmodell

Verwandte Anleitungen für Ripmax Zephyr


Inhaltszusammenfassung für Ripmax Zephyr
- Seite 1 INSTRUCTION MANUAL BAUANLEITUNG...
-
Seite 3: Wing Mounting Dowels/Montage Der Flügelbefestigung
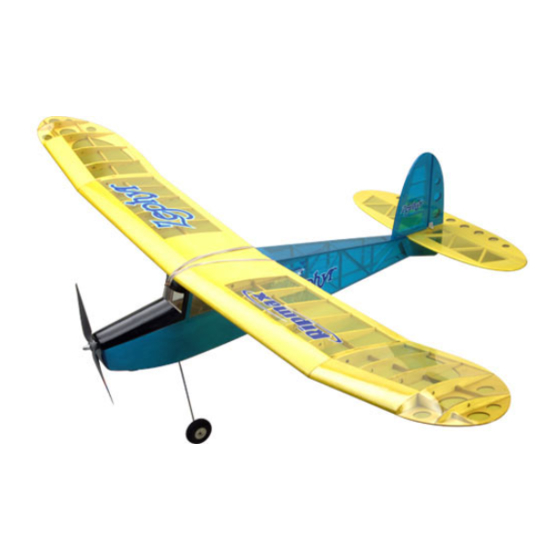
Mit dem empfohlenen 3S 1100 ~1600mAh Li-Po Akku sind lange Flugzeiten durch den geringen Stromverbrauch, möglich. Der Zephyr ist das perfekte Modell für warme Sommerabende. Durch sein geringes Gewicht und die sanfte Flugeigenschaften können Sie beim Fliegen entspannen, und genießen. Es werden nur ein paar Stunden für die Endmontage benötigt, bevor Ihr Zephyr flugfertig ist. -
Seite 4: Undercarriage Installation/ Einbau Des Fahrwerks
STAGE 3 / SCHRITT 3 Turn the fuselage over and apply cyano to the dowel and cabin frame as shown. Drehen Sie den Rumpf herum und geben einige Tropfen Sekundenkleber auf den Dübel und den Kabinenrahmen, wie gezeigt. UNDERCARRIAGE INSTALLATION/ EINBAU DES FAHRWERKS STAGE 4 / SCHRITT 4 Turn the fuselage over and trim away the covering from the pre-cut slot in the bottom of the model using a sharp knife. -
Seite 5: Fitting The Tail And Fin / Heckleitwerk Und Finne Montieren
STAGE 8 / SCHRITT 8 Locate the wheels and retaining collets. Slip a collet over the axle, install a wheel then fit a second collet to retain. Tighten the grubscrews fully then repeat the process to fit the second wheel. Be sure to use a threadlock compound on the grubscrew to secure. - Seite 6 STAGE 12 / SCHRITT 12 Using a sharp knife, remove the covering film from the tongue on the top of the rear landing skid. Mit dem scharfen Messer, entfernen Sie vorsichtig die Folie von der Zunge an der Oberseite der hinteren Landekufe. STAGE 13 / SCHRITT 13 Position the landing skid on the fuselage and mark its position with a felt tip pen.
- Seite 7 STAGE 17 / SCHRITT 17 IMPORTANT: Ensure that only the film is cut - not the tailplane - as this will seriously weaken the structure. WICHTIG: Vergewissern Sie sich, dass nur die Folie durchschnitten ist - nicht das Leitwerk- da dies die Stabilität ernsthaft schwächt.
- Seite 8 STAGE 21 / SCHRITT 21 Hold the wing panel flat on your building bench. Weight it down in position - we found a few of our favourite magazines worked a treat! Using strips of masking tape to protect the covering, apply a quantity of epoxy to the join and raise the wingtip.
- Seite 9 STAGE 25 / SCHRITT 25 Apply 30 minute epoxy to the wing joiners and insert them into one wing panel. Apply more epoxy to the wing root ribs and the exposed parts of the wing joiners. Draw the second wing panel onto the joiners and hold the panels together with masking tape.
- Seite 10 STAGE 29 / SCHRITT 29 Locate a wire pushrod for the elevator and fit a control horn on the z-bent end as shown. Use the outermost hole. Pierce a small hole in the film and thread the wire into its nylon sleeve which is pre-fitted in the fuselage.
- Seite 11 STAGE 33 / SCHRITT 33 With your servos centred and the rudder and elevator level, tighten the pushrod connectors. Mit den zentrierten Servos, Ruder und Höhenruder, ziehen Sie die Gestängeanschlüsse fest. STAGE 34 / SCHRITT 34 Test that the rudder and elevator move through their entire range of travel without binding.
- Seite 12 The lightweight structure is however vulnerable to damage from excessively rough landings, so this should be borne in mind if the Zephyr is to be landed by the pilot under instruction.
- Seite 13 SPARE PARTS AND SERVICE / ERSATZTEILE UND SERVICE Spare parts are available for the Zephyr ARTF from all Ripmax stocked model shops. In case of any difficulty, any product queries, or to locate your local Ripmax stockist, please write to the address below or visit www.ripmax.com Ersatzteile sind für den Zephyr in allen Ripmax Modellfachgeschäften verfügbar.