Inhaltsverzeichnis
Werbung
Verfügbare Sprachen
Verfügbare Sprachen
Quicklinks
Istruzioni per l'uso
GB
IT
English,17
Italiano, 1
NL
DE
Nederlands, 49
Deutsch, 65
CI 46S G W
Sommario
FR
Installazione, 2-5
Français, 33
Avvio e utilizzo, 7-12
Manutenzione e cura, 14-15
Assistenza, 16
CUCINA E FORNO
IT
Werbung
Kapitel
Inhaltsverzeichnis

Verwandte Anleitungen für Scholtes CI 46S G W


Inhaltszusammenfassung für Scholtes CI 46S G W
-
Seite 1: Inhaltsverzeichnis
Tabella caratteristiche Descrizione dell’apparecchio, 6 Vista d’insieme Pannello di controllo Display Avvio e utilizzo, 7-12 Uso del piano cottura CI 46S G W Impostare l’orologio Impostare il contaminuti Uso del forno Programmi di cottura Programmare la cottura Consigli pratici di cottura... -
Seite 2: Installazione
Installazione ! È importante conservare questo libretto per poterlo ! Dopo un uso prolungato dell’apparecchio, è consultare in ogni momento. In caso di vendita, di consigliabile aprire una finestra o aumentare la cessione o di trasloco, assicurarsi che resti insieme velocità... -
Seite 3: Collegamento Elettrico
• la presa sia in grado di sopportare il carico • se la cucina viene massimo di potenza della macchina, indicato installata sotto un HOOD della targhetta caratteristiche; pensile, esso dovrà • la tensione di alimentazione sia compresa nei Min. mantenere una valori nella targhetta caratteristiche;... -
Seite 4: Adattamento A Diversi Tipi Di Gas
Effettuato l’allacciamento assicurarsi che il tubo: Adattamento del piano cottura • non sia in nessun punto a contatto con parti che raggiungono temperature superiori a 50°C; Sostituzione degli ugelli dei bruciatori del piano: • non sia soggetto ad alcuno sforzo di trazione e di 1. -
Seite 5: Tabella Caratteristiche Bruciatori E Ugelli
Tensione e vedi targhetta caratteristiche frequenza d'alimentazione Direttiva 2002/40/CE sull’etichetta dei forni elettrici. Norma EN 50304 CI 46S G W Consumo energia convezione Naturale funzione di riscaldamento: ENERGY LABEL Tradizione Consumo energia dichiarazione Classe convezione Forzata funzione di riscaldamento:... -
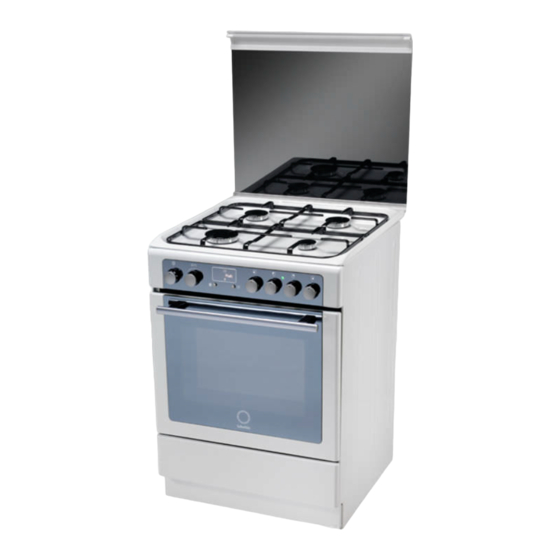
Seite 6: Descrizione Dell'apparecchio
Descrizione dell’apparecchio Vista d’insieme Coperchio in vetro Bruciatore a gas Piano di contenimento per eventuali trabocchi Griglia del piano di lavoro GUIDE Pannello di controllo di scorrimento dei ripiani posizione 5 Ripiano GRIGLIA posizione 4 posizione 3 Ripiano LECCARDA posizione 2 posizione 1 Piedino di regolazione Piedino di regolazione... -
Seite 7: Avvio E Utilizzo
Avvio e utilizzo Uso del piano cottura Bruciatore ø Diametro Recipienti (cm) Accensione dei bruciatori Ultra Rapido (UR) 24 - 26 In corrispondenza di ogni manopola BRUCIATORE è indicato con un cerchietto pieno il bruciatore Semi Rapido (S) 16 - 20 associato. -
Seite 8: Impostare Il Contaminuti
Impostare il contaminuti È possibile modificare la temperatura ruotando la manopola TERMOSTATO. ! Questa funzione non interrompe la cottura e 3. Quando si spegne l’indicatore del prescinde dall’utilizzo del forno; permette solo di preriscaldamento e si avverte un segnale azionare il segnale acustico allo scadere dei minuti acustico il preriscaldamento è... -
Seite 9: Programmi Di Cottura
Programmi di cottura Programma ROSTICCERIA Unisce all’irradiazione termica unidirezionale la circolazione ! Tutti i programmi hanno una temperatura di cottura forzata dell’aria all’interno del forno. preimpostata. Essa può essere regolata manualmente, Ciò impedisce la bruciatura superficiale degli alimenti impostandola a piacere tra 40°C e 250°C. aumentando il potere di penetrazione del calore. -
Seite 10: Programmare La Cottura
Programmare la cottura Consigli pratici di cottura ! La programmazione è possibile solo dopo aver ! Nelle cotture ventilate non utilizzare le posizioni selezionato un programma di cottura. 1 e 5: sono investite direttamente dall’aria calda che potrebbe provocare bruciature sui cibi delicati. Programmare la durata di cottura 1. -
Seite 11: Tabella Cottura In Forno
Tabella cottura in forno PIETANZE ESEMPI FUNZIONE TEMPERATURA SUPPORTI Torte salate e pasticci quiche lorraine, torta ai porri, ecc. Crostate 220 °C tortiera su leccarda (pasta frolla o pasta sfoglia) Pizze alte con impasto di pane pizze, focacce Brioche 220 °C su leccarda (o surgelate) Pizze (altro impasto) - Seite 12 Tabella cottura in forno PIETANZE ESEMPI FUNZIONE TEMPERATURA SUPPORTI pan di spagna, savoiradi, biscotti arrotolati, Biscotti (senza lievito) dolci (o multilivello) 200 °C tortiera su leccarda Brownie, Plum-cake e quattro quarti (con plum-cake alla frutta, marezzati, quattro quarti, dolci (o multilivello) 160 °C tortiera su leccarda lievito chimico)
-
Seite 13: Precauzioni E Consigli
Precauzioni e consigli ! L’apparecchio è stato progettato e costruito in conformità alle • Se la cucina viene posta su di un piedistallo, prendere norme internazionali di sicurezza. adeguati accorgimenti affinchè l'apparecchio non scivoli dal Queste avvertenze sono fornite per ragioni di sicurezza e devono piedistallo stesso. -
Seite 14: Manutenzione E Cura
Manutenzione e cura Escludere la corrente elettrica Controllare le guarnizioni del forno Prima di ogni operazione isolare l’apparecchio dalla Controllare periodicamente lo stato della guarnizione rete di alimentazione elettrica. attorno alla porta del forno. In caso risulti danneggiata rivolgersi al Centro Assistenza Autorizzato più vicino. È... -
Seite 15: Pulizia Automatica Pirolisi
Pulizia automatica PIROLISI Dispositivi di sicurezza Il programma PIROLISI porta la temperatura interna • l’icona sul display illuminata indica che la del forno a raggiungere i 500°C e attiva il processo porta del forno si è bloccata automaticamente non di pirolisi, ossia la carbonizzazione dei residui. Lo appena la temperatura ha raggiunto valori elevati;... -
Seite 16: Assistenza
08:00 e i giorni festivi, per chi chiama da telefono fisso. Per chi chiama da radiomobile le tariffe sono legate al piano tariffario dell’operatore telefonico utilizzato. Le suddette tariffe potrebbero essere soggette a variazione da parte dell’operatore telefonico; per maggiori informazioni consultare il sito www.scholtes.com. - Seite 17 Table of characteristics Description of the appliance, 22 Overall view Control panel Display Start-up and use, 23-28 Using the hob CI 46S G W Setting the clock Setting the timer Using the oven Cooking modes Programming cooking Practical cooking advice...
-
Seite 18: Installation
Installation ! Please keep this instruction booklet in a safe place ! After prolonged use of the appliance, it is for future reference.. Make sure the booklet remains advisable to open a window or increase the speed of with the appliance if it is sold, given away or moved. any fans used. -
Seite 19: Electrical Connection
Before connecting the appliance to the power • If the cooker is supply, make sure that: installed underneath a HOOD • The appliance is earthed and the plug is compliant wall cabinet, there must with the law. Min. be a minimum distance •... -
Seite 20: Adapting To Different Types Of Gas
Once the connection has been performed, make Adapting the hob sure that the hose: • Does not come into contact with any parts which Replacing the nozzles for the hob burners: reach temperatures of over 50°C. 1. Remove the hob grids and slide the burners off •... -
Seite 21: Table Of Burner And Nozzle Specifications
50304 Energy consumption for Natural convection – heating mode: ENERGY LABEL Convection mode Declared energy consumption for CI 46S G W Forced convection Class – heating mode: Roasting EC Directives: 2006/95/CE dated 12.12.06 (Low Voltage) and subsequent amendments - 2004/108/CE dated 15/12/04... -
Seite 22: Description Of The Appliance
Description of the appliance Overall view Glass cover Gas burner Containment surface spills Hob grid GUIDE RAILS Control panel for the sliding racks position 5 RACK shelf position 4 position 3 DRIPPING PAN shelf position 2 position 1 Adjustable foot Adjustable foot Control panel THERMOSTAT/TIMER... -
Seite 23: Start-Up And Use
Start-up and use Using the hob Burner ø Cookware Diameter (cm) Lighting the burners For each BURNER knob there is a complete ring Ultra rapid (UR) 24 – 26 showing the strength of the flame for the relevant burner. Semi-rapid (S) 16 –... -
Seite 24: Setting The Timer
Setting the timer 6. If a blackout occurs while the oven is already in operation, an automatic system within the appliance will reactivate the cooking mode from the point at ! This function does not interrupt cooking and does which it was interrupted, provided that the not affect the oven;... -
Seite 25: Cooking Modes
Cooking modes ROASTING ROASTING ROASTING ROASTING ROASTING mode This combination of features increases the ! All cooking modes have a default cooking effectiveness of the unidirectional thermal radiation temperature which may be adjusted manually to a provided by the heating elements through the forced value between 40°C and 250°C as desired. -
Seite 26: Programming Cooking
Practical cooking advice Programming cooking ! Do not place racks in position 1 and 5 during fan- ! A cooking mode must be selected before assisted cooking. This is because excessive direct programming can take place. heat can burn temperature sensitive foods. ! In the SPIT ROAST, BARBECUE and ROASTING Programming the cooking duration cooking modes, place the dripping pan in position 1... -
Seite 27: Oven Cooking Advice Table
Oven cooking advice table DISHES EXAMPLES FUNCTION TEMPERATURE SUPPORT Savoury pies and pastries quiche Lorraine, leek tart, etc. Pies 220 °C cake tin on dripping pan (shortcrust or puff pastry) Deep-pan pizza made with fresh bread dough pizza, focaccia Brioche 220 °C on dripping pan (or frozen) - Seite 28 Oven cooking advice table DISHES EXAMPLES FUNCTION TEMPERATURE SUPPORT Baked desserts Biscuit cakes (without yeast) sponge cake, sponge fingers, swirled biscuits, brownies, etc. 200 °C cake tin on dripping pan (or Multilevel) Sponge cake made with yoghurt and fruit-filled sponge cake made with yoghurt, marble cake, pound Baked desserts 160 °C cake tin on dripping pan...
-
Seite 29: Precautions And Tips
Precautions and tips ! This appliance has been designed and manufactured in by someone who assumes responsibility for their safety or receive compliance with international safety standards. preliminary instructions relating to the operation of the appliance. The following warnings are provided for safety reasons and must be •... -
Seite 30: Care And Maintenance
Care and maintenance Switching the appliance off Inspecting the oven seals Disconnect your appliance from the electricity Check the door seals around the oven regularly. If supply before carrying out any work on it. the seals are damaged, please contact your nearest Authorised After-sales Service Centre. -
Seite 31: Automatic Cleaning Using The Pyrolytic Cycle
Automatic cleaning using the Safety devices PYROLYTIC cycle • The icon on the display, when lit, indicates During the PYROLYTIC cycle, the internal that the oven door was automatically locked as temperature of the oven reaches 500°C. The soon as the temperature reached a high value. pyrolytic cycle is activated and burns away food and grime residues. -
Seite 32: Assistance
Assistance Warning: The appliance is fitted with an automatic diagnostic system which detects any malfunctions. Malfunctions are displayed by messages of the following type: “F” followed by numbers. Call for technical assistance in the event of a malfunction. ! Never use the services of an unauthorised technician. Please have the following information to hand: •... -
Seite 33: Italiano, 1 English,17 Français
Mode d’emploi CUISINE ET FOUR Sommaire Installation, 34-37 Italiano, 1 English,17 Mise en place et mise à niveau Français, 33 Raccordement électrique Raccordement gaz Adaptation à différents types de gaz Tableau des caractéristiques des brûleurs et des Nederlands, 49 Deutsch, 65 injecteurs Tableau des caractéristiques Description de l’appareil, 38... -
Seite 34: Installation
Installation ! Conserver ce mode d’emploi pour pouvoir le ! Après une utilisation prolongée de l’appareil, il est consulter à tout moment. En cas de vente, de conseillé d’ouvrir une fenêtre ou d’augmenter la cession ou de déménagement, veiller à ce qu’il vitesse des ventilateurs éventuels. -
Seite 35: Raccordement Électrique
• la tension d’alimentation est bien comprise entre • si la cuisinière est les valeurs indiquées sur la plaque signalétique; installée sous un élément HOOD • la prise est bien compatible avec la fiche de suspendu, il faut que ce l’appareil. -
Seite 36: Vérification De L'étanchéité
Après avoir effectué le raccordement, s’assurer que Adaptation du plan de cuisson le tuyau : • ne touche en aucun point des parties pouvant Remplacement des injecteurs des brûleurs du plan atteindre plus de 50°C ; de cuisson : • n’est pas soumis à traction ou torsion et ne 1. -
Seite 37: Tableau Des Caractéristiques Des Brûleurs Et Des
ENERGIE Consommation énergie déclaration Classe convection Forcée – fonction four : Rôtisserie Directives Communautaires : 2006/95/EC du 12.12.06 (Basse CI 46S G W Tension) et modifications successives - 2004/108/EC du 15/12/04 (Compatibilité Electromagnétique) et modifications successives - 2009/142/EC du 30/11/09 (Gaz) et... -
Seite 38: Description De L'appareil
Description de l’appareil Vue d’ensemble Couvercle en verre Brûleur à gaz Plateau du plan de cuisson Grille du plan de cuisson GLISSIERES Tableau de bord de coulissement niveau 5 Support GRILLE niveau 4 niveau 3 Support LECHEFRITE niveau 2 niveau 1 Pied de réglage Pied de réglage Tableau de bord... -
Seite 39: Mise En Marche Et Utilisation
Mise en marche et utilisation Utilisation du plan de cuisson Brûleur ø Diamètre Casseroles (cm) Allumage des brûleurs Ultra Rapide (UR) 24 – 26 Un petit cercle plein près de chaque bouton BRULEUR indique le brûleur associé à ce dernier. Semi Rapide (S) 16 –... -
Seite 40: Programmer La Minuterie
Programmer la minuterie Pour modifier la température, tourner le bouton THERMOSTAT. ! Cette fonction ne stoppe pas la cuisson et est 3. L’extinction de l’indicateur de préchauffage indépendante du fonctionnement du four ; elle sert et le déclenchement du signal sonore indiquent la fin uniquement à... -
Seite 41: Programmes De Cuisson
Programmes de cuisson Programme FOUR TRADITION Pour cette cuisson traditionnelle mieux vaut cuire sur un seul niveau. ! Tous les programmes ont une température de cuisson présélectionnée. Il est possible de la régler Programme ROTICCERIE manuellement, entre 40°C et 250°C au choix. L’irradiation thermique unidirectionnelle s’ajoute au brassage de l’air pour une répartition uniforme de la Programme DECONGELATION... -
Seite 42: Comment Programmer Une Cuisson
Comment programmer une cuisson Conseils de cuisson ! La programmation n’est possible qu’après avoir ! Pour les cuissons ventilées ne pas utiliser les sélectionné un programme de cuisson. gradins 1et 5: ils sont directement frappés par l’air chaud qui pourrait brûler les mets délicats. Programmer la durée de cuisson ! En cas de cuisson en mode TOURNEBROCHE, 1. -
Seite 43: Tableau De Cuisson Au Four
Tableau de cuisson au four PLATS EXEMPLES FONCTION TEMPERATURE SUPPORTS Quiches et terrines quiche lorraine, tarte de poireaux, etc. Tartes 220 °C moule sur lèchefrite (pâte brisée et pâte feuilletée) Pizzas à pâte épaisse, fougasses (pâte à pain) pizzas, fougasses Brioches 220 °C sur lèchefrite... - Seite 44 Tableau de cuisson au four PLATS EXEMPLES FONCTION TEMPERATURE SUPPORTS desserts (ou Biscuits (sans levure) génoise, biscuits à la cuiller, biscuits roulés, Brownies, 200 °C moule sur lèchefrit multiniveaux) Plum-cake et 4/4 (avec levure desserts (ou plum-cake aux fruits, marbrés, 4/4, etc. 160 °C moule sur lèchefrite chimique)
-
Seite 45: Précautions Et Conseils
Précautions et conseils ! Cet appareil a été conçu et fabriqué conformément aux normes sous la surveillance de quelqu’un responsable de leur sécurité ou internationales de sécurité. quelles aient été dûment formées sur l’utilisation de l’appareil. Ces consignes de sécurité sont très importantes et doivent être lues •... -
Seite 46: Nettoyage Et Entretien
Nettoyage et entretien Mise hors tension Contrôler les joints du four Avant toute opération de nettoyage ou d’entretien, Contrôler périodiquement l’état du joint autour de la couper l’alimentation électrique de l’appareil. porte du four. S’il est abîmé, s’adresser au service après-vente le plus proche de chez soi. -
Seite 47: Nettoyage Automatique Par Pyrolyse
Nettoyage automatique par PYROLYSE Les sécurités Pendant le programme PYROLYSE, la température à • l’icône s’allume sur l’afficheur pour indiquer l’intérieur du four atteint 500°C et lance le processus le verrouillage automatique de la porte du four de pyrolyse, autrement dit, la carbonisation des dès que la température a atteint des valeurs salissures alimentaires. -
Seite 48: Assistance
Assistance Attention : L’appareil monte un système d’autotest qui permet de détecter toute anomalie de fonctionnement. Ces anomalies sont affichées sous la forme : “ F ” suivi des chiffres. Contactez alors un service d’assistance technique. ! Ne jamais faire appel à des techniciens non agréés. Indiquer : •... - Seite 49 Tabel eigenschappen Beschrijving van het apparaat, 54 Aanzichttekening Bedieningspaneel Display Starten en gebruik, 55-60 Gebruik van de kookplaat CI 46S G W De klok instellen De timer instellen Gebruik van de oven Kookprogramma’s De bereiding programmeren Praktische kooktips Kooktabel oven...
-
Seite 50: Plaatsen En Waterpas Zetten
Installatie ! Bewaar dit instructieboekje zorgvuldig voor ! Na een langdurig gebruik van het apparaat is het eventuele raadpleging in de toekomst. In het geval u aan te raden een raam te openen of de draaisnelheid het apparaat verkoopt, weggeeft of wanneer u van eventuele ventilatoren te vermeerderen. -
Seite 51: Gasaansluiting
• de contactdoos in staat is het maximale • als het fornuis onder vermogen van het apparaat te dragen, zoals een keukenkastje wordt HOOD aangegeven op het typeplaatje; geïnstalleerd, moet de • de spanning zich bevindt tussen de waarden die Min. -
Seite 52: Aanpassen Aan De Verschillende Soorten Gas
Zodra de verbinding is uitgevoerd moet u Aanpassen kookplaat controleren of de buis: • in geen enkel punt contact maakt met delen die Het vervangen van de sproeiers van de branders temperaturen bereiken van meer dan 50°C; van de kookplaat: •... -
Seite 53: Tabel Eigenschappen Branders En Sproeiers
Spanning en frequentie van de zie typeplaatje elektrische voeding Richtlijn 2002/40/EG op het etiket van elektrische ovens. Norm EN 50304 CI 46S G W Energieverbruik convectie Natuurlijk - verwarmingsfunctie: ENERGY LABEL Traditioneel Energieverbruikverklaring Klasse geforceerde convectie - verwarmingsfunctie: Braden EU Richtlijnen: 2006/95/EG van 12.12.06 (Laagspanning) en... -
Seite 54: Beschrijving Van Het Apparaat
Beschrijving van het apparaat Aanzichttekening Glazen deksel Gasbrander Lekplaat voor eventueel overkoken Rooster van het werkvlak GELEIDERS Bedieningspaneel van de roosters stand 5 Rooster GRILL stand 4 stand 3 Rooster LEKPLAAT stand 2 stand 1 Stelvoetje Stelvoetje Bedieningspaneel Knop THERMOSTAAT/INSTELLEN TIJDEN PROGRAMMAKNOP DISPLAY... -
Seite 55: Starten En Gebruik
Starten en gebruik Gebruik van de kookplaat Brander ø Diameter Pannen (cm) Aansteken van de branders Naast elke BRANDER knop wordt met een vol rondje Extra Snel (UR) 24 – 26 aangegeven bij welke brander deze knop hoort. Om een brander van de kookplaat aan te steken: Half-snel (S) 16 –... -
Seite 56: De Klok Instellen
De klok instellen De temperatuur kan veranderd worden door te draaien aan de THERMOSTAATKNOP. !U kunt de klok zowel instellen als de oven uit is als 3. Als de aanwijzer van de voorverwarming wanneer hij aan is, maar alleen als u geen uitgaat en u een geluidssignaal hoort, is de uitgestelde bereiding heeft ingesteld. -
Seite 57: Kookprogramma's
Kookprogramma’s Functie TRADITIONELE OVEN Met deze traditionele kookwijze is het beter een ! Alle programma’s hebben een vooringestelde enkel rooster te gebruiken. kooktemperatuur. Deze kan handmatig worden aangepast,en naar wens worden ingesteld tussen de Functie BRADEN 40°C en de 250°C. Hiermee wordt de rechtstreekse bovenhitte van de grill gecombineerd met de geforceerde luchtcirculatie Functie ONTDOOIEN... -
Seite 58: De Bereiding Programmeren
De bereiding programmeren Praktische kooktips ! De programmering is alleen mogelijk wanneer een ! Gebruik voor het koken met de heteluchtoven nooit kookprogramma is geselecteerd. de standen 1 en 5: in deze standen zou de hete lucht de fijne gerechten kunnen verbranden. Het programmeren van de kookduur ! Bij de functies DRAAISPIT, BARBECUE en 1. -
Seite 59: Kooktabel Oven
Kooktabel oven GERECHTEN VOORBEELDEN FUNCTIE TEMPERATUUR HULPMIDDELEN Quiches en ovenschotels quiche lorraine, preiquiche, enz. Vruchtentaarten 220 °C taartvorm op lekplaat (kruimeldeeg of bladerdeeg) Dikke pizza van brooddeeg pizza, focaccia Croissants 220 °C op lekplaat (of diepvriespizza) Pizza (ander deeg) Vruchtentaarten 220 °C taartvorm op lekplaat patisserie... - Seite 60 Kooktabel oven GERECHTEN VOORBEELDEN FUNCTIE TEMPERATUUR HULPMIDDELEN Koekjes (zonder gist) cake, lange vingers, opgerolde koekjes, Brownies, gebak (of multilevel) 200 °C taartvorm op lekplaat Plum-cake en marmercake (met vruchtencake, marmercake, enz. gebak (of multilevel) 160 °C taartvorm op lekplaat gedroogde gist) Vruchtentaart (kruimeldeeg of appeltaart, pruimentaart, perentaart enz.
-
Seite 61: Voorzorgsmaatregelen En Advies
Voorzorgsmaatregelen en advies ! Dit apparaat is ontworpen en vervaardigd volgens de geldende • Als het fornuis op een voetstuk wordt geplaatst moet u er voor internationale veiligheidsvoorschriften. zorgen dat het er niet af kan schuiven. Deze aanwijzingen zijn geschreven voor uw veiligheid en u dient •... -
Seite 62: Onderhoud En Verzorging
Onderhoud en verzorging De elektrische stroom afsluiten Het controleren van de afdichtingen van de oven Sluit altijd eerst de elektrische stroom af voordat u Controleer regelmatig de staat van de afdichtingen tot enige handeling overgaat. rondom de ovendeur. In het geval de afdichting beschadigd is, dient u zich tot de dichtstbijzijnde Erkende Servicedienst te wenden. -
Seite 63: Automatische Reiniging Pyrolyse
Automatische reiniging PYROLYSE Veiligheidsmechanismen Het programma PYROLYSE brengt de • het verlichte symbool op het display geeft oventemperatuur op 500°C om het pyrolyseproces aan dat de ovendeur automatisch is geblokkeerd (ofwel het verbranden van voedselrestjes) te starten. omdat de temperatuur zeer hoog is geworden; Het vuil wordt letterlijk as. -
Seite 64: Service
Servicedienst Belangrijk: Het apparaat is voorzien van een automatisch diagnostisch systeem dat eventuele storingen opspoort. Deze kunt u op het display aflezen met berichten zoals: “F” gevolgd door enkele nummers. In deze gevallen moet u de technische dienst inschakelen. ! Wendt u nooit tot niet erkende monteurs. Dit dient u door te geven: •... -
Seite 65: Herd Und Backofen
Deutsch, 65 Merkmal-Tabelle Beschreibung des Gerätes, 70 Geräteansicht Bedienfeld Display Inbetriebsetzung und Gebrauch, 71-76 Gebrauch des Kochfeldes CI 46S G W Uhr einstellen Einstellung des Kurzzeitweckers Gebrauch des Backofens Garprogramme Garzeit programmieren Praktische Tipps Tabelle Garen im Backofen Vorsichtsmaßregeln und Hinweise, 77... -
Seite 66: Installation
Installation ! Bewahren Sie diese Bedienungsanleitung bitte ! Nach langem Gebrauch des Gerätes, sollte sorgfältig auf, damit Sie sie jederzeit zu Rate ziehen möglichst ein Fenster geöffnet oder – im Falle der können. Sorgen Sie dafür, dass sie im Falle eines Anwesenheit von Ventilatoren - eine höhere Verkaufs, einer Übergabe oder eines Umzugs das Gebläsestufe eingestellt werden. -
Seite 67: Anschluss An Die Gasleitung
• die Netzsteckdose für die auf dem Typenschild • Sollte der Herd unter angegebene maximale Leistungsaufnahme des einem Hängeschrank HOOD Gerätes ausgelegt ist; installiert werden, ist • die Netzspannung im Bereich der auf dem letzterer in einem Min. Typenschild angegebenen Werte liegt; Mindestabstand von •... -
Seite 68: Kontrolle Auf Dichtheit
Stellen Sie nach dem Anschluss sicher, dass der Anpassung des Kochfeldes Schlauch: • an keiner Stelle mit Teilen in Berührung kommt, Austausch der Kochfeld-Brennerdüsen: die eine Temperatur von mehr als 50°C erreichen; 1. Nehmen Sie die Kochflächenroste ab und ziehen •... -
Seite 69: Merkmal-Tabelle Brenner Und Düsen
-frequenz: Richtlinie 2002/40/EG Energieetikettierung für Elektrobacköfen Norm EN 50304 Energieverbrauch Natürliche ENERGY LABEL Konvektion – Heizfunktion: Ober-Unterhitze CI 46S G W Energieverbrauch Umluft – Heizfunktion: Braten EG-Richtlinien: EG-Richtlinien: 2006/95/EC vom 12.12.06 (Niederspannung) und nachfolgende Änderungen - 2004/108/EC vom 15.12.04 (elektromagnetische Verträglichkeit) und... -
Seite 70: Beschreibung Des Gerätes
Beschreibung des Gerätes Geräteansicht Glasabdeckung * Gasbrenner Kochfeld- Überlaufschutz Kochmuldenrost GLEITFÜHRUNGEN Bedienfeld der Einschübe Einschubhöhe 5 Einschub BACKOFENROST Einschubhöhe 4 Einschubhöhe 3 Einschub FETTPFANNE Einschubhöhe 2 Einschubhöhe 1 Höhenverstellbarer Stellfuß Höhenverstellbarer Stellfuß Bedienfeld Drehknopf THERMOSTAT/ZEITEINSTELLUNG Reglerknopf Reglerknopf DISPLAY PROGRAMME KOCHFELDBRENNER Taste Taste ZEITEINSTELLUNG... -
Seite 71: Inbetriebsetzung Und Gebrauch
Inbetriebsetzung und Gebrauch Gebrauch des Kochfeldes Brenner ø Topfdurchmesser (cm) Zündung der Brenner Ultraschneller 24 – 26 Neben jedem BRENNER-Reglerknopf ist durch ein Brenner (UR) ausgefülltes Kreissymbol die zugehörige Normalbrenner (S) 16 – 20 Gasflamme gekennzeichnet. Hilfsbrenner (A) 10 – 14 Zum Zünden eines Kochfeld-Brenners verfahren Sie bitte wie folgt: Zur Erkennung des Brennertyps verweisen wir auf... -
Seite 72: Einstellung Des Kurzzeitweckers
Einstellung des Kurzzeitweckers - Unterbrechen des Garvorgangs durch das Drehen des Drehschalters PROGRAMME auf Position „0“. 5. Die Garzeitdauer kann verändert werden ( siehe ! Diese Funktion beeinflusst weder den Garvorgang, Garprogramme ). noch den Gebrauch des Backofens. Sie weist 6. -
Seite 73: Garprogramme
Garprogramme Programm TRADITIONELL Bei dieser traditionellen Garart verwenden Sie bitte ! Alle Programme verfügen über eine voreingestellte nur eine Einschubhöhe. Gartemperatur. Diese kann manuell auf einen beliebigen Wert zwischen 40 °C und 250 °C Programm BRATEN eingestellt werden. Die einseitige Strahlungshitze wird im Inneren des Backofens mit Umluft kombiniert. -
Seite 74: Garzeit Programmieren
Garzeit programmieren Praktische Tipps ! Die Programmierung ist nur nach der Festlegung ! Verwenden Sie beim Heißluftgaren nicht die eines Garprogramms möglich. Einschubhöhen 1 und 5. Sie sind der Heißluft zu direkt ausgesetzt, wodurch empfindliche Gerichte Programmieren der Garzeit-Dauer leicht verbrennen könnten. 1. -
Seite 75: Tabelle Garen Im Backofen
Tabelle Garen im Backofen HAUPTGERICHTE BEISPIELE FUNKTION TEMPERATUR UNTERLAGE Gemüsekuchen und Pasteten Quiche, Lauchtorte usw. Kuchen 220 °C Form auf Backblech (Mürbeteig oder Blätterteig) Gefüllte Pizza mit Hefeteig Pizza, Fladen Brioche 220 °C a/ Backblech (auch tiefgefroren) Pizza (anderer Teig) Kuchen 220 °C Form auf Backblech... - Seite 76 Tabelle Garen im Backofen HAUPTGERICHTE BEISPIELE FUNKTION TEMPERATUR UNTERLAGE Plätzchen (ohne Hefe) Biskuit, Löffelbiskuit, versch. Plätzchen, Brownies Kuchen (oder Heißluft) 200 °C Form auf Backblech Plum-Cake und Pfundkuchen Plum-Cake mit Obst, Marmorkuchen, Pfundkuchen Kuchen (oder Heißluft) 160 °C Form auf Backblech (mit Backpulver) usw.
-
Seite 77: Vorsichtsmaßregeln Und Hinweise
Vorsichtsmaßregeln und Hinweise ! Das Gerät wurde entsprechend den internationalen • Dieses Gerät ist kein Spielzeug für Kinder. Sicherheitsvorschriften entworfen und gebaut. • Wird der Herd auf einem Sockel aufgestellt, dann achten Sie Die im Folgenden aus Sicherheitsgründen wiedergegebenen Hinweise bitte darauf, dass das Gerät auch nicht herunterrutschen sollten aufmerksam gelesen werden. -
Seite 78: Reinigung Und Pflege
Reinigung und Pflege Stromversorgung trennen Kontrolle der Backofendichtungen Vor jeder Reinigung und Pflege ist das Gerät vom Den Zustand der Dichtung an der Backofentür in Stromnetz zu trennen. regelmäßigen Abständen prüfen. Wenden Sie sich im Falle einer Beschädigung dieser Dichtung an die nächstgelegene Kundendienststelle. -
Seite 79: Pyrolyse-Selbstreinigung
PYROLYSE-Selbstreinigung Sicherheitsvorrichtungen • Das Aufleuchten des auf dem Display Während des pyrolyse-Reinigungsprogramms befindlichen Symbols ist ein Zeichen dafür, werden im Backofeninneren Temperaturen von bis dass die Backofentür ab dem Moment zu 500°C erzielt, dank dessen zurückgebliebene automatisch gesperrt wurde, an dem sehr hohe Speisereste verkohlt werden. -
Seite 80: Kundendienst
Kundendienst 04/2010 - 195071823.05 XEROX FABRIANO Achtung: Das Gerät ist mit einem Diagnosesystem ausgestattet, dank dem etwaige Betriebsstörungen erfasst werden können. Diese werden auf dem Display durch Meldungen folgenden Typs angezeigt: “F“ gefolgt von Nummern. In diesem Fall den Kundendienst anfordern. ! Wenden Sie sich nur an autorisierte Techniker.