Werbung
Verfügbare Sprachen
Verfügbare Sprachen
Quicklinks
gearmotor
for swing gates
wingo
Instructions and warnings for the fitter
Istruzioni e avvertenze per l'installatore
Instructions et recommandations pour l'installation
Anweisungen und hinweise für den installateur
Instrucciones j advertencias para el instalador
Instrukcja dla instalatora
Werbung

Verwandte Anleitungen für Nice wingo Serie


Inhaltszusammenfassung für Nice wingo Serie
- Seite 1 gearmotor for swing gates wingo Instructions and warnings for the fitter Istruzioni e avvertenze per l’installatore Instructions et recommandations pour l’installation Anweisungen und hinweise für den installateur Instrucciones j advertencias para el instalador Instrukcja dla instalatora...
- Seite 3 30mm...
- Seite 5 To make these instructions easier to follow, we have, wherever possible, product, people and property. put them in the order in which they will be carried out during the various Nice declines all liability for badly built gates or any deformations that may system installation phases. occur during use.
- Seite 6 WINGO is an electromechanical gear motor for automating the movement of single or double leaf residential gates. A NICE control unit should be used to ensure the gear motor works correctly. The release device allows the gate to be opened manually.
- Seite 7 2.3) Assembly To assemble the system correctly, check the following points: Projection of column α Opening angle Speed Thrust α 2.3.1) Fixing the rear bracket Carry out the following operations: 1.1 Measure the value of C (e.g.: 70mm). permitted angles. If, for example (fig.9), the gate must be 1.2 Find the value of C in the graph and draw a horizontal line (fig.8).
- Seite 8 2.3.2) Fixing the front bracket Fixing the rear of the gear motor (fig.5) The front bracket (21) is fitted with its clamp to the gate according to the distance D (see drawing in paragraph 2.3 - Assembly); Fix WINGO to the bracket (22) using the screw (48), washer (55) and before fixing permanently: nut (51);...
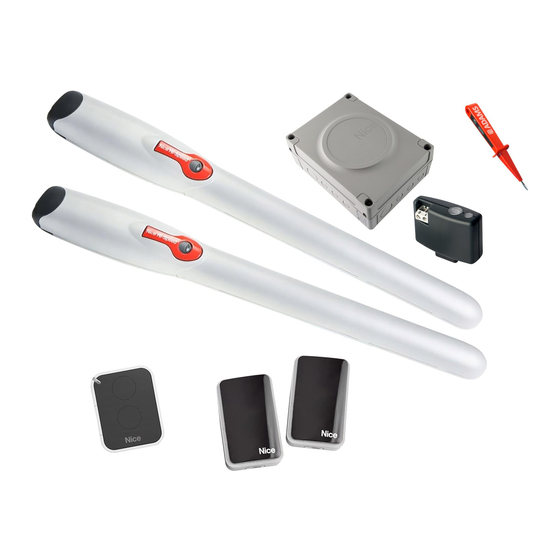
- Seite 9 2.4) Typical system layout Column for photocells Pair of opening travel stops Mains power line A400 control unit Aerial Flashing lamp Photocell WINGO actuator Key switch or digital keypad 2.5) Connecting the gear motor Respecting the numbering in the table, connect the product to the terminal board (A) following the electrical diagram.
- Seite 10 3) Manual manoeuvre or release The gate must be moved manually (fig.3) in case of a power failure or a system fault. Manual movement allows the gear motor to move freely only if this is correctly mounted and original accessories have been used. 4) Testing The whole system must be tested by qualified and expert staff who •...
- Seite 11 Nice however, is not the producer of your automated system as this is handbook that the fitter will have given you. Keep this manual for...
- Seite 12 To do this, perform the manual release operation: gate once the gear motor has been released as described further on. this can be done by the user and Nice has made it as easy as • Maintenance. Just like all machines, your automated system possible, without the need for tools or physical effort.
- Seite 13 Istruzioni ed avvertenze destinate all’utilizzatore del motoriduttore WINGO Avvertenze importanti Nice si congratula per la scelta di questo prodotto e vi invita a leggere con Tutto quello che non è espressamente previsto in queste istruzioni non è molta attenzione queste pagine.
- Seite 14 1) Descrizione prodotto WINGO è un motoriduttore elettromeccanico per l’automazione di cancelli ad una o due ante per uso residenziale. Si consiglia l’utilizzo di una centrale NICE per un corretto funzionamento del motoriduttore. Lo sblocco permette di aprire manualmente il cancello.
- Seite 15 2.3) Fissaggio Per il corretto montaggio sono da verificare i seguenti punti: Ingombro colonna α Angolo di manovra Velocità Forza α 2.3.1) Posizionamento della staffa posteriore Le operazioni da eseguire sono: 1.1 Misurare sul posto il valore di C (es. 70mm). massimi consentiti.
- Seite 16 2.3.2) Posizionamento della staffa anteriore Fissaggio posteriore motoriduttore (fig.5) La staffa anteriore (21) va posizionata con apposito morsetto al cancello rispettando la quota (vedi disegno relativo al paragrafo Fissare WINGO alla staffa (22) con la vite (48), la rondella (55) ed il 2.3 Fissaggio);...
- Seite 17 2.4) Impianto tipico Colonnina per fotocellule Coppia di arresti in apertura Linea elettrica di alimentazione Centrale di comando A400 Antenna Lampeggiante Fotocellula Attuatore WINGO Selettore a chiave o tastiera digitale 2.5) Collegamento al motoriduttore Rispettando la numerazione della tabella effettuare i collegamenti alla morsettiera (A) seguendo lo schema elettrico.
- Seite 18 3) Manovra manuale o sblocco L’operazione manuale (fig.3) si deve eseguire nel caso di mancanza di corrente o in caso di anomalie dell’impianto. La manovra manuale consente una corsa libera del motoriduttore solo se montato correttamente e con gli accessori originali. 4) Collaudo Il collaudo dell’intero impianto deve essere eseguito da personale •...
- Seite 19 • Prima di usare per la prima volta l’automazione, fatevi spiegare Nice non è però il produttore della vostra automazione, che è invece il dall’installatore l’origine dei rischi residui, e dedicate qualche minuto alla risultato di un’opera di analisi, valutazione, scelta dei materiali, e...
- Seite 20 Nice vi garantirete, oltre che la consulenza di uno specialista e i prodotti della pila (a seconda del tipo, possono trascorrere da diversi mesi fino a più...
- Seite 21 Instructions et recommandations destinées à l’utilisateur de l’opérateur WINGO Recommandations importantes Nice vous félicite pour avoir choisi ce produit et vous invite à lire très Tout ce qui n’est pas expressément prévu dans ces instructions n’est pas attentivement ces pages.
- Seite 22 WINGO est un opérateur électromécanique pour l’automatisation de portails à un ou deux battants pour usage résidentiel. Il est conseillé d’utiliser une armoire de commande NICE pour assurer le fonctionnement correct de l’opérateur. Le débrayage permet l’ouverture manuelle du portail.
- Seite 23 2.3) Fixation Pour un montage correct il faut vérifier les points suivants: Saillie colonne α Angle de manœuvre Vitesse Force α 2.3.1) Positionnement de la platine de fixation arrière Les opérations à effectuer sont les suivantes: 1.1 Mesurer sur place la valeur de C (ex. 70 mm). positionnement de la platine de fixation arrière) où...
- Seite 24 2.3.2) Positionnement de la platine de fixation avant Fixation arrière de l’opérateur (fig.5) La platine de fixation avant (21) doit être positionnée sur le portail Fixer WINGO à la platine (22) avec la vis (48), la rondelle (55) et l’écrou avec une bride spéciale en respectant la mesure D (voir dessin relatif (51);...
- Seite 25 2.4) Installation typique Colonne pour photocellules Paire de butées en ouverture Ligne électrique d’alimentation Armoire de commande A400 Antenne Clignotant Photocellule Opérateur WINGO Sélecteur à clé ou clavier à code 2.5) Connexions à l’opérateur En respectant la numération du tableau, effectuer les connexions au bornier (A) en suivant le schéma électrique.
- Seite 26 3) Manœuvre manuelle ou débrayage L’opération manuelle (fig.3) doit être effectuée en cas de panne de courant ou en cas d’anomalie dans le fonctionnement de l’automatisme. La manœuvre manuelle permet une course libre de l’opérateur seulement s’il est monté correctement et avec les accessoires originaux.
- Seite 27 à la lecture du manuel d’instructions Nice n’est toutefois pas le producteur de votre automatisme qui est en et d’avertissement pour l’utilisateur qui vous est remis par effet le résultat d’un travail d’analyse, évaluation, choix des matériaux et l’installateur.
- Seite 28 être effectuée par l’utilisateur de l'automatisme, a fait conseille une intervention tous les 6 mois pour une utilisation l’objet d’une étude particulière de la part de Nice pour vous assurer domestique normale mais celle période peut varier en fonction de toujours une utilisation extrêmement simple et aisée, sans aucun outil...
- Seite 29 Anweisungen und Hinweise für den Benutzer des toröffners WINGO Wichtige Hinweise Nice gratuliert Ihnen zur Wahl dieses Produktes und bittet Sie, diese Alles nicht ausdrücklich in diesen Anweisungen vorgesehene ist Seiten sehr aufmerksam zu lesen. unzulässig; nicht in den Anweisungen vorgesehene Verwendungen Um den Gebrauch dieser Anweisungen so einfach wie möglich zu...
- Seite 30 WINGO ist ein elektromechanischer Toröffner für die Automatisierung von ein- oder zweiflügeligen Toren in Wohnhäusern. Für den korrekten Betrieb des Toröffners wird die Verwendung einer NICE Steuerung empfohlen. Dank der Entriegelung kann das Tor von Hand geöffnet werden. 2) Installation 2.1) Vorprüfungen...
- Seite 31 2.3) Befestigung Für die korrekte Montage müssen folgende Punkte überprüft werden: Vorsprung der Torsäule C α Bewegungswinkel Geschwindigkeit 4) Kraft α 2.3.1) Positionieren des hinteren Bügels Die auszuführenden Schritte sind: 1.1 Den Wert C an Ort und Stelle messen (z.B. 70 mm). Positionieren des hinteren Bügels), wo verschiedenfarbige 1.2Im Schaubild durch den Wert C eine horizontale Linie ziehen Bereiche die zulässigen Höchstwinkel darstellen.
- Seite 32 2.3.2) Positionieren des vorderen Bügels Befestigung hinten des Toröffners (Abb.5) Der vordere Bügel muss unter Einhaltung des Maßes D (siehe Zeichnung in Abschnitt 2.3 Befestigung) mit einer Zwinge am Tor WINGO mit der Schraube (22), der Unterlegscheibe (48) und der befestigt werden.
- Seite 33 2.4) Typische Anlage Standsäule für Photozellen Paar Endanschläge in Öffnung Netzstromlinie Steuerung A400 Antenne Blinkleuchte Photozelle Toröffner WINGO Schlüsseltaster oder drahtloses digitales Codeschloss 2.5) Anschluss am Toröffner Die Nummerierung in der Tabelle beachten und die Anschlüsse am Klemmenbrett (A) nach dem Schaltplan ausführen. WEIß...
- Seite 34 3) Manuelle Betätigung oder Entriegelung Die manuelle Betätigung (Abb.3) muss bei Stromausfall oder Störungen der Anlage ausgeführt werden. Durch die manuelle Betätigung wird sich der Toröffner nur, falls korrekt und mit den Original-Zubehörteilen montiert, frei bewegen. 4) Prüfung Die Prüfung der ganzen Anlage muss von erfahrenem Fachpersonal Anschläge in gutem Zustand sind;...
- Seite 35 Anweisungen Hinweise für Benutzer des Toröffners WINGO Wir danken Ihnen, dass Sie ein Nice Produkt für Ihre Automatisierung Eine Automatisierungsanlage ist bestimmt bequem, aber auch ein gewählt haben! wertvolles Sicherheitssystem, und mit wenigen, einfachen Maßnahmen dauert sie lange Jahre.
- Seite 36 Teil der Automatisierung vom Benutzer selbst betätigt empfiehlt bei normalem Gebrauch im Haushalt eine Wartung alle 6 werden kann, wird von Nice mit besonderer Sorgfalt hergestellt, da wir Monate, diese Zeit kann sich aber je nach Verwendung ändern.
- Seite 37 Instrucciones y advertencias destinadas al usuario del motorreductor WINGO Advertencias importantes Nice les agradece por haber elegido este producto y les invita a leer con Todo aquello que no está previsto expresamente en estas instrucciones mucha atención estas páginas. no está permitido; en efecto, usos no indicados en las instrucciones Para simplificar el uso de estas instrucciones, hemos tratado de podrían ser fuentes de averías para el producto y poner en peligro las...
- Seite 38 WINGO motorreductor electromecánico para automatización de puertas de una o dos hojas para uso residencial. Se aconseja usar una central NICE para un funcionamiento correcto del motorreductor. El desbloqueo permite abrir manualmente la puerta. 2) Instalación 2.1) Controles preliminares Recuerde que WINGO motoriza una puerta (de una o Antes de empezar la instalación, es necesario controlar que la...
- Seite 39 2.3) Sujeción Para efectuar el montaje correctamente, hay que comprobar los siguientes puntos: Distancia de la bisagra C desde borde columna α Ángulo de maniobra Velocidad Fuerza α 2.3.1) Posicionamiento del estribo trasero Las operaciones que se han de cumplir son: 1.1 Mida en el lugar el valor C (ej.
- Seite 40 2.3.2) Posicionamiento del estribo delantero Sujeción trasera del motorreductor (fig.5) El estribo delantero (21) se debe colocar con el sujetador correspondiente en la puerta, respetando la cota D (véase dibujo que Fije WINGO al estribo (22) con el tornillo (48), la arandela (55) y la corresponde al párrafo 2.3 Sujeción);...
- Seite 41 2.4) Instalación típica Columnas para fotocélulas Par de topes de apertura Línea eléctrica de alimentación Central de mando A400 Antena Luz intermitente Fotocélula Actuador WINGO Selector de llave o teclado digital 2.5) Conexión al motorreductor Respetando la numeración de la tabla, realice las conexiones a la regleta de bornes (A), siguiendo el esquema eléctrico.
- Seite 42 3) Maniobra manual o desbloqueo La operación manual (fig. 3) se debe llevar a cabo cuando falta la corriente o cuando hay alguna irregularidad en la instalación. La maniobra manual permite una carrera libre del motorreductor sólo si está montado correctamente y con los accesorios originales. 4) Ensayo El ensayo de toda la instalación tiene que ser efectuado por personal •...
- Seite 43 • Antes de usar por primera vez la automatización, pida Sin embargo, Nice no es el fabricante de su automatización, que en explicaciones al instalador sobre el origen de los riesgos residuales, y cambio es una obra de análisis, elección de los materiales y realización...
- Seite 44 ¿Está Ud. satisfecho? Si desea instalar en su casa un sistema de transcurrido un cierto tiempo, le parece que no funcionara automatización nuevo, diríjase al instalador y a Nice: tendrá la garantía correctamente, o que directamente no funciona, podría ser que la pila de recibir el asesoramiento de un especialista y los productos más...
- Seite 45 Przed przystąpieniem do czynności instalowania, należy uważnie Nice nie bierze na siebie odpowiedzialności za niewłaściwy montaż i przeczytać instrukcje oraz dołączone: “Uwagi dla instalatora”, ponieważ nieprawidłowości w wykonaniu bram skrzydłowych oraz za dostarczają...
- Seite 46 Mając na uwadze bezbłędne działanie motoreduktora zaleca się zastosowanie centrali A400 Firmy Nice. Wysprzęglenie służy do ręcznego otwarcia bramy. 2) Instalowanie 2.1) Kontrola wstępna Przed przystąpieniem do wykonywania jakiejkolwiek czynności brama ma kąt otwarcia i siłę...
- Seite 47 2.3) Mocowanie Aby wykonać prawidłowy montaż należy sprawdzić następujące punkty: Wymiar słupka α Kąt otwarcia Prędkość. Siła. α 2.3.1) Ustawienie wspornika tylnego W tym celu należy wykonać następujące czynności: 1.1 Zmierzyć na słupku bramy, wartość C (na przykładzie: 70mm). kolorach przedstawiają maksymalnie dozwolone kąty. 1.2 Odszukać...
- Seite 48 2.3.2) Ustawianie wspornika przedniego Mocowanie tylne motoreduktora (rys.5) Przy zachowaniu wartości D (patrz wartość podana w rozdziale 2.3 Mocowanie), wspornik przedni (21) musi być umocowany do Šrubą (22) z podkładką (48) i nakrętką (55) przymocować WINGO bramy w odpowiednim miejscu. do wspornika (51);...
- Seite 49 2.4) Instalacja typowa Kolumna na fotokomórki. Blokady przy otwieraniu. Linia elektryczna zasilania. Centrala sterownicza A400. Antena. Lampa sygnalizacyjna. Fotokomórka. Siłownik WINGO. Selektor kluczowy lub klawiatura numeryczna. 2.5) Podłączenie motoreduktora Zgodnie z numeracją zacisków wykonać połączenia do tabliczki zaciskowej (A) według schematu elektrycznego. CZARNY BIAłY NIEBIESKI ZIELONY...
- Seite 50 3) Obsługa ręczna i wysprzęglenie Ruch bramy należy wykonywać ręcznie (rys.3) w przypadku braku prądu lub w przypadku zauważenia nieprawidłowości w urządzeniu. Ruch ręczny umożliwi pokonanie oporu przekładni motoreduktora tylko wtedy, gdy jest właściwie zamontowany i z oryginalnymi częściami. 4) Próby ostateczne Próby ostateczne całego urządzenia mogą...
- Seite 51 Gratulujemy wyboru do Waszej automatyki produktu Nice! System automatyki, poza ważnym systemem bezpieczeństwa, jest doskonałą wygodą, i dzięki swym prostym i pewnym rozwiązaniom Nice S.p.A. produkuje elementy do automatyzacji bram, drzwi, rolet, jest przeznaczony do wieloletniej eksploatacji. zasłon przeciwsłonecznych: motoreduktory, centrale sterowania, Nawet, gdy system automatyki, którego jesteście posiadaczami...
- Seite 52 Nice zagwarantuje Wam, wraz z baterii (w zależności od typu, może ona wyczerpać się po kilku konsultacją specjalisty, produkty najbardziej innowacyjne spośród miesiącach jaki i po dwóch/trzech latach).
- Seite 54 Fax +34.9.35.88.42.49 Roma Italia Aubagne France Tel. +39.06.72.67.17.61 Tel. +33.(0)4.42.62.42.52 Fax +39.06.72.67.55.20 Fax +33.(0)4.42.62.42.50 www.niceforyou.com info.roma@niceforyou.com info.marseille@nicefrance.fr Nice Gate is the doors and gate automation division of Nice Nice Screen is the rolling shutters and awnings automation division of Nice...
- Seite 55 PMDPA 4610 PLA 7 CM-B 1630...