Herunterladen Inhalt Inhalt Diese Seite drucken
TMI VD31 Bedienungsanleitung
Vorschau ausblenden Andere Handbücher für VD31:

Werbung

Verfügbare Sprachen
  • DE

Verfügbare Sprachen

  • DEUTSCH, seite 14
V D 3 1
I N S T R U C T I O N
M A N U A L

Werbung

Inhaltsverzeichnis
loading

Inhaltszusammenfassung für TMI VD31

  • Seite 1 V D 3 1 I N S T R U C T I O N M A N U A L...
  • Seite 2 DISPLAY AND CROWN / BUTTON OPERATION Minute hand Hour hand Button A...-1 hour / push Dual time of 24 hour hand adjustment First position VD31...Date setting VD32...Time setting Second position VD31...Time setting Dual time of 24 hour hand Crown at normal position (Time difference correction) Button B...+1 hour / push...
  • Seite 3 24 hour hand is not in the “0” position, reset them following the procedure below. The battery setting and after battery change, please execute the “0” position adjustment. 1. Pull out the crown VD31...second click VD32...first click 2. Keep the buttons “A” & “B” pressed at the same time more than 2 seconds, and then release the buttons.
  • Seite 4 3. Press button A or B to reset the dual time of 24 hour hand to “0” position. * By pressing button A the hand move counter clockwise. * By pressing button B the hand move clockwise. * Press and hold the button, possible to fast-forward modification.
  • Seite 5: Time Setting

    1. Pull out the crown when the second hand is at the 12 o’clock position. [ Crown position ] VD31...second click. VD32...first click. 2. Turn the crown to set the hour and minute hands. (Check that 24 hour hand is set correctly) 3.
  • Seite 6 1. Pull out the crown when the second hand is at the 12 o’clock position. [ Crown position ] VD31...second click. VD32...first click. 2. To adjust the time by pressing the buttons A or B. By pressing button A the hands move counter clockwise.
  • Seite 7 DATE SETTING...Cal.VD31 only 1. Pull out the crown to the first click. 2. Turn the crown to clockwise until the next data appears. 3. Push the crown back in to the normal position. Note * Do not set the date during any time between 9:00 P.M. and 1:00 A.M.
  • Seite 8 Tasto A…- Un'ora/scatto lancetta delle ore Ora duale della regolazione della lancetta delle 24 ore Prima posizione VD31… Impostazione della data VD32… Impostazione dell'ora Seconda posizione VD31… Impostazione dell'ora Ora duale della lancetta delle Corona nella posizione normale...
  • Seite 9 Impostare la batteria, e dopo averla sostituita, eseguire la regolazione della posizione “0”. 1. Tirare la corona verso l'esterno VD31…secondo clic VD32…primo clic 2. Tenere i tasti “A” e “B” premuta lo stesso tempo per più...
  • Seite 10 3. Premere il tasto A o il tasto B per presentare loro attuale della lancetta delle 24 ore sulla posizione “0”. * Premendo il tasto A, la lancetta si muove in senso antiorario. * Premendo il tasto B, la lancetta si muove in senso orario.
  • Seite 11: Impostazione Dell'ora

    IMPOSTAZIONE DELL'ORA 1. Tirare la corona verso l'esterno quando la lancetta dei secondi è nella posizione delle 12. [Posizione della corona] VD31…secondo clic VD32…primo clic 2. Girare la corona per impostare le lancette delle ore e dei minuti (controllare che la lancetta delle ventiquattr'ore sia impostata correttamente).
  • Seite 12 1. Tirare la corona verso l'esterno quando la lancetta dei secondi è nella posizione delle 12. [Posizione della corona] VD31…secondo clic VD32…primo clic 2. Regolare l'ora premendo il tasto A o B. Premendo il tasto A, le lancette si muovono in senso antiorario.
  • Seite 13 IMPOSTAZIONE DELL'ORA…Cal.VD31 solo. 1. Tirare la corona verso l'esterno, fino a quando non si sente il primo clic. 2. Girare la corona in senso orario, fino a che non appare la data successiva. 3. Spingere la corona di nuovo nella posizione normale.
  • Seite 14: Anzeige Und Krone/Tasten-Bedienung

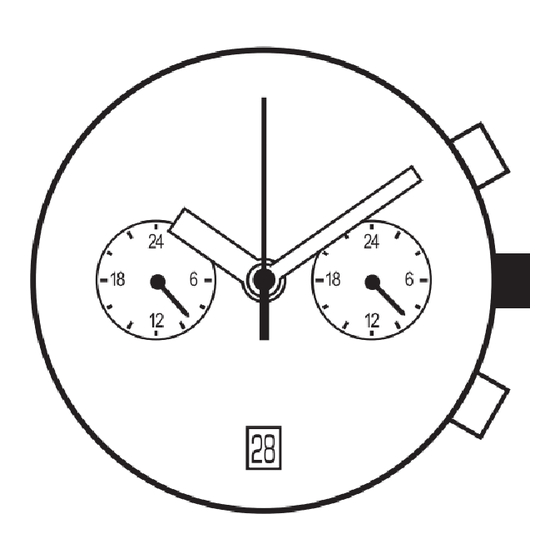
    ANZEIGE UND KRONE/TASTEN-BEDIENUNG Minutenzeiger Stundenzeiger Taste A ... – 1 Stunde/drücken Dualzeiteinstellung für 24-Stundenzeiger Erste Einrastposition VD31 ... Datumseinstellung VD31 ... Zeiteinstellung Zweite Einrastposition VD31 ... Zeiteinstellung Dualzeit des 24-Stundenzeigers Krone in Normalstellung (Zeitdifferenz Korrektur) Taste B ... +1 hour / drücken Dualzeiteinstellung für 24-Stundenzeiger...
  • Seite 15: Einstellung Der Dualzeit Für Den 24-Stundenzeiger

    Sie eine Rückstellung in die „0“-Stellung, falls nötig, vor der Einstellung und nach jedem Batteriewechsel aus. 1. Ziehen Sie die Krone heraus VD31 ... zweite Einrastposition VD32 ... erste Einrastposition 2. Halten Sie die Taste „A“ & „B“ gleichzeitig länger als 2 Sekunden lang gedrückt, und...
  • Seite 16 3. Drücken Sie Taste „A“ oder „B“, um eine Rücksetzung des 24-Stundenzeiger für die Dualzeit in die „0“-Stellung auszuführen. * Durch Drücken von Taste „A“ bewegt sich der Zeiger im Uhrzeigersinn. * Durch Drücken von Taste „B“ bewegt sich der Zeiger im Gegenuhrzeigersinn. * Drücken und halten Sie die Taste gedrückt, Einstellung schnell...
  • Seite 17: Zeiteinstellung

    ZEITEINSTELLUNG 1. Ziehen Sie die Krone heraus, sobald der Sekundenzeiger in der 12-Uhr-Stellung steht. [Krone Position] VD31 ... zweite Einrastposition VD32 ... erste Einrastposition 2. Drehen Sie an der Krone, um die Stunden- und Minutenzeiger einzustellen. (Überprüfen Sie, dass 24-Stundenzeiger korrekt eingestellt ist.) 3.
  • Seite 18 ZEIT -EINSTELLUNG ... DUALZEIT DES 24-STUNDENZEIGERS 1. Ziehen Sie die Krone heraus, sobald sich der Sekundenzeiger in der 12-Uhr-Stellung befindet. [Krone Einrastposition] VD31 ... zweite Einrastposition VD32 ... erste Einrastposition 2. Stellen Sie die Zeit ein, indem Sie die Taste „A“ oder „B“ betätigen.
  • Seite 19 DATUM EINSTELLUNG ... Nur für Cal. VD31 1. Ziehen Sie die Krone in die erste Einrastposition heraus. 2. Drehen Sie die Krone im Uhrzeigersinn bis das nächste Datum angezeigt wird. 3. Drücken Sie die Krone wieder in die Ausgangsstellung zurück.
  • Seite 20 Aiguille des heures Bouton A : Chaque pression -1 heure RAZ de l’aiguille 24H du 2e fuseau horaire Position 1 VD31… Réglage du jour VD32… Réglage de l’heure Position 2 VD31… Réglage de l’heure Aiguille 24H du 2e fuseau horaire Couronne en position normale (Correction pour la différence...
  • Seite 21 être remises à zéro en suivant la procédure ci-après. Cette remise à zéro doit être faite après le remplacement de la pile également. 1. Sortez la couronne VD31… deuxième position VD32… première position 2. Appuyez simultanément sur les boutons A et B pendant plus de 2 secondes, puis relâchez-les.
  • Seite 22 3. Appuyez sur le bouton A ou B pour remettre l’aiguille 24H du 2e fuseau horaire à zéro. * Appuyez sur le bouton A pour une rotation dans le sens inverse des aiguilles d’une montre. * Appuyez sur le bouton B pour une rotation dans le sens des aiguilles d’une montre.
  • Seite 23: Reglage De L'heure

    à la position 12H, sortez la couronne. [Position de la couronne] VD31… deuxième position VD32… première position 2. Tournez la couronne pour régler l’aiguille des heures et celle des minutes. (Vérifiez que l’aiguille 24 heures est correctement positionnée).
  • Seite 24 à la position 12H, sortez la couronne. [Position de la couronne] VD31… deuxième position VD32… première position 2. Réglez l’heure en appuyant sur le bouton A ou B. Appuyez sur le bouton A pour une rotation dans le sens inverse des aiguilles d’une montre.
  • Seite 25 REGLAGE DU JOUR (Cal. VD31 uniquement) 1. Sortez la couronne à la première position. 2. Tournez la couronne pour afficher le chiffre suivant. 3. Remettez la couronne à sa position normale. Remarque: * Ne réglez pas le jour entre les heures de 21H00 et 01H00 au risque que la date ne s’affiche correctement.
  • Seite 26 Aguja de Horas Botón A…-1 hora / presionar Aguja de ajuste de hora dual de 24 horas Primera posición VD31 … Ajuste de fecha VD32 …Ajuste de hora Segunda posición VD31 … Ajuste de hora Aguja de Hora Dual de 24 hs.
  • Seite 27 24 hs.) Si la aguja de hora dual de 24 hs. No está en la posición “0”, reajústela de acuerdo al siguiente procedimiento. Ajustar la pila y tras ese ajuste, realice el ajuste de la posición “0”. 1. Extraiga la corona VD31 …segundo clic VD32 …primer clic 2. Mantenga presionados los botones “A” y “B”...
  • Seite 28 3. Presione el botón A ó B para reajustar la aguja de hora dual de 24 hs. A la posición “0”. * Al presionar el botón A, la aguja se moverá en sentido anti horario. * Al presionar el botón B, la aguja se moverá en sentido horario.
  • Seite 29: Ajuste De La Hora

    1. Extraiga la corona cuando la aguja de segundos esté en la posición de las 12 en punto. [posición de la corona] VD31 …segundo clic VD32 …primer clic 2. Gire la corona para ajustar las agujas de horas y minutos.
  • Seite 30 1. Extraiga la corona cuando la aguja de segundos esté en la posición de las 12 en punto. [posición de la corona] VD31 …segundo clic VD32 …primer clic 2. Presione los botones A ó B para ajustar la hora. Al presionar el botón A las agujas se mueven en sentido anti horario.
  • Seite 31 AJUSTE DE LA FECHA… Cal VD31 solamente 1. Tire de la corona hasta el primer clic. 2. Gire la corona en sentido horario hasta que aparezca el siguiente dato. 3. Vuelva a presionar la corona hacia la posición normal. Nota * No configure la fecha entre las horas 9:00 PM y 1:00 AM.
  • Seite 32 显 示及 表 冠 / 按 钮 操 作 分 针 A钮… - 1小 时/按一次 时 针 双 时2 4 时针调整 第一位置 V D31 … 日 期设置 V D32 … 时 间设置 第二 位置 V D31 … 时间 设置 处於 正常位置 的表冠 双...
  • Seite 33 双时 24时 针位 置调整 在设 置时 间 前,先 检查双 时24时 针是否处於 "0"( 24点钟) 位置。若否,可依下 列步骤重置。 每次 更换 电 池,均 请进行 重置"0"操 作。 1 . 拉出表冠 VD31… 到第二位置 VD32… 到第一位置 2 . 同时持续按下" A"和" B "钮多於两 秒 , 再同时放开按钮。 * 这时双时24 时针会移动,返回它 应...
  • Seite 34 3. 按 下 " A" 钮 或 " B " 钮 可 将 双 时 2 4时 针 重 置 为 " 0" 。 * 按 " A " 钮 , 指 针 以 反 时 钟 方 向 转 动 。 * 按...
  • Seite 35 时 间设 置 1. 当 秒针在12点钟 位置时将表冠拉出 [ 表冠位 置] V D3 1… 到第二位置 V D3 2… 到第一位置 2. 转 动表冠以调整时 针和分针的位置。( 先检查24时 针已调 整到正确位置) 3. 按 照报时信号,将 表冠推回到正常位置。 注意 * 24时 针 与时 针同 步移 动。 * 日 期 在每 天半 夜转换。 调整时针 要清楚上午 / 下午( AM/PM) 的设置正确,可使 用24时针 作为...
  • Seite 36 时 间设 置 … 双时 2 4 时 针 1. 当 秒针在12点钟 位置时将表冠拉出 [ 表冠位 置] V D3 1… 到第二位置 V D3 2… 到第一位置 2. 按 下A 或B钮 以调整时间。 按下A 钮, 指针 以反时钟方向转动。 按下B钮 ,指 针以顺时 钟方向转动。 * 将表冠 推回到 正常位置。 3.
  • Seite 37 日期 设 置 … 只 适用於 Cal . VD31 1. 将表冠拉出 到第一位置。 2. 以顺时针方 向转动表冠,直至下一 个日期出现。 3. 将表冠推回 到正常位置。 注意 * 不 要在 晚上9 :0 0 到 凌 晨1:0 0之间调 整日期,否则日期的转换可 能会出现异常。若有必 要 在该段 时 间设 置日 期,可 先将时间调 整到该时段 以外,设置好日 期後,再调整正确时 间...
  • Seite 38: Display E Coroa / Funcionamento Das Teclas

    Tecla A...-1 hora / pressione Ponteiro das horas Ajuste do ponteiro de 24 horas da Hora Dual Primeira posição VD31...Ajuste da Data VD32...Ajuste da Hora Segunda Posição VD31...Ajuste da Hora Ponteiro de 24 horas da hora Coroa na posição normal Dual (Correção da diferença horária)
  • Seite 39 24 horas da hora dual não estiver na posição “0”, reajuste de acordo com as instruções abaixo. Para o ajuste da bateria ou troca da mesma, execute o ajuste na posição “0”. 1. Puxe a coroa para fora VD31...segundo clique VD32...primeiro clique 2. Mantenha as teclas “A” e “B” pressionadas ao mesmo tempo por mais de 2 segundos.
  • Seite 40 3. Pressione a tecla A ou B para ajustar o ponteiro de 24 horas da hora dual à posição “0”. * Pressionando a tecla A o ponteiro se move no sentido anti-horário. * Pressionando a tecla B o ponteiro se move no sentido horário.
  • Seite 41: Ajuste Da Hora

    1. Puxe a coroa para fora quando o ponteiro dos segundos estiver na posição de 12 horas. [Posição da coroa] VD31...segundo clique VD32...primerio clique 2. Gire a coroa para ajustar os ponteiros da hora e dos minutos (Verifique que o ponteiro das 24 horas esteja ajustado corretamente).
  • Seite 42 1. Puxe para fora a coroa quando o ponteiro dos segundos estiver na posição de 12 horas. [Posição da coroa] VD31...segundo clique VD32...primeiro clique 2. Pressione a tecla A ou B para ajustar a hora. Pressionando a tecla A os ponteiros se movem no sentido anti-horário.
  • Seite 43 AJUSTE DA DATA...CAL.VD31 somente 1. Puxe a coroa para o primeiro clique. 2. Gire a coroa no sentido horário até que apareça a data seguinte. 3. Coloque a coroa na posição normal novamente. Nota * Não reajuste a data em nenhum momento entre as 9:00 PM e a 1:00 AM.
  • Seite 44 表示とリューズ/ボタンの操作 分針 ボタンA… 1押しで−1時間 時針 デュアルタイ ム24時針調整 第1ポジション VD31… 日付設定 VD32... 時刻設定 第2ポジション VD31… 時刻設定 デュアルタイ ム24時針 リューズ通常ポジション (時差修正) ボタンB… 1押しで+1時間 デュアルタイ ム24時針調整 秒針 24時針 (時刻を24時間表示)...
  • Seite 45 デュアルタイム24時針のポジション調整 時刻を設定する前に、 デュアルタイ ム24時針が0 (24時) のポジションにあることを確認します。 デュアル タイ ム24時針が0のポジションにない場合は、 次の手順でリセッ トしてください。 バッテリーの挿入や交換 後は、 この0ポジション調整をおこなってください。 1. リューズを次の位置まで引き出します。 VD31… 第2ポジション VD32… 第1ポジション 2. ボタンAとBを同時に2秒以上長押しし てから放します。 デュアルタイ ム24時針が移動してそれまで の位置に戻りますが、 移動量が少ないので 確認は困難です。...
  • Seite 46 3. ボタンAまたはBを押してデュアルタイ ム 24時針を0ポジションにリセッ トします。 * ボタンAを押すと、 針は反時計回りに進み ます。 * ボタンBを押すと、 針は時計回りに進みま す。 * ボタンを長押しすると早送りできます。 4. リューズを通常ポジションに戻します。...
  • Seite 47 時刻の設定 1. 秒針が12時の位置にきた時リューズを引き出します。 [リューズのポジション] VD31… 第2ポジション VD32… 第1ポジション 2. リューズを回して時針と分針を合わせます。 ( 24時針が正 しく設定されていることを確認します。 ) 3. 時報にあわせてリューズを通常ポジションに戻します。 注意 : * 24時針は、 時針と共に動きます。 * 日付は、 真夜中に変ります。 時針をあわせる時は、 24時針を見て午前/午後が正しく設定されている ことを確認してください。 • 時差修正の使用方法 タイ ムゾーンの異なる国に旅行する場合、 現地の現在時刻にあわせることができます。 1. リューズ位置は通常ポジションです。 2. ボタンAまたはBを押して時刻を調整します。 * ボタンAを押すと針は反時計回りに動きます。 ( 1押しで−1時間)...
  • Seite 48 時刻設定… デュアルタイム24時針 1. 秒針が12時の位置にきた時リューズを引き出します。 [リューズのポジション] VD31… 第2ポジション VD32… 第1ポジション 2. ボタンAまたはBを押して時刻を調整します。 ボタンAを押すと針は反時計回りに動きます。 ボタンBを押すと針は時計回りに動きます。 * リューズを通常ポジションに戻します。 3. リューズを通常ポジションに戻します。...
  • Seite 49 日付の設定… Cal.VD31のみ 1. リューズを第1ポジションまで引き出します。 2. リューズを時計回りに回すと、 次の日付が現れます。 3. リューズを通常ポジションに戻します。 注意 : * 午後9時から午前1時の時間帯には、 日付の設定をおこなわないでください。 この時間帯におこなうと、 日付がうまく変わらないことがあります。 この時間帯に日付の設定をおこなう 必要がある場合は、 まず時刻をこの時間帯外に設定してから日付を設定し、 その後で正しい時刻にあ わせてください。...
  • Seite 50 «A» / VD31… VD32… VD31… «B» /...
  • Seite 51 «0» (24 «0», VD31… VD32… «A» «B»...
  • Seite 52 «A» «B», «A» «B»...
  • Seite 53 «12 ». VD31… VD32… * 24- «A» «B». «A» «B»...
  • Seite 54 … «12 ». VD31… VD32… «A» «B». «A» «B»...
  • Seite 55 … . VD31 21:00 01:00.

Inhaltsverzeichnis