Graco LineDriver Betriebsanleitung
Inhaltsverzeichnis
Quicklinks
Operation - Repair - Parts
Fonctionnement - Réparation - Pieces
Funcionamiento - Reparación - Piezas
Bediening - Reparatie - Delen
Betrieb - Reparatur - Teile
LineDriver
Models / Modèles / Modelos / Modellen / Modelle: 262004 / 262005
- For the application of line striping materials -
- Pour le tracement de lignes à la peinture -
- Para la aplicación de materiales trazalíneas -
- Voor het aanbrengen van belijningsmaterialen -
- Zur Applikation von Linienmarkierungsmaterialien -
10 mph (16 kph) Maximum Operating Speed / de vitesse de fonctionnement maximum / de velocidade operando se máxima /
Maximum Werkende Snelheid / Maximale Arbeitsgeschwindigkeit
Important Safety Instructions
Read all warnings and instructions in this manual. Save these instructions.
Instructions de sécurité importantes
Lire toutes les mises en garde et instructions de ce manuel. Sauvegarder ces instructions.
Instrucciones importantes de seguridad
Lea todas las advertencias e instrucciones de este manual. Guarde las instrucciones.
Belangrijke veiligheidsinstructies
Lees alle waarschuwingen en instructies in deze handleiding. Bewaar deze instructies.
Wichtige Sicherheitshinweise
Diese Betriebsanleitung aufmerksam lesen und zum späteren Nachschlagen aufbewahren.
2
309405
™
/ LineDriver HD
312540D
ti10929a
Inhaltsverzeichnis

Verwandte Anleitungen für Graco LineDriver


Inhaltszusammenfassung für Graco LineDriver
- Seite 1 Bediening - Reparatie - Delen Betrieb - Reparatur - Teile ™ LineDriver / LineDriver HD 312540D Models / Modèles / Modelos / Modellen / Modelle: 262004 / 262005 - For the application of line striping materials - - Pour le tracement de lignes à la peinture - - Para la aplicación de materiales trazalíneas -...
-
Seite 2: Inhaltsverzeichnis
Motor de 200 cc ......36 Bomba LineDriver ..... . 38... -
Seite 3: Warnings
Warnings Warnings The following warnings are for the setup, use, grounding, maintenance, and repair of this equipment. The exclamation point symbol alerts you to a general warning and the hazard symbol refers to procedure-specific risk. Refer back to these warnings. Additional, product-specific warnings may be found throughout the body of this manual where applicable. Warnings MOVING VEHICLE HAZARD Careless and reckless behavior causes accidents. -
Seite 4: Personal Protective Equipment
Warnings Warnings PERSONAL PROTECTIVE EQUIPMENT You must wear appropriate protective equipment when operating, servicing, or when in the operating area of the equipment to help protect you from serious injury, including eye injury, inhalation of toxic fumes, burns, and hearing loss. This equipment includes but is not limited to: •... -
Seite 5: Mises En Garde
Mises en garde Mises en garde Les mises en gardes suivantes sont des mises en garde de sécurité relatives à la configuration, utilisation, mise à la terre, maintenance et réparation de ce matériel. Le point d’exclamation est une mise en garde générale et le symbole de danger fait référence à... -
Seite 6: Sécurité De La Batterie
Mises en garde Mises en garde DANGER DU MONOXYDE DE CARBONE Les gaz d’échappement contiennent du monoxyde de carbone qui est un gaz dangereux incolore et inodore. L’inhalation de monoxyde de carbone est mortelle. Ne pas travailler dans un endroit fermé. SÉCURITÉ... -
Seite 7: Advertencias
Advertencias Advertencias A continuación se ofrecen advertencias relacionadas con la seguridad de la puesta en marcha, utilización, conexión a tierra, mantenimiento y reparación de este equipo. El símbolo acompañado de una exclamación le indica que se trata de una advertencia y el símbolo de peligro se refiere a un riesgo específico. Consulte estas Advertencias. Siempre que sea pertinente, en este manual encontrará... -
Seite 8: Seguridad De La Batería
Advertencias Advertencias PELIGRO DE MONÓXIDO DE CARBONO Los gases de escape contienen monóxido de carbono, un veneno incoloro e inodoro. Respirar monóxido de carbono puede causar la muerte. No trabaje con este equipo en un recinto cerrado. SEGURIDAD DE LA BATERÍA Si manipula de forma incorrecta la batería, ésta podría tener fugas, explotar, causar quemaduras o pro- vocar una explosión: •... -
Seite 9: Waarschuwingen
Waarschuwingen Waarschuwingen Onderstaande waarschuwingen betreffen veilig(e) installatie, gebruik, aarding, onderhoud en reparatie van deze appa- ratuur. Het symbool met het uitroepteken in the tekst van deze handleiding verwijst naar een waarschuwing en het geva- rensymbool verwijst naar procedurespecifieke risico’s. Lees deze waarschuwingen. Daarnaast zijn er procedurespecifieke waarschuwingen te vinden in de tekst, waar van toepassing. -
Seite 10: Accuveiligheid
Waarschuwingen Waarschuwingen GEVAAR VAN KOOLMONOXIDE De uitlaatgassen bevatten giftig koolmonoxide, een kleurloos en geurloos gas. Inademing van koolmonoxide kan tot de dood leiden. Deze apparatuur niet in een gesloten ruimte gebruiken. ACCUVEILIGHEID De accu kan lekken, ontploffen, brandwonden veroorzaken of een explosie veroorzaken als er verkeerd mee wordt omgegaan: •... -
Seite 11: Warnhinweise
Warnhinweise Warnhinweise Die folgenden Warnhinweise beziehen sich auf Einstellung, Bedienung, Erdung, Wartung und Reparatur des Produkts. Das Symbol mit dem Ausrufezeichen steht bei einem allgemeinen Warnhinweis, und das Gefahrensymbol bezieht sich auf Risiken, die während bestimmter Arbeiten auftreten. Konsultieren Sie diese Warnhinweise regelmäßig. Weitere produktspezifische Hinweise befinden sich an den entsprechenden Stellen überall in dieser Anleitung. -
Seite 12: Batteriesicherheit
Warnhinweise Warnhinweise GEFAHR DURCH KOHLENMONOXID Die Abgase enthalten giftiges Kohlenmonoxid, das farb- und geruchlos ist. Das Einatmen von Kohlenmonoxid kann zum Tod führen. Starten Sie daher den Motor niemals in einem geschlossenen Raum. BATTERIESICHERHEIT Die Batterie kann auslaufen, explodieren, Verbrennungen oder Explosionen verursachen, wenn sie falsch gehandhabt wird: •... -
Seite 13: Component Identification
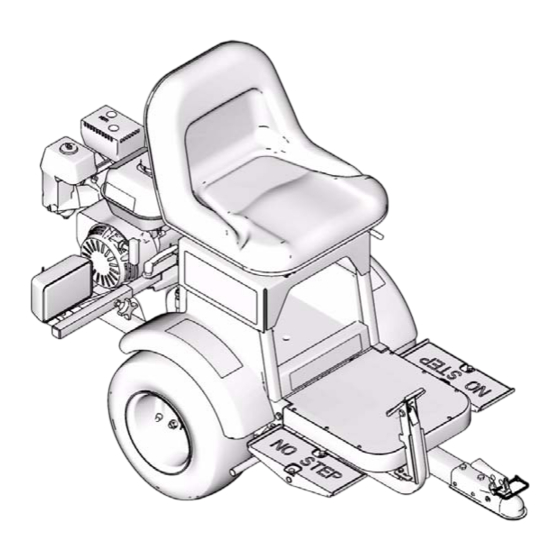
Component Identification / Identification des composants / Identificación de los componentes / De onderdelen / Komponenten Component Identification / Identification des composants / Identificación de los componentes / De onderdelen / Komponenten ti10938a ti10930a ti10936a ti11192a ti10926a English Français Español Nederlands Deutsch Wheel Release... -
Seite 14: Operation
Conecte el receptor del Monte el acoplamiento Enganche el acoplador en tracción. Abra dos vueltas enganche al trazalíneas – LineDriver a la bola del posición de bloqueo (M). ( - ) el dispositivo de Kit de receptor del enganche del LineLazer. - Seite 15 Operation / Fonctionnement / Funcionamiento / Bediening / Betrieb ti11086a ti11085a ti10940a English Insert safety pin in latch Adjust seat forward/back- Suggestion: Adjust one pedal Rotate pedal to desired ward with lever below seat. for full motion forward and one position.
-
Seite 16: Startup
Operation / Fonctionnement / Funcionamiento / Bediening / Betrieb Startup / Mise en service / Puesta en marcha / Opstarten / Inbetriebnahme ti3308a ti10938a ti3309a English Check engine oil level. Add Fill fuel tank.Do not overfill. Check hydraulic oil level. SAE 10W-30 (summer) or See Honda manual. - Seite 17 Operation / Fonctionnement / Funcionamiento / Bediening / Betrieb ti3312a ti11366a ti3313a ti11009a English Start engine. Engage parking brake Move fuel valve to open. COLD ENGINE: Move throttle to 1/3 of MAX Move choke to closed. position. WARM ENGINE: Leave choke open.
- Seite 18 Operation / Fonctionnement / Funcionamiento / Bediening / Betrieb ti5251a ti3315a ti3316a ti3317a English Set engine switch ON. Pull starter cord. After engine starts, move Set throttle to desired setting. choke to open. Français Mettre l’interrupteur du Tirer sur le cordon du lanceur G Dès que le moteur tourne, Régler l’accélérateur en moteur sur ON...
- Seite 19 Driver. frene. Nederlands Let op: De beweging van de Druk op de handgrepen van Let op: De LineDriver stopt als Beweeg het pedaal (de LineDriver is vooruit en achteruit. de belijner om de gewenste beide voeten van de pedalen pedalen) naar achteren om Draaien doet u met de belijner.
- Seite 20 Active el freno de estacio- Nota: El interbloqueo de seguri- Prueba del interbloqueo de Libere el freno de estacio- namiento cuando no esté dad del LineDriver impide que el namiento. seguridad : operando el LineDriver. motor funcione si el freno de est- Levántese del asiento del...
-
Seite 21: Troubleshooting
Check Switch position on regulator Set Switch position on regulator: Set to No Battery if your LineDriver has no battery Set to Battery if your LineDriver has a bat- tery Engine runs for short time and stops Fuel flow restriction See engine manual... -
Seite 22: Dépannage
Operation / Fonctionnement / Funcionamiento / Bediening / Betrieb Dépannage PROBLÈME CAUSE SOLUTION Le moteur ne démarre pas Le frein de parking n’est pas serré. Serrer le frein. Consulter le manuel Moteur sur ARRET, pas d’essence moteur fourni ou niveau d’huile bas Le moteur tourne trop vite –... -
Seite 23: Detección De Problemas
Inspeccione la posición del interrup- Fije la posición del interruptor en el regulador: tor en el regulador Si el LineDriver no tiene batería, fije en la posición ‘Sin batería’. Si el LineDriver tiene batería, fije en la posición ‘Batería’. El motor funciona durante un rato y... -
Seite 24: Storingen Opsporen En Verhelpen
LineDriver stapt De motor blijft draaien als de bestuur- Veiligheidsschakelaar De parkeerrem afstellen en inschake- der van de LineDriver stapt en de len. Vervang de veiligheidsschake- machine niet op de parkeerrem staat laar en/of de verbindingsdraden. De motor slaat over bij draaien en bij... -
Seite 25: Ferlersuche
Hydrauliköl-Pegelstand zu niedrig Syntheseöl Mobil 1 (15W-50) nachfül- weder vorwärts noch rückwärts Antriebsrad ist entkoppelt. Einkoppeln (handfest andrehen). Motor läuft, LineDriver fährt aber nur Hydrauliköl-Pegelstand zu niedrig. Syntheseöl Mobil 1 (15W-50) nach- langsam vorwärts und rückwärts Feststellbremse ist angezogen. füllen. Feststellbremse lösen. -
Seite 26: Repair
Repair / Réparation / Reparación / Reparatie / Reparatur Repair / Réparation / Reparación / Reparatie / Reparatur Brake Adjustment / Réglage du frein / Ajuste del freno / De rem afstellen / Bremseneinstellung 1/8-1/4 in. ti11152a ti11150a ti11149a ti11151a English Inflate tires to operating Select desired brake rod hole pattern. -
Seite 27: Hydraulic System Purging
Het hydraulisch systeem ontluchten / Spülen des Hydrauliksystems ti10938a ti11027a ti11127a English Follow this procedure after Set LineDriver on blocks so Fill oil reservoir to top of Open (–) drive wheel replacing any hydraulic compo- wheels are off ground. baffle. - Seite 28 Repair / Réparation / Reparación / Reparatie / Reparatur t110943a ti10938a ti11027a ti3316a English Start engine and run at low Slowly move motion control Check oil level and top off Close (+) drive wheel rpm. pedals in forward and to top of baffle. release and repeat step 5.
- Seite 29 Repair / Réparation / Reparación / Reparatie / Reparatur t110943a ti10938a English Increase speed. Move ped- Check oil level. Top off to als to see if wheels turn top of baffle. freely. Français Augmenter la vitesse. Contrôler le niveau d’huile. Appuyer sur les pédales Faire l’appoint jusqu’en pour voir si les roues tour-...
-
Seite 30: Tires And Wheel Motors
/ Band- en wielmotoren / Reifen und Radmotoren ti111089a ti11119a ti11127a English Tire Removal Tire Installation Set LineDriver on blocks so Remove four lug nuts (22) Replace tire and install lug Tilt LineDriver back and wheels are off ground. and tire (16). nuts. Alternately tighten lug remove blocks. - Seite 31 (21a). Relever les peut s’avérer nécessaire extrémités du flexible et pour démonter le moyeu obturer. (non fourni par Graco). Español Desmontaje del motor de rueda Desmonte el pasador (56), Desconecte las dos Retire los cuatro pernos Desmonte el neumático.
- Seite 32 Repair / Réparation / Reparación / Reparatie / Reparatur ti11088a ti111089a English Wheel Motor Installation Install wheel motor (21a) Connect two hydraulic Install wheel hub (22b), Install tire. Purge hydraulic with four bolts (78) and lock hoses (112) to wheel motor caster nut (21b), and pin system.
-
Seite 33: Light Regulator/Battery Kit
The regulator is located under the Do not install other 12 Volt equip- Battery is located under seat and seat and converts the engine-gen- ment without first installing Graco stores converted dc voltage for Installation - Install regula- erated ac voltage into a dc voltage Battery Kit 245343. -
Seite 34: Cc Engine
Disconnect all necessary (142) and engine. two washers (131), lock nut Disconnect three wires wiring. (130) and coupler guard from engine to LineDriver. NOTE: All service to the engine (125). must be performed by an autho- rized HONDA dealer. Français Démontage... - Seite 35 (129), two Install engine with four washers (131) and lock nut Connect three wires from engine mounting screws (130). engine to LineDriver. (69) and lock nuts (142). Torque to 17 ft-lb (22.6 N·m) Français Installation Remettre les quatre vis à...
-
Seite 36: Cc Engine
Den Motor von Für den späteren Zusam- fernen. Drei Kabel vom Kupplung und Pumpe menbau auf die Ausrich- HINWEIS: Sämtliche Servicear- Motor zum LineDriver lös- herunterschieben. tung der Kupplung achten. beiten am Motor müssen von Das Distanzstück (141) ent- einem autorisierten fernen. - Seite 37 Das Kupplungsgehäuse mit sie sonst zerstört wird. Motor mit vier Befesti- gen. Drei Kabel vom Motor vier Schrauben und Unter- gungsschrauben (69) und zum LineDriver Die Kupplung (34b) mit der legscheiben anbringen. Mit Sicherungsmuttern (142) anschließen. flachen Seite nach außen 22,6 N·m festziehen.
-
Seite 38: Linedriverpump
Repair / Réparation / Reparación / Reparatie / Reparatur LineDriver Pump / Pompe du LineDriver / Bomba LineDriver / Pomp van de LineDriver / LineDriver-Pumpe ti11125a ti11124a ti11122a English Removal Be prepared to plug Disconnect hydraulic lines Remove cap screw (72), Remove two cap screws hydraulic connections. - Seite 39 Repair / Réparation / Reparación / Reparatie / Reparatur ti10933a ti11123a ti10933a English Installation Remove cap screw (129), Remove set screw (A) from Install pump (5) and key Install coupler guard (125) lock nut (130), washer flexible coupling (34) and (83).
- Seite 40 Repair / Réparation / Reparación / Reparatie / Reparatur ti11125a ti11124a ti11122a English Install two cap screws (80). Install cap screw (72) and Connect hydraulic lines spacer (33) into control arm (109, 110) and hoses (118, (15) with nut (174). 119) to pump (5).
-
Seite 41: Linedriver Hd Pump/Prostart Clutch
Repair / Réparation / Reparación / Reparatie / Reparatur LineDriver HD Pump/ProStart Clutch / Pompe du LineDriver HD /Carter ProStart / Bomba LineDriver HD/Embrague ProStart / LineDriver HD pomp/ProStart koppeling / LineDriver-HD-Pumpe/ProStart-Kupplung ti11168a ti11171a ti11166a ti11125a ti111350a English Removal Remove cap screw (72),... - Seite 42 Repair / Réparation / Reparación / Reparatie / Reparatur ti11167a ti11162a ti11165a ti11161a ti11164a English Remove two screws (80), Remove screw (129), flat Remove spacer (141). Remove four screws (70), nuts (86) and clutch plate washer (156) and clutch washers (71) and clutch (4) from pump.
- Seite 43 Repair / Réparation / Reparación / Reparatie / Reparatur ti11161a ti11165a ti11162a English Installation Caution: Orientation is critical to Caution: Washer size is critical avoid destruction of clutch to keep clutch from flying apart. Install clutch housing (125) Install spacer (141). Install clutch (34b) with flat Apply LockTite to screw with four screws (70) and...
- Seite 44 Repair / Réparation / Reparación / Reparatie / Reparatur ti11164a ti11166a ti11168a ti11167a English Align holes on clutch plate Insert key on pump shaft. Extend pump shaft a mini- Apply Locktite to two set with slots in pump. Mount Align centrifugal clutch mum of 1/8 in.
- Seite 45 Repair / Réparation / Reparación / Reparatie / Reparatur ti11171a ti11351a ti11350a English Insert pump housing into 10. Install cap screw (72) and 11. Connect hydraulic lines clutch housing with return spacer (33) into control arm (109, 110) and hoses (118, to neutral mechanism (15) with nut (174).
-
Seite 46: Parts
Parts / Pièces / Piezas / Delen / Teile Parts / Pièces / Piezas / Delen / Teile ti11156a 312540D... - Seite 47 Parts / Pièces / Piezas / Delen / Teile Part Description Part Description 101566 (262005) FRAME (page 49) 100187 NUT ENGINE, gas, Honda 15R309 ROD, standoff, 1/4 OD x 2.75 in.lg 114530 160 cc, (262004) 111006 SCREW, cap 116080 200 cc, (262005) 15R310 HOSE, hydraulic BRACKET, mounting, hydraulic pump 15R311 HOSE, hydraulic...
- Seite 48 Parts / Pièces / Piezas / Delen / Teile ti10927a 312540D...
- Seite 49 116887 BEARING, flanged, bronze 116896 BALL, joint, rod end 187797 SPACER, duct 100104 PIN, cotter 15R409 PAD, non-slip, brake 15R122 SPRING 15R406 LABEL, LineDriver, ProStart 121256 SCREW, shoulder, socket head (262005) 116935 SCREW, cap, flnghd 247617 BRAKE, adjustable 121280 SCREW, cap, hex hd...
- Seite 50 Parts / Pièces / Piezas / Delen / Teile ti10928a 312540D...
- Seite 51 110988 NUT, flange hd 105679 SWITCH, toggle 15T112 LABEL, LineDriver light adjust 114425 BUSHING, strain relief 247896 KIT, repair, LineDriver light, includes 15H525 CAP, breather, filler 25, 26, 39, 40, 41, 42, 43, 44, 45, 101344 SCREW, cap, hex hd...
-
Seite 52: Safety Interlock Wiring Diagram
Change engine oil. Reference Honda Engines Owner's Manual for correct oil viscosity. YEARLY OR 500 HOURS Replace hydraulic oil and filter element. Use Mobil 1 (15W-50) synthetic oil and Graco filter 245342. Hydraulic Oil Replacement Procedure: Remove filter and allow oil reservoir to drain from filter base. - Seite 53 ANNUEL OU TOUTES LES 500 HEU- Vidanger l’huile hydraulique et remplacer le filtre. Utiliser de l’huile de synthèse Mobil 1 (15W–50) et un filtre Graco 245342. Procédure de vidange de l’huile hydraulique. Démonter le filtre et laisser l’huile s’écouler par l’embase du filtre.
- Seite 54 JAARLIJKS OF OM DE 500 UUR Ververs de hydraulische olie en het filterelement. Gebruik Mobil 1 (15W–50) synthe- tische olie en Graco-filter 245342. Procedure voor het verversen van hydraulische olie: Verwijder de filter en laat het oliereservoir leeglopen vanuit de filterhouder.
-
Seite 55: Technical Data
(attached to LineLazer IV 200HS) Left Hand 0.5 m/s Right Hand 0.4 m/s † Vibration measured per ISO 5349 based on 8 hour daily exposure A(8) LineDriver and LineDriver HD: Vibration at seat and pedals (EN1032) < 0.5 m/s 312540D... -
Seite 56: Caractéristiques Techniques
Main gauche 0,5 m/s Main droite 0,4 m/s † Vibrations mesurées selon ISO 5349 sur la base d’un service de 8 heures par jour A(8) LineDriver et LineDriver HD: Vibrations au siège et aux pédales (EN1032) < 0.5 m/s 312540D... -
Seite 57: Características Técnicas
* Mano izquierda 0,5 m/s Mano derecha 0,4 m/s † Vibraciones medidas según la ISO 5349 en base a una exposición diaria de 8 horas A(8) LineDriver y LineDriver HD: Vibración en asiento y pedales (EN1032) < 0,5 m/s 312540D... -
Seite 58: Technische Gegevens
(bevestigd aan LineLazer IV 200HS) linksdraaiend 0,5 m/s rechtsdraaiend 0,4 m/s † Trillingen gemeten conform ISO 5349 op basis van 8 uur blootstelling per dag A(8) LineDriver en LineDriver HD: trillingsniveau ter hoogte van stoel en pedalen (EN1032) < 0.5 m/s 312540D... -
Seite 59: Technische Daten
(an LineLazer IV 200HS angeschlos- sen) Linke Hand 0,5 m/s Rechte Hand 0,4 m/s † Vibrationen gemessen gemäß ISO 5349 bei 8 Stunden täglichem Einsatz A(8) LineDriver und LineDriver HD: Schwingungen an Sitz und Pedalen (EN 1032) < 0,5 m/s² 312540D... -
Seite 60: Warranty
With the exception of any special, extended, or limited warranty published by Graco, Graco will, for a period of twelve months from the date of sale, repair or replace any part of the equipment determined by Graco to be defective. This warranty applies only when the equipment is installed, operated and maintained in accordance with Graco’s written recommendations.