Children should be supervised to ensure that they do not • play with the appliance. Keep all packaging away from children and dispose of it • appropriately. WARNING: The appliance and its accessible parts become • hot during use. Keep children and pets away from the appliance when in use and when cooling down.
WARNING: The appliance and its accessible parts become • hot during use. Care should be taken to avoid touching heating elements or the surface of the appliance cavity. Always use oven gloves to remove or insert accessories or • ovenware. To remove the shelf supports first pull the front of the shelf •...
Before you install the appliance, fit it with the • This appliance is supplied without a main applicable hob from the table. plug and a main cable. • The hob connection socket is at the top of the oven cabinet. The hob has connection Type Maximum power leads for the cooking zones and the...
– be careful when you remove or install the accessories. Cable types applicable for installation or • Discoloration of the enamel or stainless replacement for Europe: steel has no effect on the performance of H07 RN-F, H05 RN-F, H05 RRF, H05 VV-F, H05 the appliance.
• Use only lamps with the same • Contact your municipal authority for specifications. information on how to dispose of the appliance. 2.6 Service • Disconnect the appliance from the mains supply. • To repair the appliance contact the • Cut off the mains electrical cable close to Authorised Service Centre.
4. PRODUCT DESCRIPTION 4.1 General overview Control panel Knobs for the hob Power lamp / symbol Knob for the heating functions Control knob (for the temperature) Temperature indicator / symbol Air vents for the cooling fan Heating element Lamp Cavity embossment - Aqua cleaning container Shelf support, removable Shelf positions...
6. BEFORE FIRST USE WARNING! Refer to Safety chapters. 6.1 Before first use The oven can emit an odour and smoke during preheating. Make sure that the room is ventilated. Step 1 Step 2 Clean the oven Preheat the empty oven Remove all accessories and removable shelf Set the maximum temperature for the function: supports from the oven.
Heating Application Heating Application function function To bake cakes with crispy bottom This function is designed to save and to preserve food. energy during cooking. When you use this function, the temperature Bottom Moist Fan in the cavity may differ from the Heat Baking set temperature.
Wire shelf Push the shelf between the guide bars of the shelf support and make sure that the feet point down. Baking tray: Push the tray between the guide bars of the shelf support. 9. ADDITIONAL FUNCTIONS 9.1 Cooling fan 9.2 Safety thermostat When the appliance operates, the cooling fan Incorrect operation of the oven or defective...
Cooking times cooking time, etc.) for your cookware, recipes and quantities when you use this appliance. Cooking times depend on the type of food, its consistency, and volume. Initially, monitor the performance when you cook. Find the best settings (heat setting, 10.2 Moist Fan Baking - recommended accessories Use the dark and non-reflective tins and containers.
Seite 13
(°C) (min) Fish fillet, 0.3 kg pizza pan on wire shelf 35 - 45 Poached meat, 0.25 baking tray or dripping pan 40 - 50 Shashlik, 0.5 kg baking tray or dripping pan 25 - 35 Cookies, 16 pieces baking tray or dripping pan 20 - 30 Macaroons, 20 baking tray or dripping pan...
( °C) (min) Apple pie, Convention‐ Wire 70 - 90 2 tins Ø20 al Cooking shelf Apple pie, Fan Cooking Wire 70 - 90 2 tins Ø20 shelf Sponge Convention‐ Wire 35 - 45 cake, al Cooking shelf cake mould Ø26 cm Sponge Fan Cooking...
Seite 15
11.1 Notes on cleaning Clean the front of the appliance only with a microfibre cloth with warm water and a mild detergent. Clean and check the door gasket around the frame of the cavity. Use a cleaning solution to clean metal surfaces. Clean stains with a mild detergent.
Seite 16
11.3 How to use: Aqua Clean Step 3 Set the temperature to 90 °C. This cleaning procedure uses humidity to remove remaining fat and food particles from Step 4 Let the oven work for 30 min. the oven. Step 5 Turn off the oven.
Seite 17
Step 4 Put the door on a soft cloth on a stable surface and release the locking system to remove the internal glass panel. Step 5 Turn the fasteners by 90° and remove them from their seats. 90° Step 6 First lift carefully and then remove the glass panel.
Before you replace the lamp: Step 1 Step 2 Step 3 Turn off the oven. Wait until the Disconnect the oven from the Put a cloth on the bottom of the oven is cold. mains. cavity. Back lamp Step 1 Turn the glass cover to remove it.
13. ENERGY EFFICIENCY 13.1 Product Information and Product Information Sheet according to EU Ecodesign and Energy Labelling Regulations Supplier's name Progress Model identification PHN23002X 944068071 Energy Efficiency Index 95.1 Energy efficiency class Energy consumption with a standard load, conventional mode 0.89 kWh/cycle Energy consumption with a standard load, fan-forced mode 0.78 kWh/cycle...
14. ENVIRONMENTAL CONCERNS appliances marked with the symbol with Recycle materials with the symbol . Put the the household waste. Return the product to packaging in relevant containers to recycle it. your local recycling facility or contact your Help protect the environment and human municipal office.
VISITEZ NOTRE SITE WEB POUR : Obtenir des conseils d’utilisation, des brochures, un dépanneur, des informations sur le service et les réparations : www.progress-hausgeraete.de/support TABLE DES MATIÈRES 1. INFORMATION SUR LA SÉCURITÉ.............. 21 2. CONSIGNES DE SÉCURITÉ................23 3. INSTALLATION....................27 4.
comprennent les risques encourus. Les enfants de moins de 8 ans et les personnes ayant un handicap très important et complexe doivent être tenus à l'écart de l’appareil, à moins d'être surveillés en permanence. Veillez à ce que les enfants ne jouent pas avec l’appareil. •...
Le bandeau de commande doit être raccordé à une • résistance adaptée en respectant les couleurs des connecteurs pour éviter tout risque. Un moyen de déconnexion doit être prévu dans le câblage • fixe conformément aux règles nationales d’installation. AVERTISSEMENT : Assurez-vous que l'appareil est éteint •...
• L’appareil est équipé d’un système de • Tous les raccordements électriques refroidissement électrique. Il doit être doivent être effectués par un électricien utilisé avec l’alimentation électrique. qualifié. • L’appareil doit être relié à la terre. • Assurez-vous que les paramètres figurant Hauteur minimale du 590 (600) mm sur la plaque signalétique correspondent...
Seite 25
les connecteurs dans la prise appropriée du four pour raccorder la table de cuisson Types de câbles compatibles pour l'ins‐ au four. La conception des fiches et des tallation ou le remplacement pour l’Euro‐ prises permet d’éviter les mauvais pe : raccordements.
2.5 Éclairage interne – ne placez jamais de feuilles d'aluminium directement sur le fond de la cavité de l'appareil. AVERTISSEMENT! – ne versez pas d'eau directement dans Risque d’électrocution. l'appareil chaud. – ne conservez pas de plats et de • Concernant la/les lampe(s) à l’intérieur de nourriture humides dans l'appareil ce produit et les lampes de rechange après avoir terminé...
3. INSTALLATION 3.1 Encastrement AVERTISSEMENT! Reportez-vous aux chapitres concernant la sécurité. min. 550 min. 560 3.2 Fixation du four au meuble FRANÇAIS...
4. DESCRIPTION DE L'APPAREIL 4.1 Vue d’ensemble Bandeau de commande Manettes de la table de cuisson Voyant / symbole de mise sous tension Manette de sélection des modes de cuisson Manette de commande (de la température) Indicateur / symbole de température Fentes d’aération du ventilateur de refroidissement Résistance...
5.3 Utilisation de la double zone (le montre 9. Ne la tournez pas jusqu'à la cas échéant) position d’arrêt. 2. Tournez lentement la manette jusqu’à ce que vous entendiez un clic. Les deux Si la table de cuisson dispose de sa zones de cuisson sont allumées.
7.1 Comment régler Mode de cuisson Mode de Application cuisson Éta‐ Tournez la manette des modes de cuisson pour sélectionner un mode pe 1 Pour faire griller des aliments peu de cuisson. épais et du pain. Éta‐ Tournez la manette de commande Gril pour sélectionner la température .
8. UTILISATION DES ACCESSOIRES 8.1 Insertion des accessoires AVERTISSEMENT! Une petite indentation sur le dessus apporte Reportez-vous aux chapitres concernant plus de sécurité. Les indentations sont la sécurité. également des dispositifs anti-bascule. Le rebord élevé de la grille empêche les ustensiles de cuisine de glisser sur la grille.
10. CONSEILS ET ASTUCES Cuisson de la viande et du poisson Laissez la viande pendant environ 15 minutes Reportez-vous aux chapitres avant de la découper afin d’éviter que le jus concernant la sécurité. ne s’écoule. 10.1 Recommandations de cuisson Pour éviter qu’il y ait trop de fumée dans le four pendant le rôtissage, ajoutez un peu Le four dispose de quatre niveaux de grille.
Seite 33
(°C) (min) Petits pains sucrés, Plateau de cuisson ou plat 35 - 40 12 pièces à rôtir Petits pains, 9 piè‐ Plateau de cuisson ou plat 35 - 40 à rôtir Pizza, surgelée, grille métallique 35 - 40 0,35 kg Gâteau Roulé...
Seite 34
(°C) (min) Biscuits à pâte sa‐ Plateau de cuisson ou plat 40 - 50 blée, 20 pièces à rôtir Tartelettes, 8 pièces Plateau de cuisson ou plat 20 - 30 à rôtir Légumes, pochés, Plateau de cuisson ou plat 35 - 40 0,4 kg à...
( °C) (min) Génoise, Chauffage Grille mé‐ 35 - 45 moule à Haut/Bas tallique gâteau Ø26 cm Génoise, Chaleur Grille mé‐ 35 - 45 moule à tournante tallique gâteau Ø26 cm Sablé Chauffage Plateau 20 - 35 Préchauffez le four Haut/Bas de cuis‐...
Seite 36
11.1 Remarques concernant le nettoyage Nettoyez l’avant de l’appareil uniquement avec un chiffon en microfibre imbibé d’eau tiède et d’un détergent doux. Nettoyez et contrôlez le joint de la porte autour du cadre de la ca‐ vité. Utilisez une solution de nettoyage pour nettoyer les surfaces métalliques. Agent net‐...
Seite 37
11.3 Comment utiliser : Nettoyage Aqua Clean Éta‐ Réglez la température sur 90 °C. pe 3 Ce processus de nettoyage utilise l'humidité pour retirer la graisse et les particules Éta‐ Laissez le four fonctionner pendant alimentaires restant dans le four. 30 minutes.
Seite 38
Éta‐ Mettez la porte sur un chiffon doux sur une surface stable et relâchez le système pe 4 de verrouillage pour retirer le panneau de verre interne. Éta‐ Faites pivoter les fixations de 90° et reti‐ rez-les de leurs logements. pe 5 90°...
Avant de remplacer l'éclairage : Étape 1 Étape 2 Étape 3 Éteignez le four. Attendez que le Débranchez le four de l'alimenta‐ Placez un chiffon au fond de la four ait refroidi. tion secteur. cavité. Lampe arrière Éta‐ Tournez le diffuseur en verre pour le retirer. pe 1 Éta‐...
13.1 Informations sur le produit et fiche d'information sur le produit conformément aux réglementations européennes sur l'écoconception et l'étiquetage énergétique Nom du fournisseur Progress Identification du modèle PHN23002X 944068071 Indice d’efficacité énergétique 95.1 Classe d’efficacité énergétique Consommation d’énergie avec charge standard, en mode con‐ 0.89kWh/cycle ventionnel Consommation d’énergie avec charge standard, en mode cha‐...
14. EN MATIÈRE DE PROTECTION DE L'ENVIRONNEMENT Recyclez les matériaux portant le symbole portant le symbole avec les ordures ménagères. Emmenez un tel produit dans . Déposez les emballages dans les votre centre local de recyclage ou contactez conteneurs prévus à cet effet. Contribuez à la vos services municipaux.
BESUCHEN SIE UNSERE WEBSITE, UM: Anwendungshinweise, Prospekte, Informationen zu Fehlerbehebung, Service und Reparatur zu erhalten: www.progress-hausgeraete.de/support INHALTSVERZEICHNIS 1. SICHERHEITSHINWEISE................42 2. SICHERHEITSANWEISUNGEN..............44 3. MONTAGE.......................48 4. GERÄTEBESCHREIBUNG................49 5. BEDIENFELD....................49 6. VOR DER ERSTEN VERWENDUNG............. 50 7. TÄGLICHER GEBRAUCH................50 8. VERWENDUNG DES ZUBEHÖRS..............51 9.
Gerät sicher zu bedienen ist und welche Gefahren bei nicht ordnungsgemäßer Bedienung bestehen. Kinder unter 8 Jahren und Personen mit schweren Behinderungen oder Mehrfachbehinderung sollten vom Gerät ferngehalten werden, wenn sie nicht ständig beaufsichtigt werden. Kinder sollten beaufsichtigt werden, um sicherzustellen, •...
Zur Vermeidung von möglichen Gefahren muss das • Bedienfeld so an den Backofen angeschlossen werden, dass die Farben der Anschlüsse übereinstimmen. Die Mittel zum Trennen müssen gemäß den • Verdrahtungsregeln in die feste Verkabelung integriert werden. WARNUNG: Vergewissern Sie sich, dass das Gerät •...
• Einige Teile des Geräts sind • Alle elektrischen Anschlüsse sind von stromführend. Das Küchenmöbel muss einem geprüften Elektriker vorzunehmen. auf allen Seiten mit dem Gerät • Das Gerät muss geerdet sein. abschließen, um einen Kontakt mit • Stellen Sie sicher, dass die Daten auf dem stromführenden Teilen zu vermeiden.
Seite 46
• Die Anschlussbuchse für das Kochfeld befindet sich an der Oberseite des Anschluss an die Klemmleiste Backofenschranks. Das Kochfeld verfügt über Anschlussleitungen für die 1 2 3 4 5 Kochzonen und das Erdungskabel. Die 230V 3~ Leitungen haben Steckverbinder. Verbinden Sie die Stecker mit der entsprechenden Buchse am Backofen, um 1 2 3 4 5 das Kochfeld mit dem Backofen zu...
eine Mischung aus Alkohol und Luft • Gehen Sie beim Aushängen der Tür verursachen. vorsichtig vor. Die Tür ist schwer! • Lassen Sie beim Öffnen der Tür keine • Reinige das Gerät regelmäßig, um eine Funken oder offenen Flammen mit dem Verschlechterung des Gerät in Kontakt kommen.
• Entfernen Sie das Türschloss, um zu verhindern, dass sich Kinder, oder Haustiere im Gerät einschließen. 3. MONTAGE 3.1 Montage WARNUNG! Siehe Kapitel Sicherheitshinweise. min. 550 min. 560 3.2 Befestigung des Ofens am Möbel DEUTSCH...
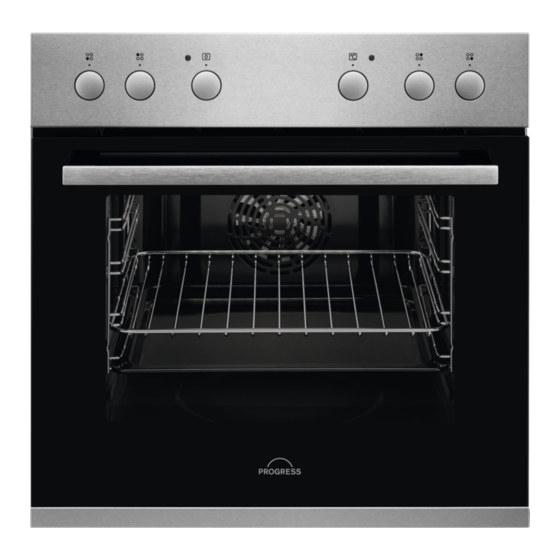
5.4 Versenkbare Knöpfe Drücken Sie zum Benutzen des Geräts den Knopf. Der Knopf kommt dann heraus. 6. VOR DER ERSTEN VERWENDUNG WARNUNG! Siehe Kapitel Sicherheitshinweise. 6.1 Vor der ersten Inbetriebnahme Der Backofen kann während des Aufheizens Geruch und Rauch verströmen. Stellen Sie sicher, dass der Raum belüftet ist.
Ofenfunk‐ Anwendung Ofenfunk‐ Anwendung tion tion Der Backofen ist ausgeschaltet. Diese Funktion ist entwickelt wor‐ den, um während des Kochvor‐ gangs Energie zu sparen. Wenn Aus-Positi‐ Feuchte Sie diese Funktion nutzen, kann Umluft die Temperatur im Garraum von der eingestellten Temperatur ab‐ Zum Braten oder zum Braten und weichen.
Kombirost Schieben Sie den Rost zwischen die Führungs‐ schienen der Einhängegitter mit den Füßen nach unten zeigend. Backblech: Schieben Sie das Backblech zwischen die Füh‐ rungsstäbe der Einhängegitter. 9. ZUSATZFUNKTIONEN 9.1 Kühlgebläse gefährlichen Überhitzung führen. Um dies zu verhindern, ist der Backofen mit einem Wenn das Gerät in Betrieb ist, schaltet sich Sicherheitsthermostat ausgestattet, der die das Kühlgebläse automatisch ein, um die...
Garen von Fleisch und Fisch Garzeitdauer Lassen Sie das Fleisch vor dem Tranchieren Die Kochzeiten hängen von der ca. 15 Minuten ruhen, damit der Bratensaft Lebensmittelart, ihrer Konsistenz und ihrem nicht austritt. Volumen ab. Um während des Bratens zu viel Rauch im Überwachen Sie zunächst die Leistung, wenn Backofen zu vermeiden, geben Sie etwas Sie kochen.
( °C) (Min) Hambur‐ Grill Kombi‐ Max. 20 - 30 Kombirost in die ger aus rost und dritte und Fettpfan‐ Rind‐ Fettpfan‐ ne in die zweite Ein‐ fleisch, 6 schubebene des Stück, 0,6 Backofens einschie‐ ben. Wenden Sie das Gericht nach der Hälfte der Gar‐...
11.2 Entfernen: Einhängegitter Entfernen Sie Einhängegitter zur Reinigung des Backofens. Schritt Schalten Sie den Backofen aus und warten Sie, bis er abgekühlt ist. Schritt Ziehen Sie das Einhängegitter vor‐ ne von der Seitenwand weg. Schritt Ziehen Sie das Einhängegitter hin‐ ten von der Seitenwand weg und nehmen Sie es heraus.
Seite 58
Schritt Öffnen Sie die Backofentür vollständig und halten Sie beide Scharniere fest. Schritt Heben und ziehen Sie die Verriegelungen an, bis sie einrasten. Schritt Schließen Sie die Backofentür halb bis zur ersten Öffnungsstellung. Anschlie‐ ßend heben und ziehen Sie die Tür aus der Aufnahme heraus.
Schritt Zuerst vorsichtig anheben und dann die Glasscheibe entfernen. Schritt Reinigen Sie die Glasscheiben mit Wasser und Spülmittel. Trocknen Sie die Glasscheiben sorg‐ fältig. Reinigen Sie die Glasscheiben nicht im Geschirrspüler. Schritt Setzen Sie nach der Reinigung die Glasscheibe und die Backofentür ein Wenn die Tür korrekt installiert ist, hören Sie beim Schließen der Verriegelungen ein Klicken.
Die Lampe ist durch‐ nicht. gebrannt. 13. ENERGIEEFFIZIENZ 13.1 Produktinformation und Produktinformationsblatt gemäß den EU- Verordnungen zu Umweltdesign und Energiekennzeichnung Name des Lieferanten Progress Modellbezeichnung PHN23002X 944068071 Energieeffizienzindex 95.1 Energieeffizienzklasse Energieverbrauch mit einer Standardbeladung, konventioneller 0.89kWh/Programm Modus Energieverbrauch mit einer Standardbeladung, Umluft-Modus 0.78kWh/Programm...
Anzahl der Garräume Wärmequelle Strom Volumen Art des Backofens Untereinbau-Backofen Masse 28.7kg IEC/EN 60350-1 – Elektrische Kochgeräte für den Hausgebrauch – Teil 1: Herde, Backöfen, Dampföfen und Grills – Methoden zur Leistungsmessung. 13.2 Energiesparen Restwärme Beträgt die Garzeit mehr als 30 Minuten, reduzieren Sie die Gerätetemperatur Das Gerät verfügt über Funktionen, mindestens 3 - 10 Min.
Seite 62
Bauteile, Unterbaugruppen und Einzelhandelsgeschäft oder in unmittelbarer Verbrauchsmaterialien des zu entsorgenden Nähe hierzu unentgeltlich zurückzunehmen; Altgeräts. die Rücknahme darf in diesem Fall nicht an den Kauf eines Elektro- oder Bevor das Altgerät entsorgt werden darf, Elektronikgerätes geknüpft, kann aber auf müssen alle Altbatterien und drei Altgeräte pro Geräteart beschränkt Altakkumulatoren vom Altgerät getrennt...
Seite 63
größer als 25 cm sind (Elektrokleingeräte), im Containerplätzen oder zugelassenen Ladengeschäft oder in unmittelbarer Nähe Recyclinghöfen erfolgen. Für weitere kostenlos zurückzunehmen; die Rücknahme Informationen wenden Sie sich bitte an Ihre darf in diesem Fall nicht vom Kauf eines Gemeindeverwaltung. Elektro- oder Elektronikgerätes abhängig gemacht werden.