
Verwandte Anleitungen für Klarstein VITAFRY DUO


Inhaltszusammenfassung für Klarstein VITAFRY DUO
- Seite 1 VITAFRY DUO Heißluftfritteuse Hot Air Fryer Freidora de aire caliente Friteuse à air chaud Friggitrice ad aria calda 10045473 www.klarstein.com...
- Seite 3 Sehr geehrter Kunde, wir gratulieren Ihnen zum Erwerb Ihres Gerätes. Lesen Sie die folgenden Hinweise sorgfältig durch und befolgen Sie diese, um möglichen Schäden vorzubeugen. Für Schäden, die durch Missachtung der Hinweise und unsachgemäßen Gebrauch entstehen, übernehmen wir keine Haftung. Scannen Sie den folgenden QR-Code, um Zugriff auf die aktuellste Bedienungsanleitung und weitere Informationen rund um das Produkt zu erhalten.
- Seite 4 ALLGEMEINE SICHERHEITSHINWEISE • Lesen Sie sich alle Anweisungen genau durch. • Berühren Sie keine heißen Oberflächen. • Zum Schutz vor Stromschlag tauchen Sie Kabel, Stecker oder die Basis niemals in Wasser oder andere Flüssigkeiten. VORSICHT Verbrennungsgefahr! Dieses Elektrogerät enthält eine Heizfunktion.
- Seite 5 HINWEISE ZUM SICHEREN GEBRAUCH • Legen Sie die zu frittierenden Zutaten immer in den Korb, damit sie nicht mit den Heizelementen in Berührung kommen. • Decken Sie Luftein- und Luftauslassöffnungen nicht ab, während das Gerät in Betrieb ist. • Füllen Sie kein Öl in die Pfanne, da dies eine Brandgefahr darstellen kann. •...
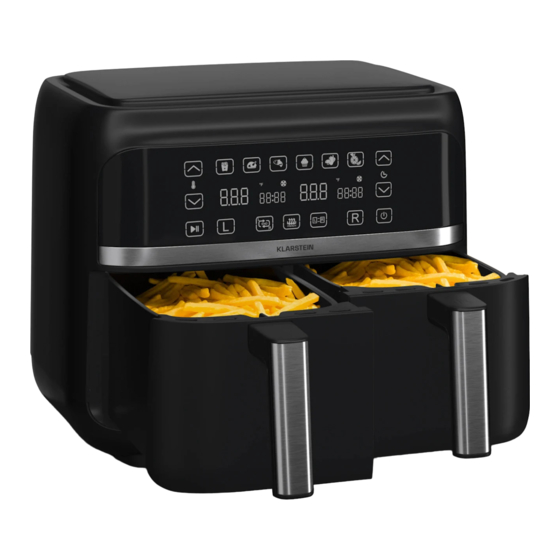
- Seite 6 GERÄTEÜBERSICHT Deckel Gitter Gehäuse Griff Bedienfeld Luftauslassöffnungen Frittierkorb Netzkabel VOR DEM ERSTEN GEBRAUCH • Entfernen Sie alle Verpackungsmaterialien. • Entfernen Sie alle Aufkleber oder Etiketten vom Gerät. • Reinigen Sie den Korb und den Topf gründlich mit heißem Wasser, etwas Spülmittel und einem nicht scheuernden Schwamm.
- Seite 7 ALLGEMEINE BEDIENUNG Heißluftfrittieren Stecken Sie den Stecker in die Steckdose. Ziehen Sie die Körbe vorsichtig aus der Heißluftfritteuse (siehe Bild 1) Geben Sie die Zutaten in den Korb (siehe Bild 2). Schieben Sie die Körbe zurück in die Heißluftfritteuse (siehe Bild 3). Orientieren Sie sich beim Hineinschieben an den Führungen im Gehäuse.
- Seite 8 Um Zutaten (wie Pommes) zu entfernen, ziehen Sie den Korb aus der Heißluftfritteuse, stellen Sie ihn auf einen Topfuntersetzer und entnehmen Sie die Zutaten mit einer Zange. Hinweis: Drehen Sie den Korb nicht auf den Kopf da sonst überschüssiges Öl, das sich am Boden angesammelt hat, auf die Zutaten gelangt.
- Seite 9 Hinweis zum Lüfter-Symbol Wenn sich der Lüfter an ist, leuchtet das Lüfter-Symbol durchgängig. Ist der Lüfter aus, erlischt das Symbol. Nach dem Betrieb blinkt das Symbol, bis sie die Taste START/PAUSE oder POWER drücken. Funktion der Pfeiltasten und der Tasten L/R/L=R •...
- Seite 10 Sync-Function (nicht geeignet für die Trocknung) • Drücken Sie zuerst die Taste L oder R und stellen Sie Zeit und Temperatur ein. • Drücken Sie auf die Taste SYNC. Die Taste beginnt zu blinken. • Drücken Sie START/PAUSE, um das Gerät zu starten. Der Korb mit der längeren eingestellten Garzeit heizt sich zuerst auf, während auf dem anderen Bildschirm [HOLD] angezeigt wird.
- Seite 11 EINSTELLUNGEN UND GARTABELLE Tipps • Kleinere Zutaten benötigen in der Regel eine etwas kürzere Zubereitungszeit als größere Zutaten. • Eine größere Menge an Zutaten erfordert nur eine etwas längere Zubereitungszeit, eine kleinere Menge an Zutaten erfordert nur eine etwas kürzere Zubereitungszeit. •...
- Seite 12 Gartabelle Die nachstehende Tabelle hilft Ihnen bei der Auswahl der Grundeinstellungen für die Zutaten. Beachten Sie, dass diese Einstellungen nur Richtwerte sind. Da sich die Zutaten in Bezug auf Herkunft, Größe, Form und Marke unterscheiden, können wir die beste Einstellung für Ihre Zutaten nicht garantieren. Addieren Sie 3 Minuten zur Zubereitungszeit, wenn Sie mit dem Frittieren beginnen, während die Heißluftfritteuse noch kalt ist.
- Seite 13 Menge Zeit in Temperatur Schütteln Min.-Max. Minuten in °C nach halber in g Zeit Backwaren Kuchen 8-15 Nein Quiche 20-22 Nein Muffins 15-18 Nein Süße Snacks Nein REINIGUNG UND PFLEGE • Ziehen Sie den Stecker aus der Steckdose und lassen Sie das Gerät mindestens 30 Minuten lang abkühlen.
- Seite 14 FEHLERBEHEBUNG Problem Mögliche Ursache Lösungsansatz Die Heißluftfritteuse Das Gerät ist nicht Stecken Sie den Stecker funktioniert nicht eingesteckt. in die Steckdose. Sie haben den Timer Stellen Sie am Timer nicht eingestellt. die gewünschte Zubereitungszeit ein schalten Sie das Gerät ein. Die mit der Die Menge der Zutaten Geben Sie kleinere...
- Seite 15 Problem Mögliche Ursache Lösungsansatz Aus dem Gerät kommt Sie bereiten fettige Wenn Sie fettige Zutaten weißer Rauch. Zutaten zu. in der Heißluftfritteuse frittieren, tritt eine große Menge Öl in den Korb aus. Das Öl erzeugt weißen Rauch, und der Korb kann sich stärker als gewöhnlich erhitzen.
- Seite 16 SPEZIELLE ENTSORGUNGSHINWEISE FÜR VERBRAUCHER IN DEUTSCHLAND Entsorgen Sie Ihre Altgeräte fachgerecht. Dadurch wird gewährleistet, dass die Altgeräte umweltgerecht verwertet und negative Auswirkungen auf die Umwelt und menschliche Gesundheit vermieden werden. Bei der Entsorgung sind folgende Regeln zu beachten: • Jeder Verbraucher ist gesetzlich verpflichtet, Elektro- und Elek- tronikaltgeräte (Altgeräte) sowie Batterien und Akkus getrennt vom Hausmüll zu entsorgen.
- Seite 17 • Bei einem Vertrieb unter Verwendung von Fernkommunikationsmitteln ist die unentgeltliche Abholung am Ort der Abgabe auf Elektro- und Elektronikgeräte der Kategorien 1, 2 und 4 gemäß § 2 Abs. 1 ElektroG, nämlich „Wärmeüberträger“, „Bildschirmgeräte“ (Oberfläche von mehr als 100 cm²) oder „Großgeräte“...
- Seite 18 HINWEISE ZUR ENTSORGUNG Wenn es in Ihrem Land eine gesetzliche Regelung zur Entsorgung von elektrischen und elektronischen Geräten gibt, weist dieses Symbol auf dem Produkt oder auf der Verpackung darauf hin, dass dieses Produkt nicht im Hausmüll entsorgt werden darf. Stattdessen muss es zu einer Sammelstelle für das Recycling von elektrischen und elektronischen Geräten gebracht werden.
- Seite 19 Dear customer, Congratulations on your purchase. Please read the following instructions carefully and follow them to prevent potential damage. We accept no liability for damage caused by disregarding the instructions and improper use. Please scan the QR code to access the latest operating instructions and further information about the product.
- Seite 20 GENERAL SAFETY INSTRUCTIONS • Read all safety instructions carefully. • Do not touch the hot surfaces. • To protect against electric shock, do not immerse cord, plug or base in water or any other liquid. CAUTION Risk of burns! This electrical appliance contains a heating function. Surfaces, even those other than the functional surfaces, can develop high temperatures.
- Seite 21 INSTRUCTIONS FOR SAFE USE • Always place the ingredients to be fried in the basket so that they do not come into contact with the heating elements. • Do not cover air inlet and outlet openings while the device is in operation. •...
- Seite 22 DEVICE OVERVIEW Cover Grid Housing Handle Control panel Air outlet openings Frying basket Power cable BEFORE FIRST USE • Remove all packaging materials. • Remove any stickers or labels from the device. • Thoroughly clean the basket and pot with hot water, a little washing-up liquid and a non-abrasive sponge.
- Seite 23 GENERAL OPERATION Hot air frying Plug the power plug into the mains socket. Carefully pull the baskets out of the hot air fryer (see image 1) Put the ingredients in the basket (see image 2). Slide the baskets back into the air fryer (see image 3). Use the guides in the housing as a guide when pushing it in.
- Seite 24 To remove ingredients (like chips), pull the basket out of the air fryer, place it on a trivet and use tongs to remove the ingredients. Note: Do not turn the basket upside down or excess oil that has collected at the bottom will spill onto the ingredients.
- Seite 25 Note on the fan symbol When the fan is on, the fan icon will be solidly illuminated. If the fan is off, the symbol goes out. After operation, the icon will flash until you press the START/ PAUSE or POWER button. Function of the arrow buttons and the buttons L/R/L=R •...
- Seite 26 Sync function (not suitable for drying) • First press the L or R button and set the time and temperature. • Press the SYNC button. The button starts flashing. • Press START/PAUSE to start the device. The basket with the longer set cooking time will heat up first while [HOLD] is displayed on the other screen.
- Seite 27 SETTINGS AND COOKING TABLE Tips • Smaller ingredients usually require a slightly shorter preparation time than larger ingredients. • A larger amount of ingredients only requires a slightly longer preparation time, a smaller amount of ingredients only requires a slightly shorter preparation time.
- Seite 28 Cooking table The table below will help you to choose the basic settings for the ingredients you are using. Note that these settings are guidelines only. Because ingredients vary in origin, size, shape and brand, we cannot guarantee the best setting for your ingredients.
- Seite 29 Quantity Time (in Temperature Shake Min.-Max. minutes) in °C halfway in g through Baked goods Cake 8-15 Quiche 20-22 Muffins 15-18 Sweet snacks CLEANING AND CARE • Remove the plug from the socket and let the device cool down for at least 30 minutes.
- Seite 30 TROUBLESHOOTING Problem Possible cause Solution The hot air fryer does The device is not Plug the power plug into not work. plugged in. the mains socket. You have not set the Set the desired timer. preparation time on the timer and switch on the device.
- Seite 31 Problem Possible cause Solution White smoke is coming You are preparing When you fry greasy out of the device. greasy ingredients. ingredients in the air fryer, a large amount of oil will leak into the basket. The oil produces white smoke and the basket may heat up more than usual.
- Seite 32 DISPOSAL CONSIDERATIONS If there is a legal regulation in your country regarding the disposal of electrical and electronic equipment, this symbol on the product or on the packaging indicates that this product must not be disposed of with household waste. Instead, it must be taken to a collection point for the recycling of electrical and electronic equipment.
- Seite 33 Estimado cliente: Le felicitamos por la adquisición de este producto. Lea atentamente el siguiente manual y siga cuidadosamente las instrucciones de uso con el fin de evitar posibles daños. La empresa no se responsabiliza de los daños ocasionados por un uso indebido del producto o por haber desatendido las indicaciones de seguridad.
- Seite 34 INSTRUCCIONES GENERALES DE SEGURIDAD • Lea atentamente todas las instrucciones de seguridad. • No toque las superficies calientes. • Para evitar las descargas eléctricas, no sumerja el cable, el enchufe ni la base en agua ni en ningún otro líquido. ATENCIÓN ¡Riesgo de quemaduras! Este aparato eléctrico contiene una función de calentamiento.
- Seite 35 INDICACIONES PARA UN USO SEGURO • Introduzca siempre los ingredientes que vaya a freír en la cesta de forma que no entren en contacto con los elementos calefactores. • No cubra las aberturas de entrada y salida de aire mientras el aparato esté en funcionamiento.
- Seite 36 VISTA GENERAL DEL APARATO Tapa Rejilla Carcasa Panel de control Aberturas de salida de aire Cesta para freír Cable de alimentación ANTES DEL PRIMER USO • Retire todo el material de embalaje. • Retire cualquier pegatina o etiqueta en el aparato. •...
- Seite 37 PUESTA EN FUNCIONAMIENTO Freidora de aire caliente Introduzca el cable de alimentación en la toma de corriente. Retire con cuidado las cestas de la freidora de aire caliente (véase imagen 1). Introduzca los ingredientes en las cestas (véase imagen 2). Vuelva a introducir las cestas en la freidora de aire (véase imagen 3).
- Seite 38 Para retirar los ingredientes (como las patatas fritas), saque la cesta de la freidora de aire, colóquela sobre un salvamanteles y utilice unas pinzas para retirar los ingredientes. Nota: No ponga la cesta boca abajo o el exceso de aceite que se haya acumulado en el fondo se derramará...
- Seite 39 Nota sobre el icono de ventilador Si el ventilador esté encendido, el icono de ventilador se ilumina de forma fija. Si el ventilador está apagado, el icono se apaga. Tras el funcionamiento, el icono parpadeará hasta que pulse el botón START/PAUSE o POWER. Función de los botones de flecha y de los botones L/R/L=R •...
- Seite 40 Función de sincronización (no apta para la función «Deshidratación») • Pulse el botón L o R y programe el temporizador o la temperatura. • Pulse el botón POWER. El botón comienza a parpadear. • Pulse START/PAUSE para poner el aparato en marcha. La cesta con el tiempo de cocción programado más largo se calentará...
- Seite 41 AJUSTES Y TABLA DE COCCIÓN Consejos • Los ingredientes más pequeños suelen requerir un tiempo de preparación algo menor que los ingredientes más grandes. • Una mayor cantidad de ingredientes requiere un tiempo de preparación ligeramente mayor, mientras que una menor cantidad de ingredientes requiere un tiempo de preparación ligeramente menor.
- Seite 42 Tabla de cocción La siguiente tabla le ayudará a elegir los ajustes básicos para los ingredientes que esté utilizando. Tenga en cuenta que estos ajustes son sólo orientativos. Dado que los ingredientes varían en origen, tamaño, forma y marca, no podemos garantizar el mejor ajuste para sus ingredientes.
- Seite 43 Cantidad Tiempo (en Temperatura Sacudir a la Mín. - Máx. minutos) en ºC mitad en g Productos horneados Pastel 8-15 Quiche 20-22 Magdalenas 15-18 Aperitivos dulces LIMPIEZA Y CUIDADO • Retire el enchufe de la toma de corriente y deje que el aparato se enfríe durante al menos 30 minutos.
- Seite 44 DETECCIÓN Y REPARACIÓN DE ANOMALÍAS Anomalía Posible causa Solución La freidora de aire El aparato no está Introduzca el cable de caliente no funciona. enchufado. alimentación en la toma de corriente. No ha programado el Programe el tiempo de temporizador. preparación deseado en el temporizador y encienda el aparato.
- Seite 45 Anomalía Posible causa Solución Sale humo blanco del Está preparando Cuando fríe ingredientes aparato. ingredientes grasientos. grasientos en la freidora de aire, se derrama una gran cantidad de aceite en la cesta. El aceite produce humo blanco y la cesta puede calentarse más de lo normal.
- Seite 46 INDICACIONES SOBRE LA RETIRADA DEL APARATO Si en su país existe una normativa legal relativa a la eliminación de aparatos eléctricos y electrónicos, este símbolo en el producto o en el embalaje indica que este producto no debe desecharse con la basura doméstica. En su lugar, debe llevarse al punto de recolección apropiado para el reciclaje de equipos eléctricos y electrónicos.
- Seite 47 Cher client, chère cliente, Félicitations pour l'achat votre appareil. Lisez attentivement les indications suivantes et suivez-les pour éviter d'éventuels dommages. Nous ne saurions être tenus pour responsables des dommages dus au non-respect des consignes et à la mauvaise utilisation de l’appareil. Veuillez scanner le code QR pour accéder aux dernières instructions d'utilisation et pour obtenir de plus amples informations sur le produit.
- Seite 48 CONSIGNES GÉNÉRALES DE SÉCURITÉ • Lisez toutes les consignes de sécurité avec attention. • Ne touchez pas les surfaces chaudes. • Pour vous protéger contre les chocs électriques, ne plongez pas le cordon, la fiche ou la base dans l'eau ou tout autre liquide. ATTENTION Risque de brûlures ! Cet appareil électrique contient une fonction de chauffage.
- Seite 49 INSTRUCTIONS POUR UNE UTILISATION EN TOUTE SÉCURITÉ • Placez toujours les ingrédients à frire dans le panier afin qu'ils n'entrent pas en contact avec les éléments chauffants. • Ne couvrez pas les ouvertures d'entrée et de sortie d'air lorsque l'appareil est en marche.
- Seite 50 APERÇU DE L'APPAREIL Couvercle Grille Boîtier Poignée Panneau de commande Ouvertures d'aération Panier de friture Câble d'alimentation AVANT LA PREMIÈRE UTILISATION • Retirez tous les matériaux d'emballage. • Retirez tous les autocollants ou étiquettes de l'appareil. • Nettoyez soigneusement le panier et la cuve avec de l'eau chaude, un peu de liquide vaisselle et une éponge non abrasive.
- Seite 51 FONCTIONNEMENT GÉNÉRAL Friture à l'ir chaud Branchez la fiche d'alimentation dans la prise secteur. Retirez délicatement les paniers de la friteuse à air chaud (voir image 1) Mettez les ingrédients dans le panier (voir image 2). Glissez les paniers dans la friteuse à air (voir image 3). Utilisez pour ce faire les guides du boîtier.
- Seite 52 Pour retirer les ingrédients (comme les frites), sortez le panier de la friteuse à air, placez-le sur un dessous de plat et utilisez des pinces pour retirer les ingrédients. Remarque : Ne renversez pas le panier, pour ne pas renverser l'excès d'huile accumulé...
- Seite 53 Remarque sur l’icône de ventilateur Lorsque le ventilateur est allumé, son icône s'allume en continu. Si le ventilateur est éteint, elle s'éteint. Après le fonctionnement, l'icône clignotera jusqu'à ce que vous appuyiez sur le bouton START/PAUSE ou POWER. Fonction des touches fléchées et des touches L/R/L=R •...
- Seite 54 Fonction Sync (ne convient pas à la déshydratation) • Appuyez sur le bouton L ou R et réglez la minuterie et la température. • Appuyez sur le bouton POWER. Le bouton se met à clignoter. • Appuyez sur START/PAUSE pour démarrer l'appareil. Le panier avec le temps de cuisson le plus long chauffe en premier pendant que [HOLD] s'affiche sur l'autre écran.
- Seite 55 RÉGLAGES ET TABLEAU DE CUISSON Conseils • Les ingrédients plus petits nécessitent généralement un temps de préparation légèrement plus court que les ingrédients plus gros. • Une plus grande quantité d'ingrédients ne nécessite qu'un temps de préparation légèrement plus long, une plus petite quantité d'ingrédients ne nécessite qu'un temps de préparation légèrement plus court.
- Seite 56 Tableau de cuisson Le tableau ci-dessous vous aidera à choisir les paramètres de base pour les ingrédients que vous utilisez. Notez que ces paramètres ne sont que des lignes directrices. Étant donné que l'origine, la taille, la forme et la marque des ingrédients varient, nous ne pouvons pas garantir le meilleur réglage pour vos ingrédients.
- Seite 57 Quantité Durée (en Température Secouer à Min.-Max. minutes) en °C mi-cuisson en g Produits de boulangerie Gâteau 8-15 Quiche 20-22 Muffins 15-18 Collations sucrées NETTOYAGE ET ENTRETIEN • Retirez la fiche de la prise et laissez l'appareil refroidir pendant au moins 30 minutes.
- Seite 58 DÉPANNAGE Problème Cause possible Solution La friteuse à air chaud L'appareil n'est pas Branchez la fiche ne fonctionne pas. branché. d'alimentation dans la prise secteur. Vous n'avez pas réglé la Réglez le temps de minuterie. préparation souhaité sur la minuterie et allumez l'appareil.
- Seite 59 Problème Cause possible Solution De la fumée blanche sort Vous préparez des Lorsque vous faites frire de l'appareil. ingrédients gras. des ingrédients gras dans la friteuse à air, une grande quantité d'huile s'écoule dans le panier. L'huile dégage de la fumée blanche et le panier peut chauffer plus que d'habitude.
- Seite 60 INFORMATIONS SUR LE RECYCLAGE S'il existe une réglementation légale dans votre pays concernant la mise au rebut des équipements électriques et électroniques, ce symbole sur le produit ou sur l'emballage indique que ce produit ne doit pas être jeté avec les ordures ménagères. Au lieu de cela, il doit être apporté...
- Seite 61 Gentile cliente, Congratulazioni per l'acquisto del dispositivo. La preghiamo di leggere attentamente le seguenti istruzioni per l'uso e di seguirle per evitare potenziali danni. Non ci assumiamo alcuna responsabilità per danni scaturiti da una mancata osservanza delle avvertenze di sicurezza o da un uso improprio del dispositivo.
- Seite 62 AVVERTENZE DI SICUREZZA GENERICHE • Leggere attentamente tutte le avvertenze di sicurezza. • Non toccare le superfici bollenti. • Per evitare scosse elettriche, non immergere il cavo, la spina e la base in acqua o altri liquidi. ATTENZIONE Pericolo di ustioni! Questo dispositivo elettrico è dotato di una funzione di riscaldamento.
- Seite 63 ISTRUZIONI PER UN UTILIZZO SICURO • Posizionare sempre gli ingredienti da friggere nel cestello, in modo da evitare il contatto con gli elementi riscaldanti. • Non coprire le aperture di uscita e ingresso dell'aria quando il dispositivo è in funzione. •...
- Seite 64 PANORAMICA DEL DISPOSITIVO Copertura Griglia Alloggiamento Impugnatura Pannello di controllo Aperture di uscita dell'aria Cestello per friggere Cavo di alimentazione PRIMA DI PROCEDERE ALL'USO • Rimuovere tutti i materiali d'imballaggio. • Rimuovere tutti gli adesivi e le etichette dal dispositivo. •...
- Seite 65 UTILIZZO Friggere con aria calda Inserire la spina nella presa elettrica. Tirare fuori con cura i cestelli dalla friggitrice ad aria (v. immagine 1). Mettere gli ingredienti nel cestello (v. immagine 2). Rimettere i cestelli nella friggitrice ad aria (v. immagine 3). Usare le guide sull'alloggiamento quando si spinge il cestello all'interno.
- Seite 66 Per rimuovere gli ingredienti (come le patatine), tirare fuori il cestello dalla friggitrice ad aria, poggiarlo su un sottopentola e usare una pinza. Nota: non rovesciare il cestello, altrimenti l'olio in eccesso accumulatosi sul fondo verrà versato sugli ingredienti. ATTENZIONE Pericolo di ustioni!Dopo la cottura, gli ingredienti e il cestello sono estremamente caldi.
- Seite 67 Nota sul simbolo della ventola Quando la ventola è accesa, il simbolo corrispondente resta acceso. Quando la ventola è spenta, il simbolo si spegne. Dopo l'uso, il simbolo lampeggia fino a quando si preme START/PAUSA o POWER. Funzione dei tasti freccia e dei tasti L/R/L=R •...
- Seite 68 Funzione di sincronizzazione (non adatta all'essiccazione) • Per prima cosa, premere L o R e regolare la durata e la temperatura. • Premere il tasto SYNC. Il tasto inizia a lampeggiare. • Premere START/PAUSA per avviare il dispositivo. Il cestello con la durata di cottura maggiore si scalderà...
- Seite 69 IMPOSTAZIONI E TABELLA PER LA COTTURA Consigli • Gli ingredienti più piccoli richiedono tendenzialmente una durata di preparazione più breve degli ingredienti più grandi. • Una maggiore quantità di ingredienti richiede una durata di preparazione leggermente più lunga e una quantità minore di ingredienti una durata leggermente più...
- Seite 70 Tabella per la cottura La tabella seguente aiuta a selezionare le impostazioni di base per gli ingredienti da cuocere. Nota: queste impostazioni servono solo come riferimento. Dato che gli ingredienti si differenziano per origine, dimensioni, forma e marca, non possiamo garantire le migliori impostazioni per gli ingredienti in questione.
- Seite 71 Quantità Durata (in Temperatura Agitare a Min.-Max. minuti) in °C metà cottura in g Prodotti da forno Torta 8-15 Torta salata 20-22 Muffin 15-18 Snack dolci PULIZIA E MANUTENZIONE • Staccare la spina dalla presa elettrica e lasciare raffreddare il dispositivo per almeno 30 minuti.
- Seite 72 RISOLUZIONE DEI PROBLEMI Problema Possibile causa Soluzione La friggitrice ad aria non Il dispositivo Inserire la spina nella funziona. non è collegato presa elettrica. all'alimentazione. Il timer non è stato Impostare la durata impostato. desiderata con il timer e accendere il dispositivo. Gli ingredienti cucinati La quantità...
- Seite 73 Problema Possibile causa Soluzione Esce fumo bianco dal Si stanno cuocendo Quando si cuociono dispositivo. ingredienti grassi. ingredienti grassi nella friggitrice ad aria, una grande quantità d'olio finisce nel cestello. L'olio produce fumo bianco e il cestello potrebbe scaldarsi più del solito. Questo non influisce sul dispositivo o sul risultato finale.
- Seite 74 AVVISO DI SMALTIMENTO Se nel vostro paese sono vigenti regolamenti legislativi sullo smaltimento di dispositivi elettrici ed elettronici, questo simbolo sul prodotto o sull'imballaggio indica che non è consentito smaltire questo prodotto nei rifiuti casalinghi. Il dispositivo deve invece essere portato in un centro di raccolta per il riciclaggio di dispositivi elettrici ed elettronici.