Herunterladen Inhalt Inhalt Diese Seite drucken
Inhaltsverzeichnis

Werbung

Verfügbare Sprachen
  • DE

Verfügbare Sprachen

  • DEUTSCH, seite 1
VIGOR AIR
Heißluftfritteuse
Hot Air Fryer
Friteuse à air chaud
Freidora de aire caliente
Friggitrice ad aria calda
10039940 10039941
www.klarstein.com

Werbung

Inhaltsverzeichnis
loading

Inhaltszusammenfassung für Klarstein VIGOR AIR

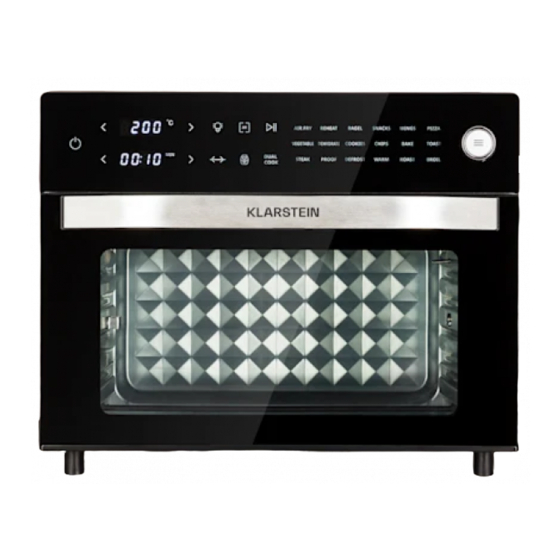
  • Seite 1 VIGOR AIR Heißluftfritteuse Hot Air Fryer Friteuse à air chaud Freidora de aire caliente Friggitrice ad aria calda 10039940 10039941 www.klarstein.com...
  • Seite 3: Inhaltsverzeichnis

    Sehr geehrter Kunde, wir gratulieren Ihnen zum Erwerb Ihres Gerätes. Lesen Sie die folgenden Hinweise sorgfältig durch und befolgen Sie diese, um möglichen Schäden vorzubeugen. Für Schäden, die durch Missachtung der Hinweise und unsachgemäßen Gebrauch entstehen, übernehmen wir keine Haftung. Scannen Sie den folgenden QR-Code, um Zugriff auf die aktuellste Bedienungsanleitung und weitere Informationen rund um das Produkt zu erhalten.
  • Seite 4: Sicherheitshinweise

    SICHERHEITSHINWEISE • Überprüfen Sie vor der ersten Verwendung, ob die Spannung Ihrer Steckdose mit der angegebenen Spannung übereinstimmt. • Tauchen Sie das Netzkabel oder das Gerät selbst nicht in Wasser oder andere Flüssigkeiten, um einen Stromschlag zu vermeiden. • Halten Sie Kinder und Haustiere während des Betriebs vom Gerät fern. •...
  • Seite 5 • Das Gerät ist nur für den häuslichen Gebrauch im Innenbereich ausgelegt. • Verwenden Sie das Gerät ausschließlich für den dafür vorgesehenen Verwendungszweck. • Bewahren Sie diese Bedienungsanleitung für den zukünftigen Gebrauch auf. • Kinder ab 8 Jahren, psychisch, sensorisch und körperlich eingeschränkte Menschen dürfen das Gerät nur benutzen, wenn sie vorher von einer für sie verantwortlichen Aufsichtsperson ausführlich mit den Funktionen und den Sicherheitsvorkehrungen vertraut gemacht wurden und die damit...
  • Seite 6: Geräteübersicht

    GERÄTEÜBERSICHT LED Bedienfeld Drehspieß Türgriff Sichtfenster Lampe Krümelfach Geräteeigenschaften Das Gerät verfügt über eine 360 °C-Heißlufttechnologie. Türsensor Wenn die Tür während des Garvorgangs geöffnet wird, pausiert der Garvorgang und das Licht geht an. Auf dem Bedienfeld erscheint die Anzeige: Sobald die Tür geschlossen wird, geht das Licht aus und der Garvorgang wird fortgesetzt.
  • Seite 7: Zubehör

    ZUBEHÖR Backrost Kann für die Zubereitung von Fleisch, Brot, Pizza etc. verwendet werden. Frittierkorb Verwenden Sie den Frittierkorb in Kombination mit der Heißluftfunktion, um Ihre Kochergebnisse zu optimieren. Kann für die Zubereitung von Pommes, Hähnchenflügeln, Zwiebeln etc. oder als Dörrkorb verwendet werden. Backblech Kann für die Zubereitung von Keksen, Kuchen, Truthahn etc.
  • Seite 8: Inbetriebnahme

    INBETRIEBNAHME Vor der Verwendung Entfernen Sie das gesamte Platzieren Sie das Gerät auf einer Verpackungsmaterial, das sich stabilen, ebenen, hitzeresistenten um das Gerät herum und im Oberfläche, in sicherer Entfernung Geäteinneren befindet. zu Objekten, die durch Hitze beschädigt werden könnten. Halten Sie einen Mindestabstand von 110 mm zwischen Netzanschluss und der Wand,...
  • Seite 9: Led-Bedienfeld

    LED-BEDIENFELD TASTENFUNKTIONEN Tastensymbol Tastenfunktion Bedienung Die Auflistung der Programme Programm- finden Sie im Abschnitt übersicht „Garprogramme“. Berühren Sie das START/ PAUSE-Symbol, um ein Start/Pause Programm zu starten oder zu pausieren. Berühren Sie, nachdem Sie ein Programm ausgewählt und die Temperatur eingestellt haben, das Symbol zum Vorheizen des Geräts.
  • Seite 10 Tastensymbol Tastenfunktion Bedienung Berühren Sie das Licht-Symbol, um die Lampe ein- oder Lichtschalter auszuschalten. (Das Licht wird nach 5 Minuten automatisch ausgeschaltet). Um die Temperatur zu senken, berühren Sie die Taste < . Um die Temperatur zu erhöhen, Temperatur- berühren Sie die Taste > . Um einstellung die Einstellungen schneller vorzunehmen, halten Sie die...
  • Seite 11: Tastenfunktion

    Tastensymbol Tastenfunktion Bedienung Diese fortschrittliche Technologie ermöglicht es Ihnen, das Gerät mit einem Programm zu starten und danach automatisch zu einem anderen Programm überzugehen, um eine perfekte Zubereitung zu ermöglichen. Wenn Sie beispielsweise einen Schmorbraten mit Panade zubereiten möchten, stellen Duales Kochen Sie die Programme „BAKE“...
  • Seite 12: Garprogramme

    GARPROGRAMME Programm Voreingestellte Voreingestellte Temperatur- Zeit- Temperatur Zeit Einstellbereich Einstellbereich AIR FRY 200 °C 10 min 90-230 °C bis zu 2 Stunden (Heißluftfrittieren) CHIPS (Gefrorene 230 °C 18 min 90-230 °C bis zu 2 Stunden Pommes) WINGS 230 °C 18 min 90-230 °C bis zu 2 Stunden (Hänchenflügel)
  • Seite 13: Bedienung

    BEDIENUNG Stecken Sie den Netzstecker in die Steckdose und berühren Sie zum Einschalten die EIN/AUS-Taste (6). Der Bildschirm leuchtet auf und das HEISSLUFT-Symbol (9) blinkt auf. Drehen Sie am MENÜ-Regler (11) und wählen Sie das gewünschte Programm aus. Die jeweilige voreingestellte Temperatur und Zeit werden auf dem Bildschirm angezeigt.
  • Seite 14 Zubehör positionieren Position 2: Position 1: TOAST DEHYDRATE DEHYDRATE Position 3: TOAST Position 2: DEHYDRATE CHIPS BAKE WINGS VEGGIES PIZZA Postion 4: Postion 5: ROAST Drehspieß Zubehör Backrost Frittierkorb Backblech Drehspieß Hinweis: Wenn Sie fettige Lebensmittel mit dem Backrost, Frittierkorb oder dem Drehspieß zubereiten (beispielsweise Huhn), sollten Sie auch das Backblech eine Stufe weiter unten einsetzen, um heruntertropfendes Fett aufzufangen.
  • Seite 15 Schieben Sie das Zubehör mit den Lebensmitteln in den gewünschten Einschub in das Gerät und schließen Sie die Tür. Es sind vier Einschübe vorhanden. Positionieren Sie das Zubehör gemäß der obigen Tabelle „Zubehör positionieren“ im passenden Einschub. Zubehör positionieren Hinweis: Wenn Sie den Drehspieß verwenden möchten, fixieren Sie die Lebensmittel auf diesem und bringen Sie den Drehspieß...
  • Seite 16: Duales Kochen

    DUALES KOCHEN Stecken Sie den Netzstecker in die Steckdose und berühren Sie zum Einschalten des Geräts die EIN/ AUS-Taste (6). Der Bildschirm leuchtet auf und das HEISSLUFT-Symbol (9) blinkt auf dem Bildschirm auf. Beispiel: Schritt 1: Schritt 2: Berühren Sie das Symbol DUAL COOK (10). Die fünf Programme AIR FRY / BAKE/ BROIL / ROAST / WARM leuchten lange auf.
  • Seite 17 Hinweis: Berühren Sie das START/PAUSE-Symbol (2) und anschließend das DUAL COOK-Symbol (10), um zum Hauptmenü zurückzukehren und die duale Kochfunktion abzubrechen. Berühren Sie das VORHEIZEN-Symbol (3), um das Gerät vorzuheizen. Sobald der Garraum des Geräts eine Temperatur von 150 °C erreicht, wird auf dem Bildschirm „Add Food“...
  • Seite 18: Gartabellen

    GARTABELLEN GARPROGRAMME Funktion Vorheizen Empfohlene Empfohlenes Empfohlene Lebens mittel menge Zubehör Position AIR FRY abhängig von den Frittierkorb (Heißluftfrittieren) gewählten Lebensmitteln CHIPS (Gefrorene 550 g Frittierkorb Pommes) WINGS 1038 g Frittierkorb (Hänchenflügel) (28 Stück) Backblech PIZZA 33 cm oder Backrost Backblech STEAK 190 g...
  • Seite 19: Empfohlenes Empfohlene Zubehör Position

    DUALES KOCHEN Funktion 1 Funktion 2 Vorheizen Empfohlene Empfohlenes Empfohlene Lebens mittel- Zubehör Position menge AIR FRY WARM Frittierkorb (Heißluftfrittieren) (Warmhalten) BAKE BROIL Backblech (Backen) (Grillen) oder Backrost 4 oder AIR FRY WARM abhängig von Backblech Drehspieß- (Heißluftfrittieren) (Warmhalten) den gewählten oder Drehspieß...
  • Seite 20: Glühbirne Austauschen

    GLÜHBIRNE AUSTAUSCHEN VORSICHT Stromschlaggefahr! Stellen Sie sicher, dass der Netzstecker des Geräts aus der Steckdose gezogen wurde, und lassen Sie das Gerät vollständig abkühlen, bevor Sie die Glühbirne austauschen. Benötigtes Leuchtmittel: 25 W Halogenleuchte Drehen Sie die Lampenabdeckung Entfernen Sie die defekte gegen den Uhrzeigersinn, Glühbirne, indem Sie diese um sie herauszunehmen.
  • Seite 21: Glastür Auseinanderbauen

    GLASTÜR AUSEINANDERBAUEN VORSICHT Verbrennungsgefahr! Stellen Sie sicher, dass sich die Glastür vollständig abgekühlt hat, bevor Sie diese auseinanderbauen. Lösen Sie die Schrauben, indem Sie diese mit einem Schraubenzieher gegen den Uhrzeigersinn drehen. Das Glas kann mit einem Silikonsaugnapf angesaugt und dann mit den Händen herausgenommen werden.
  • Seite 22: Reinigung, Pflege Und Lagerung

    REINIGUNG, PFLEGE UND LAGERUNG Hinweis: Ziehen Sie vor der Reinigung den Netzstecker aus der Steckdose. Lassen Sie das Gerät und das Zubehör vor dem Auseinanderbauen und Reinigen vollständig abkühlen. Reinigung des Gehäuses, der Tür und des LED-Bildschirms • Wischen Sie das Gehäuse mit einem weichen, feuchten Schwamm ab. Ein milder Flüssigreiniger oder ein mildes Spray kann verwendet werden, um Fleckenbildung zu vermeiden.
  • Seite 23 Reinigung des Krümelfachs • Ziehen Sie das Krümelfach nach jeder Verwendung des Geräts heraus und entsorgen Sie die Krümel. Wischen Sie das Krümelfach mit einem weichen, feuchten Schwamm aus. Um Fleckenbildung zu vermeiden, können Sie ein nicht-scheuerndes flüssiges Reinigungsmittel oder ein mildes Reinigungsspray verwenden.
  • Seite 24: Fehlersuche Und Fehlerbehebung

    FEHLERSUCHE UND FEHLERBEHEBUNG Problem Mögliche Ursache Lösung Das Gerät funktioniert Das Gerät ist nicht Stellen Sie sicher, dass nicht. an den Strom der Stecker des Geräts in angeschlossen. der Steckdose steckt. Das Gerät wurde nicht Berühren Sie die EIN/ eingeschaltet. AUS-Taste Einschalten des Gerät.
  • Seite 25 Problem Mögliche Ursache Lösung Das Essen wird nicht gar. Es befindet sich eine zu Reduzieren Sie die große Speisenmenge im Speisenmenge, die auf Gerät. einmal gegart werden soll. Die eingestellte Stellen Sie eine höhere Gartemperatur ist zu Temperatur oder eine niedrig oder die Garzeit längere Zeit ein.
  • Seite 26: Hinweise Zur Entsorgung

    HINWEISE ZUR ENTSORGUNG Wenn es in Ihrem Land eine gesetzliche Regelung zur Entsorgung von elektrischen und elektronischen Geräten gibt, weist dieses Symbol auf dem Produkt oder auf der Verpackung darauf hin, dass dieses Produkt nicht im Hausmüll entsorgt werden darf. Stattdessen muss es zu einer Sammelstelle für das Recycling von elektrischen und elektronischen Geräten gebracht werden.
  • Seite 27 Dear Customer, Congratulations on purchasing this device. Please read the following instructions carefully and follow them to prevent possible damages. We assume no liability for damage caused by disregard of the instructions and improper use. Scan the QR code to get access to the latest user manual and more product information.
  • Seite 28: Safety Instructions

    SAFETY INSTRUCTIONS • Before using for the first time, check that the voltage of your socket corresponds to the voltage specified. • To avoid electric shock, do not immerse the power cord or the device itself in water or other liquids. •...
  • Seite 29 • The device is designed for domestic use only. • Only use the device for its intended purpose. • Keep these operating instructions for future reference. • Children over 8 years as well as mentally, sensory and physically impaired persons may only use the device if they have been informed in detail about the functions and safety precautions by a supervisor responsible for them beforehand and understand the associated risks.
  • Seite 30: Device Overview

    DEVICE OVERVIEW LED control panel Rotary spit Door handle Viewing window Lamp Crumb tray Device properties The appliance works with 360 °C hot air technology. Door sensor If the door is opened during cooking, the cooking process will pause and the light will come on.
  • Seite 31: Accessories

    ACCESSORIES Baking rack Can be used for the preparation of meat, bread, pizza etc. Frying basket Use the frying basket in combination with the hot air function to optimise your cooking results. Can be used for the preparation of chips, chicken wings, onions etc.
  • Seite 32: Getting Started

    GETTING STARTED Before use Remove all packing material Place the appliance on a stable, around the unit and inside the flat, heat-resistant surface, at a unit. safe distance from objects that could be damaged by heat. Keep a minimum distance of 110 mm between the mains connection and the wall, furniture, etc.
  • Seite 33: Led Control Panel

    LED CONTROL PANEL KEY FUNCTIONS Key symbol Key function Operation You will find the list of Programme programmes in the 'Cooking overview Programmes' section. Touch the START/PAUSE icon to Start/Pause start or pause a programme. After selecting a programme and setting the temperature, touch the symbol to preheat the appliance.
  • Seite 34 Key symbol Key function Operation To lower the temperature, touch the < button. To raise the temperature, touch the > Temperature setting button. To make the settings more quickly, press and hold the respective button. Touch this button to turn the ON / OFF appliance on and off.
  • Seite 35 Key symbol Key function Operation The desired programme can be selected by turning the control dial. Select the next programme by turning the control dial clockwise. Select Menu the previous programme by turning the control dial counter-clockwise. After selecting the programme, press the MENU button to start the cooking process.
  • Seite 36: Cooking Programmes

    COOKING PROGRAMMES Programme Preset Preset time Temperature Time setting Temperature setting range range AIR FRY 200 °C 10 min 90-230 °C up to 2 hours (Hot air frying) CHIPS 230 °C 18 min 90-230 °C up to 2 hours (frozen chips) WINGS 230 °C 18 min...
  • Seite 37: Operation

    OPERATION Insert the mains plug into the socket and touch the ON/ OFF button (6) to switch on. The screen lights up and the HOT AIR symbol (9) flashes. Turn the MENU knob (11) and select the desired programme. The respective preset temperature and time are displayed on the screen.
  • Seite 38 Position accessories Position 2: Position 1: TOAST DEHYDRATE DEHYDRATE Position 3: TOAST Position 2: DEHYDRATE CHIPS BAKE WINGS VEGGIES PIZZA Position 4: Position 5: ROAST Rotary spit Accessories Baking rack Frying basket Baking tray Rotary spit Note: If you prepare greasy food with the baking rack, deep-frying basket or rotisserie (for example chicken), you should also place the baking tray one step lower to catch dripping fat.
  • Seite 39 Slide the accessories with the food into the desired slot in the appliance and close the door. There are four slide- in units. Position the accessories in the appropriate slot according to the 'Position accessories' table above. Position accessories Note: If you want to use the rotisserie, fix the food on it and then place the rotisserie in the appliance.
  • Seite 40: Dual Cooking

    DUAL COOKING Insert the mains plug into the socket and touch the ON/ OFF button (6) to switch on the device. The screen lights up and the HOT AIR symbol (9) flashes on the screen. Example: Step 1: Step 2: Touch the DUAL COOK symbol (10).
  • Seite 41 Touch the PREHEAT icon (3) to preheat the appliance. As soon as the cooking chamber of the device reaches a temperature of 150 °C, 'Add Food' is displayed on the screen. (After preheating, place the food in the appliance and close the door, the cooking process will start automatically) Slide the accessories with the food into the desired slot in the appliance and close the door.
  • Seite 42: Cooking Tables

    COOKING TABLES COOKING PROGRAMMES Function Preheat Recommended Recommended Recommended food quantity accessories position AIR FRY depending on the Frying basket (hot air frying) selected foods CHIPS 550 g Frying basket (frozen chips) WINGS 1038 g Frying basket (chicken wings) (28 pieces) Baking tray PIZZA 33 cm...
  • Seite 43 DUAL COOKING Function 1 Function 2 Preheat Recommended Recommended Recommended food quantity accessories position AIR FRY WARM Frying basket (hot air frying) (keeping warm) BAKE BROIL Baking tray (baking) (grilling) or baking rack depending 4 or AIR FRY WARM Baking tray on the rotary spit (hot air frying)
  • Seite 44: Replacing The Light Bulb

    REPLACING THE LIGHT BULB CAUTION Risk of electric shock! Make sure that the mains plug of the appliance has been disconnected from the socket and allow the appliance to cool down completely before replacing the light bulb. Bulb required: 25 W halogen lamp Turn the lamp cover Remove the defective counter-clockwise to take it out.
  • Seite 45: Disassembling The Glass Door

    DISASSEMBLING THE GLASS DOOR CAUTION Risk of burns! Make sure that the glass door has cooled down completely before disassembling it. Loosen the screws by turning them counter-clockwise with a screwdriver. The glass can be sucked in with a silicone suction cup and then removed with the hands.
  • Seite 46: Cleaning, Care And Storage

    CLEANING, CARE AND STORAGE Note: Disconnect the power plug from the socket before cleaning. Let the appliance and accessories cool down completely before disassembling and cleaning. Cleaning the housing, the door and the LED screen • Wipe the housing with a soft, damp sponge. A mild liquid cleaner or spray can be used to prevent staining.
  • Seite 47 Cleaning the crumb tray • Pull out the crumb tray after each use of the appliance and dispose of the crumbs. Wipe the crumb tray out with a soft, damp sponge. To avoid staining, you can use a non-abrasive liquid detergent or a mild cleaning spray. Before cleaning, apply the detergent to the sponge and not directly in the crumb tray.
  • Seite 48: Troubleshooting

    TROUBLESHOOTING Problem Potential cause Solution The device does not The device is not Make sure that the plug work connected to the mains. of the device is inserted in the socket. The unit has not been Touch the ON/OFF switched on. button to switch on the unit.
  • Seite 49 Problem Potential cause Solution The food is not cooking. There is too much food Reduce the amount of in the appliance. food being cooked at one time. The set cooking Set a higher temperature temperature is too low or a longer time. or the cooking time is set too short.
  • Seite 50: Disposal Considerations

    DISPOSAL CONSIDERATIONS If there is a legal regulation for the disposal of electrical and electronic devices in your country, this symbol on the product or on the packaging indicates that this product must not be disposed of with household waste. Instead, it must be taken to a collection point for the recycling of electrical and electronic equipment.
  • Seite 51: Fiche Technique

    Cher client, chère cliente, Toutes nos félicitations pour l’acquisition de ce nouvel appareil. Veuillez lire attentivement et respecter les instructions de ce mode d’emploi afin d’éviter d’éventuels dommages. Nous ne saurions être tenus pour responsables des dommages dus au non-respect des consignes et à la mauvaise utilisation de l’appareil.
  • Seite 52: Consignes De Sécurité

    CONSIGNES DE SÉCURITÉ • Avant la première utilisation, vérifiez que la tension de votre prise correspond à la tension spécifiée. • Pour éviter toute décharge électrique, ne plongez pas le cordon d'alimentation ou l'appareil dans l'eau ou dans tout autre liquide. •...
  • Seite 53 • L'appareil est conçu pour un usage domestique uniquement. • Utilisez l'appareil uniquement aux fi ns prévues. • Conservez ce mode d'emploi pour vous y référer ultérieurement. • Les enfants à partir de 8 ans et les personnes souff rant de handicaps mentaux, sensoriels et physiques ne peuvent utiliser l'appareil que s'ils ont été...
  • Seite 54: Aperçu De L'appareil

    APERÇU DE L'APPAREIL Panneau de commande LED Tournebroche Poignée de porte Fenêtre de visualisation Lampe Ramasse-miettes Caractéristiques de l'appareil L'appareil dispose d'une technologie d'air chaud à 360 °C. Capteur de porte Si la porte est ouverte pendant la cuisson, le processus de cuisson s'interrompt et le voyant s'allume.
  • Seite 55: Accessoires

    ACCESSOIRES Grille de cuisson Peut être utilisé pour la viande, le pain, la pizza, etc. Panier à friture Utilisez le panier à friture en combinaison avec la fonction air chaud pour optimiser vos résultats de cuisson. Peut être utilisé pour les frites, les ailes de poulet, les oignons, etc.
  • Seite 56: Mise En Marche

    MISE EN MARCHE Avant l'utilisation Retirez tous les matériaux Placez l'appareil sur une surface d'emballage autour et à l'intérieur stable, plane et résistante à la de l'appareil. chaleur, à une distance sûre des objets qui pourraient être endommagés par la chaleur. Maintenez une distance minimale de 110 mm entre le raccordement au réseau et le mur, les meubles,...
  • Seite 57: Panneau De Commande Led

    PANNEAU DE COMMANDE LED FONCTION DES TOUCHES Symbole de la Fonction de la N° Utilisation touche touche Vous trouverez la liste des Aperçu du programmes dans la section « programme Programmes de cuisson ». Touchez l'icône START/PAUSE Démarrage / pour démarrer ou mettre en pause pause un programme.
  • Seite 58 Symbole de la Fonction de la N° Utilisation touche touche Touchez le symbole d'éclairage pour allumer ou éteindre la Interrupteur lampe. (La lumière s'éteint d'éclairage automatiquement après 5 minutes). Appuyez sur la touche < pour réduire la température. Appuyez sur la touche > pour Réglage de la augmenter la température.
  • Seite 59 Symbole de la Fonction de la N° Utilisation touche touche Cette technologie avancée vous permet de démarrer l'appareil avec un programme, puis de passer automatiquement à un autre programme pour une cuisson parfaite. Par exemple, si vous voulez préparer un rôti braisé...
  • Seite 60: Programmes De Cuisson

    PROGRAMMES DE CUISSON Programme Par défaut Durée par défaut Plage de Plage de réglage Température réglage de la de la durée température AIR FRY 200 °C 10 min 90-230 °C jusqu'à 2 heures (Friture à l'air chaud) CHIPS 230 °C 18 min 90-230 °C jusqu'à...
  • Seite 61: Utilisation

    UTILISATION Insérez la fiche secteur dans la prise de courant et appuyez sur la touche ON/OFF (6) pour mettre l'appareil en marche. L'écran s'allume et le symbole AIR CHAUD (9) clignote. Tournez le bouton MENU (11) et sélectionnez le programme souhaité. La température et l'heure préréglées respectives s'affichent à...
  • Seite 62 Positionnement des accessoires Position 2 : Position 1 : TOAST DEHYDRATE DEHYDRATE Position 3 : TOAST Position 2 : DEHYDRATE CHIPS BAKE WINGS VEGGIES PIZZA Position 4 : Position 5 : ROAST Tournebroche Accessoires Grille de cuisson Panier à friture Plaque de cuisson Tournebroche Remarque : si vous préparez des aliments gras à...
  • Seite 63 Faites glisser les accessoires avec les aliments dans la fente souhaitée de l'appareil et fermez la porte. Il y a quatre hauteurs de rails. Positionnez les accessoires dans l'emplacement approprié selon le tableau Positionne- « Positionnement des accessoires » ci-dessus. ment des accessoires Remarque : si vous souhaitez utiliser la rôtissoire,...
  • Seite 64: Double Cuisson

    DOUBLE CUISSON Insérez la fiche secteur dans la prise de courant et appuyez sur la touche ON/OFF (6) pour mettre l'appareil en marche. L'écran s'allume et le symbole AIR CHAUD (9) clignote. Exemple : Étape 1 : Étape 2 : Appuyez sur le symbole DUAL COOK (10).
  • Seite 65 Touchez l'icône PRECHAUFFAGE (3) pour préchauffer l'appareil. Dès que l'espace de cuisson atteint une température de 150 °C, le message « Add Food » s'affiche à l'écran. (Après le préchauffage, placez les aliments dans l'appareil et fermez la porte, le processus de cuisson démarre automatiquement) Faites glisser les accessoires avec les aliments dans la fente souhaitée de l'appareil et fermez la porte.
  • Seite 66: Tableau De Cuisson

    TABLEAU DE CUISSON PROGRAMMES DE CUISSON Fonction Préchauf- Quantité d'aliments Accessoires Position fage recommandée recommandés recommandée AIR FRY en fonction des Panier à friture (Friture à l'air chaud) aliments sélectionnés CHIPS 550 g Panier à friture (Frites surgelées) WINGS 1038 g Panier à...
  • Seite 67 Double cuisson Fonction 1 Fonction 2 Préchauffage Quantité Accessoires Position d'aliments recommandés recommandée recommandée AIR FRY WARM (Friture à l'air Panier à friture (Réchauffer) chaud) Plaque de BAKE BROIL cuisson (Cuire) (gratiner) ou grille de cuisson en fonction Plaque de AIR FRY 4 ou WARM...
  • Seite 68: Remplacement De L'ampoule

    REMPLACEMENT DE L'AMPOULE ATTENTION Risque d'électrocution ! Assurez-vous que la fi che secteur de l'appareil a été débranchée de la prise et laissez l'appareil refroidir complètement avant de remplacer l'ampoule. Ampoule requise : lampe halogène de 25 W Tournez le couvercle de la Retirez l'ampoule défectueuse lampe dans le sens inverse des en la tirant directement.
  • Seite 69: Démontage De La Porte Vitrée

    DÉMONTAGE DE LA PORTE VITRÉE ATTENTION Risque de brûlure ! Assurez-vous que la porte vitrée a complètement refroidi avant de la démonter. Desserrez les vis en les tournant dans le sens inverse des aiguilles d'une montre à l'aide d'un tournevis. La vitre peut s'aspirer à...
  • Seite 70: Nettoyage, Entretien Et Stockage

    NETTOYAGE, ENTRETIEN ET STOCKAGE Remarque : Avant le nettoyage, débranchez la fi che d'alimentation de la prise. Laissez l'appareil et les accessoires refroidir complètement avant de les démonter et de les nettoyer. Nettoyage du boîtier, de la porte et de l'écran LED •...
  • Seite 71 Nettoyage du ramasse-miettes • Retirez le ramasse-miettes après chaque utilisation de l'appareil et jetez les miettes. Essuyez le ramasse-miettes avec une éponge douce et humide. Pour éviter les taches, vous pouvez utiliser un détergent liquide non abrasif ou un spray nettoyant doux. Appliquez le produit de nettoyage sur le chiffon avant le nettoyage et non directement sur les surfaces de l'espace de cuisson.
  • Seite 72: Identification Et Résolution Des Problèmes

    IDENTIFICATION ET RÉSOLUTION DES PROBLÈMES Problème Cause possible Solution L'appareil ne fonctionne L'appareil n'est pas Vérifiez que la fiche pas. branché au secteur. de l'appareil est bien branchée dans la prise. L'appareil n'est pas Pour allumer l'appareil, allumé. appuyez sur la touche de Marche/arrêt .
  • Seite 73 Problème Cause possible Solution La nourriture n'est pas Il y a trop de nourriture Réduisez la quantité assez cuite. dans l'appareil. d'aliments à cuire en une seule fois. La température de Réglez une température cuisson réglée est trop plus élevée ou un temps basse ou le temps de plus long.
  • Seite 74: Informations Sur Le Recyclage

    INFORMATIONS SUR LE RECYCLAGE S‘il existe une réglementation pour l‘élimination ou le recyclage des appareils électriques et électroniques dans votre pays, ce symbole sur le produit ou sur l‘emballage indique que cet appareil ne doit pas être jeté avec les ordures ménagères.
  • Seite 75: Datos Técnicos

    Estimado cliente: Le felicitamos por la adquisición de este producto. Lea atentamente las siguientes instrucciones y sígalas para evitar posibles daños. No asumimos ninguna responsabilidad por los daños causados por el incumplimiento de las instrucciones y el uso inadecuado. Escanee el siguiente código QR para obtener acceso a la última guía del usuario y más información sobre el producto.
  • Seite 76: Indicaciones De Seguridad

    INDICACIONES DE SEGURIDAD • Antes de utilizar el aparato, compruebe que la tensión de la toma de corriente coincida con la indicada en la placa técnica del aparato. • No sumerja el aparato, el cable de alimentación ni el enchufe en agua ni en ningún otro líquido para evitar descargas eléctricas.
  • Seite 77 • El aparato solamente es apto para un uso doméstico y en interiores. • Utilice el aparato solamente para el fi n indicado en este manual. • Conserve este manual de instrucciones para usos posteriores. • Los niños mayores de 8 años y las personas con discapacidad física, sensorial o psíquica pueden utilizar el aparato si han sido previamente instruidos por una persona responsable sobre el funcionamiento del mismo y conocen las funciones, las indicaciones de seguridad y los riesgos asociados.
  • Seite 78: Descripción General Del Aparato

    DESCRIPCIÓN GENERAL DEL APARATO Panel de control LED Asador giratorio Asa de la puerta Visor Lámpara Bandeja recogemigas Características del aparato El aparato cuenta con tecnología de aire caliente a 360 °C. Sensor de puerta Si se abre la puerta durante la cocción, el proceso se detiene y la luz indicadora se enciende.
  • Seite 79: Accesorios

    ACCESORIOS Rejilla para hornear Puede utilizarse para carne, pan, pizza, etc. Cesta para freír Utilice la cesta para freír con la función de aire caliente para optimizar sus resultados de cocción. Puede utilizarse para patatas fritas, alitas de pollo, cebollas, etc. o como cesta para deshidratar. Bandeja de horneado Puede utilizarse para galletas, pasteles, pavo, etc.
  • Seite 80: Puesta En Marcha

    PUESTA EN MARCHA Antes del uso Retire todo el material de Coloque el aparato sobre una embalaje alrededor y dentro del superficie estable, plana y aparato. resistente al calor, a una distancia segura de los objetos que puedan sufrir daños por el calor. Mantenga una distancia mínima de 110 mm entre la conexión a la red y la pared, los muebles, etc.
  • Seite 81: Panel De Control Led

    PANEL DE CONTROL LED FUNCIONES DE LAS TECLAS Símbolo de la tecla Función de la Núm. Funcionamiento tecla Encontrará la lista de Vista general programas en la sección del programa "Programas de cocina". Toque el símbolo START/ Inicio/pausa PAUSE para iniciar o pausar un programa.
  • Seite 82 Símbolo de la tecla Función de la Núm. Funcionamiento tecla Toque el símbolo de la luz para encender o apagar la Interruptor lámpara. (La luz se apaga de luz automáticamente después de 5 minutos). Pulse la tecla < para reducir la temperatura.
  • Seite 83 Símbolo de la tecla Función de la Núm. Funcionamiento tecla Esta avanzada tecnología permite poner en marcha el aparato con un programa y cambiar automáticamente a otro para lograr una cocción perfecta. Por ejemplo, si quiere preparar carne guisada con empanado, seleccione los programas Cocción dual "BAKE"...
  • Seite 84: Programas De Cocción

    PROGRAMAS DE COCCIÓN Programa Predeterminado Tiempo Rango de tempera- Rango de franja Temperatura predeterminado tura configurable de tiempo AIR FRY (freír con aire 200 °C 10 min 90-230 °C hasta 2 horas caliente) CHIPS (Patatas fritas 230 °C 18 min 90-230 °C hasta 2 horas congeladas)
  • Seite 85: Funcionamiento

    FUNCIONAMIENTO Inserte el enchufe en la toma de corriente y toque la tecla ON/OFF (6) para encender el aparato. La pantalla se ilumina y el símbolo HOT AIR (9) parpadea. Gire el regulador MENU (11) y seleccione el programa deseado. La temperatura y la hora predeterminadas aparecen en la pantalla.
  • Seite 86 Colocar accesorios Posición 2: Posición 1: TOAST DEHYDRATE DEHYDRATE Posición 3: TOAST Posición 2: DEHYDRATE CHIPS BAKE WINGS VEGGIES PIZZA Posición 5: Posición 4: Asador ROAST giratorio Accesorios Rejilla para Cesta para freír Bandeja de Asador giratorio hornear horneado Nota: si prepara alimentos grasos con la rejilla para hornear, la cesta para freír o el espetón giratorio (por ejemplo, pollo), debe colocar también la bandeja para hornear un escalón más abajo para recoger la grasa que gotea.
  • Seite 87 Deslice los accesorios con los alimentos por la ranura deseada del aparato y cierre la puerta. Hay cuatro zonas de inserción. Coloque los accesorios en la ranura correspondiente según la tabla "Colocar accesorios" anterior. Colocar accesorios Nota: si desea utilizar el asador giratorio, fije los alimentos en él y luego coloque el asador en el aparato.
  • Seite 88: Cocción Dual

    COCCIÓN DUAL Conecte el enchufe a la toma de corriente y toque la tecla ON/OFF (6) para encender el aparato. La pantalla se ilumina y el símbolo HOT AIR (9) parpadea en pantalla. Ejemplo: Paso 1: Paso 2: Toque el símbolo DUAL COOK (10). Los cinco programas AIR FRY / BAKE/ BROIL / ROAST / WARM se iluminan permanentemente.
  • Seite 89 Toque el símbolo PREHEAT (3) para precalentar el aparato. En cuanto la cámara de cocción alcance una temperatura de 150 °C, aparece en la pantalla "Add Food" (añadir alimentos). (Tras el precalentamiento, coloque los alimentos en el aparato y cierre la puerta, y el proceso de cocción se iniciará...
  • Seite 90: Tablas De Cocción

    TABLAS DE COCCIÓN PROGRAMAS DE COCCIÓN Función Precalen- Cantidad Accesorios Posición tamiento recomendada de alimentos recomendados recomendada AIR FRY según (freír con aire sí Cesta para freír los alimentos seleccionados caliente) CHIPS (Patatas fritas sí 550 g Cesta para freír congeladas) WINGS 1038 g...
  • Seite 91 COCCIÓN DUAL Función 1 Función 2 Precalenta- Cantidad Accesorios Posición miento recomendada recomendados recomendada de alimentos AIR FRY WARM (freír con aire (mantener Cesta para freír caliente) caliente) Bandeja de BAKE BROIL horneado (hornear) (asar) o rejilla para hornear Bandeja de AIR FRY WARM según...
  • Seite 92: Sustituir La Bombilla

    SUSTITUIR LA BOMBILLA PRECAUCIÓN ¡Peligro de descarga eléctrica! Asegúrese de que el enchufe del aparato se haya desconectado de la toma de corriente y deje que el aparato se enfríe completamente antes de sustituir la bombilla. Bombilla necesaria: lámpara halógena de 25 W Desenrosque la cubierta de la Retire la bombilla defectuosa lámpara en sentido contrario a...
  • Seite 93: Desmontaje De La Puerta De Cristal

    DESMONTAJE DE LA PUERTA DE CRISTAL ATENCIÓN ¡Peligro de quemaduras! Asegúrese de que la puerta de cristal se haya enfriado completamente antes de desmontarla. Afl oje los tornillos girándolos con un destornillador en sentido contrario a las agujas del reloj. El vidrio puede succionarse con una ventosa de silicona y luego retirarse con las manos.
  • Seite 94: Limpieza, Cuidado Y Almacenamiento

    LIMPIEZA, CUIDADO Y ALMACENAMIENTO Nota: antes de limpiar el aparato, desenchúfelo de la toma de corriente. Deje que el aparato y los accesorios se enfríen completamente antes de desmontarlos y limpiarlos. Limpieza de la carcasa, la puerta y la pantalla LED •...
  • Seite 95 Limpieza de la bandeja recogemigas • Saque la bandeja recogemigas después de cada uso del aparato y elimine las migas. Limpie la carcasa con una esponja suave y húmeda. Para evitar las manchas, puede utilizar un limpiador líquido no abrasivo o un spray de limpieza suave.
  • Seite 96: Detección Y Reparación De Anomalías

    DETECCIÓN Y REPARACIÓN DE ANOMALÍAS Problema Posible causa Solución El aparato no funciona. El aparato no está Asegúrese de que el conectado a la red enchufe esté conectado eléctrica. a la toma de corriente. El aparato no está Pulse la tecla de encendido.
  • Seite 97 Problema Posible causa Solución La comida no termina de Hay demasiada cantidad Reduzca la cantidad cocinarse. de comida en el aparato. de alimentos que se cocinan a la vez. La temperatura de Ajuste una temperatura cocción ajustada es más alta o mayor tiempo demasiado baja o el de preparación.
  • Seite 98: Indicaciones Sobre La Retirada Del Aparato

    INDICACIONES SOBRE LA RETIRADA DEL APARATO Si en su país existe una disposición legal relativa a la eliminación de aparatos eléctricos y electrónicos, este símbolo estampado en el producto o en el embalaje advierte que no debe eliminarse como residuo doméstico. En lugar de ello, debe depositarse en un punto de recogida de reciclaje de aparatos eléctricos y electrónicos.
  • Seite 99: Dati Tecnici

    Gentile cliente, La ringraziamo per aver acquistato il dispositivo. La preghiamo di leggere attentamente le seguenti istruzioni per l’uso e di seguirle per evitare possibili danni. Non ci assumiamo alcuna responsabilità per danni scaturiti da una mancata osservazione delle avvertenze di sicurezza e da un uso improprio del dispositivo.
  • Seite 100: Avvertenze Di Sicurezza

    AVVERTENZE DI SICUREZZA • Prima di procedere all'utilizzo, verificare che la tensione della presa elettrica corrisponda a quella indicata sulla targhetta del dispositivo. • Non immergere il cavo di alimentazione o il dispositivo in acqua o altri liquidi, in modo da evitare scosse elettriche. •...
  • Seite 101 • Il dispositivo è adatto solo all'utilizzo casalingo in ambienti chiusi. • Utilizzare il dispositivo solo per gli scopi previsti. • Conservare il manuale d'uso per futuri utilizzi. • Bambini a partire da 8 anni e persone con limitate capacità fi siche, psichiche e sensoriali possono utilizzare il dispositivo solo se sono stati istruiti da una persona responsabile della loro supervisione sulle modalità...
  • Seite 102: Descrizione Del Dispositivo

    DESCRIZIONE DEL DISPOSITIVO Pannello di controllo LED Spiedo girarrosto Impugnatura dello sportello Finestra panoramica Lampada Vano di raccolta per le briciole Caratteristiche del dispositivo Il dispositivo è dotato di una tecnologia ad aria calda a 360°. Sensore dello sportello Se lo sportello viene aperto durante la cottura, il processo di cottura si ferma e la luce si accende.
  • Seite 103: Accessori

    ACCESSORI Griglia di cottura Può essere usata per la preparazione di carne, pane, pizza, ecc. Cestello per friggere Usare il cestello per friggere in combinazione con la funzione ad aria calda per ottimizzare i risultati di cottura. Può essere usato per la preparazione di patatine fritte, alette di pollo, cipolle, ecc.
  • Seite 104: Messa In Funzione

    MESSA IN FUNZIONE Prima di procedere all'utilizzo Rimuovere tutto il materiale Posizionare il dispositivo su d'imballaggio intorno e all'interno una superficie stabile, piatta e del dispositivo. resistente al calore, a distanza di sicurezza da oggetti che potrebbero essere danneggiati dal calore. Mantenere una distanza minima di 110 mm tra la connessione di alimentazione e pareti, mobili, ecc.
  • Seite 105: Pannello Di Controllo Led

    PANNELLO DI CONTROLLO LED TASTI FUNZIONE Simbolo dei tasti Tasti funzione Utilizzo La lista dei programmi si trova Panoramica dei nel paragrafo "Programmi di programmi cottura". Toccare il simbolo START/ Start/Pausa PAUSA per avviare o mettere in pausa un programma. Dopo aver selezionato un programma e impostato la temperatura, toccare il simbolo...
  • Seite 106 Simbolo dei tasti Tasti funzione Utilizzo Toccare il simbolo della luce per accendere o spegnere la Interruttore lampada. (La luce si spegne luce automaticamente dopo 5 minuti). Utilizzare il tasto < per abbassare la temperatura. Utilizzare il tasto > per alzare Impostazione della la temperatura.
  • Seite 107 Simbolo dei tasti Tasti funzione Utilizzo Questa tecnologia avanzata permette di avviare il dispositivo con un programma e di passare automaticamente a un altro programma per una cottura perfetta. Ad esempio, per preparare un arrosto con panatura, impostare i Cottura diversi- programmi "BAKE"...
  • Seite 108: Programmi Di Cottura

    PROGRAMMI DI COTTURA Programma Temperatura Durata Intervallo di impostazio- Intervallo di impo- predefinita predefinita ne della temperatura stazione della durata AIR FRY (friggere con aria 200 °C 10 min 90-230 °C fino a 2 ore calda) CHIPS (patate fritte 230 °C 18 min 90-230 °C fino a 2 ore...
  • Seite 109: Utilizzo

    UTILIZZO Inserire la spina nella presa e toccare il tasto ON/OFF (6) per accendere il dispositivo.Lo schermo si illumina e il simbolo ARIA CALDA (9) lampeggia. Girare la manopola MENU (11) e selezionare il programma desiderato. La temperatura e la durata preimpostate vengono mostrate sullo schermo.
  • Seite 110 Posizionare gli accessori Posizione 2: Posizione 1: TOAST DEHYDRATE DEHYDRATE Posizione 3: TOAST Posizione 2: DEHYDRATE CHIPS BAKE WINGS VEGGIES PIZZA Posizione 5: Posizione 4: Spiedo ROAST girarrosto Accessori Griglia di Cestello per Teglia Spiedo girarrosto cottura friggere Nota: se si preparano cibi grassi con la griglia, il cestello per friggere o lo spiedo rotante (ad es. pollo), posizionare anche la teglia un livello più...
  • Seite 111 Posizionare gli accessori con gli alimenti sul livello desiderato del dispositivo e chiudere lo sportello. Sono disponibili quattro livelli per il posizionamento. Posizionare gli accessori sul livello adeguato seguendo Posizionare la tabella in alto "Posizionare gli accessori". gli accessori Nota: se si vuole usare il girarrosto, fissare gli alimenti allo spiedo e posizionarlo poi nel dispositivo.
  • Seite 112: Cottura Diversificata

    COTTURA DIVERSIFICATA Inserire la spina nella presa e toccare il tasto ON/OFF (6) per accendere il dispositivo. Lo schermo si illumina e il simbolo ARIA CALDA (9) lampeggia. Esempio: Passaggio 1: Passaggio 2: Toccare il simbolo DUAL COOK (10). I cinque programmi AIR FRY/BAKE/BROIL/ROAST/WARM si illuminano a lungo.
  • Seite 113 Toccare il simbolo PREHEAT (3) per preriscaldare il dispositivo. Non appena il vano di cottura raggiunge una temperatura di 150 °C, sullo schermo compare "Add Food". (Dopo il preriscaldamento, mettere gli alimenti nel dispositivo e chiudere lo sportello. Il processo di cottura inizierà...
  • Seite 114: Tabelle Di Cottura

    TABELLE DI COTTURA PROGRAMMI DI COTTURA Funzione Preriscal- Quantità di alimenti Accessori consigliati Posizione damento consigliata consigliata AIR FRY in base agli sì Cestello per friggere (friggere con aria calda) alimenti selezionati CHIPS sì 550 g Cestello per friggere (patate fritte congelate) WINGS 1038 g sì...
  • Seite 115 COTTURA DIVERSIFICATA Funzione 1 Funzione 2 Preriscal- Quantità di ali- Accessori Posizione damento menti consigliata consigliati consigliata AIR FRY WARM Cestello (friggere con aria (mantenimento per friggere calda) calore) Teglia BAKE BROIL o griglia di (cottura al forno) (grigliare) cottura AIR FRY WARM Teglia...
  • Seite 116: Sostituire La Lampadina

    SOSTITUIRE LA LAMPADINA ATTENZIONE Pericolo di scossa elettrica! Assicurarsi che la spina sia stata scollegata dalla presa e lasciare raff reddare completamente il dispositivo prima di sostituire la lampadina. Lampadina necessaria: lampada alogena da 25 W Girare la copertura della lampada Rimuovere la lampadina in senso antiorario per rimuoverla.
  • Seite 117: Smontaggio Dello Sportello Di Vetro

    SMONTAGGIO DELLO SPORTELLO DI VETRO ATTENZIONE Pericolo di ustioni! Assicurarsi che lo sportello di vetro si sia raff reddato completamente prima di smontarlo. Allentare le viti girandole in senso antiorario con un cacciavite. Il vetro può essere tenuto con una ventosa in silicone e poi rimosso con le mani.
  • Seite 118: Pulizia, Manutenzione E Stoccaggio

    PULIZIA, MANUTENZIONE E STOCCAGGIO Nota: staccare la spina dalla presa prima della pulizia. Lasciare raff reddare completamente il dispositivo e gli accessori prima di procedere a smontaggio e pulizia. Pulizia dell'alloggiamento, dello sportello e dello schermo LED • Pulire l'alloggiamento con una spugna morbida e umida. Per prevenire la formazione di macchie, si può...
  • Seite 119 Pulire il vano di raccolta per le briciole • Estrarre il vano di raccolta delle briciole dopo ogni uso e svuotarlo. Pulirlo con una spugna morbida e umida. Per evitare la formazione di macchie, usare un detergente liquido non abrasivo o uno spray per la pulizia delicato. Applicare il detergente sul panno prima della pulizia e non direttamente sul vano di raccolta per le briciole.
  • Seite 120: Ricerca E Correzione Degli Errori

    RICERCA E CORREZIONE DEGLI ERRORI Problema Possibile causa Soluzione Il dispositivo non Il dispositivo Assicurarsi che la spina funziona. non è collegato sia collegata alla presa all'alimentazione. elettrica. Il dispositivo non è Premere il tasto ON/ acceso. per accendere il dispositivo.
  • Seite 121 Problema Possibile causa Soluzione Gli alimenti non si Ci sono troppi alimenti Ridurre la quantità di cuociono. nel dispositivo. alimenti da cucinare in una sola volta. La temperatura di Impostare una cottura impostata è temperatura più alta o troppo bassa o il tempo un tempo più...
  • Seite 122: Avviso Di Smaltimento

    AVVISO DI SMALTIMENTO Se nel proprio paese si applicano le regolamentazioni inerenti lo smaltimento di dispositivi elettrici ed elettronici, questo simbolo sul prodotto o sulla confezione segnala che questi prodotti non possono essere smaltiti con i rifiuti normali e devono essere portati a un punto di raccolta di dispositivi elettrici ed elettronici.

Diese Anleitung auch für:

1003994010039941

Inhaltsverzeichnis