Inhaltsverzeichnis
Werbung
Verfügbare Sprachen
Verfügbare Sprachen
Quicklinks
Werbung
Inhaltsverzeichnis

Verwandte Anleitungen für Klarstein VITA PRO


Inhaltszusammenfassung für Klarstein VITA PRO
- Seite 1 VITA PRO Heißluftfritteuse mit Dampfgaren Air Fryer with Steam Cooking Friteuses à air chaud et cuisson vapeur Freidoras de aire caliente con cocción al vapor Friggitrice ad aria con cottura a vapore 10041333 10041334 www.klarstein.com www.klarstein.com...
-
Seite 3: Inhaltsverzeichnis
Sehr geehrter Kunde, wir gratulieren Ihnen zum Erwerb Ihres Gerätes. Lesen Sie die folgenden Hinweise sorgfältig durch und befolgen Sie diese, um möglichen Schäden vorzubeugen. Für Schäden, die durch Missachtung der Hinweise und unsachgemäßen Gebrauch entstehen, übernehmen wir keine Haftung. Scannen Sie den folgenden QR-Code, um Zugriff auf die aktuellste Bedienungsanleitung und weitere Informationen rund um das Produkt zu erhalten. -
Seite 4: Technische Daten
TECHNISCHE DATEN Artikelnummer 10041333, 10041334 Stromversorgung 220–240 V ~ 50-60 Hz Leistung 2450 W Temperaturbereich 50–230 °C Topfgröße 18 l Fassungsvermögen des 800 ml Wassertanks Gewicht 14,5 kg... -
Seite 5: Sicherheitshinweise
SICHERHEITSHINWEISE Allgemeine Hinweise • Waschen Sie das Gehäuse niemals mit fl ießendem Wasser ab, um die elektrischen Komponenten nicht zu beschädigen. • Lassen Sie kein Wasser oder andere Flüssigkeiten in das Gerät eindringen, um einen Stromschlag zu vermeiden. • Kinder ab 8 Jahren, psychisch, sensorisch und körperlich eingeschränkte Menschen dürfen das Gerät nur benutzen, wenn sie vorher von einer für sie verantwortlichen Aufsichtsperson ausführlich mit den Funktionen und den Sicherheitsvorkehrungen vertraut gemacht wurden und die damit... - Seite 6 Hinweise zum sicheren Gebrauch VORSICHT Verbrennungsgefahr! Während des Gebrauchs wird das Gerät heiß. Achten Sie darauf, dass Sie die Heizelemente im Inneren des Ofens nicht berühren und benutzen Sie Ofenhandschuhe. • Ziehen Sie vor der Reinigung den Stecker aus der Steckdose und lassen Sie das Gerät komplett abkühlen.
-
Seite 7: Geräteübersicht
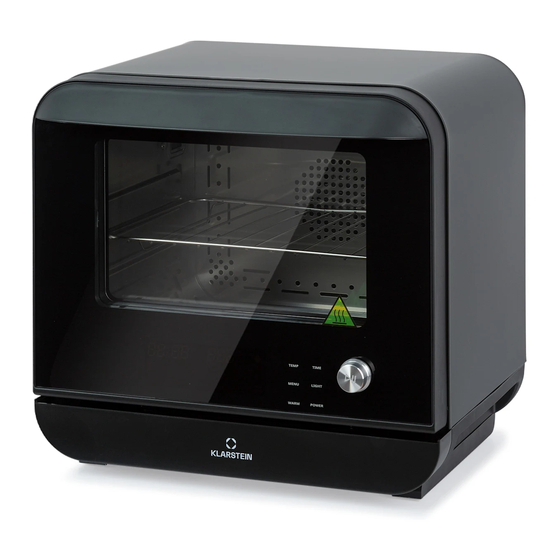
GERÄTEÜBERSICHT Teile des Geräts Türrahmen Stabilisiert das Gerät. Griff Zum Öff nen und Schließen des Geräts. Sichtfenster Überwachung der Lebensmittel während der Zubereitung. Drehregler Funktionswahl Wassertank Lagerung des Wassers zur Produktion von Dampf. Abtropfschale Sammelt während der Zubereitung entstandenes überschüssiges Wasser. Luftauslass Überschüssiger Dampf wird über den Luftauslass abgegeben. - Seite 8 Bedienfeld Symbol Modus Beschreibung Zeit Zeigt die Zubereitungszeit an. Temperatur Zeigt die Betriebstemperatur an. Kein Wasser Das Symbol blinkt und der Alarm- ton erklingt lange, um anzuzeigen, dass sich im Wassertank kein Wasser mehr befindet. Automatischer Automatisches Menü. Die Zeit und Menümodus (Chips) die Temperatur können während des Betriebs angepasst werden.
- Seite 9 Symbol Modus Beschreibung Automatischer Automatisches Menü. Die Zeit Menümodus (Suppe) und die Temperatur können nicht angepasst werden. Automatischer Automatisches Menü. Die Zeit und Menümodus (Autauen) die Temperatur können während des Betriebs angepasst werden. Automatischer Automatisches Menü. Die Zeit und Menümodus (Dörr- die Temperatur können während modus) des Betriebs angepasst werden.
- Seite 10 Symbol Modus Beschreibung Standbytaste Wenn Sie diese Taste drücken, wird das Gerät in den Standbymo- dus versetzt. Drehregler Drehen Sie am Drehregler um Temperatur, Zeit oder Menü anzu- passen. Drücken Sie den Drehreg- ler nach unten, um den Betrieb zu starten oder zu pausieren.
-
Seite 11: Inbetriebnahme
INBETRIEBNAHME Entpacken Sie das Gerät und entfernen Sie das gesamte Verpackungsmaterial. Befestigen Sie die Trennwand an der Rückseite des Geräts. Platzieren Sie das Gerät auf einer stabilen, horizontalen Oberfl äche. Achten Sie darauf, dass zur Rückseite des Geräts ein Mindestabstand von 20 cm und zu beiden Seiten ein Mindestabstand von 10 cm eingehalten wird (siehe Abbildung). - Seite 12 Entnehmen Sie den Wassertank. Entleeren Sie die Abtropfschale und den Wasserbehälter. Befüllen Sie den Wassertank mit Wasser. Befestigen Sie die Wassertankabdeckung und achten Sie darauf, dass diese richtig sitzt. Setzen Sie den Wassertank anschließend in das Gerät ein (siehe Abbildung). Hinweise •...
-
Seite 13: Bedienung
BEDIENUNG Einschalten Wenn das Gerät eingeschaltet wird, ist ein Piepton zu hören. Der Digitalbildschirm und alle Anzeigeleuchten blinken auf und gehen anschließend aus. Lediglich die Betriebsanzeige der Taste ON/OFF blinkt langsam auf. Dies weist darauf hin, dass das Gerät sich im Standbymodus befindet. Wenn Sie die Taste ON/OFF drücken, leuchten alle Anzeigeleuchten des Bedienfelds auf. -
Seite 14: Funktionsmenü
Symbole leuchten auf. Drücken Sie die Taste TIME und der Signalton ertönt. Das Sterilisationssymbol leuchtet auf, die anderen Symbole sind erloschen. Drehen Sie den Drehregler, um die gewünschte Zeit für die Sterilisation zu wählen. Drücken Sie den Drehregler, um mit dem Betrieb zu beginnen. Auf dem Bildschirm werden die eingestellte Temperatur und die verbleibende Zeit angezeigt. -
Seite 15: Warmhaltefunktion
Betriebsmodus wechseln. Hinweis: Nach der Entkalkung müssen Sie den Netzstecker ziehen. Sie können das Gerät erst wieder verwenden, wenn es abgekühlt ist; die Entkalkungszeit beträgt 50 Minuten. Modus wechseln Drücken Sie lange auf den Drehregler (3 Sekunden), um den Vorgang abzubrechen, und drehen Sie dann den Drehregler, um den Modus zu ändern. -
Seite 16: Voreinstellungen Und Einstellungsbereich
VOREINSTELLUNGEN UND EINSTELLUNGSBEREICH Menü Symbol Zuberei- Temp. Temp.- Zeit Zeitbe- tungs- bereich reich modus Dämpfen Frittieren Untermenü-Modus Dämpfen & Frittieren Sterilisieren 110 °C Nicht an- 0:30 min 10 min - 2 h passbar Entkalken Nicht an- 0:50 min Nicht an- passbar passbar Warmhalten... - Seite 17 Untermenüs Reiner Dämpfmodus Menü- Menüs Zeit Temp. Zeit- Temp.- code HH:MM (°C) bereich bereich (min) (°C) Gebratener 00:15 1-20 90-110 Eierkuchen Geröstete 00:15 1-20 90-110 Kastanien Gugelhupf 00:15 1-20 110-120 Bagel 00:18 1-25 90-110 Makrone 00:20 1-30 110-130 Pommes 00:28 1-35 110-130 Knuspriger Toast...
- Seite 18 Gugelhupf 15-25 100-140 0:20 + 0:10 + 160 + 7-13 + 140-180 Bagel 00:20 1-30 180-220 Makrone 00:15 1-30 140-190 Pommes 00:18 1-30 180-220 Knuspriger Toast 00:10 1-20 180-220 Knusprig 00:07 1-20 170-200 gebackene Brötchen 01:00 1-60 35-230 Kombinationsmodus Dämpfen + Frittieren Menü- Menüs Zeit HH:MM...
-
Seite 19: Reinigung Und Wartung
REINIGUNG UND WARTUNG • Verwenden Sie zur Reinigung keine aggressiven Reinigungsmittel, Benzin, abreibendes Pulver oder eine Metallbürste. • Wenn das Gerät über einen längeren Zeitraum verwendet wird, kann es vorkommen, dass das Geräteinnere seltsam riecht. Gehen Sie folgendermaßen vor, falls dies der Fall sein sollte: Legen Sie 5 –... -
Seite 20: Fehlersuche Und Fehlerbehebung
FEHLERSUCHE UND FEHLERBEHEBUNG Problem Mögliche Ursache Lösung Das Gerät funktioniert Inkorrekte Verwendung. Lesen Sie sich die gesamte nicht, piept aber beim Bedienungsanleitung aufmerksam durch. Einschalten und der Beschädigte Komponenten Kontaktieren Sie den Kundendienst, falls Bildschirm wird beim dies der Fall sein sollte. Einstecken angezeigt. -
Seite 21: Fehlermeldung
Fehlermeldung Fehlercode Mögliche Ursache Lösung Überhitzen oder NTC- Kontaktieren Sie den Kurzschluss Kundendienst. Offener NTC-Kreislauf Kontaktieren Sie den Kundendienst. Überhitzen oder Kontaktieren Sie den Kurzschluss des 1 NTC Kundendienst. Verdampfers. Offener Kreislauf des 1 NTC Kontaktieren Sie den Verdampfers. Kundendienst. Überhitzen oder Kontaktieren Sie den Kurzschluss des 2 NTC-... -
Seite 22: Schaltplan
SCHALTPLAN... -
Seite 23: Spezielle Entsorgungshinweise Für Verbraucher In Deutschland
SPEZIELLE ENTSORGUNGSHINWEISE FÜR VERBRAUCHER IN DEUTSCHLAND Entsorgen Sie Ihre Altgeräte fachgerecht. Dadurch wird gewährleistet, dass die Altgeräte umweltgerecht verwertet und negative Auswirkungen auf die Umwelt und menschliche Gesundheit vermieden werden. Bei der Entsorgung sind folgende Regeln zu beachten: • Jeder Verbraucher ist gesetzlich verpflichtet, Elektro- und Elektronikaltgeräte (Altgeräte) sowie Batterien und Akkus getrennt vom Hausmüll zu entsorgen. - Seite 24 • Bei einem Vertrieb unter Verwendung von Fernkommunikationsmitteln ist die unentgeltliche Abholung am Ort der Abgabe auf Elektro- und Elektronikgeräte der Kategorien 1, 2 und 4 gemäß § 2 Abs. 1 ElektroG, nämlich „Wärmeüberträger“, „Bildschirmgeräte“ (Oberfläche von mehr als 100 cm²) oder „Großgeräte“...
-
Seite 25: Hinweise Zur Entsorgung
HINWEISE ZUR ENTSORGUNG Wenn es in Ihrem Land eine gesetzliche Regelung zur Entsorgung von elektrischen und elektronischen Geräten gibt, weist dieses Symbol auf dem Produkt oder auf der Verpackung darauf hin, dass dieses Produkt nicht im Hausmüll entsorgt werden darf. Stattdessen muss es zu einer Sammelstelle für das Recycling von elektrischen und elektronischen Geräten gebracht werden. - Seite 27 Dear Customer, Congratulations on purchasing this device. Please read the following instructions carefully and follow them to prevent possible damages. We assume no liability for damage caused by disregard of the instructions and improper use. Scan the QR code to get access to the latest user manual and more product information.
-
Seite 28: Technical Data
TECHNICAL DATA Item number 10041333, 10041334 Power supply 220–240 V ~ 50-60 Hz Power rating 2450 W Temperature range 50–230 °C Pot capacity 18 l Water tank capacity 800 ml Weight 14.5 kg... -
Seite 29: Safety Instructions
SAFETY INSTRUCTIONS General information • Never wash the cabinet with running water to prevent damage to the electrical components. • To prevent electric shock, do not allow water or other liquids to enter the unit. • This device may be only used by children 8 years old or older and persons with limited physical, sensory and mental capabilities and / or lack of experience and knowledge, provided that they have been instructed in use of the device by a responsible person who understands the associated risks. - Seite 30 Instructions for safe use CAUTION Danger of burns! The appliance becomes hot during use. Take care not to touch the heating elements inside the oven and use oven gloves. • Before cleaning, unplug the appliance from the wall outlet and allow it to cool completely.
-
Seite 31: Product Description
PRODUCT DESCRIPTION Product components Door frame Fixes the whole machine. Handle Used for open/close the door. Glass observe the internal food state. Knob used for adjust the function. Water tank used to store water that produces steam. Condensate tray collect excess water during cooking. Air outlet used to exhaust excess steam from the air fryer. - Seite 32 Control panel Diagram Function description Working mode Time Displays the set time while working. Temperature Displays the set temperature while working. Water shortage This icon flickers and the buzzer sounds for a long time, indicat- ing that the water tank is short of water.
- Seite 33 Diagram Function description Working mode (SOUP) Automatic menu Automatic menu, time and mode temperature cannot be adjusted. (DEFROST) Automatic Automatic menu, time and menu mode temperature can be adjusted during operation. (DEHYDRATE) Automatic Automatic menu, time and menu mode temperature can be adjusted during operation.
- Seite 34 Diagram Function description Working mode Standby button Press this button, enter standby mode or off mode. Adjustment knob Rotate to adjust temperature, time, menu, press the knob to start / pause.
-
Seite 35: Getting Started
GETTING STARTED After unpacking, fasten the partition wall block to the back of the machine. Place the machine on a stable horizontal surface. Leave not less than 20 cm in the back and not less than 10 cm on both sides of the space, and pay attention to keep away from curtains, wall cloth and other combustible materials, as picture shows. - Seite 36 Take out the water tank, empty the condensate tray and water tray, fi ll the tank with water and tighten the water tank lid, then put it into the houst. As picture shows. Note • Diff erent cooking options, diff erent accessories. •...
-
Seite 37: Operation
OPERATION Power on When the product is powered on, there will have a "Bi" sound, the digital screen and all indicator lights flicker and then turn off, only the ON/OFF button indicator light flashes slowly, indicating that the appliance is power on state (the power on state is the standby mode), press ON/OFF button, all lights on the control panel light up, then press the MENU button to enter the function selection interface. - Seite 38 After adding water, should press the start knob to continue the baking process. Menu function introduction Press the ON/OFF button after powering on. All lights on the control panel light up. Then press the MENU button to enter the menu mode. Rotate the selection knob, the menu is cycling on the digital screen.
- Seite 39 Mode change Long press the selection knob (3 seconds) to cancel the operation, and then turn the knob to change the mode. Lamp function Press the ON/OFF button after power on, all lights on the control panel light up, press the lamp button to turn on the lamp.
-
Seite 40: Preset Parameters And Adjustment Range
PRESET PARAMETERS AND ADJUSTMENT RANGE Menu Icon Cook Default Tempera- Default Time ad- mode temper- ture ad- time justment ature justment (HH:MM) range range Steam Fryer Submenu mode Steam & Fryer Sterilize 110 °C Can’t 0:30 min 10 min - 2 h adjust Descaling Can’t... - Seite 41 Sub-menus Pure Steam Mode Menu Menus Time Temp. Time Temp. code HH:MM (°C) range range (min) (°C) Steamed eggs 00:15 1-20 90-110 Steamed scallops 00:15 1-20 90-110 with garlic and fans Heat up pastry 00:15 1-20 110-120 Steamed crab 00:18 1-25 90-110 Steamed bun...
- Seite 42 Bagel 00:20 1-30 180-220 Macaron 00:15 1-30 140-190 Chips 00:18 1-30 180-220 Crisp toast 00:10 1-20 180-220 Crispy baked buns 00:07 1-20 170-200 01:00 1-60 35-230 Steam + Fryer Combination Mode Menu Menus Time Temp. Time range Temp. code HH:MM (°C) (min) range...
-
Seite 43: Cleaning And Maintenance
CLEANING AND MAINTENANCE Notes • Do not use any corrosive detergent, gasoline, abrasive powder or metal brush to clean any part of the appliance. • The appliance may have some peculiar smell after a long time of use, can put 5-6 slices of lemon into the chamber, and use the low-temperature steaming function to run 15-20 minutes with 100 ℃, the peculiar smell can be removed. -
Seite 44: Common Problems And Solutions
COMMON PROBLEMS AND SOLUTIONS Problem Matters to be Solution confirmed The product have a Correct operation or not. Read the manual carefully. prompt sound when does not work , and the If the components Please contact customer service. screen can display when damaged or not. - Seite 45 Error alarm Error code Cause Solution Over temperature or Excessive temperature short circuit of the or damage, please furnace NTC. contact after-sales service. Open circuit of the NTC fall off, please furnace NTC. contact after-sales service. Over temperature or Excessive temperature short circuit of the or damage, please evaporator 1 NTC.
-
Seite 46: Circuit Principle Diagram
CIRCUIT PRINCIPLE DIAGRAM... -
Seite 47: Disposal Considerations
DISPOSAL CONSIDERATIONS If there is a legal regulation for the disposal of electrical and electronic devices in your country, this symbol on the product or on the packaging indicates that this product must not be disposed of with household waste. Instead, it must be taken to a collection point for the recycling of electrical and electronic equipment. - Seite 49 Cher client, chère cliente, Toutes nos félicitations pour l’acquisition de ce nouvel appareil. Lisez attentivement les indications suivantes et suivez-les pour éviter d'éventuels dommages. Nous ne saurions être tenus pour responsables des dommages dus au non-respect des consignes et à la mauvaise utilisation de l’appareil.
-
Seite 50: Fiche Technique
FICHE TECHNIQUE Numéro d'article 10041333, 10041334 Alimentation 220-240 V ~ 50-60 Hz Puissance 2450 W Plage de température 50-230 °C Taille de la cuve 18 l Capacité du réservoir d'eau 800 ml Poids 14,5 kg... -
Seite 51: Consignes De Sécurité
CONSIGNES DE SÉCURITÉ Consignes générales • Ne lavez jamais le boîtier à l'eau courante afi n de ne pas endommager les composants électriques. • Pour éviter toute décharge électrique, ne laissez pas d'eau ou d'autres liquides pénétrer dans l'appareil. • Les enfants à... - Seite 52 Consignes pour une utilisation en toute sécurité ATTENTION Risque de brûlure ! Pendant l'utilisation, l'appareil devient chaud. Veillez à ne pas toucher les éléments chauff ants à l'intérieur du four et utilisez des gants de four. • Avant le nettoyage, débranchez la fi che de la prise et laissez l'appareil refroidir complètement.
-
Seite 53: Aperçu De L'appareil
APERÇU DE L'APPAREIL Pièces de l'appareil Cadre de porte Stabilise l'appareil. Poignée Pour ouvrir et fermer l'appareil. Fenêtre de Surveillance des aliments pendant la préparation. visualisation Bouton rotatif Sélecteur de fonction Réservoir d'eau Stockage de l'eau pour la production de vapeur. Bac récepteur Recueille l'excédent d'eau produit pendant la préparation. - Seite 54 Panneau de commande Symbole Mode Description Durée Indique le temps de préparation. Température Indique la température de fonc- tionnement Pas d'eau Le symbole clignote et l'alarme retentit longuement pour indiquer qu'il n'y a plus d'eau dans le réser- voir d'eau. Mode menu automa- Menu automatique.
- Seite 55 Symbole Mode Description Mode menu automa- Menu automatique. La durée et la tique (soupe) température ne peuvent pas être ajustées. Mode menu automa- Menu automatique. La durée et la tique (décongélation) température peuvent être ajustées en cours de fonctionnement. Mode menu automa- Menu automatique.
- Seite 56 Symbole Mode Description Touche de veille Une nouvelle pression sur cette touche met l'appareil en mode veille. Bouton rotatif Tournez le bouton rotatif pour ajuster la température, la durée ou le menu. Appuyez sur le bouton rotatif vers le bas pour démarrer ou mettre en pause le fonction- nement...
-
Seite 57: Mise En Marche
MISE EN MARCHE Déballez l'appareil et retirez tous les matériaux d'emballage. Fixez la cloison à l'arrière de l'appareil. Placez l'appareil sur une surface plane horizontale. Veillez à respecter une distance minimale de 20 cm à l'arrière de l'appareil et une distance minimale de 10 cm de chaque côté (voir illustration). Ne placez pas l'appareil à... - Seite 58 Retirez le réservoir d'eau. Videz le bac d'égouttage et le récipient d'eau. Remplissez le réservoir d'eau. Fixez le couvercle du réservoir d'eau en veillant à ce qu'il soit bien en place. Insérez ensuite le réservoir d'eau dans l'appareil (voir illustration). Remarque •...
-
Seite 59: Utilisation
UTILISATION Allumer Lorsque l'appareil est mis en marche, un bip sonore retentit. Les lumières de l'écran numérique et des voyants clignotent avant de s'éteindre. Seul le témoin de fonctionnement de la touche ON/OFF clignote lentement. Cela indique que l'appareil est en mode veille. Lorsque vous appuyez sur le bouton ON/OFF, tous les voyants du panneau de commande s'allument. - Seite 60 Appuyez sur le bouton TIME et le signal sonore retentit. Le symbole de stérilisation s'allume, les autres symboles sont éteints. Tournez le bouton rotatif pour sélectionner la durée souhaitée pour la stérilisation. Appuyez sur le bouton rotatif pour commencer à utiliser l'appareil. La température réglée et le temps restant s'affichent à...
- Seite 61 Remarque : Après le détartrage, vous devez débrancher la fiche d'alimentation. Vous ne pouvez réutiliser l'appareil qu'une fois refroidi : le temps de détartrage est de 50 minutes. Changer de mode Appuyez longuement sur le bouton rotatif (3 secondes) pour annuler l'opération, puis tournez le bouton rotatif pour changer de mode.
-
Seite 62: Préférences Et Zone De Réglage
PRÉFÉRENCES ET ZONE DE RÉGLAGE Menu Sym- Mode Temp. Plage de Durée Plage de bole tempéra- temps prépa- ture ration Cuisson à la vapeur Frire Mode sous-menu Cuire à la va- peur & frire Stériliser 110 °C 0:30 min 10 min - 2 h réglable Détartrage 0:50 min... - Seite 63 Sous-menus Mode vapeur pur Code de Menus Heure Temp. Plage de Plage de menu HH:MM (°C) temps température (min.) (°C) Oeufs frits 00:15 1-20 90-110 Marrons grillés 00:15 1-20 90-110 Kouglof 00:15 1-20 110-120 Bagel 00:18 1-25 90-110 Macaron 00:20 1-30 110-130 Frites...
- Seite 64 Kougelhopf 15-25 100-140 0:20 + 0:10 + 160 + 7-13 + 140-180 Bagel 00:20 1-30 180-220 Macaron 00:15 1-30 140-190 Frites 00:18 1-30 180-220 Toasts croustillants 00:10 1-20 180-220 Petits pains 00:07 1-20 170-200 croustillants au four 01:00 1-60 35-230 Mode combiné...
-
Seite 65: Nettoyage Et Maintenance
NETTOYAGE ET MAINTENANCE • Pour le nettoyage, n'utilisez pas de produits de nettoyage agressifs, d'essence, de poudre abrasive ou de brosse métallique... • Si l'appareil est utilisé pendant une période prolongée, il peut arriver que l'intérieur de l'appareil dégage une odeur étrange. Si c'est le cas, procédez comme suit : placez 5 à... -
Seite 66: Identification Et Résolution Des Problèmes
IDENTIFICATION ET RÉSOLUTION DES PROBLÈMES Problème Cause possible Solution L'appareil ne fonctionne Utilisation incorrecte. Lisez attentivement et entièrement le pas, mais il émet un mode d'emploi. bip lors de la mise Composants endommagés Contactez le service clientèle si c'est le en marche et l'écran cas. - Seite 67 Message d'erreur Code erreur Cause possible Solution Surchauffe ou court-circuit Contactez le service clientèle. Circuit ouvert NTC Contactez le service clients. Surchauffe ou court-circuit Contactez le service clients. de l'évaporateur 1 NTC. Circuit ouvert de Contactez le service clients. l'évaporateur 1 NTC. Surchauffe ou court-circuit Contactez le service clients.
-
Seite 68: Schéma Électrique
SCHÉMA ÉLECTRIQUE... -
Seite 69: Conseils Pour Le Recyclage
CONSEILS POUR LE RECYCLAGE S‘il existe une réglementation pour l‘élimination ou le recyclage des appareils électriques et électroniques dans votre pays, ce symbole sur le produit ou sur l‘emballage indique que cet appareil ne doit pas être jeté avec les ordures ménagères. - Seite 71 Estimado cliente: Le felicitamos por la adquisición de este producto. Lea atentamente el siguiente manual y siga cuidadosamente las instrucciones de uso con el fin de evitar posibles daños. La empresa no se responsabiliza de los daños ocasionados por un uso indebido del producto o por haber desatendido las indicaciones de seguridad.
-
Seite 72: Datos Técnicos
DATOS TÉCNICOS Número del artículo 10041333, 10041334 Suministro eléctrico 220–240 V ~ 50-60 Hz Potencia 2450 W Rango de temperaturas 50-230 °C Tamaño de la olla 18 l Capacidad del depósito 800 ml de agua Peso 14,5 kg... -
Seite 73: Indicaciones De Seguridad
INDICACIONES DE SEGURIDAD Indicaciones generales • No lave nunca la carcasa con agua corriente para no dañar los componentes eléctricos. • No permita que entre agua u otros líquidos en la unidad para evitar una descarga eléctrica. • Los niños mayores de 8 años y las personas con discapacidad física, sensorial o psíquica pueden utilizar el aparato si han sido previamente instruidos por una persona responsable sobre el funcionamiento del mismo y conocen las funciones, las indicaciones de seguridad y los riesgos asociados. - Seite 74 Notas sobre el uso correcto ATENCIÓN ¡Peligro de quemaduras! El aparato se calienta durante su uso. Tenga cuidado de no tocar las resistencias en el interior del horno y utilice guantes de cocina. • Desenchufe el aparato y deje que se enfríe totalmente antes de limpiarlo. •...
-
Seite 75: Vista General Del Aparato
VISTA GENERAL DEL APARATO Partes del aparato Marco de la Estabiliza el aparato. puerta Para abrir y cerrar el aparato. Ventana de Permite controlar los alimentos durante su seguridad preparación. Regulador Selector de funciones Depósito de Almacena el agua para la producción de vapor. agua Bandeja de Recoge el exceso de agua producido durante la... - Seite 76 Panel de control Símbolo Modo Descripción Tiempo Muestra el tiempo de preparación. Temperatura Muestra la temperatura de funcio- namiento. Sin agua El símbolo parpadea y la alarma suena durante un tiempo prolon- gado para indicar que no hay agua en el depósito de agua. Modo de menú...
- Seite 77 Símbolo Modo Descripción Modo de menú au- Menú automático. El tiempo y la tomático (sopa) temperatura no se pueden ajustar. Modo de menú au- Menú automático. El tiempo y la tomático (descongelar) temperatura se pueden ajustar durante el funcionamiento. Modo de menú au- Menú...
- Seite 78 Símbolo Modo Descripción Botón Standby Al pulsar este botón, el aparato pasa al modo de espera. Regulador Gire el regulador para ajustar la temperatura, el tiempo o el menú. Pulse el regulador hacia abajo para iniciar o pausar el funciona- miento.
-
Seite 79: Puesta En Marcha
PUESTA EN MARCHA Desembale el aparato y retire todo el material de embalaje. Fije el separador en la parte posterior del aparato. Coloque el aparato sobre una superfi cie plana y estable. Asegúrese de que haya una distancia mínima de 20 cm a la parte posterior del aparato y una distancia mínima de 10 cm a ambos lados (véase la ilustración). - Seite 80 Retire el depósito de agua. Vacíe la bandeja de goteo y el recipiente de agua. Llene el depósito de agua con agua. Coloque la tapa del depósito de agua y asegúrese de que está bien asentada. A continuación, introduzca el depósito de agua en el aparato (véase la ilustración).
-
Seite 81: Funcionamiento
FUNCIONAMIENTO Encendido Cuando se enciende el aparato, suena un pitido. La pantalla digital y los indicadores luminosos parpadean y luego se apagan. Sólo el indicador de funcionamiento del botón «ON/OFF» parpadea lentamente. Esto indica que el aparato está en modo de espera. Al pulsar el botón «ON/OFF», se encienden todos los indicadores luminosos del panel de control. - Seite 82 iniciar el funcionamiento. La temperatura y el tiempo configurados aparecen en la pantalla. Nivel de agua bajo en el depósito de agua Cuando en el depósito de agua queda poca agua, el símbolo parpadea. El indicador «tiempo» parpadea. El funcionamiento se interrumpe y suena la señal acústica.
- Seite 83 descalcificación es de 50 minutos. Cambio de modo Mantenga pulsado el regulador (3 segundos) para cancelar el procedimiento y luego gire el regulador para cambiar el modo. Función de la lámpara Pulse el botón «ON/OFF» después de encender el aparato. Se encienden todos los indicadores luminosos del panel de control.
-
Seite 84: Gama De Preferencias Y Ajustes
GAMA DE PREFERENCIAS Y AJUSTES Menú Símbolo Modo Temp. Rango de Tiempo Rango de tempera- tiempo prepa- tura ración Cocción al vapor Freír Modo de submenú Cocinar al vapor y freír Esterilizar 110 °C No ajust- 0:30 min 10 min - 2 h able Descalcificación No ajust-... - Seite 85 Submenús Modo de cocción al vapor completo Código Menús Tiempo Temp. Rango Rango de HH:MM (°C) temp. (ºC) menú tiempo (min) Crepe frita 00:15 1-20 90-110 Castañas asadas 00:15 1-20 90-110 Gugelhupf 00:15 1-20 110-120 Bagel 00:18 1-25 90-110 Macarrón 00:20 1-30 110-130...
- Seite 86 Gugelhupf 15-25 100-140 0:20 + 0:10 + 160 + 7-13 + 140-180 Bagel 00:20 1-30 180-220 Macarrón 00:15 1-30 140-190 Patatas fritas 00:18 1-30 180-220 Tostadas crujientes 00:10 1-20 180-220 Panecillos 00:07 1-20 170-200 crujientes al horno Repostería propia 01:00 1-60 35-230 Modo combinado de cocción al vapor + fritura...
-
Seite 87: Limpieza Y Mantenimiento
LIMPIEZA Y MANTENIMIENTO • No utilice productos de limpieza agresivos, gasolina, polvo abrasivo o un cepillo metálico para la limpieza. • Si el aparato se utiliza durante un largo período de tiempo, su interior puede llegar a oler de forma extraña. Si este es el caso, siga estos pasos: introduzca 5-6 rodajas de limón en el interior del aparato y programe la función «Cocción al vapor a baja temperatura». -
Seite 88: Detección Y Reparación De Anomalías
DETECCIÓN Y REPARACIÓN DE ANOMALÍAS Anomalía Posible causa Solución El aparato no funciona, Uso incorrecto. Lea atentamente todo el manual de pero emite un pitido instrucciones. cuando se enciende y se Componentes dañados Póngase en contacto con el servicio técni- muestra la pantalla al co si es el caso. - Seite 89 Mensaje de error Código de Posible causa Solución error Sobrecalentamiento o Contacte con el servicio cortocircuito del NTC técnico. Circuito NTC abierto Contacte con el servicio técnico. Sobrecalentamiento Contacte con el servicio o cortocircuito del técnico. evaporador de 1 NTC. Circuito abierto del Contacte con el servicio evaporador de 1 NTC.
-
Seite 90: Esquema Del Circuito
ESQUEMA DEL CIRCUITO... -
Seite 91: Indicaciones Sobre La Retirada Del Aparato
INDICACIONES SOBRE LA RETIRADA DEL APARATO Si en su país existe una disposición legal relativa a la eliminación de aparatos eléctricos y electrónicos, este símbolo estampado en el producto o en el embalaje advierte que no debe eliminarse como residuo doméstico. En lugar de ello, debe depositarse en un punto de recogida de reciclaje de aparatos eléctricos y electrónicos. - Seite 93 Gentile cliente, La ringraziamo per l'acquisto del dispositivo. La preghiamo di leggere attentamente le seguenti indicazioni e di seguirle per prevenire eventuali danni. Non ci assumiamo alcuna responsabilità per danni scaturiti da una mancata osservanza delle avvertenze di sicurezza e da un uso improprio del dispositivo.
-
Seite 94: Dati Tecnici
DATI TECNICI Numero articolo 10041333, 10041334 Alimentazione 220–240 V ~ 50-60 Hz Potenza 2450 W Intervallo di temperatura 50 - 230 °C Dimensioni della camera 18 l di cottura Capacità del serbatoio 800 ml d'acqua Peso 14,5 kg... -
Seite 95: Avvertenze Di Sicurezza
AVVERTENZE DI SICUREZZA Avvertenze generiche • Non lavare mai l'alloggiamento con acqua corrente per evitare di danneggiare i componenti elettrici. • Non lasciare che acqua o altri liquidi penetrino nel dispositivo, in modo da evitare scosse elettriche. • Bambini a partire da 8 anni e persone con limitate capacità fi siche, psichiche e sensoriali possono utilizzare il dispositivo solo se sono stati istruiti da una persona responsabile della loro sicurezza sulle modalità... - Seite 96 Indicazioni per un utilizzo sicuro ATTENZIONE Pericolo di ustioni! Il dispositivo diventa estremamente caldo durante l'uso. Fare attenzione a non toccare gli elementi riscaldanti all'interno del dispositivo e usare guanti da forno. • Prima della pulizia, staccare la spina e lasciar raff reddare completamente il dispositivo.
-
Seite 97: Descrizione Del Dispositivo
DESCRIZIONE DEL DISPOSITIVO Componenti del dispositivo Telaio dello Stabilizzare l'unità. sportello Impugnatura Per aprire e chiudere l'unità. Finestra di Monitoraggio degli alimenti durante la visualizzazione preparazione. Manopola Manopola di selezione della funzione Serbatoio Immagazzinamento dell'acqua per la produzione dell'acqua di vapore. Vaschetta di Raccoglie l'acqua in eccesso prodotta durante la sgocciolamento... - Seite 98 Pannello di controllo Simbolo Modalità Descrizione Tempo Indica il tempo di preparazione. Temperatura Visualizza la temperatura impo- stata. Non c'è acqua Il simbolo lampeggia e l'allarme suona a lungo per indicare che non c'è più acqua nel serbatoio. Modalità menu auto- Menu automatico.
- Seite 99 Simbolo Modalità Descrizione Modalità menu auto- Menu automatico. Il tempo e la matico (zuppa) temperatura non possono essere regolati. Modalità menu Menu automatico. Il tempo e la automatico (scongela- temperatura possono essere rego- mento) lati durante il funzionamento. Modalità menu Menu automatico.
- Seite 100 Simbolo Modalità Descrizione Tasto standby Premendo questo tasto, il disposi- tivo entrerà in modalità standby. Manopola Ruotare la manopola per impo- stare la temperatura, il tempo o il menu. Premere la manopola verso il basso per avviare o mettere in pausa il funzionamento.
-
Seite 101: Messa In Funzione
MESSA IN FUNZIONE Disimballare il dispositivo e rimuovere tutto il materiale della confezione. Fissare il divisorio sul retro dell'unità. Posizionare il dispositivo su una superfi cie stabile e piana. Assicurarsi che ci sia una distanza minima di 20 cm dal retro del dispositivo e di 10 cm da entrambi i lati (vedi illustrazione). Non posizionare l'apparecchio nelle immediate vicinanze di tende, arazzi o altri materiali infi ammabili. - Seite 102 Rimuovere il serbatoio dell'acqua. Svuotare la vaschetta di sgocciolamento e il serbatoio dell'acqua. Riempire il serbatoio d'acqua. Fissare il coperchio del serbatoio dell'acqua e assicurarsi che sia posizionato correttamente. Poi inserire il serbatoio dell'acqua nella macchina (vedi illustrazione). Nota • Metodi di preparazione diversi richiedono accessori diversi.
-
Seite 103: Utilizzo
UTILIZZO Accensione Quando il dispositivo viene acceso, emette un segnale acustico. Lo schermo digitale e tutte le spie lampeggiano e poi si spengono. Solo l'indicatore di funzionamento del tasto ON/OFF lampeggia lentamente. Questo indica che l'unità è in modalità standby. Premendo il tasto ON/OFF, tutte le spie sul pannello di controllo si accendono. - Seite 104 desiderato per la sterilizzazione. Premere poi la manopola di controllo per mettere in funzione il dispositivo. La temperatura impostata e il tempo rimanente vengono visualizzati sullo schermo. Livello dell'acqua nel serbatoio basso Se nel serbatoio non c'è sufficiente acqua, il simbolo lampeggia.
- Seite 105 Nota: Dopo la decalcificazione, è necessario scollegare la spina di alimentazione. È possibile utilizzare nuovamente il dispositivo solo quando si è raffreddato; il tempo di decalcificazione è di 50 minuti. Cambiare modalità Tenere premuto la manopola di controllo (3 secondi) per annullare l'operazione, poi girare la manopola per cambiare la modalità.
-
Seite 106: Configurazione Predefinita E Impostazioni
CONFIGURAZIONE PREDEFINITA E IMPOSTAZIONI Menu Simbolo Moda- Temp. Intervallo Tempo Intervallo lità di di tempe- di tempo prepa- ratura razione Cottura al vapore Frittura Modalità sottomenu Cottura a vapo- re & frittura Sterilizzare 110 °C Non rego- 0:30 min 10 min - 2 h labile Decalcificazione Non rego-... - Seite 107 Sottomenu Modalità di solo vapore Codice Menu Tempo Temp. Intervallo Intervallo HH:MM (°C) tempo temp. (°C) menu (min) Crespella fritta 00:15 1-20 90-110 Castagne arrostite 00:15 1-20 90-110 Torta marmorizzata 00:15 1-20 110-120 Bagel 00:18 1-25 90-110 Macaron 00:20 1-30 110-130 Patatine fritte 00:28...
- Seite 108 Torta marmorizzata 15-25 100-140 0:20 + 0:10 + 160 + 7-13 + 140-180 Bagel 00:20 1-30 180-220 Macaron 00:15 1-30 140-190 Patatine fritte 00:18 1-30 180-220 Toast croccante 00:10 1-20 180-220 Panini croccanti al 00:07 1-20 170-200 forno FAI DA TE 01:00 1-60 35-230...
-
Seite 109: Pulizia E Manutenzione
PULIZIA E MANUTENZIONE • Non usare detergenti aggressivi, benzina, polvere abrasiva o una spazzola metallica per la pulizia. • Dopo aver usato l'unità per un lungo periodo di tempo, l'interno dell'unità potrebbe avere un odore indesiderato. In tal caso, procedere come segue: disporre 5 - 6 fette di limone all'interno del dispositivo e impostare la funzione "Cottura a vapore a bassa temperatura". -
Seite 110: Ricerca E Correzione Degli Errori
RICERCA E CORREZIONE DEGLI ERRORI Problema Possibile causa Soluzione Il dispositivo non funzio- Uso non corretto. Leggere attentamente tutto il manuale na, ma emette un segna- d'uso. le acustico all'accensione Componenti danneggiati In tal caso, contattare il servizio clienti. e lo schermo si attiva al momento dell'inseri- mento della spina. - Seite 111 Messaggio di errore Codice di Possibile causa Soluzione errore Surriscaldamento o corto Contattare il servizio di circuito NTC assistenza clienti. Circuito NTC aperto Contattare il servizio di assistenza clienti. Surriscaldamento o corto Contattare il servizio di circuito dell'evaporatore assistenza clienti. 1 NTC.
-
Seite 112: Schema Elettrico
SCHEMA ELETTRICO... -
Seite 113: Avviso Di Smaltimento
AVVISO DI SMALTIMENTO Se nel proprio paese si applicano le regolamentazioni inerenti lo smaltimento di dispositivi elettrici ed elettronici, questo simbolo sul prodotto o sulla confezione segnala che questi prodotti non possono essere smaltiti con i rifiuti normali e devono essere portati a un punto di raccolta di dispositivi elettrici ed elettronici.