LaserLiner MultiFinder Pro Bedienungsanleitung
Ortungsgerät
Vorschau ausblenden
Andere Handbücher für MultiFinder Pro:
- Bedienungsanleitung (68 Seiten) ,
- Bedienungsanleitung (60 Seiten) ,
- Bedienungsanleitung (3 Seiten)
Quicklinks
MultiFinder Pro
MULTIFINDER PRO
Mehrere integrierte Sensoren machen den MultiFinder Pro von
Laserliner zu einem leistungsfähigen Ortungsgerät. Der MultiFinder
ist mit einem LC-Display mit Bedienerführung ausgestattet. Damit
können Sie das Gerät einfach und sicher bedienen. Akustische und
optische Signale zum Finden von Gegenständen erleichtern die
Bedienung zusätzlich. Eine hohe Funktionssicherheit wird durch spe-
zielle Warnhinweise gewährleistet.
1
2
3
4
5
6
BEDIENUNGSANLEITUNG
1.
Einsetzen der Batterie: Öffnen Sie das Batteriefach
auf der Gehäuserückseite und setzen Sie eine 9V-
Batterie (E-Block/PP3/6LR61) ein.
2.
Gerät einschalten (Taste 8).
3.
Wählen Sie: STUD-SCAN, METAL-SCAN oder
AC-SCAN (4, 5, 6):
A. STUD-SCAN: Elektronisches Erkennen von Wand-
und Querbalken im Trockenbau (Gipsfaserplatten, Holzpaneele
oder andere nicht metallische Verschalungen). Mit der SET-Taste
(3) können Sie die Messtiefe einstellen.
B. METAL-SCAN: Auffinden von Metall in Stein- und
Betonwänden. Das Gerät erkennt verdeckt liegendes Metall in
allen nicht metallischen Materialien wie z. B. Stein, Beton,
Estrich, Holz, Gipsfaserplatten, Gasbeton, keramischen und
mineralischen Baustoffen. Mit der SET-Taste (3) können Sie die
Messtiefe einstellen.
C. AC-SCAN: Lokalisieren von spannungsführenden Leitungen
direkt unter Putz bzw. Holzpaneelen und anderen nicht metalli-
schen Verschalungen. Spannungsführende Leitungen werden in
Trockenbauwänden mit Metallständerwerk nicht erkannt.
4.
STUD-SCAN Messung
D
Bedienungsanleitung
•
Wählen Sie STUD-SCAN (Taste 4). (Standardeinstellung
"Normal". Diese Einstellung ist optimal für einfach verlegte
Gipsfaserplatten (max. 1 cm).
Operating instructions
GB
•
Wählen Sie "Deep" (SET-Taste) für zweifach verlegte
Gipsfaserplatten (max. 2 cm).
NL
Gebruiksaanwijzing
•
Wählen Sie "S-Deep" (SET-Taste für dicke Holzpanele und Fuß-
bodenkonstruktionen (Parkett etc.), maximale Messtiefe 3 cm.
Betjeningsvejledning
DK
Folgen Sie nun den Hinweisen auf dem LC-Display.
•
ON WALL: Gerät auf die Wand setzen.
Mode d´emploi
F
•
PRESS CAL: Kalibrierungstaste (7) drücken und warten bis die
Kalibrierung abgeschlossen ist: CAL OK
•
MOVE: Bewegen Sie das Gerät langsam über die Oberfläche.
WICHTIG: Gerät und Wand müssen während der gesamten
Messungen in Kontakt bleiben.
Gerät bewegen
Schieben Sie das Gerät seitlich über die
Wand. Wenn die Maximalanzeige
erscheint, haben Sie die Kante des
Balkens erreicht.
Tip 1: Zwischen beiden Markierungen ist die Balkenmitte.
Tip 2: Achten Sie auf die Ausgangsposition: Setzen Sie das Gerät an
eine Stelle auf, hinter der sich kein Balken befindet.
Andernfalls wird ein Fehler angezeigt (ERROR).
Fehlerbehebung: Das Gerät ein paar Zentimeter von der aktu-
ellen Stelle weg bewegen und die Messung erneut beginnen.
Tip 3: Die Maximalanzeige leuchtet nicht auf, obwohl das LC-Display
reagiert. Sobald die stärkste Anzeige erfolgt, befindet sich das
Gerät über der Balkenkante. Bringen Sie an dieser Stelle eine
Markierung an. Alternativ die Messtiefe erhöhen (SET-Taste).
Tip 4: Halten Sie zur Vermeidung von Störungen während des
Abtastvorgangs Ihre freie Hand oder sonstige Objekte minde-
stens 15 cm vom MultiFinder entfernt.
Tip 5: Der MultiFinder findet nur die äußere Kante von Doppel-
balken, die evtl. um Türen, Fenster und Ecken angebracht
sind.
Tip 6: Stellen Sie sicher, dass Sie tatsächlich auf einen Balken gesto-
ßen sind. Überprüfen Sie dazu, ob andere Balken auf beiden
Seiten in gleichmäßigen Abständen vorhanden sind, in der
Regel 30, 40 oder 60 cm. Überprüfen Sie zusätzlich an mehre-
ren Stellen direkt über und unter der ersten gefundenen
Stelle, ob es sich um einen Balken handelt.
Tip 7: Texturierte Decken: Die Decke muss mit einem Schutzkarton
abgedeckt werden. Hier die DeepScan-Funktion verwenden.
VORSICHT: Falls sich elektrische Leitungen, Metall- oder
Kunststoffrohre in der Nähe einer Gipsfaserplatte befinden oder
diese berühren, werden diese vom MultiFinder unter Umständen als
Balken erkannt. Schalten Sie immer die Stromversorgung aus, wenn
Sie in der Nähe von elektrischen Leitungen arbeiten.
BESONDERHEITEN BEI VERSCHIEDENEN MATERIALIEN
Es können durch folgende Materialien evtl. keine Holzbalken und
entdeckt werden:
•
Bodenfliesen aus Keramik
•
Teppichböden mit gepolsterter Rückseite
•
Tapeten mit Metallfasern oder Metallfolie
•
Frisch gestrichene, feuchte Wände. Diese müssen mindestens
eine Woche lang trocknen.
•
Verwenden Sie in Problemfällen METAL-SCAN, um Nägel oder
Schrauben in Trockenmauern zu lokalisieren, die bei einem
Balken in senkrechter Reihe angeordnet sind.
D
D
5.
METAL-SCAN-Messung (Eisen, Kupferrohre und -leitungen)
•
Wählen Sie METAL-SCAN (Taste 5). Standardeinstellung
"Normal". Die Einstellung ist für Eisen- und Stahlbewehrungen
geeignet, die nahe der Oberfläche vermutet werden.
•
Wählen Sie "Deep" oder "S-Deep" für tiefer gelegene Objekte
bis max. 10 cm (SET-Taste).
•
Wählen Sie "S-Deep" für Kupferohre oder elektrische Leitungen
Benennung
aus Kupfer, die nahe an der Oberfläche vermutet werden –
1 Maximalanzeige
Kupferrohre bis max. 5 cm, elektr. Leitungen bis max. 3 cm.
Des Weiteren können flexible Boden- und Wandheizungsrohre,
9
2 LC-Display
die eine Metallfolie enthalten und sich nahe der Oberfläche
3 Umschaltung Messtiefe
befinden, unter Umständen erkannt werden. Testen Sie diese
8
Normal / Deep / S-Deep
Funktion an Stellen, wo Sie den Verlauf eines Rohres kennen.
Folgen Sie nun den Hinweisen auf dem LC-Display.
4 STUD-SCAN
(max. Messtiefe 3 cm)
•
PRESS CAL: Kalibrierungstaste (7) drücken und warten, bis die
7
Kalibrierung abgeschlossen ist: CAL OK (Auf der Oberfläche
5 METAL-SCAN
kalibrieren.)
(max. Messtiefe 10 cm)
•
MOVE: Bewegen Sie das Gerät langsam über die Oberfläche.
6 AC-SCAN
WICHTIG: Gerät und Wand müssen während der gesamten
(max. Messtiefe 4 cm)
Messungen in Kontakt bleiben.
7 Kalibrierung
8 EIN / AUS
9 Spannungswarnung
Gerät bewegen
Schieben Sie das Gerät seitlich über die
Wand. Wenn die Maximalanzeige
erscheint, markieren Sie.
Tip 1: Zwischen beiden Markierungen ist die Mitte des Metall-
objektes. Durch die hohe Mess-Empfindlichkeit erscheinen
dicke Metallobjekte breiter als in Wirklichkeit. Durch erneute
Kalibrierung (PRESS CAL) können Sie die Empfindlichkeit redu-
zieren und mit der Messung näher am Metallobjekt erneut
beginnen. Wiederholen Sie den Vorgang bei Bedarf. Alternativ
verringern Sie die Messtiefe (SET-Taste).
Tip 2: Wichtig ist die Ausgangsposition: Setzen Sie das Gerät an
einer Stelle auf, hinter der sich kein Metall befindet.
Andernfalls wird ein Fehler angezeigt (ERROR).
Fehlerbehebung: Das Gerät ein paar Zentimeter von der aktu-
ellen Stelle weg bewegen und die Messung erneut beginnen.
Tip 3: Die Maximalanzeige leuchtet nicht auf, obwohl das LC-Display
reagiert. Sobald die stärkste Anzeige erfolgt, befindet sich das
Gerät in der Nähe von Metall. Bringen Sie an dieser Stelle eine
Markierung an. Alternativ die Messtiefe erhöhen (SET-Taste).
Tip 4: Bei anspruchsvollen Anwendungen, z. B. bei Rippenstahl,
tasten Sie die Fläche sowohl horizontal als auch vertikal ab.
6.
AC-SCAN
Der MultiFinder entdeckt elektrische Felder von spannungsführenden
Leitungen.
•
Wählen Sie AC-SCAN (Taste 6).
•
PRESS CAL: Halten Sie das Gerät in die Luft, so dass es von evtl.
vorhandenen spannungsführenden Leitungen weg zeigt.
Drücken Sie auf die Kalibrierungstaste (7). Platzieren Sie das
Gerät auf der Wand.
•
MOVE: Bewegen Sie das Gerät langsam über die Oberfläche.
Gerät bewegen
Anschließend die
andere Kante des
Schieben Sie das Gerät seitlich über die
Balkens suchen.
Wand. Wenn die Maximalanzeige
erscheint, markieren Sie.
VORSICHT: Leitungen, die tiefer als 40 mm verlegt sind, werden
unter Umständen nicht entdeckt. Schalten Sie immer die
Stromversorgung aus, wenn Sie in der Nähe von elektrischen
Leitungen arbeiten.
Tip 1: Aufgrund von statischer Ladung können unter Umständen
seitlich von der tatsächlichen Leitungsposition elektrische
Felder entdeckt werden. Leiten Sie diese Ladung ab, in dem
Sie Ihre freie Hand auf die Wand legen.
Tip 2: Langsam arbeiten, da Reibung störende Ladung erzeugen
kann.
Tip 3: Wenn Sie vermuten, dass Leitungen vorhanden sind, jedoch
keine gefunden werden, sind diese möglicherweise in
Kabelkanälen abgeschirmt. Verwenden Sie METAL-SCAN, um
Kabelkanäle aus Metall zu lokalisieren.
Tip 4: Metall in Wänden (z.B. Metallständerwerk) übertragen
elektrische Felder und erzeugen somit Störeinflüsse. In diesem
Fall wechseln Sie zu METAL-SCAN, um die Leitung zu finden.
Tip 5: Wichtig ist die Ausgangsposition: Damit die maximale
Empfindlichkeit erzielt werden kann, beginnen Sie den
Vorgang, indem Sie das Gerät nicht in der Nähe von strom-
führenden Leitungen positionieren.
Technische Änderungen vorbehalten.
Garantieerklärung
Die Garantiezeit beträgt 2 Jahre ab Kaufdatum. Von der Garantie
sind ausgenommen: Schäden, die auf unsachgemäßen Gebrauch
oder falscher Lagerung, zurück- zuführen sind, normaler Verschleiß
und Mängel, die den Wert oder die Gebrauchstauglichkeit nur
unerheblich beeinflussen. Bei Eingriffen nicht von uns autorisierter
Stellen erlischt die Garantie. Im Garantiefall geben Sie bitte das
vollständige Gerät mit allen Informationen, sowie Rechnung einem
unserer Händler oder senden Sie es an Umarex-Laserliner.
D
D
GB
MULTIFINDER PRO
Several integrated sensors make the MultiFinder Pro from Laserliner
to a highly effective detection tool. The MultiFinder is equipped with
an LC display with user guide, ensuring easy and reliable operation.
Acoustic and visual signals for finding objects provide additional
assistance. High functioning safety is ensured by special warning
signals.
1
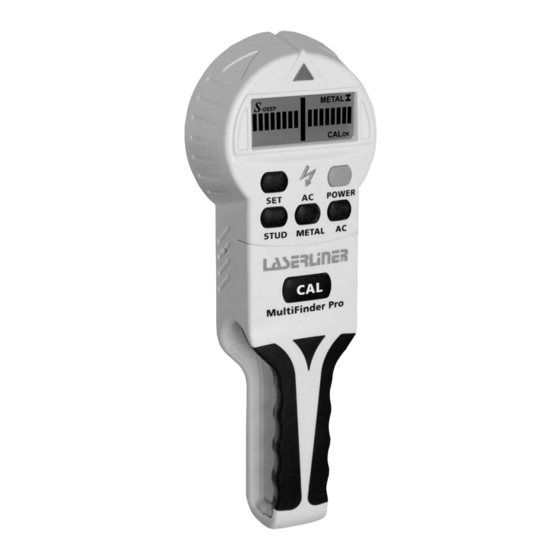
Key
1 Maximum display
2
9
2 LC display
3 Measuring depth switch:
8
3
Normal / Deep /S-Deep
4 STUD-SCAN (max.
4
7
measuring depth: 3 cm)
5 METAL SCA (max.
5
measuring depth: 10 cm)
6 AC-SCAN (max.
6
measuring depth: 4 cm)
7 Calibration
8 ON / OFF
9 Live wire warning
OPERATING INSTRUCTIONS
1.
Insert battery: To do so, open the battery
compartment in the back of the housing and insert
a 9V battery (E-Block/PP3/&LR61).
2.
Switch on the MultiFinder (button 8)
3.
Select STUD-SCAN, METAL-SCAN or AC-SCAN (4,
Anschließend von der
5, 6)
andere Seite suchen.
A. STUD-SCAN: For electronically detecting studs and joists in dry
walls (plaster fibreboard, wooden panels and other non-metallic
panelling). Use the SET button (3) to adjust the measuring
depth.
B. METAL-SCAN: For detecting metal in masonry and concrete
walls. The tool is able to detect hidden metal in all non-metallic
materials, e.g. brick, concrete, screed, wood, plaster fibreboard,
gas concrete, ceramic and mineral building materials. Use the
SET button (3) to adjust the measuring depth.
C. AC-SCAN: For localising live wires directly beneath the plaster or
behind wooden panels and other non-metallic panelling. It is not
possible to detect live wires in dry walls with metal studs.
4.
Measuring in STUD-SCAN mode
•
Select STUD-SCAN (button 4) (Standard setting: "Normal". This
setting is ideal for plaster fibreboard panels installed in one
thickness (max. 1 cm).
•
Select "Deep" (SET button) for two plaster fibreboard panels
installed on top of each other (max. 2 cm).
•
Select "S-Deep" (SET button) for thick wooden panels and floor
constructions (parquet etc.), max. measuring depth 3 cm.
Now follow the instructions on the LC display.
•
ON WALL: Place the tool against the wall.
•
PRESS CAL: Press the calibration button (7) and wait until
calibration is completed: CAL OK.
•
MOVE: Move the tool slowly across the surface.
IMPORTANT: The device must be in contact with the wall all the
time while scanning.
Move the tool
Slide the tool sideways across the wall.
Then scan for the other
When the maximum display appears,
edge of the stud.
Anschließend von der
you have reached the edge of the
andere Seite suchen.
stud.
Tip 1: The position between the two markings is the mid-point of
the stud.
Tip 2: The position where you start is important: First place the tool
in a position where you know there is no stud. Otherwise, the
message "ERROR" will appear in the display. To remedy: Move
the tool to another position a few centimetres away and start
measuring again.
Tip 3: The maximum display does not light up, even though the LC
display shows a reading. As soon as the most intense display
appears, the tool is over the edge of the stud. Mark this point.
Alternatively, increase the measuring depth (SET button).
Tip 4: To avoid interference while scanning, keep your free hand and
other objects at least 15 cm away from the MultiFinder.
Tip 5: The MultiFinder will only find the outside edge of double
studs and headers which may be fitted around doors,
windows and corners.
Tip 6: Ensure that you have really detected a stud. To do so, check
on both sides whether other studs are present at equal
distances, usually at 30, 40 or 60 cm. Also check that it is a
stud by scanning at several places directly above and below
the position of the first find.
Tip 7: Textured ceilings: The ceiling must be covered with cardboard
to protect it. In this case, use the DeepScan function.
STUD-SCAN /
CAUTION: If electric wires or metal or plastic pipes are located near
METALSCAN:
or in contact with a plaster fibreboard panel, they may be identified
Permanente
by the MultiFinder as studs. Always switch off the power supply
Spannungswarnung in
when working near electric wires.
nicht abgeschirmten
SPECIAL THINGS TO NOTE WITH VARIOUS MATERIALS
Leitungen sobald ein
elektrisches Feld
It may not be possible to detect wooden studs or joists through the
erkannt wird.
following materials:
•
Ceramic floor tiles
•
Fitted carpeting with padded backing
•
Wallpaper with metal fibres or metal foil
•
Freshly painted, damp walls. These must have dried for at least
one week.
•
In problem cases, use METAL-SCAN to localise nails or screws in
dry walls that line up vertically where a stud is located.
GB
GB
Laserliner – Innovation in Tools
5.
Measuring in METAL-SCAN mode (iron, copper pipes and wires)
•
Select METAL-SCAN (button 5). Standard setting "Normal".
This setting is suitable for iron and steel reinforcement elements
that are suspected near the surface.
•
Select "Deep" or "S-Deep" for deeper objects to a depth of
max. 10 cm (SET button).
•
Select "S-Deep" for copper pipes or copper electric wires which
are suspected to be near the surface – copper pipes to a depth
of max. 5 cm, electric wires to a depth of max. 3 cm. Flexible
floor and wall heating pipes which contain a metal foil and are
located near the surface may also be detected. Test for this
function in places where you know the position of such pipes.
Now follow the instructions on the LC display.
•
PRESS CAL: Press the calibration button (7) and wait until
calibration is completed: CAL OK. (Calibrate on the surface.)
•
MOVE: Move the device slowly across the surface.
IMPORTANT: The device must be in contact with the wall all the
time while scanning.
MeterMaster Pro Laser
Art-Nr: 080.930A
Move the tool
Slide the tool sideways across the wall.
Then scan from the
When the maximum display appears,
other side.
mark the position.
Tip 1: The position between the two markings is the mid-point of
the metal object. Through the high measuring sensitivity, thick
metal objects appear broader than they are in real life. By
calibrating once more (PRESS CAL), the sensitivity can be
reduced, and you can then begin measuring again nearer the
HandyLaser Compact
metal object. If need be, repeat the process. Alternatively,
Art-Nr: 025.03.00A
reduce the measuring depth (SET button).
Tip 2: The position where you start is important: First place the
device in a position where you know there is no metal.
MultiBeam-Laser 3
Otherwise, the message "ERROR" will appear in the display.
Art-Nr: 060.010A
To remedy: Move the device to another position a few
centimetres away and start measuring again.
Tip 3: The maximum display does not light up, even though the LC
display shows a reading. As soon as the most intense display
appears, the tool is near to metal. Mark this point.
Alternatively, increase the measuring depth (SET button).
Tip 4: In the case of complicated applications, e.g. ribbed steel, scan
the surface both horizontally and vertically.
6.
AC-SCAN
The MultiFinder is able to detect the electrical fields of live wires.
•
Select AC-SCAN (button 6).
•
PRESS CAL: Hold the tool in the air so that it is pointing away
from any live wires. Press the calibration button (7). Place the
tool against the wall.
•
MOVE: Move the device slowly across the surface.
Move the tool
Slide the tool sideways across the wall.
Then scan from the
When the maximum display appears,
other side.
mark the position.
CAUTION: Wires which are at a depth of more than 4 cm may not
be detected. Always switch off the power supply when working near
electric wires.
Tip 1: Because of static charges, electric fields may be detected at
the side of the actual position of the wire. To carry away these
charges, lay your free hand on the wall.
Tip 2: Move the tool slowly as friction can generate interfering
electric charges.
Tip 3: If you suspect that wires must be present but cannot find any,
this may be because they are shielded in conduits. Use
METAL-SCAN in order to localise conduits.
Tip 4: Metal in walls (e.g. metal studs) transmit electrical fields and
may therefore cause interference. In this case, switch to
METAL-SCAN in order to find the wire.
Tip 5: The position where you start is important: To achieve
maximum sensitivity, start by placing the device in a position
which is known not to be near live wires.
STUD-SCAN /
METALSCAN:
Continuous current
monitoring in
unshielded wires as
D
Service- und Versand-Anschrift:
soon as an electrical
field is detected.
GB
Service- and Shipping Address:
NL
Service- en verzendadres:
DK
Service- og Postadresse:
Subject to technical alterations.
Warranty
F
Livraison et expédition:
The warranty is valid for 2 years from the date of purchase. The
Umarex GmbH & Co KG
warranty does not cover damage caused by improper use or storage,
normal wear and tear, or defects which only insignificantly impair
– Laserliner –
the value of the product or its functioning. Any tampering by
Möhnestraße 149, 59755 Arnsberg, Germany
unauthorised persons will render this warranty void. In the event
Tel.: +49 2932 638-486, Fax: +49 2932 638-489
that you need to claim warranty, please take the complete device
together with all information and the invoice to one of our dealers
laserliner@umarex.com
or send it in to UMAREX-Laserliner.
Donnerfeld 2
59757 Arnsberg, Germany
Tel.: +49 2932 638-300
Fax: +49 2932 638-333
www.laserliner.com
GB
AutoCross-Laser 2
Art-Nr: 031.00.01A
BeamControl-Master
Basic-Plus 120
Art-Nr: 026.03.00A
GmbH & Co KG

Verwandte Anleitungen für LaserLiner MultiFinder Pro


Inhaltszusammenfassung für LaserLiner MultiFinder Pro
- Seite 1 Measuring in METAL-SCAN mode (iron, copper pipes and wires) Mehrere integrierte Sensoren machen den MultiFinder Pro von Several integrated sensors make the MultiFinder Pro from Laserliner to a highly effective detection tool. The MultiFinder is equipped with Laserliner zu einem leistungsfähigen Ortungsgerät. Der MultiFinder •...
- Seite 2 Meerdere geïntegreerde sensoren maken de MultiFinder Pro van Flere integrerede sensorer gør MultiFinder Pro fra Laserliner til et MultiFinder Pro de Laserliner, doté de plusieurs capteurs intégrés, est un murs à pose à sec les clous ou les vis alignés à la verticale à...
- Seite 3 Medición METAL-SCAN (hierros, tubos y líneas de cobre) Misura METAL-SCAN (ferro, tubi e cavi elettrici di rame) Varios sensores integrados convierten al MultiFinder Pro de Laserliner Diversi sensori incorporati rendono il MultiFinder Pro della Laserliner un efficiente apparecchio di localizzazione. Il MultiFinder possiede un en un potente aparato localizador.
- Seite 4 METAL-SCAN-mittaus (raudan, kupariputkien ja -johtojen • Em casos problemáticos, use METAL-SCAN para localizar pregos Kilka zintegrowanych czujników sprawia, że MultiFinder Pro firmy Laserlinerin MultiFinder Pro on useita tunnistimia sisältävä Vários sensores integrados transformam o MultiFinder Pro da metallinilmaisu) ou parafusos em paredes secas que estejam alinhadas Laserliner jest bardzo wydajnym przyrządem do lokalizacji.