
Verwandte Anleitungen für urmet domus 1716/2


Inhaltszusammenfassung für urmet domus 1716/2
- Seite 1 Mod. 1716 DS 1716-001B LBT 8484 AIKO AIKO MONITOR MONITEUR AIKO MONITOR AIKO MONITOR AIKO Sch./Ref. 1716/1 -/2...
- Seite 2 Aiko . 1716/1 . 1716/2 2Voice. « » ( LINE IN LINE OUT 10 - (MUTE) 11 - 12 - 13 - 14 - 15 - 16 - 17 - (Line Termination) 18 - CODE § Aiko = 127 DS1716-001B...
- Seite 3 § Terminazione Terminazione Ref. 1083/20.. Terminazione CODE: LINE OUT • Terminazione • LINE OUT LINE OUT • LINE IN LINE 3 LINE 1 LINE 3 LINE 1 1083/55 1083/55 § dip- 8 (2 = LINE 4 LINE 2 ); Dip- OFF.
- Seite 4 MUTE § (S +, S-) MENU • MENU • • • § • • • (OK) MENU, (CP) push-to-talk push-to-talk, § DS1716-001B DS1716-001B...
- Seite 5 « » max 20cm • MENU • INT = 0: • MENU • MENU. • MENU • § MENU § • MENU • § • • MARIO ROSSI PAOLO BIANCHI • MENU < > • OK.. • • • DS1716-001B DS1716-001B...
- Seite 6 – • MENU – • OK.. • – • • • • – – – • MENU • • RESET • • MENU § • • • OK.. • : ........................36 ÷ 48Vdc : ..................3mA max : .
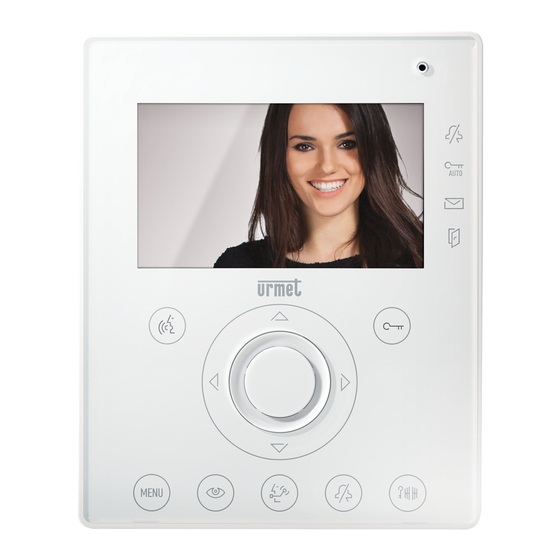
- Seite 7 Fix the fl ush mounting box at the height shown in the following fi gure. Fasten the bracket to the embedding box. Aiko video door phones Ref. 1716/1 and Ref. 1716/2 are designed to be used in 2Voice systems. COMPONENTS DESCRIPTION AND CHARACTERISTICS Perform connections and dip-switch settings.
- Seite 8 CODE: user code. CLEANING Set a number from 0 to 127, according to the following rules: Clean the video door phone with a damp cloth, wiping gently the screen. • In the column there must not be any apartments with the same user code. •...
- Seite 9 AUDIO / VIDEO SETTINGS DURING CALL apartment (the called device must be in the same column). To perform a call from the directory: • Press the button MENU to access the menu. When a call is received or during communication, some audio/video adjustments can be performed: by •...
-
Seite 10: Automatic Door Lock Release
MENU VIDEO DOOR PHONE ANSWERING MACHINE To access the video door phone main menu, press the button MENU. The display shows: If there are recorded video messages, the led blinks slowly. To receive messages: • Press the button MENU to access the menu. •... -
Seite 11: Audio Adjustments
To delete a record in the directory: • Press the button MENU to access the menu. Les vidéophones Aiko Réf. 1716/1 et Réf. 1716/2 ont été projetés pour être utilisés dans les systèmes • Select the icon and press OK. -
Seite 12: Description Des Bornes
§ INSTALLATION Pour les confi gurations des dip switch, consulter le livret de système livré avec l’alimentation Réf. 1083/20. Fixer le boîtier en encastrement à la hauteur montrée dans le dessin suivant. Fixer la bride sur le boîtier à encastrer. CODE: code utilisateur. - Seite 13 Si les modules d’appel sont équipés d’un senseur de porte ouverte (et le service d’absence n’est pas actif), Terminaison Terminaison Terminaison la led permet de contrôler si la porte est effectivement ouverte: la led est allumée fi xe si la porte ouverte est celle de la porte principale;...
- Seite 14 avec le poste d’appel sélectionné; en appuyant une deuxième fois sur la touche , l’auto-insertion est terminée. L’auto-insertion ne peut pas être activée si la colonne est déjà en conversation. Si la colonne est max 20cm déjà occupée avec une autre conversation quand la demande d’auto-insertion est envoyée, le vidéophone émettra une tonalité...
-
Seite 15: Ouvre-Porte Automatique
OUVRE-PORTE AUTOMATIQUE Demande spéciale : Demande à décodage spécial – Le service d’ouvre-porte automatique permet d’ouvrir directement la porte à la suite de la réception d’un • Entrer le nom qu’on veut attribuer à l’appel en utilisant les touches directionnelles (Haut et Bas pour appel;... -
Seite 16: Caractéristiques Techniques
• Après avoir effectué les réglages, appuyer sur OK pour confi rmer. Los vidéointerfonos Aiko Sch. 1716/1 y Sch. 1716/2 son dedicados para el uso en los sistemas 2Voice. RESTAURATION DESCRIPCIÓN DE LOS COMPONENTES Y CARACTERÍSTICAS Dans ce menu il est possible de réinitialiser le dispositif et de remettre toutes les confi... -
Seite 17: Descripción De Los Bornes
§ INSTALLATION Para las impostaciones de los interruptores dip consultar el manual del sistema anexo con el alimentador Sch. 1083/20. Tapiar la caja de encaje en la altura indicada en el diseño siguiente. CODE: código usuario. Fijar el soporte a la caja de empotrar. Programar un número desde 0 hasta 127 según las siguientes reglas: •... - Seite 18 Terminación Terminación ausencia), por el led es posible controlar el estado de la puerta: el led está encendido si la puerta principal está abierta y relampaguea si la puerta secundaria está abierta. Terminación DESACTIVACIÓN SONERÍA ALTAVOZ LINE OUT Esta función permite de excluir la sonería de llamada. Para activar esta función presionar la tecla Terminación Cuando la función es activa el led MUTE se enciende y con la recepción de una llamada el dispositivo...
- Seite 19 con función “T” ubicados a una distancia de 20 cm. aprox. No es posible efectuar la autoactivación si la columna está ya ocupada en una conversación. Si cuando es mandada la pedida de autoactivación la columna está ya ocupada en otra conversación, el dispositivo emitirá...
- Seite 20 APERTURA DE LA PUERTA AUTOMATICA Llamada interior Llamada hacia el dispositivo de la misma habitación – Llamada exterior Llamada hacia el externo de la habitación pero hacia dispositivos de El servicio de apertura de la puerta automática permite de abrir directamente la puerta en seguida de la –...
-
Seite 21: Beschreibung Der Bestandteile Und Merkmale
• Seleccionar el icono para regular la luminosidad usando las teclas direccionales Derecha/Izquierda, Die Videosprechanlagen Aiko Sch. 1716/1 und Sch. 1716/2 sind speziell für den Gebrauch der 2 Voice seleccionar para regular el contraste, seleccionar para regular el color y seleccionar para Systeme entworfen. -
Seite 22: Klemmenbeschreibung
§ INSTALLATION Für die Einstellungen des Dip-Switch sollte man sich an das mitgelieferte Systemhandbuch des Netzgerätes Sch.1083/20 halten. Die Unterputzdose in der angegebenen Höhe, (siehe nachfolgende Zeichnung), einbauen. CODE: Teilnehmercode. Befestigen Sie den Bügel am Einbaukasten. Eine Nummer von 0-127 sollte man nach folgenden Richtlinien einstellen: •... -
Seite 23: Reinigung
Sollten die Rufmodule mit einem Sensor „offene Tür“ ausgestattet sein (und der Abwesenheitsmodus nicht Abschluss Abschluss Abschluss aktiviert sein), ist es möglich auf dem Led die „effektive“ Öffnung der Tür zu beobachten: falls das Haupttor geöffnet ist, leuchtet das Led ununterbrochen auf, sollte die Nebentür geöffnet sein, blinkt das Led. -
Seite 24: Anruf An Die Zentrale
HÖRGERÄTBETRIEB des Bildes ab (das erste Bild, das man sieht, wird das des Hauptanrufmoduls n°0 sein); die Taste noch einmal drücken, um zu den folgenden Rufmodulen zu gelangen. Erst werden alle Hauptrufmodule Die Gegensprechanlage ist mit einem Gerät versehen, mit dem Gehörgeschädigte, die über ein angebrachtes angezeigt, dann die Nebenrufmodule der eigenen Steigleitung. -
Seite 25: Automatischer Türöffner
§ Sollte das System belegt sein, ist es nicht möglich, in das Menü zu gelangen. NAMENSVERZEICHNIS DER VIDEOSPRECHANLAGE MARIO ROSSI Ins Namensverzeichnis der Sprechanlage kann man bis zu 32 Anrufe eingeben (Teilnehmeranrufe und Spezialanrufe). PAOLO BIANCHI Dem Namensverzeichnis einen Datensatz beifügen Um einen Namen im Verzeichnis hinzuzufügen: <... -
Seite 26: Audioeinstellungen
AUDIOEINSTELLUNGEN In diesem Menü ist es möglich, die Lautstärke des Klingeltons, die Lautstärke des Sprachsignals und den Tastenbeep einzustellen. Die MENU Taste drücken, um in das Menü zu gelangen. • • Das Symbol wählen und OK drücken. • Das Symbol wählen und OK drücken. - Seite 27 DS 1716-001B LBT 8484 URMET S.p.A. Area tecnica 10154 TORINO (ITALY) servizio clienti +39 011.23.39.810 VIA BOLOGNA 188/C http://www.urmetdomus.com Telef. +39 011.24.00.000 (RIC. AUT.) e-mail: info@urmetdomus.it +39 011.24.00.300 - 323 Fabbricato da Urmet Electronics Limited (azienda del gruppo Urmet) - Made in P.R.C. Manufactured by Urmet Electronics Limited (an Urmet group company) - Made in P.R.C.