RICOO S1611 Montageanleitung
Verfügbare Sprachen
Verfügbare Sprachen
Quicklinks
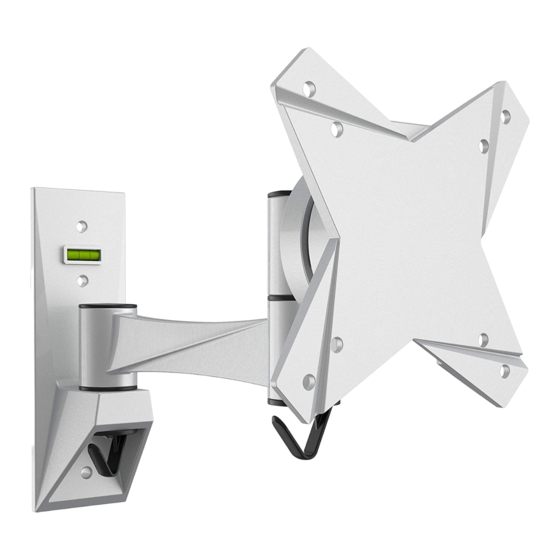
Bitte überprüfen Sie VOR der Montage den Lochabstand zwischen den Befestigungslöchern an Ihrem Bildschirm!
!
Diese Wandhalterung unterstützt folgende Lochabstände:
Horizontal / Waagerecht
Vertikal / Senkrecht
S1611
All manuals and user guides at all-guides.com
Wandhalterung
für TV / Monitore
Horizontal / Waagerecht
75x75
100x100
1
ACHTUNG: NIEMALS DAS MAXIMAL
ZULÄSSIGE BELASTUNGSGEWICHT
ÜBERSCHREITEN. MISSACHTUNG
KANN ZU SACHSCHÄDEN ODER
SCHWEREN VERLETZUNGEN FÜHREN!
VESA-Befestigungslöcher
Vertikal /
Senkrecht
Bildschirm Rückseite
75mm, 100mm
75mm, 100mm
15kg
(33lbs)
MAX
MONTAGEANLEITUNG
v.18.02
Deutsch
English

Verwandte Anleitungen für RICOO S1611


Inhaltszusammenfassung für RICOO S1611
- Seite 1 Bitte überprüfen Sie VOR der Montage den Lochabstand zwischen den Befestigungslöchern an Ihrem Bildschirm! VESA-Befestigungslöcher Vertikal / Senkrecht Horizontal / Waagerecht Bildschirm Rückseite Diese Wandhalterung unterstützt folgende Lochabstände: 75mm, 100mm Horizontal / Waagerecht 75mm, 100mm Vertikal / Senkrecht 15kg S1611 (33lbs) 75x75 100x100 Deutsch English...
-
Seite 2: Kunden-Hotline
Liebe Kundin, lieber Kunde, S1611 wir freuen uns, dass Sie sich für ein Produkt der Marke "RICOO" entschieden haben Manchmal trotz aller Bemühungen unsererseits Ihnen ein qualitativ hochwertiges Produkt zu liefern, kann es vorkommen, dass einmal ein Zubehörteil fehlt oder ein Teil während des Transports beschädigt wird... -
Seite 3: Lieferumfang
All manuals and user guides at all-guides.com Lieferumfang WICHTIG: Stellen Sie vor der Montage sicher, dass alle Teile welche hier aufgeführt sind, bei der Lieferung dabei sind. Sollten Teile fehlen oder defekt sein, kontaktieren Sie Ihren Händler. 3mm Inbusschlüssel (x1) 4mm Inbusschlüssel (x1) Grundgerüst (x1) M4x14 (x2) - Seite 4 All manuals and user guides at all-guides.com Schritt 1 Schritt 2a 50mm 50mm (2") (2") ø 4mm (ø 5/32”) Holzbalken mit Balkenfinder Montagelöcher finden und die Montagelöcher bohren. markieren. √ Wandplatte an die Wand anschrauben. WARNUNG • Stellen Sie sicher, dass die Befestigungsschrauben in der Mitte der Balken verankert sind. Die Verwendung eines Balkenfinders wird dringend empfohlen.
- Seite 5 All manuals and user guides at all-guides.com Schritt 2b 60mm 55mm Achtung: Mitgelieferte Dübel (2.4") (2.2") sind nur für Massivbeton- wände geeignet! ø 8mm (ø 5/16") Montagelöcher markieren. Montagelöcher bohren. √ Wandplatte an die Wand anschrauben. WARNUNG Installateure müssen sicher stellen, dass die Anbaufläche das Gesamtgewicht von diesem Produkt inkl. aller angeschlossener Komponente sicher tragen kann.
- Seite 6 All manuals and user guides at all-guides.com Schritt 3 Schritt 4 oder M-C M-A · Wählen Sie die zu Ihrem TV passenden Schrauben. · Montieren Sie die Frontplatte am Display. · Fixieren Sie die Frontplatte mit Hilfe von den dazugehörigen Schrauben. Ziehen Sie alle Schrauben nach.
- Seite 7 All manuals and user guides at all-guides.com Schritt 5 Heben Sie das Display inkl. montierter Frontplatte an und hängen diese in das Grundgerüst der Halterung ein. Ziehen Sie alle Schrauben (welche im Schritt 1 entfernt wurden) wieder zu. Wand Wand Schritt 6 Wand Schließen Sie die Kabel an Ihrem Fernseher...
- Seite 8 All manuals and user guides at all-guides.com Schritt 7. Fertig! Wand Je nach Gewicht des Displays, kann es notwendig sein, Anpassungen an der Kugelgelenk- Vorrichtung durchzuführen. Die TV-Halterung kann um 180° geschwenkt, um +/-15° geneigt oder um 360° gedreht werden. 180°...