Herunterladen Inhalt Inhalt Diese Seite drucken
Inhaltsverzeichnis

Werbung

Verfügbare Sprachen

Verfügbare Sprachen

BEDIENUNGSANLEITUNG
USER MANUAL
MODE D'EMPLOI
MANUAL DEL USUARIO
LED MAT-64 DMX
©
Für weiteren Gebrauch aufbewahren!
Copyright
Keep this manual for future needs!
Nachdruck verboten!
Gardez ce mode d'emploi pour des
Reproduction prohibited!
utilisations ultérieures!
Réproduction interdit!
Guarde este manual para posteriores usos.
Prohibida toda reproducción.

Werbung

Inhaltsverzeichnis
loading

Inhaltszusammenfassung für EuroLite LED MAT-64 DMX

  • Seite 1 BEDIENUNGSANLEITUNG USER MANUAL MODE D'EMPLOI MANUAL DEL USUARIO LED MAT-64 DMX © Für weiteren Gebrauch aufbewahren! Copyright Keep this manual for future needs! Nachdruck verboten! Gardez ce mode d’emploi pour des Reproduction prohibited! utilisations ultérieures! Réproduction interdit! Guarde este manual para posteriores usos.
  • Seite 2: Inhaltsverzeichnis

    MULTI-LANGUAGE-INSTRUCTIONS Inhaltsverzeichnis / Table of contents Sommaire / Contenido EINFÜHRUNG..............................4 SICHERHEITSHINWEISE..........................4 BESTIMMUNGSGEMÄßE VERWENDUNG..................... 6 INSTALLATION ..............................7 Überkopfmontage............................7 Anschluss an den DMX-512 Controller / Verbindung Gerät – Gerät ............. 8 Master/Slave-Betrieb ............................. 9 Anschluss ans Netz ............................9 BEDIENUNG ..............................
  • Seite 3 You can find the latest update of this user manual in the Internet under: Vous pouvez trouvez la dernière version de ce mode d'emploi dans l'Internet sous: Vd. puede encontrar la versión más reciente de este manual en el Internet bajo: www.eurolite.de 3/44 51918550_V_1_0.DOC...
  • Seite 4: Einführung

    - sich die letzte Version der Anleitung im Internet herunter laden EINFÜHRUNG Wir freuen uns, dass Sie sich für einen EUROLITE LED MAT-64 DMX entschieden haben Wenn Sie nachfolgende Hinweise beachten, sind wir sicher, dass Sie lange Zeit Freude an Ihrem Kauf haben werden.
  • Seite 5 Bitte überprüfen Sie vor der ersten Inbetriebnahme, ob kein offensichtlicher Transportschaden vorliegt. Sollten Sie Schäden an der Netzleitung oder am Gehäuse entdecken, nehmen Sie das Gerät nicht in Betrieb und setzen sich bitte mit Ihrem Fachhändler in Verbindung. Der Aufbau entspricht der Schutzklasse I. Der Netzstecker darf nur an eine Schutzkontakt-Steckdose angeschlossen werden, deren Spannung und Frequenz mit dem Typenschild des Gerätes genau übereinstimmt.
  • Seite 6: Bestimmungsgemäße Verwendung

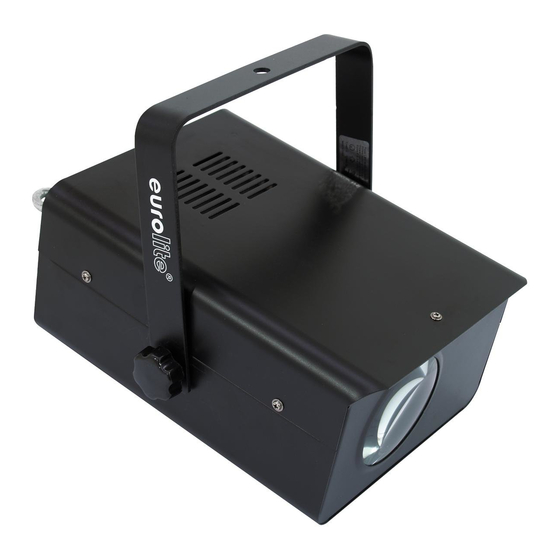
    Kinder und Laien vom Gerät fern halten! Das Gerät darf niemals unbeaufsichtigt betrieben werden! BESTIMMUNGSGEMÄßE VERWENDUNG Bei diesem Gerät handelt es sich um einen Effektstrahler, mit dem sich dekorative Lichteffekte erzeugen lassen. Dieses Produkt ist nur für den Anschluss an 230 V, 50 Hz Wechselspannung zugelassen und wurde ausschließlich zur Verwendung in Innenräumen konzipiert.
  • Seite 7: Installation

    Soll das Gerät transportiert werden, verwenden Sie bitte die Originalverpackung, um Transportschäden zu vermeiden. Achten Sie bitte unbedingt darauf, dass das Gerät im Lieferzustand verpackt wird. Beachten Sie bitte, dass eigenmächtige Veränderungen an dem Gerät aus Sicherheitsgründen verboten sind. Der Serienbarcode darf niemals vom Gerät entfernt werden, da ansonsten der Garantieanspruch erlischt. Wird das Gerät anders verwendet als in dieser Bedienungsanleitung beschrieben, kann dies zu Schäden am Produkt führen und der Garantieanspruch erlischt.
  • Seite 8: Anschluss An Den Dmx-512 Controller / Verbindung Gerät - Gerät

    Achtung: Hängend installierte Geräte können beim Herabstürzen erhebliche Verletzungen verursachen! Wenn Sie Zweifel an der Sicherheit einer möglichen Installationsform haben, installieren Sie das Gerät NICHT! Vergewissern Sie sich vor der Montage, dass die Montagefläche mindestens die 10-fache Punktbelastung des Eigengewichtes des Gerätes aushalten kann. BRANDGEFAHR! Achten Sie bei der Installation des Gerätes bitte darauf, dass sich im Abstand von mind.
  • Seite 9: Master/Slave-Betrieb

    Aufbau einer seriellen DMX-Kette: Schließen Sie den DMX-Ausgang des ersten Gerätes der Kette an den DMX-Eingang des nächsten Gerätes an. Verbinden Sie immer einen Ausgang mit dem Eingang des nächsten Gerätes bis alle Geräte ange- schlossen sind. Achtung: Am letzten Gerät muss die DMX-Leitung durch einen Abschlusswiderstand abgeschlossen Ω...
  • Seite 10: Steuerung Über Dip Schalter

    STEUERUNG ÜBER DIP SCHALTER Automatischer Modus Um den Automatischen Modus einzustellen, stellen Sie DIP-Schalter 9 und 10 auf OFF. Stellen Sie DIP- Schalter 1 bis 5 auch auf OFF. Die Geschwindigkeit kann durch DIP-Schalter 6, 7 und 8 eingestellt werden. Motive Stellen Sie DIP-Schalter 9 und 10 auf OFF.
  • Seite 11: Adressierung Des Geräts

    Gerät Kanäle Gerät Kanäle Gerät Kanäle 10-12 Gerät Kanäle 13-15 Ansteuerung: Nachdem Sie die Startadresse definiert haben, können Sie den LED MAT-64 DMX über Ihren Controller ansteuern. DMX-Protokoll Kanal 1 Programm Leds Aus 1-10 Programm 1 11-20 Programm 2 21-30...
  • Seite 12: Blackout

    191-200 Programm 20 201-210 Programm 21 211-220 Programm 22 221-230 Programm 23 231-240 Programm 24 241-250 Programm 25 251-255 Programm per Zufallsgenerator Kanal 2 Geschwindigkeit Stop 1-249 0-100 % mit zunehmender Geschwindigkeit 250-255 Musikgetaktet Kanal 3 Strobe-Effekt Keine Funktion 1-250 0-100 % mit zunehmender Geschwindigkeit...
  • Seite 13: Sicherungswechsel

    Sicherung: F 0,5 A, 250 V Anzahl der Kanäle: Anzahl der LEDs: Optionales Zubehör: Best.-Nr. EUROLITE TH-90 Theaterhaken für 50mm Rohr 58000720 Sicherheits-Fangseil 40cm x 3mm bis 10kg 58010120 Sicherheits-Fangseil 90cm x 3mm bis 10kg 58010130 Sicherheits-Fangseil 140cm x 3mm bis 10kg 58010135 Bitte beachten Sie: Technische Änderungen ohne vorherige Ankündigung und Irrtum vorbehalten.
  • Seite 14: Introduction

    Thank you for having chosen a EUROLITE LED MAT-64 DMX. If you follow the instructions given in this manual, we are sure that you will enjoy this device for a long period of time. The LED MAT-64 DMX features a built-in microphone.
  • Seite 15: Health Hazard

    Please make sure that there are no obvious transport damages. Should you notice any damages on the A/C connection cable or on the casing, do not take the device into operation and immediately consult your local dealer. This device falls under protection-class I. The power plug must only be plugged into a protection class I outlet.
  • Seite 16 This device is designed for professional use, e.g. on stages, in discotheques, theatres etc. Lighting effects are not designed for permanent operation. Consistent operation breaks will ensure that the device will serve you for a long time without defects. Do not shake the device. Avoid brute force when installing or operating the device. When choosing the installation-spot, please make sure that the device is not exposed to extreme heat, moisture or dust.
  • Seite 17: Installation

    INSTALLATION Overhead rigging The installation of the device has to be built and constructed in a way that it can hold 10 times the weight for 1 hour without any harming deformation. The installation must always be secured with a secondary safety attachment, e.g. an appropriate catch net. This secondary safety attachment must be constructed in a way that no part of the installation can fall down if the main attachment fails.
  • Seite 18: Danger To Life

    The maximum drop distance must never exceed 20 cm. A safety rope which already held the strain of a crash or which is defective must not be used again. Adjust the desired inclination-angle via the mounting-bracket and tighten the fixation screws. DANGER TO LIFE! Before taking into operation for the first time, the installation has to be approved by an expert! Connection with the mains...
  • Seite 19: Master/Slave-Operation

    The master/slave-operation enables that several devices can be synchronized and controlled by one master- device. On the rear panel of the EUROLITE LED MAT-64 DMX you can find an XLR-jack and an XLR-plug, which can be used for connecting several devices.
  • Seite 20: Operation Via Dip Switches

    OPERATION VIA DIP SWITCHES Auto Mode In order to select Auto mode, set DIP switch 9 and 10 to OFF. Set DIP switches 1 – 5 to OFF as well. Speed can be adjusted via DIP switches 6, 7 and 8. Patterns Set DIP switches 9 and to OFF.
  • Seite 21: Addressing The Device

    DMX data link. If two, three or more devices are addressed similarly, they will work similarly. Occupation of the DIP-switches: Controlling: After having addressed all LED MAT-64 DMX, you may now start operating these via your lighting controller. DMX-protocol Channel 1 Program...
  • Seite 22: Blackout

    201-210 Program 21 211-220 Program 22 221-230 Program 23 231-240 Program 24 241-250 Program 25 251-255 Random Program Channel 2 Speed Stop 1-249 0-100 % with increasing speed 250-255 Sound control Channel 3 Strobe No function 1-250 0-100 % with increasing speed Sound control Blackout...
  • Seite 23: Replacing The Fuse

    Fuse: F 0.5 A, 250 V Number of channels: Number of LEDs: Optional accessories: EUROLITE TH-90 theatre-hook for 50mm pipe No. 58000720 Safety-rope 40cm x 3mm up to 10kg No. 58010120 Safety-rope 90cm x 3mm up to 10kg No. 58010130 Safety-rope 140cm x 3mm up to 10kg No.
  • Seite 24: Introduction

    - télécharger la version ultérieure du mode d'emploi d'Internet INTRODUCTION Nous vous remercions d'avoir choisi un EUROLITE LED MAT-64 DMX. Si vous respectez les instructions de service suivantes, vous allez profiter longtemps de votre achat. Le Bande LED MAT-64 DMX dispose d'un microphone integré.
  • Seite 25 Avant tout, assurez-vous que l'appareil n'a pas subi de dommage lors de son transport. Si l'appareil ou le câble d'alimentation est endommagé, ne jamais mettre l'appareil en service. Contactez immédiatement votre revendeur. La construction de l'appareil correspond à la classe de protection I. La fiche secteur doit être connectée uniquement à...
  • Seite 26: Emploi Selon Les Prescriptions

    Tenir les enfants et les novices éloignés de l'appareil. Ne jamais faire marcher sans surveillance. EMPLOI SELON LES PRESCRIPTIONS Cet appareil est un effet lumineux pour créer des effets décoratifs. Cet appareil doit seulement être connecté avec une tension alternative de 230 V, 50 Hz et a été conçu pour un usage dans des locaux clos. Cet appareil est prévu pour des utilisations professionnelles, p.
  • Seite 27: Installation

    Si vous deviez transporter l'appareil, utilisez l'emballage d'origine pour éviter tout dommage. Assurez-vous que vous enviez l’appareil dans l’etat original. Ne nettoyez pas l'appareil avec des produits de nettoyage trop puissants ou abrasifs. Utilisez un chiffon doux, humide. Notez que pour des raisons de sécurité, il est interdit d'entreprendre toute modification sur l'appareil. Il est interdit de retirer le code barre de l'appareil.
  • Seite 28: Danger D'incendie

    Attention: En tombant, les appareils en montage par dessus peuvent causer des blessures considérables! En cas de doutes concernant la sécurité d’une forme d’installation possible, NE PAS installer l'appareil! Rassurez-vous avant le montage que la surface de montage peut supporter au moins dix fois la charge ponctuelle du poids propre de l'appareil.
  • Seite 29: Operation Master/Slave

    Cet appareil doit seulement être connecté avec une installation électrique correspondant aux régulations IEC. L’installation doit être equippée avec un disjoncteur à courant de défaut (RCD) avec un courant différentiel résiduel de 30 Ma. MANIEMENT Dès que vous les brancherez au secteur, le LED MAT-64 DMX commençera à fonctionner. 29/44 51918550_V_1_0.DOC...
  • Seite 30: Contrôle Par Les Interrupteurs Dip

    CONTRÔLE PAR LES INTERRUPTEURS DIP Auto Mode Pour choisir Auto Mode, mettez les interrupteurs dip 9 et 10 à OFF et les interrupteurs dip 1 – 5 à OFF. Avec les interrupteurs dip 6, 7 et 8, vous pouvez contrôler la vitesse. Motifs Mettez les interrupteurs dip 9 et 10 à...
  • Seite 31: Contrôle Par Dmx

    DMX. Lorsque deux ou plus appareils sont codés à la même adresse initiale, ils fonctionneront synchronement. Occupation des interrupteurs DIP: Contrôle: Après avoir codé tous les LED MAT-64 DMX vous pouvez commencer avec le maniement via vôtre contrôleur DMX. Protocôle DMX Canal 1...
  • Seite 32: Vitesse

    101-110 Programme 11 111-120 Programme 12 121-130 Programme 13 131-140 Programme 14 141-150 Programme 15 151-160 Programme 16 161-170 Programme 17 171-180 Programme 18 181-190 Programme 19 191-200 Programme 20 201-210 Programme 21 211-220 Programme 22 221-230 Programme 23 231-240 Programme 24 241-250 Programme 25...
  • Seite 33: Remplacer Le Fusible

    Fusible: F 0,5 A, 250 V Nombre de canaux: Nombre de DELs: Optional accessories: EUROLITE TH-90 theatre-hook for 50mm pipe No. 58000720 Safety-rope 40cm x 3mm up to 10kg No. 58010120 Safety-rope 90cm x 3mm up to 10kg No. 58010130 Safety-rope 140cm x 3mm up to 10kg No.
  • Seite 34: Introducción

    -descargar la última versión del manual del Internet INTRODUCCIÓN Gracias por haber elegido un EUROLITE LED MAT-64 DMX. Si Vd. respecte las instrucciones sucesivas, aseguremos que vaya a gozarse mucho de su compra. El LED MAT-64 DMX dispone de un micrófono integrado. Desembale su LED MAT-64 DMX.
  • Seite 35: Peligro Para La Salud

    Antes de la puesta en marcha inicial, por favor asegúrese de que no hay daños causados durante el transporte. Si el aparato u el cable están estropeado, consulte a su proveedor y no use el aparato. Este aparato pertenece a la clase de protección I. El aparato sólo debe ser conectado con un enchufe de la clase I con voltaje y frecuencia indéntico como indicado en el aparato.
  • Seite 36 Cuando buscar el sitio de instalación, por favor asegúrese de que el aparato no está expuesto a calor extremo, humedad o polvo. No debe haber cables mal instalados o no fijados correctamente. ¡Se pone usted en peligro y pone en peligro a otros! Nunca operar o almacenar el aparato en un ambiente con agua proyectada, lluvia, humedad o humo.
  • Seite 37: Instalación

    INSTALACIÓN Montaje por encima de la cabeza La suspensión del aparato debe ser fabricado de una manera que puede llevar 10 vezes la carga por una hora sin sufrir deformaciones dañosas permanentes. La instalación siempre debe ser efectuada con una segunda suspensión independiente, por ejemplo una red de anclaje apropriada.
  • Seite 38: Peligro De Muerte

    roscado. Insere el cable de anclaje en el ojete de seguridad y en el trussing u un lugar de fijación seguro. Insere el final en el eslabón de conexión roscado y fije el tornillo de seguridad. La distancia máxima de caida es 20 cm. Un cable de anclaje ya utilizado u estropeado nunca debe ser utilizado otra vez.
  • Seite 39: Alimentación

    Sólo conectar el aparato a una instalación eléctrica conforme a las regulaciones IEC. Esta instalación debe ser equipada con un disyuntor de corriente residual (RCD) con un máximo corriente residual de 30 mA. OPERACIÓN Tras la conexión del aparato a la red, el LED MAT-64 DMX comienza a funcionar. CONTROL POR INTERRUPTORES DIP 39/44...
  • Seite 40: Auto Mode

    DMX. Los aparatos con la misma dirección de comienzo funcionarán sincronizadamente. Ocupación de los interruptores DIP: Control: Después de ajustar la dirección de comienzo, Vd. puede controlar el LED MAT-64 DMX mediante su controlador DMX. 40/44 51918550_V_1_0.DOC...
  • Seite 41: Protócolo Dmx

    Protócolo DMX Canal 1 Programa Canal 2 Velocidad No función No función 1-10 Programa 1 1-249 0-100 % con 11-20 Programa 2 velocidad creciente 21-30 Programa 3 250-255 Control por sonido 31-40 Programa 4 41-50 Programa 5 51-60 Programa 6 Canal 3 Strobe 61-70...
  • Seite 42: Reemplazar El Fusible

    Fusible: F 0,5 A, 250 V Número de canales: Número de LEDs: Accesorios opcionales: Referencia: EUROLITE TH-90 gancho p.tubo diá. 50mm 58000720 Cable de anclaje 40cm x 3mm hasta 10kg 58010120 Cable de anclaje 90cm x 3mm hasta 10kg 58010130...
  • Seite 43 43/44 51918550_V_1_0.DOC...
  • Seite 44 Operation via DIP switches DMX-controlled operation 191-200 Program 20 Channel 1 Program 201-210 Program 21 211-220 Program 22 Leds off 221-230 Program 23 1-10 Program 1 231-240 Program 24 11-20 Program 2 241-250 Program 25 21-30 Program 3 251-255 Random Program 31-40 Program 4 41-50...

Inhaltsverzeichnis