EuroLite LED MFX-1 Bedienungsanleitung

Verwandte Anleitungen für EuroLite LED MFX-1


Inhaltszusammenfassung für EuroLite LED MFX-1
- Seite 1 BEDIENUNGSANLEITUNG USER MANUAL LED MFX-1 Beam effect Für weiteren Gebrauch aufbewahren! © Copyright Keep this manual for future needs! Nachdruck verboten! Reproduction prohibited!
-
Seite 2: Inhaltsverzeichnis
Inhaltsverzeichnis EINFÜHRUNG ..............................4 SICHERHEITSHINWEISE ..........................4 BESTIMMUNGSGEMÄSSE VERWENDUNG ....................6 GERÄTEBESCHREIBUNG ..........................7 Features ................................. 7 Geräteübersicht .............................. 8 INSTALLATION ..............................9 Projektormontage ............................9 Anschluss an den DMX-512 Controller / Verbindung Projektor – Projektor ..........10 Anschluss ans Netz ............................11 Anschluss zwischen Geräten ........................ - Seite 3 Diese Bedienungsanleitung gilt für die Artikelnummer: 50944301 This user manual is valid for the article number: 50944301 Das neueste Update dieser Bedienungsanleitung finden Sie im Internet unter: You can find the latest update of this user manual in the Internet under: www.eurolite.de 3/31 00096242, Version 1.0...
-
Seite 4: Einführung
- sich die letzte Version der Anleitung im Internet herunter laden EINFÜHRUNG Wir freuen uns, dass Sie sich für einen EUROLITE LED MFX-1 entschieden haben. Wenn Sie nachfolgende Hinweise beachten, sind wir sicher, dass Sie lange Zeit Freude an Ihrem Kauf haben werden. - Seite 5 Das Gerät darf nicht in Betrieb genommen werden, nachdem es von einem kalten in einen warmen Raum gebracht wurde. Das dabei entstehende Kondenswasser kann unter Umständen Ihr Gerät zerstören. Lassen Sie das Gerät solange uneingeschaltet, bis es Zimmertemperatur erreicht hat! Bitte überprüfen Sie vor der ersten Inbetriebnahme, ob kein offensichtlicher Transportschaden vorliegt.
-
Seite 6: Bestimmungsgemässe Verwendung
BESTIMMUNGSGEMÄSSE VERWENDUNG Bei diesem Gerät handelt es sich um einen kopfbewegten LED-Effektstrahler, mit dem sich dekorative Lichteffekte erzeugen lassen. Dieses Produkt ist für den Anschluss an 100-240 V, 50/60 Hz Wechselspannung zugelassen und wurde ausschließlich zur Verwendung in Innenräumen konzipiert. Dieses Gerät ist für professionelle Anwendungen, z. -
Seite 7: Gerätebeschreibung
nicht mehr korrekt funktionieren, ist das meist das Ergebnis von unfachmännischer Bedienung! Soll das Gerät transportiert werden, verwenden Sie bitte die Originalverpackung, um Transportschäden zu vermeiden. Beachten Sie bitte, dass eigenmächtige Veränderungen an dem Gerät aus Sicherheitsgründen verboten sind. Der Serienbarcode darf niemals vom Gerät entfernt werden, da ansonsten der Garantieanspruch erlischt. Wird das Gerät anders verwendet als in dieser Bedienungsanleitung beschrieben, kann dies zu Schäden am Produkt führen und der Garantieanspruch erlischt. -
Seite 8: Geräteübersicht
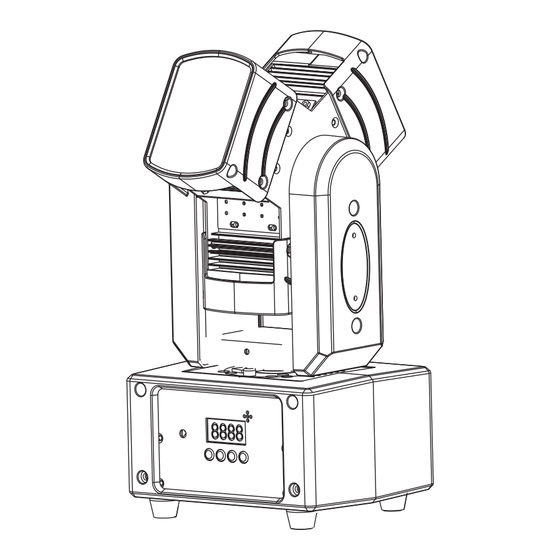
Geräteübersicht (1) Projektorarm (2) LED/Linse (3) Projektorkopf (4) Menu-Taste (5) Up-Taste (6) Down-Taste (7) Enter-Taste (8) Steuereinheit/Display (9) Mikrofon (10) Base (11) Gummifuß (12) DMX-Eingang (13) DMX-Ausgang (14) Spannungsversorgungseingang (15) Spannungsversorgungsausgang (16) Sicherungshalter (17) Fangseilloch (18) Schraubgewinde für Haken (19) Lüftungsgitter 8/31 00096242, Version 1.0... -
Seite 9: Installation
INSTALLATION Projektormontage Die Aufhängevorrichtungen des Projektors muss so gebaut und bemessen sein, dass sie 1 Stunde lang ohne dauernde schädliche Deformierung das 10-fache der Nutzlast aushalten kann. Die Installation muss immer mit einer zweiten, unabhängigen Aufhängung, z. B. einem geeigneten Fangnetz, erfolgen. -
Seite 10: Anschluss An Den Dmx-512 Controller / Verbindung Projektor - Projektor
ACHTUNG! Montieren Sie den Projektor ausschließlich über einen geeigneten Haken. Achten Sie darauf, dass das Gerät sicher befestigt wird. Vergewissern Sie sich, dass die Verankerung stabil ist. Das Gerät kann direkt auf den Boden gestellt werden oder in jeder möglichen Position im Trussing installiert werden, ohne seine funktionellen Eigenschaften zu verändern. -
Seite 11: Anschluss Ans Netz
Belegung der XLR-Verbindung: Wenn Sie Controller mit dieser XLR-Belegung verwenden, können Sie den DMX-Ausgang des Controllers direkt mit dem DMX-Eingang des ersten Gerätes der DMX-Kette verbinden. Sollen DMX-Controller mit anderen XLR-Ausgängen angeschlossen werden, müssen Adapterkabel verwendet werden. Aufbau einer seriellen DMX-Kette: Schließen Sie den DMX-Ausgang des ersten Gerätes der Kette an den DMX-Eingang des nächsten Gerätes an. -
Seite 12: Bedienung
Betrieb auf. Während des Reset justieren sich die Motoren aus und das Gerät ist danach betriebsbereit. Standalone-Betrieb Der LED MFX-1 lässt sich im Standalone-Betrieb ohne Controller einsetzen. Trennen Sie dazu den LED MFX-1 vom Controller und rufen Sie das vorprogrammierte Programm, wie im Kapitel Control Board beschrieben, auf. -
Seite 13: Dmx-Protokoll
DMX-Protokoll Channel Decimal Hexad. Percentage S/F Eigenschaft Horizontale Bewegung (PAN) Wenn Sie den Regler verschieben, bewegen Sie den Kopf horizontal (PAN). Allmähliches Einstellen des Kopfes bei 255 00 FF 0% 100% langsamen Schieben des Reglers (0-255, 128-Mitte). Der Kopf kann an jeder gewünschten Einstellung angehalten werden. - Seite 14 255 00 FF 0% 100% Allmähliche Einstellung der Intensität von 0 bis 100 % Grün 255 00 FF 0% 100% Allmähliche Einstellung der Intensität von 0 bis 100 % Blau 255 00 FF 0% 100% Allmähliche Einstellung der Intensität von 0 bis 100 % Weiß...
-
Seite 15: Control Board
Control Board Das Control Board bietet mehrere Möglichkeiten: so lassen sich z. B. die DMX-Startadresse eingeben oder das vorprogrammierte Programm abspielen. Drücken Sie die Menu-Taste, so dass sich das Display einschaltet. Durch Drücken der Menu-Tasten können Sie sich im Hauptmenü bewegen. Zur Auswahl des gewünschten Menüpunktes drücken Sie die Enter-Taste. Durch Drücken der Up/Down-Tasten können Sie die Auswahl verändern. -
Seite 16: Reinigung Und Wartung
REINIGUNG UND WARTUNG Der Unternehmer hat dafür zu sorgen, dass sicherheitstechnische und maschinentechnische Einrichtungen mindestens alle vier Jahre durch einen Sachverständigen im Umfang der Abnahmeprüfung geprüft werden. Der Unternehmer hat dafür zu sorgen, dass sicherheitstechnische und maschinentechnische Einrichtungen mindestens einmal jährlich durch einen Sachkundigen geprüft werden. Dabei muss unter anderem auf folgende Punkte besonders geachtet werden: 1) Alle Schrauben, mit denen das Gerät oder Geräteteile montiert sind, müssen fest sitzen und dürfen nicht korrodiert sein. -
Seite 17: Technische Daten
TECHNISCHE DATEN Spannungsversorgung: 100-240 V AC, 50/60 Hz ~ Gesamtanschlusswert: 35 W DMX-Steuerkanäle: DMX512-Anschluss: 3-pol. XLR Musiksteuerung: über eingebautes Mikrofon Blitzrate: 18 Hz LED-Typ: 10 W QCL, RGBW Anzahl der LEDs: Max. Schwenkbewegung (PAN): 540° Max. Kippbewegung (TILT): unbegrenzt Abstrahlwinkel (einfarbiger Strahl): 2°...