
Verwandte Anleitungen für StarLab S8030-5000


Inhaltszusammenfassung für StarLab S8030-5000
- Seite 1 This is your Minicentrifuge user manual. USER MANUAL · BEDIENUNGSANLEITUNG MODE D‘EMPLOI · ISTRUZIONI PER L‘USO Passionate for science.
- Seite 2 2 · Minicentrifuge · Manual...
-
Seite 3: Declaration Of Conformity Konformitätserklärung
Authorised Managing Director Klaus Ambos Registry Court Klaus Ambos Amtsgericht [first instance court] Hamburg CEO STARLAB International GmbH Register number: HRB 122020 VAT ID no. pursuant to Hamburg, 16.08.2022 § 27 a German VAT Act DE 214 891 717 Passionate for science. - Seite 4 Starlab International GmbH Neuer Höltigbaum 38 22143 Hamburg, Germany E-Mail: info@starlab.de Klaus Ambos www.starlabgroup.com CEO STARLAB International GmbH Tel.: +49 (0)40 675 99 39 0 Fax: +49 (0)40 675 9939 20 Hamburg, 16.08.2022 Authorised Managing Director Klaus Ambos Registry Court Amtsgericht [fi...
-
Seite 5: Inhaltsverzeichnis
User Manual ____________________________________________________________________5 – 16 Bedienungsanleitung ________________________________________________________ 17 – 28 Instruction initiale ____________________________________________________________29 – 40 Istruzioni d‘uso _______________________________________________________________ 41 – 52 Certificates ________________________________________________________________________3 – 4 Safety _________________________________________________________________ About this user manual ___________________________________________________ Intended use ___________________________________________________________ Electric current _________________________________________________________ Clearance envelope _____________________________________________________ Moving rotor ___________________________________________________________... -
Seite 6: User Manual
Safety 1.1 About this user manual Before using the minicentrifuge for the first time, please read this user manual. This user manual is part of the minicentrifuge and it should be easily accessible at all times. If the minicentrifuge is transferred to a third party, this user manual must be included. 1.2 Intended use The minicentrifuge is intended for indoor laboratory use and similar applications requiring relatively low centrifugal forces, such as microfiltration, cell separation and quick spin downs... -
Seite 7: Manipulation
1.8 Manipulation Do not open the housing or manipulate the minicentrifuge or accessories in any way. Only use the rotors and accessories supplied with the minicentrifuge. 1.9 Product liability In the following cases the protection provided in the minicentrifuge may be impaired. The liability for the function of the minicentrifuge passes to the operator if: ›... -
Seite 8: Product Description
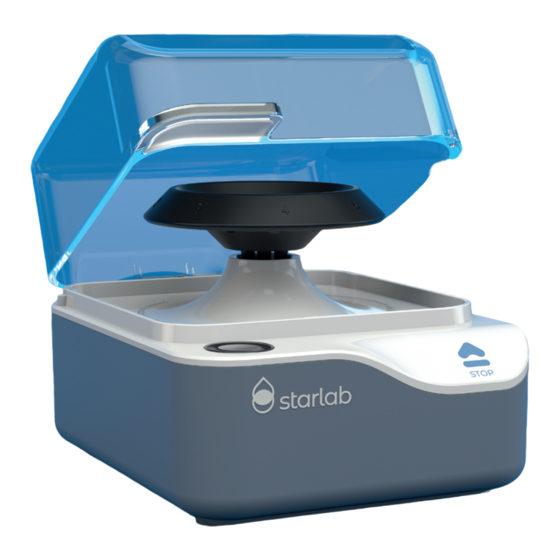
Product description 2.1 Minicentrifuge components Fig. 1 Minicentrifuge STOP button Power input connection Tube rotor Power switch PCR strip rotor Drive shaft 8 · Minicentrifuge · Manual... -
Seite 9: Delivery Package
Adapters for 0.5 ml tubes Adapters for 0.2 ml tubes Power adapter with 4 exchangeable plugs (EU, UK, US, AUS) User manual 2.3 Type plate Minicentrifuge Model: Rating: Starlab International GmbH Neuer Höltigbaum 38 Power: 22143 Hamburg www.starlabgroup.com Speed: LABORATORY EQUIPMENT Made in CHN Fig. -
Seite 10: Installation
Installation 3.1 Positioning the minicentrifuge Choose a place with a flat surface, where the minicentrifuge can remain during centrifugation. Do not operate the minicentrifuge at altitudes above 2,000 m or in the open air. Avoid long-term exposure to high UV radiation levels as discoloration of the plastic material might occur. -
Seite 11: Operation
4 Operation 4.1 Switching on the minicentrifuge Switch on the power switch at the back of the minicentrifuge. The lid will open automatically. 4.2 Removing and mounting a rotor To mount one of the two rotors, push it onto the drive shaft until there is an audible click. Make sure that the rotor is properly attached to the drive shaft before inserting the tubes. -
Seite 12: Starting The Minicentrifuge
Fig. 4 Symmetrical positions of the tube rotor 4.4 Starting the minicentrifuge Once the minicentrifuge has started, it must not be moved. Do not knock against the minicentri- fuge while it is in operation. › To start the centrifugation of the samples, simply close the lid. The rotor will start spinning. If the rotor can not spin properly (for example, if a tube is open and hits against the lid), then the lid will open after a few seconds and the rotor will stop spinning. -
Seite 13: Maintenance
Maintenance Before using any cleaning or decontamination methods except those recommended, contact the manufacturer to make sure that the proposed method will not damage the equipment. For further information and detailed instructions for cleaning and disinfection, contact your local distributor. 5.1 Cleaning Regularly check and clean the housing of the minicentrifuge as well as the lid, the rotors and rotor accessories. -
Seite 14: Disinfection
5.2 Disinfection WARNING Electric shock as a result of penetration of liquid. › Switch off the minicentrifuge and disconnect it from the power supply before starting to disinfect. › Do not allow any liquids to enter the inside of the housing. ›... -
Seite 15: Transport, Storage And Disposal
Transport, storage and disposal 6.1 Transport and storage Ambient temperature for transport and storage: -25 – 55 °C (-13 – 131 °F) Relative humidity for transport and storage: ≤95 % Air pressure for transport and storage: 30 – 106 kPa 6.2 Disposal In the event of disposing of the product, please observe the applicable legal regulations. Infor- mation on the disposal of electrical and electronic devices in the European Community: The disposal of electrical devices is regulated within the European Community by national regula- tions based on EU Directive 2012/19/EU pertaining to waste electrical and electronic equipment... -
Seite 16: Technical Data
PCR strips and 0.2ml tubes 10 Ordering information Article no. Description S8030-5000 Minicentrifuge S8030-5010 Tube rotor for 8 × 1.5/2.0 ml tubes S8030-5011 PCR strip rotor for 32 × 0.2 ml PCR tubes or 4 × 8 PCR tube strips... -
Seite 17: Bedienungsanleitung
User Manual ____________________________________________________________________5 – 16 Bedienungsanleitung ________________________________________________________ 17 – 28 Instruction initiale ____________________________________________________________29 – 40 Istruzioni d‘uso _______________________________________________________________ 41 – 52 Zertifikate _________________________________________________________________________3 – 4 Sicherheit ____________________________________________________________ Über diese Bedienungsanleitung __________________________________________ Bestimmungsgemäßer Gebrauch __________________________________________ Elektrischer Strom _____________________________________________________ Sicherheitsabstand _____________________________________________________ Drehender Rotor _______________________________________________________ Mikrozentrifugenröhrchen _______________________________________________... -
Seite 18: Sicherheit
Sicherheit 1.1 Über diese Bedienungsanleitung Vor dem ersten Gebrauch der Minizentrifuge diese Bedienungsanleitung lesen. Diese Bedienungsanleitung ist Bestandteil der Minizentrifuge und sollte gut erreichbar aufbe- wahrt werden. Wenn die Minizentrifuge an Dritte weitergegeben wird, muss diese Bedienungsanleitung mit weitergegeben werden. 1.2 Bestimmungsgemäßer Gebrauch Die Minizentrifuge ist für den Innengebrauch in Laboren und ähnliche Anwendungen vorgesehen, bei denen relativ geringe Zentrifugalkräfte erforderlich sind, wie z. B. -
Seite 19: Beladen Des Rotors
1.7 Beladen des Rotors Den Rotor symmetrisch beladen, um Unwucht zu vermeiden. Die Minizentrifuge niemals mit nur einem Gefäß oder einem PCR-Streifen beladen betreiben. Den Rotor stets mit einer geraden Anzahl Gefäße oder PCR-Streifen beladen. Die Gefäße vor dem Einsetzen in den Rotor sorgfältig befüllen und mit den Gefäßdeckeln ver- schließen. -
Seite 20: Produktbeschreibung
Produktbeschreibung 2.1 Komponenten der Minizentrifuge Fig. 1 Minizentrifuge Deckel Stopptaste Netzeingangsanschluss Gefäßrotor Netzschalter PCR-Streifen-Rotor Antriebswelle 20 · Minicentrifuge · Bedienungsanleitung... -
Seite 21: Lieferumfang
Adapter für 0,5-ml-Gefäße Adapter für 0,2-ml-Gefäße Netzadapter mit vier auswechselbaren Steckern (EU, UK, US, AUS) Bedienungsanleitung 2.3 Typenschild Minicentrifuge Model: Rating: Starlab International GmbH Neuer Höltigbaum 38 Power: 22143 Hamburg www.starlabgroup.com Speed: LABORATORY EQUIPMENT Made in CHN Fig. 2 Typenschild an der Unterseite der Minizentrifuge... -
Seite 22: Installation
Installation 3.1 Positionieren der Minizentrifuge Die Minizentrifuge auf einer ebenen Fläche aufstellen, wo sie auch während des Zentrifugier- vorgangs bleiben kann. Die Minizentrifuge nicht in Höhen von über 2.000 m oder im Freien verwenden. Die Minizentrifuge nicht über längere Zeit hoher UV-Strahlung aussetzen, da dies zu Verfärbun- gen des Kunststoffmaterials führen könnte. -
Seite 23: Betrieb
4 Betrieb 4.1 Einschalten der Minizentrifuge Den Netzschalter auf der Rückseite der Minizentrifuge einschalten. Der Deckel öffnet sich automatisch. 4.2 Entfernen und Einsetzen der Rotoren Um einen der beiden Rotoren einzusetzen, den gewünschten Rotor auf die Antriebswelle schieben, bis er hörbar einrastet. Vor dem Einsetzen der Gefäße sicherstellen, dass der Rotor sicher an der Antriebswelle befestigt ist. -
Seite 24: Starten Der Minizentrifuge
Fig. 4 Symmetrische Positionen des Gefäßrotors 4.4 Starten der Minizentrifuge Nachdem die Minizentrifuge gestartet wurde, darf sie nicht mehr bewegt werden. Während des Betriebs nicht gegen die Minizentrifuge stoßen. › Um die Zentrifugation der Proben zu starten, einfach den Deckel schließen. Der Rotor be- ginnt dann zu drehen. -
Seite 25: Wartung
Wartung Vor der Anwendung von Reinigungs- oder Dekontaminationsmethoden, die nicht vom Hersteller empfohlen werden, an den Hersteller wenden, um sicherzugehen, dass das Gerät dadurch nicht beschädigt wird. Für weitere Informationen und detaillierte Anweisungen zur Reinigung und Desinfektion an den örtlichen Händler wenden. 5.1 Reinigung Das Gehäuse der Minizentrifuge sowie den Deckel, die Rotoren und das Rotorzubehör regelmäßig überprüfen und reinigen. -
Seite 26: Desinfektion
5.2 Desinfektion WARNUNG Stromschlag durch eindringende Flüssigkeit. › Vor der Desinfektion die Minizentrifuge ausschalten und von der Stromversorgung trennen. › Sicherstellen, dass keine Flüssigkeiten in das Gehäuseinnere eindringen können. › Keine Sprühdesinfektion verwenden. › Die Minizentrifuge erst dann wieder an die Stromversorgung anschließen, wenn sie vollstän- dig getrocknet ist. -
Seite 27: Transport, Lagerung Und Entsorgung
Transport, Lagerung und Entsorgung 6.1 Transport und Lagerung Umgebungstemperatur während Transport -25 – 55 °C (-13 – 131 °F) und Lagerung: Relative Luftfeuchte während Transport und ≤95 % Lagerung: Luftdruck während Transport und Lagerung: 30 – 106 kPa 6.2 Entsorgung Bei der Entsorgung des Produkts die geltenden gesetzlichen Vorschriften beachten. Informa- tionen zur Entsorgung von Elektro- und Elektronikgeräten in der Europäischen Gemein- schaft: Die Entsorgung von elektrischen Geräten ist in der Europäischen Gemeinschaft durch nationale Vorschriften geregelt, die auf der EU-Richtlinie 2012/19/EU über Elektro- und... -
Seite 28: Technische Daten
PCR-Rotor – 35 mm 6 mm PCR-Streifen und 0,2-ml-Gefäße 10 Bestellinformationen Artikel-Nr. Bezeichnung S8030-5000 Minizentrifuge S8030-5010 Gefäßrotor für 8 × 1,5-/2,0-ml-Gefäße PCR-Streifen-Rotor für 32 × 0,2-ml-PCR-Gefäße oder S8030-5011 4 × 8 PCR-Gefäßstreifen S8030-5012 Netzadapter mit vier auswechselbaren Steckern, 24 V, 1 A für EU, UK, US und AUS S8030-5013 Adapter für 0,5-ml-Gefäße, 8 Stk. -
Seite 29: Instruction Initiale
User Manual ____________________________________________________________________5 – 16 Bedienungsanleitung ________________________________________________________ 17 – 28 Instruction initiale ____________________________________________________________29 – 40 Istruzioni d‘uso _______________________________________________________________ 41 – 52 Certificats _________________________________________________________________________3 – 4 Consignes générales de sécurité _________________________________________ À propos de ce manuel d’utilisation ________________________________________ Utilisation appropriée ___________________________________________________ Courant électrique _____________________________________________________ Espace de sécurité... -
Seite 30: Consignes Générales De Sécurité
Consignes générales de sécurité 1.1 À propos de ce manuel d’utilisation Avant d’utiliser la minicentrifugeuse pour la première fois, veuillez lire ce manuel d’utilisation. Ce manuel d’utilisation fait partie de la minicentrifugeuse. Il doit par conséquent toujours être à portée de main. Si la minicentrifugeuse est transférée à... -
Seite 31: Chargement Du Rotor
1.7 Chargement du rotor Chargez le rotor de manière symétrique pour assurer un bon équilibre. N’utilisez jamais la minicentrifugeuse avec un seul tube ou une seule barrette PCR. Ne chargez le rotor qu’avec un nombre pair de tubes ou de barrettes PCR. Remplissez les tubes et fermez tous les couvercles des tubes avec précaution avant de les insérer dans le rotor. -
Seite 32: Description Du Produit
Description du produit 2.1 Composants de la minicentrifugeuse Fig. 1 Minicentrifugeuse Couvercle Bouton STOP Connexion de l’entrée d’alimentation Rotor pour tubes Interrupteur d’alimentation Rotor pour barrettes PCR Arbre d’entraînement 32 · Minicentrifuge · Instruction initiale... -
Seite 33: Pièces Incluses Dans La Livraison
Adaptateurs pour tubes de 0,2 ml Adaptateur électrique avec 4 fiches interchangeables (UE, Royaume-Uni, États- Unis, Australie) Manuel d’utilisation 2.3 Plaque signalétique Minicentrifuge Model: Rating: Starlab International GmbH Neuer Höltigbaum 38 Power: 22143 Hamburg www.starlabgroup.com Speed: LABORATORY EQUIPMENT Made in CHN Fig. -
Seite 34: Installation
Installation 3.1 Positionnement de la minicentrifugeuse Choisissez un emplacement à surface plane sur laquelle la minicentrifugeuse peut rester durant la centrifugation. N’utilisez pas la minicentrifugeuse à l’air libre et à des altitudes supérieures à 2 000 m. Évitez une exposition prolongée à des niveaux élevés de rayonnement UV, car cela pourrait entraîner une décoloration du matériau plastique. -
Seite 35: Fonctionnement
4 Fonctionnement 4.1 Mise en marche de la minicentrifugeuse Mettez la minicentrifugeuse en marche avec l’interrupteur général au dos de la minicentrifu- geuse. Le couvercle s’ouvrira automatiquement. 4.2 Démontage et montage d’un rotor Pour monter l’un des deux rotors, poussez-le sur l’arbre d’entraînement jusqu’à ce qu’il y ait un clic audible. -
Seite 36: Démarrage De La Minicentrifugeuse
Fig. 4 Positions symétriques du rotor pour tubes 4.4 Démarrage de la minicentrifugeuse Une fois la minicentrifugeuse démarrée, elle ne doit pas être déplacée. Ne heurtez pas la mini- centrifugeuse lorsqu’elle est en fonctionnement. › Pour démarrer la centrifugation des échantillons, il suffit de fermer le couvercle. Le rotor commencera à... -
Seite 37: Entretien
Entretien Avant d’utiliser une méthode de nettoyage ou de décontamination autre que celle recomman- dée, contactez le fabricant pour vous assurer que la méthode proposée n’endommagera pas l’équipement. Pour plus d’informations et des instructions détaillées sur le nettoyage et la désinfection, contactez votre distributeur local. -
Seite 38: Désinfection
5.2 Désinfection AVERTISSEMENT Électrocution suite à la pénétration d’un liquide. › Éteignez la minicentrifugeuse et débranchez-la du bloc d’alimentation avant de procéder à la désinfection. › Ne laissez aucun liquide pénétrer à l’intérieur du boîtier. › N’utilisez pas de spray désinfectant. ›... -
Seite 39: Transport, Stockage Et Élimination
Transport, stockage et élimination 6.1 Transport et stockage Température ambiante pour le transport -25 à 55 °C (-13 à 131 °F) et le stockage : Humidité relative pour le transport et le stockage : ≤95 % Pression d’air pour le transport et le stockage : 30 à 106 kPa 6.2 Élimination En cas d’élimination du produit, veuillez respecter les réglementations légales en vigueur. Infor- mations sur l’élimination des appareils électriques et électroniques dans la Communauté... -
Seite 40: Données Techniques
– 35 mm 6 mm Barrettes PCR et tubes de 0,2 ml 10 Références Réf. Description S8030-5000 Minicentrifugeuse S8030-5010 Rotor pour 8 tubes de 1,5/2,0 ml Rotor pour barrettes PCR de 32 tubes PCR de 0,2 ml ou 4 barrettes S8030-5011 de 8 tubes PCR S8030-5012 Adaptateur électrique avec 4 fiches interchangeables, 24 V, 1 A pour UE, Royaume-Uni, États-Unis et Australie... -
Seite 41: Istruzioni D'uso
User Manual ____________________________________________________________________5 – 16 Bedienungsanleitung ________________________________________________________ 17 – 28 Instruction initiale ____________________________________________________________29 – 40 Istruzioni d‘uso _______________________________________________________________ 41 – 52 Certificati __________________________________________________________________________3 – 4 Sicurezza _____________________________________________________________ Informazioni sul presente manuale d’uso ___________________________________ Uso conforme _________________________________________________________ Corrente elettrica ______________________________________________________ Spazio libero circostante ________________________________________________ Rotore in movimento ___________________________________________________... -
Seite 42: Sicurezza
Sicurezza 1.1 Informazioni sul presente manuale d’uso Prima di utilizzare la minicentrifuga per la prima volta, leggere il presente manuale d’uso. Il presente manuale d’uso fa parte della minicentrifuga e dovrebbe essere facilmente accessi- bile in ogni momento. Se la minicentrifuga viene ceduta a terzi, il presente manuale d’uso dovrà essere incluso nel prodotto consegnato. -
Seite 43: Caricamento Del Rotore
1.7 Caricamento del rotore Caricare il rotore con le provette disposte in modo simmetrico in modo da garantire un buon bilanciamento. Non mettere mai in funzione la minicentrifuga con una sola provetta o una strip PCR in posizione. Caricare il rotore solo con un numero pari di provette o strip PCR. Riempire le provette e chiudere accuratamente tutti i relativi tappi prima di inserirle nel rotore. -
Seite 44: Descrizione Del Prodotto
Descrizione del prodotto 2.1 Componenti della minicentrifuga Fig. 1 Minicentrifuga Coperchio Pulsante STOP Collegamento dell'alimentazione in ingresso Rotore per provette Interruttore di alimentazione Rotore per strip PCR Albero di trasmissione 44 · Minicentrifuge · Istruzioni d‘uso... -
Seite 45: Dotazione
Adattatori per provette da 0,2 ml Adattatore di alimentazione con 4 spine intercambiabili (UE, UK, USA, AUS) Manuale d'uso 2.3 Targhetta identificativa Minicentrifuge Model: Rating: Starlab International GmbH Neuer Höltigbaum 38 Power: 22143 Hamburg www.starlabgroup.com Speed: LABORATORY EQUIPMENT Made in CHN Fig. -
Seite 46: Installazione
Installazione 3.1 Posizionamento della minicentrifuga Scegliere un posto con una superficie piana, dove la minicentrifuga può rimanere durante la centrifugazione. Non utilizzare la minicentrifuga ad altitudini superiori ai 2.000 m o all’aria aperta. Evitare l’esposizione a lungo termine ad alti livelli di radiazioni UV in quanto potrebbe verificarsi uno scolorimento del materiale plastico. -
Seite 47: Funzionamento
4 Funzionamento 4.1 Accensione della minicentrifuga Accendere l’interruttore di rete sul retro della minicentrifuga. Il coperchio si aprirà automaticamente. 4.2 Rimozione e montaggio di un rotore Per montare uno dei due rotori, spingerlo sull’albero di trasmissione finché non si sente un clic. Prima di inserire le provette, assicurarsi che il rotore sia attaccato correttamente all’albero di trasmissione. -
Seite 48: Avvio Della Minicentrifuga
Fig. 4 Posizioni simmetriche nel rotore per provette 4.4 Avvio della minicentrifuga Una volta avviata, la minicentrifuga non deve essere spostata. Non urtare contro la minicentrif- uga mentre è in funzione. › Per avviare la centrifugazione dei campioni, basta chiudere il coperchio. Il rotore inizierà a girare. -
Seite 49: Manutenzione
Manutenzione Prima di utilizzare delle tecniche di pulizia o decontaminazione diverse da quelle raccomandate, contattare il produttore per assicurarsi che il metodo proposto non danneggi l’attrezzatura. Per maggiori informazioni e istruzioni dettagliate sulla pulizia e sulla disinfezione, contattare il distributore locale. 5.1 Pulizia Controllare e pulire regolarmente l’alloggiamento della minicentrifuga così... -
Seite 50: Disinfezione
5.2 Disinfezione AVVERTENZA Scosse elettriche in seguito all’infiltrazione di liquidi. › Prima di iniziare a disinfettare la minicentrifuga, spegnerla e scollegare l’alimentazione. › Evitare che all’interno dell’alloggiamento penetrino dei liquidi. › Non procedere a una disinfezione mediante spruzzatura. › Ricollegare l’alimentazione della minicentrifuga solo quando questa è completamente asciutta. -
Seite 51: Trasporto, Conservazione E Smaltimento
Trasporto, conservazione e smaltimento 6.1 Trasporto e conservazione Temperatura ambiente per il trasporto e -25 – 55 °C (-13 – 131 °F) la conservazione: Umidità relativa per il trasporto e la conservazione: ≤95 % Pressione dell'aria per il trasporto e 30 – 106 kPa la conservazione: 6.2 Smaltimento In caso di smaltimento del prodotto, osservare le disposizioni di legge vigenti. Informazi- oni sullo smaltimento dei dispositivi elettrici ed elettronici nella Comunità... -
Seite 52: Dati Tecnici
Strip PCR e provette da 0,2 ml 10 Informazioni per l’ordine Cod. art. Descrizione S8030-5000 Minicentrifuga S8030-5010 Rotore per 8 provette da 1,5/2,0 ml S8030-5011 Rotore per 32 provette PCR da 0,2 ml o 4 x 8 strip di provette PCR... - Seite 53 Minicentrifuge · Manual · 53...
- Seite 54 54 · Minicentrifuge · Manual...
- Seite 55 Minicentrifuge · Manual · 55...
- Seite 56 Starlab International GmbH Neuer Höltigbaum 38 22143 Hamburg Germany T: +49 (0)40 675 99 39 0 F: +49 (0)40 675 99 39 20 info@starlab.de www.starlabgroup.com Starlab (UK), Ltd 5 Tanners Drive Milton Keynes MK14 5BU United Kingdom T: +44 (0)1908 283800 F: +44 (0)1908 283802 infoline@starlab.co.uk...