Grasslin talento easy C1 Bedienungsanleitung
Astro timer

Verwandte Anleitungen für Grasslin talento easy C1


Inhaltszusammenfassung für Grasslin talento easy C1
- Seite 1 Vor Beginn aller Arbeiten Anleitung lesen! Bedienungsanleitung Operating instructions ta le n to e a sy 16 (1 0) A 25 0V talento easy C1 – Astro Timer Zeitschaltuhr Thermostat...
- Seite 2 Diese Anleitung ermöglicht den sicheren und effizienten Umgang mit der Zeitschaltuhr (im Folgenden „Gerät“). Diese Anleitung ist Bestandteil des Geräts und muss für jeden, der mit dem Gerät umgeht, jeder- zeit zugänglich aufbewahrt werden. Jeder, der mit dem Gerät umgeht, muss diese Anleitung vor Beginn aller Arbeiten sorgfältig durchgelesen und verstanden haben.
-
Seite 3: Inhaltsverzeichnis
Übersicht ................5 Aufbau und Funktion ........................5 Betriebsmodi ..........................10 Sicherheit ................12 Installation ................15 Konfiguration ............... 17 Erstinbetriebnahme ........................ 17 Datum und Uhrzeit einstellen ....................18 Zeitformat einstellen .......................19 Datumformat einstellen ......................20 Ersten Wochentag einstellen ....................21 Standortinformationen einstellen ....................22 Dämmerungsmodus aktivieren/deaktivieren ................24 Sommer-/Winterzeit wählen ....................25 Betriebsmodus wählen ......................29 Betriebsstundenzähler ablesen ....................31... - Seite 4 Neues Ferien-Schaltprogramm erstellen .................48 Ferien-Schaltprogramm aktivieren ..................49 Ferien-Schaltprogramm ansehen ....................50 Ferien-Schaltprogramm bearbeiten ..................51 Ferien-Schaltprogramm löschen .....................52 Einzelnes Ferien-Schaltprogramm löschen .................52 Alle Ferien-Schaltprogramme löschen ................53 Entsorgung ................54...
-
Seite 5: Übersicht
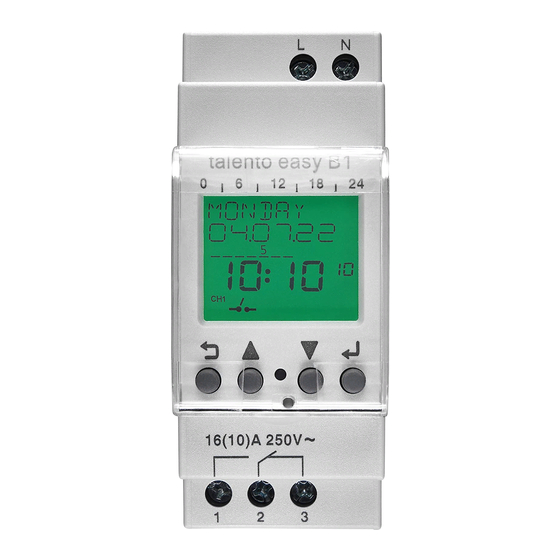
Übersicht Aufbau und Funktion ta le n to e a sy 16 (1 0) A 25 0V Abb. 1: Zeitschaltuhr Klicksystem für Montage auf DIN-Schiene Anschlussklemme Phase Anschlussklemme Neutralleiter Plombierbares Gehäuse Display Bedientasten Anschlussklemme Relay Ausgang Funktionsbeschreibung Die Zeitschaltuhr ist eine Schaltuhr, die mit einem Klicksystem auf eine DIN-Schiene (Abb. 1/ ) montiert wird;... - Seite 6 Technische Daten (DIN EN 60730-1) Wirkungsweise Verschmutzungsgrad Bemessungsstoßspannung 4000 V Die technischen Daten der Geräte, die in dieser Anleitung beschrieben sind, finden Sie unter: https://graesslin.co.uk/product/talento-easy-c1/ Verwendungsmöglichkeiten Diese Funktionen sind an der Zeitschaltuhr programmierbar: • Datumsunabhängige Programmierung • Datumsbezogene Programmierung im aktuell laufenden Jahr •...
- Seite 7 Anzeige- und Bedienelemente talento easy C1 Abb. 2: Displayaufbau Programmierte Schaltzeiten Wochentag bzw. Menü Datum Tag der Woche Uhrzeit Sommer-/Winterzeit Tag-/Nachtzeit Symbolleiste Enter-Taste Down-Taste Reset-Taste Up-Taste Menü-Taste Funktionstastenasten (Abb. 2/ Symbol...
- Seite 8 ENTER • Auswahl treffen • Übernehmen RESET Hardware-Reset. Die Einstellungen werden nicht gelöscht. Tastenkombinationen Symbol Bezeichnung Funktion ESC + UP Override-Modus Symbole (Abb. 2/ + 7 + Symbol Beschreibung Sommerzeit Tagzeit Nachtzeit Kanal 1 Der Kanal ist eingeschaltet Der Kanal ist ausgeschaltet Override-Modus aktiv Dauerhaft EIN aktiv Dauerhaft AUS aktiv...
-
Seite 9: Menüstruktur
Menüstruktur Manual Program Clock Holiday Astro Time Perm On Channel Status Sunrise Date/Time Time Format Override On/Off Sunset View Date Format Perm Off View Modify Week Start Day Modify Delete Location Delete Twilight Options Operating Hour Backlight Password Factory Restore Device Info Abb. -
Seite 10: Betriebsmodi
Betriebsmodi Astro-Modus Im Astro-Modus wird der Kanal in Abhängigkeit von Sonnenauf- und Untergang geschaltet. Die Werte dafür werden täglich neu berechnet. Beschreibung siehe Kapitel „Neues Astro-Schaltprogramm erstellen“ auf Seite 41 Dauerhaft EIN Kanal dauerhaft eingeschaltet. Beschreibung siehe Kapitel „Dauerhaft EIN“ auf Seite 29 Dauerhaft AUS Kanal dauerhaft ausgeschaltet. - Seite 11 Prioritäten Bei der Verwendung mehrer Programme können gleichzeitig unterschiedliche Schaltbefehle anliegen. Daher wird der Kanal nach folgender Priorität geschaltet: Dauerhaft EIN / Dauerhaft AUS / Override Holiday-Modus EIN Holiday-Modus AUS Astro-Modus AUS Astro-Modus EIN...
-
Seite 12: Sicherheit
Sicherheit Sicherheitshinweise Sicherheitshinweise sind in dieser Anleitung durch Symbole gekennzeichnet. Die Sicherheitshinweise wer- den durch Signalworte eingeleitet, die das Ausmaß der Gefährdung zum Ausdruck bringen. Diese Kombination aus Symbol und Signalwort weist auf eine möglicherweise gefährliche Situation hin, die zum Tod oder zu schweren Verletzungen führen kann, wenn sie nicht gemie- WARNUNG! den wird. -
Seite 13: Restrisiken
Jede über die bestimmungsgemäße Verwendung hinausgehende oder andersartige Benutzung gilt als Fehlgebrauch. Durch Eingriffe und Veränderungen am Gerät erlischt die gesetzliche Gewährleistung. Gefahr durch zu geringen Leitungsquerschnitt! Bei der Verwendung von Leitungen mit zu geringem Querschnitt kann ein Kurzschluss oder WARNUNG! ein Brand entstehen. - Seite 14 Personalanforderungen Elektrofachkraft Die Elektrofachkraft ist aufgrund ihrer fachlichen Ausbildung, Kenntnisse und Erfahrungen sowie Kenntnis der einschlägigen Normen und Bestimmungen in der Lage, Arbeiten an elektrischen Anlagen auszuführen und mögliche Gefahren selbstständig zu erkennen und zu vermeiden. Die Elektrofachkraft ist speziell für das Arbeitsumfeld, in dem sie tätig ist, ausgebildet und kennt die rele- vanten Normen und Bestimmungen.
-
Seite 15: Installation
Installation Elektrisch anschließen Lebensgefahr durch elektrischen Schlag! Unsachgemäße Montage und Installation des Geräts können zu lebensgefährlichen elektri- WARNUNG! schen Spannungen führen. − Montage und Anschluss ausschließlich durch Elektrofachkraft durchführen lassen. Personal: • Elektrofachkraft Materialien: • DIN-Schiene (15 mm x 7,5 mm) •... - Seite 16 Abb. 5: Schaltbild Zeitschaltuhr gemäß Schaltbild (Abb. 5) anschließen.
-
Seite 17: Konfiguration
Konfiguration Backup-Batterie Reduzierte Gangreserve der Backup-Batterie! Nach 6 Jahren Lagerung ohne Netzbetrieb ist die Backup-Batterie entladen. HINWEIS! Erstinbetriebnahme Die Programmierung der Zeitschaltuhr kann erst nach dem Anschluss an eine externe Span- nungsversorgung erfolgen. Auslieferungszustand Im Auslieferungszustand befindet sich das Gerät im Automatik-Modus mit Voreinstellungen für Uhrzeit und Datum. -
Seite 18: Datum Und Uhrzeit Einstellen
Datum und Uhrzeit einstellen CLOCK HOUR 21:48 DATE/TIME MINUTE 21:48 YEAR SAVED 21.10.12 MONTH 21.10.12 21.10.12 Abb. 6: Datum und Uhrzeit einstellen Taste drücken. wählen und mit der Taste bestätigen. CLOCK wählen und mit der Taste bestätigen. DATE/TIME Jahr einstellen und mit der Taste bestätigen. -
Seite 19: Zeitformat Einstellen
Zeitformat einstellen CLOCK TIME FORMAT AM/PM SAVED Abb. 7: Zeitformat einstellen Taste drücken. wählen und mit der Taste bestätigen. CLOCK wählen und mit der Taste bestätigen. TIME FORMAT Zeitformat auswählen und mit der Taste bestätigen. Einstellung Auswirkung Die Uhrzeit wird im 24-Stunden-Format angezeigt. 24 Stunden Die Uhrzeit wird im 12-Stunden-Format angezeigt. -
Seite 20: Datumformat Einstellen
Datumformat einstellen CLOCK DATE FORMAT MM.DD.YY SAVED Abb. 8: Datumformat einstellen Taste drücken. wählen und mit der Taste bestätigen. CLOCK wählen und mit der Taste bestätigen. DATE FORMAT Datumformat auswählen und mit der Taste bestätigen. Einstellung Auswirkung Beispiel: 13.10.21 DD:MM:YY Beispiel: 10.13.21 MM:DD:YY Beispiel: 21.10.13... -
Seite 21: Ersten Wochentag Einstellen
Ersten Wochentag einstellen CLOCK WEEK START SUNDAY SAVED Abb. 9: Ersten Wochentag einstellen Taste drücken. wählen und mit der Taste bestätigen. CLOCK wählen und mit der Taste bestätigen. WEEK START DAY Ersten Wochentag (Samstag bis Sonntag) auswählen und mit der Taste bestätigen. -
Seite 22: Standortinformationen Einstellen
Standortinformationen einstellen Die Standortinformation werden von der Astro-Funktion benötigt. Wenn der Standort definiert wird, können sich die Programme an den Sonnenauf- und Sonnenuntergang des jeweiligen Standorts anpassen. Die Standortinformationen können über das gewünschte Land und eine Stadt eingestellt werden. Alternativ können auch die genauen Standortkoordinaten angegeben werden. -
Seite 23: Standortkoordinaten Einstellen
Standortkoordinaten einstellen CLOCK SIGN LONGITUDE LOCATION DEGREE LONGITUDE COORDINATE MINUTE LONGITUDE SIGN LATITUDE TIME ZONE DEGREE SAVED LATITUDE MINUTE LATITUDE Abb. 11: Standortkoordinaten einstellen Taste drücken. wählen und mit der Taste bestätigen. CLOCK wählen und mit der Taste bestätigen. LOCATION wählen und mit der Taste bestätigen. -
Seite 24: Dämmerungsmodus Aktivieren/Deaktivieren
Dämmerungsmodus aktivieren/deaktivieren Auch nach Sonnenuntergang ist noch genügend Umgebungslicht vorhanden. Daher ist es nicht notwendig den Kanal bei bestimmten Anwenungen (z.B. Aussenleuchte) exakt bei Sonnenuntergang einzuschalten. Mit der Dämmerungsfunktion wird der Kanal zeitversetzt eingeschaltet. Diese Zeitdauer wird automatisch berechnet. CLOCK TWILIGHT ENABLE/ DISABLE... -
Seite 25: Sommer-/Winterzeit Wählen
Sommer-/Winterzeit wählen Die automatische Berechnung der Sommer-/Winterzeit (Sommerzeit = DST – Daylight Saving Time) kann nach folgenden möglichen Einstellungen ausgeführt werden. Die zuletzt eingegebene Einstellung besitzt dabei die Priorität. Um Einstellungen bei der Tagesumstellung zu vermeiden, ist die Zeit von 9.01 PM - 11.59 PM im Einstellbereich gesperrt. - Seite 26 Feste Sommerzeit einstellen Die Umschaltung erfolgt nach dem eingestellten Datum und Uhrzeit mit 1 Stunde Offset (Korrekturwert). CLOCK START HOUR 02:00 START MINUTE 02:00 FIX DST END MONTH START MONTH END DAY START DAY SAVED Abb. 14: Feste Sommerzeit einstellen Taste drücken.
- Seite 27 Kundenspezifische Sommerzeit einstellen Die Umschaltung erfolgt nach dem eingestellten Datum und Uhrzeit. Der Offset-Bereich (Korrekturwert) kann von 1 Minute bis 2 Stunden eingestellt werden. CLOCK START MINUTE 02:00 END MONTH CUSTOM DST END WEEK START MONTH SUNDAY START WEEK OFFSET HOUR 01:00 SUNDAY OFFSET MINUTE...
- Seite 28 Sommerzeit nach Ländertabelle einstellen CLOCK EUROPE SAVED Abb. 16: Sommerzeit nach Ländertabelle einstellen Taste drücken. wählen und mit der Taste bestätigen. CLOCK wählen und mit der Taste bestätigen. Land wählen und mit der Taste bestätigen. Die Einstellungen werden übernommen. Sommerzeit Ländertabelle Start Start Start...
-
Seite 29: Betriebsmodus Wählen
Betriebsmodus wählen In diesem Menü können verschieden Betriebsmodi aktiviert bzw.deaktiviert werden. Die zuletzt eingege- bene Einstellung besitzt dabei die Priorität. Bei deaktivierten Betriebsmodi befindet sich die Zeitschaltuhr im Automatik-Modus. Mögliche Einstellungen Dauerhaft EIN Kanal dauerhaft eingeschaltet. Dauerhaft AUS Kanal dauerhaft ausgeschaltet. Override-Modus EIN Mit dem Override-Modus wird das laufende Programm temporär überschrieben. - Seite 30 Dauerhaft AUS MANUAL MANUAL PERM OFF STOP PERM OFF Abb. 18: Betriebsmodus Dauerhaft AUS Taste drücken. wählen und mit der Taste bestätigen. MANUAL mit der Taste bestätigen um den Betriebsmodus Dauerhaft AUS zu starten. PERM OFF m den Betriebsmodus Dauerhaft AUS zu beenden mit der Taste bestätigen.
-
Seite 31: Betriebsstundenzähler Ablesen
Betriebsstundenzähler ablesen Betriebsstundenzähler ablesen OPTIONS OPERATING HOUR VIEW HOUR 00036h SINCE 10.04.21 Abb. 20: Betriebsstundenzähler ablesen Taste drücken. wählen und mit der Taste bestätigen. OPTIONS wählen und mit der Taste bestätigen. OPERATING HOUR wählen und mit der Taste bestätigen. Es werden die Betriebsstunden angezeigt. VIEW HOUR Nochmaliges Drücken der Taste zeigt an, wann der Betriebsstundenzähler gestartet wurde. -
Seite 32: Betriebsstundenzähler Löschen
Betriebsstundenzähler löschen OPTIONS OPERATING HOUR DELETE DELETE ? NO/YES Abb. 21: Betriebsstundenzähler löschen Taste drücken. wählen und mit der Taste bestätigen. OPTIONS wählen und mit der Taste bestätigen. OPERATING HOUR wählen und mit der Taste bestätigen. DELETE Wählen ob der Betriebsstundenzähler gelöscht werden soll und mit der Taste bestätigen. -
Seite 33: Servicealarm Einstellen
Servicealarm einstellen Es besteht die Möglichkeit nach einer eingestellten Betriebsstundenzahl einen Alarmmeldung auszugeben. OPTIONS OPERATING HOUR SERVICE 00200h Abb. 22: Servicealarm einstellen Taste drücken. wählen und mit der Taste bestätigen. OPTIONS wählen und mit der Taste bestätigen. OPERATING HOUR wählen und mit der Taste bestätigen. -
Seite 34: Hintergrundbeleuchtung Einstellen
Hintergrundbeleuchtung einstellen OPTIONS BACKLIGHT ONE MINUTE SAVED Abb. 23: Hintergrundbeleuchtung einstellen Taste drücken. wählen und mit der Taste bestätigen. OPTIONS wählen und mit der Taste bestätigen. BACKLIGHT Art der Hintergrundbeleuchtung wählen und mit der Taste bestätigen. Einstellung Auswirkung Die Hintergrundbeleuchtung des Displays bleibt für eine Minute nach dem letzten Tastendruck ONE MINUTE eingeschaltet. -
Seite 35: Passwort Festlegen
Passwort festlegen OPTIONS PASSWORD ENABLE/ DISABLE PASSWORD 1234 SAVED Abb. 24: Passwort festlegen Taste drücken. wählen und mit der Taste bestätigen. OPTIONS wählen und mit der Taste bestätigen. PASSWORD wählen und mit der Taste bestätigen. PASSWORD ENABLE Passwort eingeben und mit der Taste bestätigen. -
Seite 36: Auf Werkseinstellungen Zurücksetzen
Auf Werkseinstellungen zurücksetzen Es werden alle Einstellungen, außer Zeit und Datum auf die Werkseinstellungen zurückgesetzt. OPTIONS FACTORY RESTORE RESTORE ? NO/YES DONE Abb. 25: Auf Werkseinstellungen zurücksetzen Taste drücken. wählen und mit der Taste bestätigen. OPTIONS wählen und mit der Taste bestätigen. -
Seite 37: Werkseinstellungen
Werkseinstellungen Einstellung Auswirkung Zeitformat 24 h Datumformat DD:MM:YY Erster Wochentag Sonntag Dämmerungsmodus deaktiviert Sommerzeit keine Sommerzeit Holiday-Modus deaktiviert Hintergrundbeleuchtung 1 Minute Passwort deaktiviert... -
Seite 38: Geräteinformationen
Geräteinformation zu gelangen. Info Beschreibung Gerätebezeichnung, XXXX = Firmwareversion TALENTO EASY C1 XXXX Herstelldatum (Datum an dem die Firmware auf dem Gerät installiert wurde) MANUFACTURE ON Gesamtdauer seit der Herstellung, in der das Gerät im Batteriebetrieb lief ON BATTERY HRS Gesamtdauer seit der Herstellung, in der das Gerät am Stromnetz angeschlossen war... -
Seite 39: Astrozeit Ablesen
Astrozeit ablesen ASTRO TIME SUNRISE 07:29 SUNSET 19:14 Abb. 27: Astrozeit ablesen Taste drücken. wählen und mit der Taste bestätigen. ASTRO TIME Sonnenaufgangszeit wird angezeigt. Nach Bestätigung mit der Taste wird die Sonnenuntergangszeit angezeigt. -
Seite 40: Ende-Menü
Ende-Menü Das Ende-Menü taucht an mehreren Stellen in Menüführung auf, so z.B. im Hauptmenü, Program, Clock, Holiday und Options. Es dient dazu das Menü zu beenden und zum Startbildschirm zurückzukehren. Abb. 28: Ende-Menü Taste drücken. wählen und mit der Taste bestätigen. -
Seite 41: Programmierung
Programmierung Die Programmierung der Zeitschaltuhr kann erst nach dem Anschluss an eine externe Span- nungsversorgung erfolgen. Neues Astro-Schaltprogramm erstellen Es können bis zu 50 Astro-Schaltprogramme erstellt werden. Beispiel Sunset – Sunrise Der Kanal wird von Montag bis Sonntag ohne Offset mit dem Sonnenuntergang eingeschaltet. Der Kanal soll aber nicht während der ganzen Nacht eingeschaltet sein. - Seite 42 Taste drücken. wählen und mit der Taste bestätigen. PROGRAM wählen und mit der Taste bestätigen. Es wird kurz die automatisch vergebene Programmnummer angezeigt. oder wählen und mit der Taste bestätigen. SUNSET-SUNRISE SUNRISE-SUNSET Die Sonnenaufgangs- und Sonnenuntergangszeiten werden automatisch berechnet. Einstellung Auswirkung Der Kanal wird von Sonnenuntergang bis Sonnenaufgang eingeschaltet.
- Seite 43 10. Start Uhrzeit – Stunden wählen und mit der Taste bestätigen. Start Uhrzeit – Minuten wählen und mit der Taste bestätigen. 12. Ende Uhrzeit – Stunden wählen und mit der Taste bestätigen. 13. Ende Uhrzeit – Minuten wählen und mit der Taste bestätigen.
-
Seite 44: Astro-Schaltprogramm Ansehen
Astro-Schaltprogramm ansehen PROGRAM VIEW PRG 01 SUNSET-SUN- RISE … Abb. 30: Astro-Schaltprogramm ansehen Taste drücken. wählen und mit der Taste bestätigen. PROGRAM wählen und mit der Taste bestätigen. VIEW Programmnummer auswählen und mit der Taste bestätigen. Taste drücken zum nächsten Programmschritt. -
Seite 45: Astro-Schaltprogramm Bearbeiten
Astro-Schaltprogramm bearbeiten PROGRAM MODIFY PRG 01 … SAVED Abb. 31: Astro-Schaltprogramm bearbeiten Taste drücken. wählen und mit der Taste bestätigen. PROGRAM wählen und mit der Taste bestätigen. MODIFY Programmnummer auswählen und mit der Taste bestätigen. Programm bearbeiten. Vorgehensweise Ä Kapitel „Neues Astro-Schaltprogramm erstellen“ auf Seite 41. -
Seite 46: Astro-Schaltprogramm Löschen
Astro-Schaltprogramm löschen EINZELNES ASTRO-SCHALTPROGRAMM LÖSCHEN PROGRAM DELETE SINGLE DELETE PRG 01 DELETE NO/YES DONE Abb. 32: Einzelnes Astro-Schaltprogramm löschen Taste drücken. wählen und mit der Taste bestätigen. PROGRAM wählen und mit der Taste bestätigen. DELETE wählen und mit der Taste bestätigen. -
Seite 47: Alle Astro-Schaltprogramme Löschen
ALLE ASTRO-SCHALTPROGRAMME LÖSCHEN PROGRAM DELETE ALL DELETE DELETE NO/YES DONE Abb. 33: Einzelnes Astro-Schaltprogramm löschen Taste drücken. wählen und mit der Taste bestätigen. PROGRAM wählen und mit der Taste bestätigen. DELETE wählen und mit der Taste bestätigen. ALL DELETE Wählen ob alle Astro-Schaltprogramme gelöscht werden soll und mit der Taste bestätigen. -
Seite 48: Neues Ferien-Schaltprogramm Erstellen
Neues Ferien-Schaltprogramm erstellen Es können bis zu 10 Schaltprogramme erstellt werden. Für eine Feriendauer kann der Kanal ein- bzw. ausgeschaltet werden. Das Ferienprogramm muss aktiviert werden, damit es ausgeführt wird, siehe Kapitel „Ferien- Schaltprogramm aktivieren“ auf Seite 49. Beispiel Der Kanal wird für die Dauer vom 30.07.2021 um 12:00 Uhr bis zum 12.09.2021 um 18:00 eingeschaltet. -
Seite 49: Ferien-Schaltprogramm Aktivieren
Ende Datum – Monat wählen und mit der Taste bestätigen. 12. Ende Datum – Tag wählen und mit der Taste bestätigen. 13. Ende Uhrzeit – Stunden wählen und mit der Taste bestätigen. 14. Ende Uhrzeit – Minuten wählen und mit der Taste bestätigen. -
Seite 50: Ferien-Schaltprogramm Ansehen
Ferien-Schaltprogramm ansehen HOLIDAY VIEW PRG 01 START DATE 21.06.15 … Abb. 36: Ferien-Schaltprogramm ansehen Taste drücken. wählen und mit der Taste bestätigen. PROGRAM wählen und mit der Taste bestätigen. VIEW Programmnummer auswählen und mit der Taste bestätigen. Taste drücken zum nächsten Programmschritt. -
Seite 51: Ferien-Schaltprogramm Bearbeiten
Ferien-Schaltprogramm bearbeiten PROGRAM MODIFY PRG 01 … SAVED Abb. 37: Ferien-Schaltprogramm bearbeiten Taste drücken. wählen und mit der Taste bestätigen. PROGRAM wählen und mit der Taste bestätigen. MODIFY Programmnummer auswählen und mit der Taste bestätigen. Programm bearbeiten. Vorgehensweise Ä Kapitel „Neues Ferien-Schaltprogramm erstellen“ auf Seite 48. -
Seite 52: Ferien-Schaltprogramm Löschen
Ferien-Schaltprogramm löschen EINZELNES FERIEN-SCHALTPROGRAMM LÖSCHEN PROGRAM DELETE SINGLE DELETE PRG 01 DELETE NO/YES DONE Abb. 38: Einzelnes Ferien-Schaltprogramm löschen Taste drücken. wählen und mit der Taste bestätigen. PROGRAM wählen und mit der Taste bestätigen. DELETE wählen und mit der Taste bestätigen. -
Seite 53: Alle Ferien-Schaltprogramme Löschen
ALLE FERIEN-SCHALTPROGRAMME LÖSCHEN PROGRAM DELETE ALL DELETE DELETE NO/YES DONE Abb. 39: Alle Ferien-Schaltprogramm löschen Taste drücken. wählen und mit der Taste bestätigen. PROGRAM wählen und mit der Taste bestätigen. DELETE wählen und mit der Taste bestätigen. ALL DELETE Wählen ob alle Schaltprogramme gelöscht werden soll und mit der Taste bestätigen. -
Seite 54: Entsorgung
Entsorgung Gefahr für die Umwelt durch falsche Entsorgung! Durch falsche Entsorgung können Gefahren für die Umwelt entstehen. UMWELT- − Die ordnungsgemäße Entsorgung dient dem Umweltschutz und verhindert mögliche SCHUTZ! schädliche Auswirkungen auf Mensch und Umwelt. Im Falle der Entsorgung des Geräts sind die jeweiligen gesetzlichen Vorschriften zu beachten. Information zur Entsorgung von elektrischen und elektronischen Geräten in der Europäi- schen Union: Innerhalb der Europäischen Union wird für elektrisch betriebene Geräte die Entsorgung durch... - Seite 110 Grässlin Zeitschalttechnik GmbH Leopoldstr.1 78112 St. Georgen Germany +49 7724 933-0 +49 7724 933-240 info@graesslin.de www.graesslin.de 80.11.1557.7/1121/V01...