
Verwandte Anleitungen für geo-FENNEL FLG 64-GREEN HP


Inhaltszusammenfassung für geo-FENNEL FLG 64-GREEN HP
- Seite 1 DE | EN | FR All manuals and user guides at all-guides.com FLG 64-GREEN HP BEDIENUNGSANLEITUNG USER MANUAL MODE D‘EMPLOI www.geo-fennel.de www.geo-fennel.com www.geo-fennel.fr...
-
Seite 2: Inhaltsverzeichnis
All manuals and user guides at all-guides.com Sehr geehrter Kunde, vielen Dank für das Vertrauen, welches Sie uns beim Erwerb Ihres neuen geo-FENNEL-Gerätes ent- gegengebracht haben. Dieses hochwertige Qualitätsprodukt wurde mit größter Sorgfalt produziert und qualitätsgeprüft. Die beigefügte Anleitung wird Ihnen helfen, das Gerät sachgemäß zu bedienen. Bitte lesen Sie ins- besondere auch die Sicherheitshinweise vor der Inbetriebnahme aufmerksam durch. -
Seite 3: Stromversorgung
All manuals and user guides at all-guides.com Technische Daten Selbstnivellierbereich ±3° Genauigkeit ±2 mm / 10 m Arbeitsbereich · ohne Empfänger 30 m* (Radius) · mit Empfänger (optional) 60 m Stromversorgung Li-Ion alternativ: Alkalinebatterien Betriebsdauer (alle Linien geschaltet) Staub-/Wasserschutz IP 54 Laserklasse Temperaturbereich -5°C bis +50°C... -
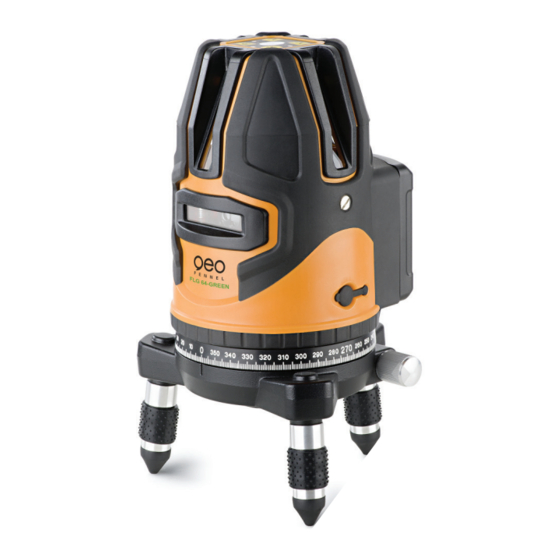
Seite 4: Bedienelemente
All manuals and user guides at all-guides.com LI-ION-AKKU LADEN Ladegerät mit Netz und Ladebuchse am Gerät verbinden. Der Ladezustand wird an der kleinen Lampe am Ladegerät angezeigt: · Rotes Licht zeigt an, dass der Akku geladen wird. · Grünes Licht zeigt an, dass der Akku voll geladen ist. Der Akkupack kann auch außerhalb des Gerätes geladen werden. -
Seite 5: Bedienfeld
All manuals and user guides at all-guides.com BEDIENFELD 1. AN/AUS-LED 2. AN/AUS horizontale Laserlinie H 3. Manuell-LED 4. AN/AUS Empfängerbetrieb / Manuell-Funktion Tilt mode indication LED 5. LED Empfängerbetrieb 6. AN/AUS vertikale Laserlinie V2 Receiving/tilt 7 . AN/AUS vertikale Laserlinie V1 Horizontal line control button Power indication LED... -
Seite 6: Seitenfeintrieb
All manuals and user guides at all-guides.com HÖHENVERSTELLBARE FÜSSE Gegebenenfalls Dosenlibelle des Bedienfeldes mit Hilfe der 3 höhenverstellbaren Füße des Geräte- fußes einspielen, damit die maximale Genauigkeit erreicht wird. SEITENFEINTRIEB Das Gerät kann grob per Hand oder fein mit dem Seitenfeintrieb gedreht werden. FOLGENDE LASERLINIEN KÖNNEN GESCHALTET WERDEN... -
Seite 7: Gerät Einschalten
All manuals and user guides at all-guides.com GERÄT EINSCHALTEN AN-/AUS-Schalter in Position „ON“ bringen. Das Gerät ist nun betriebsbereit (AN/AUS-LED leuchtet). Steht das Gerät zu schräg (außerhalb des Selbstnivellierbereiches), ertönt ein akustisches Warnsignal. Eingeschaltete Laserlinien blinken als zusätzliche Warnung. Zum Ausschalten AN-/AUS-Schalter wieder in Position „OFF“ stellen. Das Gerät ist nun ausgeschaltet, und der Kompensator wird blockiert, um Beschädigungen während des Transportes zu vermeiden. -
Seite 8: Sicherheitshinweise
All manuals and user guides at all-guides.com SICHERHEITSHINWEISE BESTIMMUNGSGEMÄSSE VERWENDUNG Das Gerät sendet einen sichtbaren Laserstrahl aus, um z.B. folgende Messaufgaben durchzuführen: Ermittlung von Höhen; rechten Winkeln, Ausrichtung von horizontalen und vertikalen Bezugsebenen sowie Lotpunkten (je nach Gerät). UMGANG UND PFLEGE Messinstrumente generell sorgsam behandeln. -
Seite 9: Haftungsausschluss
Sicherheitsmassnahmen eingesetzt werden. Das Auge ist bei zufälligem, kurzzei- tigem Hineinsehen in den Laserstrahl durch den Lidschlussreflex geschützt. Laserwarnschilder der Klasse 2 sind gut sichtbar am Gerät angebracht. www.geo-fennel.de GE R M AN Y Laser IEC 60825-1:2014... - Seite 10 All manuals and user guides at all-guides.com Dear Customer, Thank you for your confidence in us, having purchased a geo-Fennel instrument. For the optimum performance of the instrument, please read this manual carefully and keep it in a convenient place for future reference. This manual contains important safety information that should be read and understood before use.
-
Seite 11: Technical Data
All manuals and user guides at all-guides.com Technical Data Self-levelling range ±3° Accuracy ±2 mm / 10 m Working range · w/o receiver 40 m* · with receiver (optional) 60 m Power supply Li-Ion Alkaline batteries alternatively Operating time (all lines powered on) Dust / water protection IP 54 Laser class... -
Seite 12: Features
All manuals and user guides at all-guides.com CHARGE THE LI-ION BATTERY PACK Connect the charger with the socket. · Red light at the charger indicates that batteries are being charged. · Green light at the charger indicates that batteries are fully charged. The Li-Ion battery pack can be charged outside of the laser. -
Seite 13: Keypad
All manuals and user guides at all-guides.com KEYPAD 1. ON/OFF LED 2. ON/OFF horizontal laser line H 3. MANUAL LED 4. ON/OFF receiving mode / manual function 5. LED receiving mode Tilt mode indication LED 6. ON/OFF vertical laser line V2 7 . - Seite 14 All manuals and user guides at all-guides.com HEIGHT ADJUSTABLE SUPPORT LEGS If necessary centre the circular bubble of the keypad by means of the height adjustable support legs in order to reach a maximum accuracy. FINE ADJUSTMENT SCREW The laser can be rotated by hand or carefully by use of the fine adjustment screw. FOLLOWING LASER LINES CAN BE PROJECTED:...
-
Seite 15: Power On The Instrument
All manuals and user guides at all-guides.com POWER ON THE INSTRUMENT Set the ON/OFF knob to position „ON“ . The instrument is now ready for use (the ON/OFF LED is illumi- nated). An audible and optical (blinking lines) alarm indicates if the instrument was set up outside of the compensator range. -
Seite 16: Safety Notes
All manuals and user guides at all-guides.com SAFETY NOTES INTENDED USE OF INSTRUMENT The instrument emits a visible laser beam in order to carry out the following measuring tasks (depen- ding on instrument): Setting up heights, horizontal and vertical planes, right angles and plumbing points. CARE AND CLEANING Handle measuring instruments with care. -
Seite 17: Safety Instructions
The user manual must always be kept with the instrument. LASER CLASSIFICATION The instrument is a laser class 2 laser product according to DIN IEC 60825-1:2014. www.geo-fennel.de G E R M ANY It is allowed to use the unit without further safety precautions. The Laser eye protection is normally secured by aversion responses and the blink reflex. -
Seite 18: Livré Comme Suit
Cher client, Nous tenons à vous remercier pour la confiance que vous avez témoignée, par l‘acquisition de votre nouvel instrument geo-FENNEL. Les instructions de service vous aideront à vous servir de votre instrument de manière adéquate. Nous vous recommandons de lire avec soin tout particulièrement les consignes de sécurité de ladite notice avant la mise en service de votre appareil. -
Seite 19: Données Techniques
All manuals and user guides at all-guides.com Données techniques Plage d‘autonivellement ±3° Précision ±2 mm / 10 m Portée · sans cellule 40 m* (rayon) · avec cellule 60 m Alimentation en courant Li-Ion alternativement: piles alcalines Autonomie Étanche aux poussières / eaux IP 54 Classe laser Plage de température... -
Seite 20: Description De L'appareil
All manuals and user guides at all-guides.com CHARGE DU PACK BATTERIE LI-ION Connectez le chargeur sur la battérie grâce à la fiche. · Quand la diode rouge est allumée, cela signifie que la battérie est en charge. · Quand la diode verte est allumée, cela signifie que la battérie est chargée. Le pack batterie Li-Ion peut être chargé... -
Seite 21: Clavier
All manuals and user guides at all-guides.com CLAVIER 1. Diode ON/OFF du laser 2. Bouton ON/OFF de l‘horizontal H 3. Diode MANUEL 4. Bouton ON/OFF du mode réception / mode MANUEL 5. Diode mode MANUEL 6. Bouton ON/OFF de la verticale V2 7 . -
Seite 22: Pieds Reglables
All manuals and user guides at all-guides.com PIEDS REGLABLES Pour centrer la nivelle dans son cercle, vous pouvez utiliser les pieds réglables pour bénéficier d‘une grande précision de réglage. MOLETTE DE REGLAGE FIN Le laser pivote sur son socle manuellement avec la main ou vous pouvez utiliser la molette sur le côte pour un réglage fin. -
Seite 23: Allumer L'appareil
All manuals and user guides at all-guides.com ALLUMER L‘APPAREIL Mettre le bouton en position ON. L ‘instrument est maintenant prêt à être utilisé (la diode ON/OFF doit être allumée). Un signal sonore et lumineux (les lignes clignotent) indique si l‘instrument est en dehors de sa plage de compensation. -
Seite 24: Consignes De Sécurité
All manuals and user guides at all-guides.com CONSIGNES DE SÉCURITÉ UTILISATION CONFORME AUX PRESCRIPTIONS Le niveau projette un faisceau laser visible, pour effectuer p. ex. les travaux de mesures suivants: détermination de hauteurs, tracé d’angles droits, pointage de plans de référence horizontaux et verti- caux ainsi qu’obtention de points d’aplomb (dépendant de l‘instrument). -
Seite 25: Exclusion De La Responsabilité
Ce niveau correspond à la classe de sécurité des lasers 2, conformé- ment à la norme DIN EN 60825-1:2014. De ce fait, l’instrument peut www.geo-fennel.de G E R M AN Y être utilisé sans avoir recours à d’autres mesures de sécurité. Au Laser cas où... - Seite 26 All manuals and user guides at all-guides.com...
- Seite 27 All manuals and user guides at all-guides.com...
- Seite 28 All manuals and user guides at all-guides.com geo-FENNEL GmbH Technische Änderungen vorbehalten. Kupferstraße 6 All instruments subject to technical changes. D-34225 Baunatal Sous réserve de modifications techniques. Tel. +49 561 / 49 21 45 +49 561 / 49 72 34 info@geo-fennel.de...