The product complies with all the required European product safety, Electromagnetic compatibility and environmental standards. It is fully compliant with the LVD, EMC, RoHS and
Seite 1
ECO 15/20/25 RADIATEUR ÉCOLOGIQUE SANS HUILE / ÖLFREIER RADIATOR OIL-FREE RADIATOR / OLIEVRIJE RADIATOR / GRZEJNIK BEZOLEJOWY OLJEFRI RADIATOR 08/54395/0 - Issue 2 The product complies with all the required European product safety, Electromagnetic compatibility and environmental standards. It is fully compliant with the LVD, EMC, RoHS and Eco design directives.
Seite 2
® pour un fonctionnement optimal. POUR VOTRE SÉCURITÉ: LIRE ATTENTIVEMENT ET COMPRENDRE TOUTES LES INSTRUCTIONS. DE | Vielen Dank für den Kauf dieses Ölfreier Radiator, ECO EWT . Sie können sicher sein, dass Sie mit EWT ein hochwertiges Produkt erworben haben, ®...
CONSIGNES DE SÉCURITÉ • AVERTISSEMENT : Afin d’éviter risque d’incendie. tout risque de suffocation, veiller à • La prise de courant doit être retirer tout le matériel d’emballage, accessible à tout moment afin de notamment éléments pouvoir débrancher la fiche secteur plastique et en EPS, et les tenir le plus rapidement possible.
Seite 4
à condition d’être sous surveillance ans ou maintenir une surveillance ou d’avoir reçu des instructions constante. concernant l’utilisation de l’appareil • Les enfants âgés de 3 à 8 ans en toute sécurité et de comprendre peuvent allumer/éteindre l’appareil les risques encourus. Les enfants sous réserve qu’il ait été...
Seite 5
mêmes, à moins que ces dernières • ASSUREZ-VOUS personne soient constamment surveillées. ne puisse trébucher sur le câble • ATTENTION : Pour réduire le risque d’alimentation. d’incendie, tenez les textiles, rideaux • Si radiateur renversé, et autres matériaux inflammables à débranchez-le et laissez-le refroidir une distance minimum d’un mètre avant de le remettre à...
CARACTÉRISTIQUES Modèle Description Puissance (W) ECO15 7 éléments, thermostat, trois réglages de chaleur et néon 1500 ECO20 9 éléments, thermostat, trois réglages de chaleur et néon 2000 ECO25 11 éléments, thermostat, trois réglages de chaleur et néon 2500...
MONTAGE ET MISE EN PLACE INSTALLATION DES ROULETTES AVERTISSEMENT : CET APPAREIL DOIT ÊTRE BRANCHÉ SUR UNE PRISE DE TERRE AVERTISSEMENT : Le radiateur doit être utilisé uniquement avec les roulettes, qui doivent être montées et en position verti- cale. Les roulettes doivent être fixées au panneau de commande et sur le support entre la dernière et l’avant-dernière ailette à...
Seite 8
UTILISATION IMPORTANT : AUCUN OBJET OU VÊTEMENT NE DOIT ÊTRE POSÉ SUR CE RADIATEUR. Avant d’utiliser l’appareil, veuillez lire attentivement tous les avertissements et toutes les consignes d’utilisation. Pour mettre le radiateur en marche, il suffit de le brancher. Les voyants lumineux situés sur le panneau de commande s’allu- ment lorsque le radiateur est branché sur le secteur. Cela indique que l’appareil est sous tension et prêt à être utilisé. Attention : l’appareil est recouvert d’un film protecteur qui se consume au cours des premières minutes d’utilisation, ce qui peut provoquer de légères émissions de fumées.
Commutateurs de sélection de la chaleur (voir Fig.2) La sélection de la chaleur est assurée par un commutateur rotatif proposant quatre réglages différents. La puissance ther- mique peut être modifiée pour s’adapter à l’application et aux conditions, et pour améliorer l’économie de fonctionnement. Les options de puissance disponibles sont les suivantes : Réglage du commutateur Modèle...
Dans l’intérêt d’un développement ultérieur, l’appareil peut faire l’objet de modifications de construction ou de conception sans préavis. Veuillez conserver votre reçu comme prévue d’achat. GARANTIE Cet appareil EWT est assorti d’une garantie de (2) ans à compter de la date d’achat sous les conditions d’utilisation normales. ®...
Seite 11
Modèle ECO15M ECO20M ECO25M Puissance thermique Puissance thermique nominale Pnom Puissance thermique minimale (indicative) Pmin Puissance thermique maximale continue Pmax,c Consommation électrique auxiliaire À la puissance thermique nominale elmax À la puissance calorifique minimale elmin En mode veille elSB Type de puissance thermique / contrôle de la température ambiante Avec contrôle de la température ambiante par thermostat mécanique GLEN DIMPLEX FRANCE Immeuble Maille Nord III...
SICHERHEITSANWEISUNGEN • VORSICHT: die Gefahr zu Schmelzen, Verformung und des Erstickens zu vermeiden, sogar zum Brand führen kann. entfernen bitte alles • Die Steckdose muss jederzeit Verpackungsmaterial frei zugänglich bleiben, damit der halten Sie dieses von Personen Netzstecker so rasch wie möglich mit verringerten physischen,...
Seite 13
W a h r n e h m u n g s f ä h i g k e i t • NICHT direkt unter einer fest eingeschränkt ist, sowie angebrachten Steckdose Personen mangelnden aufstellen. Kenntnissen oder Erfahrung • Kinder unter 3 Jahren sollten sich benutzt werden.
Seite 14
• WARNUNG: Heizgerät nicht • WARNUNG: Wartungs- und Räumen einsetzen Reparaturarbeiten dürfen nur von Personen, die nicht in der Lage durch den Hersteller autorisiertem sind, den Raum eigenständig zu Servicepersonal durchgeführt verlassen. Bei Überhitzung drohen werden. Grundlegende gesundheitliche Gefahren. Reparaturen dürfen ausschließlich •...
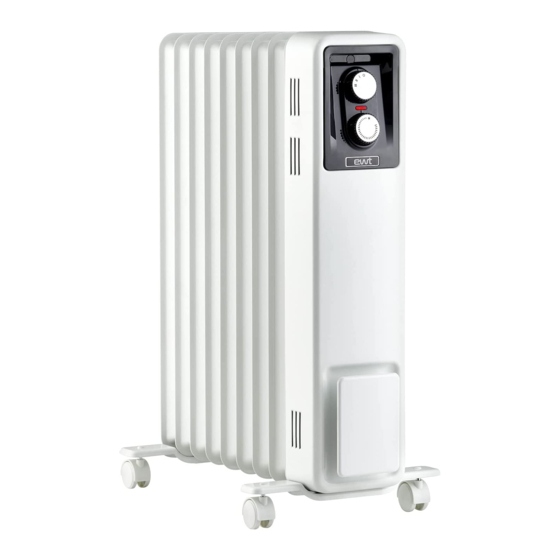
TECHNISCHE SPEZIFIKATION Modell Beschreibung Leistung (W) ECO15 7 Rippen, Thermostat, drei Heizstufen & Neon 1500 ECO20 9 Rippen, Thermostat, drei Heizstufen & Neon 2000 ECO25 11 Rippen, Thermostat, drei Heizstufen & Neon 2500 ZUSAMMENBAU MONTAGE DER ROLLEN ACHTUNG: DIESES GERÄT MUSS GEERDET SEIN ACHTUNG Der Heizkörper darf nur mit montierten Rädern und Laufrollen und in aufrechter Position betrieben werden. AUFSTELLEN DES RADIATORS Wählen Sie die Position für das Heizgerät so, dass ein Abstand von Möbeln und Einrichtungsgegenständen von mindestens 30 cm über dem Heizgerät, 15 cm auf jeder Seite und 30 cm von der Steuer- und Endplatte gewährleistet ist.
AUFSTELLEN DES RADIATORS Wählen Sie die Position für das Heizgerät so, dass ein Abstand von Möbeln und Einrichtungsgegenständen von mindestens 30 cm über dem Heizgerät, 15 cm auf jeder Seite und 30 cm von der Steuer- und Endplatte gewährleistet ist. Der Abstand sollte nach Möglichkeit maximiert werden. ALLGEMEINES Der Radiator ist für den Betrieb mit Wechselstrom konzipiert und für den Einsatz in Wohnhäusern und ähnlichen Innenbereichen vorgesehen. Zum einfacheren Transport ist das Heizgerät mit Rollen und einem Griff ausgestattet. Über einen Drehwahlschalter kann die gewünschte Heizleistung gewählt und über einen einstellbarer Thermostat die entsprechende Regelung der Raumtemperatur vorgenommen werden.
Seite 17
Über den Thermostat gesteuert. Dadurch verschwendet das Heizgerät bei entsprechender Raumtemperatur keine Energie. Zum Einstellen der gewünschten Temperatur drehen Sie den Einstellknopf im Uhrzeigersinn. Zum schnellen Aufheizen eines kalten Raumes drehen Sie den Thermostatknopf ganz auf. Wenn der Raum die gewünschte Temperatur erreicht hat, drehen Sie den Thermostatknopf gegen den Uhrzeigersinn, bis sie ein deutliches Klicken vernehmen. Der Radiator läuft nun automatisch mit dieser Temperatur weiter.
Anspruch auf Erstattung oder Rabatt besteht. Auf diese Weise denken Sie, der Verbraucher oder Benutzer, an die Umwelt und tragen dazu bei, natürliche Ressourcen und menschliche Gesundheit zu schützen. GARANTIE Für dieses EWT -Gerät besteht eine Garantie von zwei (2) Jahren ab Kaufdatum bei normalen Nutzungsbedingungen. Die ® Garantie gilt nicht für Schäden, die direkt oder indirekt auf missbräuchliche Nutzung, Nachlässigkeit, unsachgemäße Nutzung, Unfälle, nicht konforme Reparaturen oder Modifikationen oder auf falsche Pflege zurückzuführen sind. Bewahren Sie bitte Ihren Kassenzettel / Ihre Rechnung als Kaufbeleg auf.
Seite 19
Modellbezeichnung(en): ECO15M ECO20M ECO25M Heizleistung Nominale Heizleistung Pnom Minimale Heizleistung (indikativ) Pmin Maximale Dauerheizleistung Pmax,c Hilfsstromverbrauch Bei nominaler Heizleistung elmax Bei minimaler Heizleistung elmin Im Standby-Modus elSB Art der Heizleistung/Raumtemperaturregelung Mit mechanischem Thermostat Raumtemperaturregelung GLEN DIMPLEX FRANCE Immeuble Maille Nord III Kontakt 12 boulevard du Mont d’Est 93160 NOISY-LE-GRAND France...
SAFETY ADVICES • WARNING: To avoid danger of fins. suffocation please remove all • DO NOT COVER or obstruct the air packaging materials particularly inlet and outlet openings in any way. plastic and EPS and keep these • DO NOT use the heater on deep pile away from vulnerable people, carpets or the long hair type of rugs, children and babies.
Seite 21
due to inadvertent resetting of the a shower or a swimming pool. thermal cut-out, this appliance must • DO NOT use this heater if it has not be supplied through an external been dropped. switching device, such as a timer, •...
Seite 22
service agent. Repairs should only be made by the manufacturer or his service agent. • DO ENSURE that the mains lead cannot be tripped over. • If the radiator is tipped over, unplug it and allow it to cool before standing it back up. • The supply cord should be uncoiled before use.
SPECIFICATIONS Model Description Power (W) ECO15 7 fin, thermostat, three heat settings & Neon 1500 ECO20 9 fin, thermostat, three heat settings & Neon 2000 ECO25 11 fin, thermostat, three heat settings & Neon 2500 ASSEMBLY FITTING THE CASTORS WARNING THIS APPLIANCE MUST BE EARTHED WARNING The radiator must only be operated with the wheels and castors fitted and in the upright position. The castors must be fitted to the control panel and on the bracket between the last and second last fin on the opposite end, as shown in Fig.1. To fit the castors, turn the radiator upside down on a carpet or other soft surface to avoid damage. WARNING : THE RADIATOR IS HEAVY – ENSURE THAT IT IS SUPPORTED TO PREVENT IT FROM TOPPLING. Ask a second person to help with this if necessary. To fit the castors, position the castor plates (A) in position and secure using the wing bolts (B). There are guides to ensure the correct positioning and orientation of the caster plate. Return the radiator to the correct orientation so it rests on the castors. The product is now ready for use. Fig. 1...
POSITIONING THE HEATER Select the position for the heater ensuring there is clearance from any furniture and fittings of at least 300mm above the heater and 150mm each side and 300mm from the control and end panel. We recommend maximising the clearance where possible. GENERAL The radiator is designed for operation on an AC electricity supply, and is suitable for use in domestic dwellings and similar indoor locations. The radiator is fitted with castors and a handle for ease of movement. A rotary selector switch provide the ability to choose an available heat output and an adjustable thermostat enables the room temperature to be controlled accordingly. It is supplied with a cord and plug and is ready for use once the castors have been correctly fitted. OPERATION IMPORTANT - OBJECTS OR CLOTHING MUST NOT BE PLACED ON THIS HEATER. Before using the heater ensure that all warnings and instructions have been read carefully. To activate the heater simply plug it in. Neon indicating light located at the controls area will illuminate when the appliance is plugged into the mains. This indi- cates the appliance is energised and ready for use. Please note – The element has been coated with a protective film which will burn off during the first few minutes of use, this may cause a small amount of fuming. This is quite normal – the fumes are non-toxic and will quickly disappear. We recommend that you open a window to ventilate the room when using the heater for the first time.
Seite 25
CONTROLS Fig. 2 Thermostat The thermostat, see Fig.2, controls the heat output according to the room temperature. This ensures that the heater will not produce heat unnecessarily when the room is warm. To set the temperature you require, turn the thermostat knob clockwise until the required setting is reached. Alternatively to heat a cold room quickly, turn the thermostat knob up fully. When the room has reached the desired temperature, turn the thermostat knob anti-clockwise until the thermostat just clicks off. The heater will now automatically operate at this temperature. The thermostat also has a frost protection setting marked ‘...
This appliance incorporates a number of safety devices. In addition to the ‘Important Safety Advice’ section your attention is drawn to the following; Tilt Switch The tilt switch will prevent the heater from working if it is accidentally tipped over on its side. If the radiator is tipped over while it is hot, disconnect the power and allow it to cool, then stand the radiator back upright. Reconnect the power - normal operation should be resumed. Safety Overheat Protection The heater is fitted with a temperature limiter which will reduce the output of the heater should it overheat for any reason. The product will return to normal operation after the cause of the over heating has been rectified. ADDITIONAL Storage If the radiator is not required for long periods, for example during the summer, it should be stored in a dry place and preferably covered to prevent the accumulation of dirt and dust. The supply cord should be neatly coiled around the cable wrap.
WARRANTY This EWT appliance comes with a two- (2) year warranty which begins on the date of purchase and only applies to use ® under normal conditions. The warranty does not apply to damage incurred as a direct or indirect result of inappropriate use, negligence, improper use, accidents, improper repairs or lack of maintenance. Please keep your receipt/invoice as proof of purchase. The accessories which come with this are consumables and the warranty pertaining to them is limited to one (1) month. EXCLUSIONS FROM WARRANTY • Modifications, disassembly or integration into another machine or assembly making the appliance fixed or semi-fixed, • Normal wear and tear of parts, • Deterioration following incorrect use, • Failure to respect the instructions manual or the maintenance and safety instructions, • Damage arising from faulty maintenance or lack of maintenance, • Damage caused by exterior factors (lightning…), • Abnormal use of the machine, • Storage in poor/inappropriate conditions, •...
Seite 28
Model Identifier(s): ECO15M ECO20M ECO25M Heat output Nominal heat output Pnom Minimum heat output (indicative) Pmin Maximum continuous heat output Pmax,c Auxiliary electricity Consumption At nominal heat output elmax At minimum heat output elmin In standby mode elSB Type of heat output/ room temperature control With mechanical thermostat room temperature control GLEN DIMPLEX FRANCE Immeuble Maille Nord III...
Seite 29
VEILIGHEIDSINSTRUCTIES • WAARSCHUWING: tijde toegankelijk zijn om de verstikkingsgevaar stekker zo snel mogelijk te kunnen vermijden, verwijdert alle loskoppelen. verpakkingsmaterialen, met name • Gebruik het apparaat NIET wanneer plastic en EPS, en houd deze uit het snoer over de elementen hangt. de buurt van kwetsbare personen, •...
Seite 30
krijgen over het op een veilige alleen in- of uitschakelen als het manier gebruiken van het apparaat in de normale gebruikspositie is mogelijke gevaren geplaatst of geïnstalleerd en zij begrijpen. Laat kinderen nooit op een veilige manier toezicht met het apparaat spelen. Reinigen krijgen instructies hebben...
Seite 31
kunnen verlaten, tenzij permanent het snoer kan struikelen. toezicht is gewaarborgd. • Als de radiator gekanteld is, koppel • WAARSCHUWING: Houd om het hem los en laat afkoelen vooraleer risico van brand te verminderen hem weer rechtop te zetten. textiel, gordijnen andere •...
KENMERKEN Model Beschrijving Vermogen (W) ECO15 7 elementen, thermostaat, drie verwarmingsstanden & Neon 1500 ECO20 9 elementen, thermostaat, drie verwarmingsstanden & Neon 2000 ECO25 11 elementen, thermostaat, drie verwarmingsstanden & Neon 2500 MONTAGE WAARSCHUWING: AARDING NOODZAKELIJK De zwenkwielen moeten gemonteerd worden op het bedieningspaneel en op de beugel tussen het laatste en voorlaatste element aan het tegenovergestelde eind, zoals getoond in Fig.1.
Seite 33
ALGEMEEN De radiator is ontworpen voor gebruik op een AC-elektriciteitsnet en is aangewezen voor een gebruik in huishoudelijke en gelijkaardige omgevingen. De radiator is voorzien van zwenkwielen en een handgreep voor makkelijke verplaatsing. Met een draaischakelaar kan men makkelijk een stand selecteren voor de verwarming en er is een regelbare thermostaat voorhanden om de temperatuur in het vertrek te regelen. Geleverd met snoer en stekker en klaar voor gebruik eens de wielen correct gemonteerd zijn.
Opmerking – Indien de radiator niet inschakelt wanneer de thermostaat laag ingesteld is, kan dit te wijten zijn aan het feit dat de temperatuur in het vertrek hoger is dan de instelling van de thermostaat. Keuzeschakelaars Warmte (Fig.2) De warmte kan geselecteerd worden met de draaischakelaar met vier standen. Het warmtevermogen kan gekozen worden in functie van de toepassing, de omstandigheden en met het oog op een zuinig verbruik.
Seite 35
GARANTIE Voor dit EWT toestel geldt een garantie van (2) jaar vanaf de datum van aankoop onder normale gebruiksomstandigheden. ® De garantie geldt niet voor schade die direct of indirect te wijten is aan foutief gebruik, nalatigheid, afwijkend gebruik, onge- vallen, niet-officiële reparaties of wijzigingen en aan een gebrek aan onderhoud. Gelieve uw kassabon/factuur te bewaren als bewijs van uw aankoop.
Seite 36
Identificatie Model: ECO15M ECO20M ECO25M Verwarmingsvermogen Nominaal verwarmingsvermogen Pnom Minimum verwarmingsvermogen (indicatief) Pmin Maximum continu verwarmingsvermogen Pmax,c Aanvullend elektriciteitsverbruik Bij nominal verwarmingsvermogen elmax Bij minimum verwarmingsvermogen elmin In stand-by elSB Type verwarmingsvermogen/ regeling omgevingstemperatuur Regeling omgevingstemperatuur met mechanische thermostaat GLEN DIMPLEX FRANCE Immeuble Maille Nord III Contact 12 boulevard du Mont d’Est...
Seite 37
WYTYCZNE DOTYCZĄCE BEZPIECZEŃSTWA • OSTRZEŻENIE: W celu uniknięcia było szybko odłączyć wtyczkę zagrożenia uduszeniem zasilania. usunąć wszystkie materiały • NIE używać urządzenia, gdy kabel opakowaniowe, szczególnie sieciowy zwisa z żeber. plastik i EPS i trzymać je z dala • NIE WOLNO ZAKRYWAĆ od wrażliwych osób, dzieci i blokować w jakikolwiek sposób niemowląt.
Seite 38
niebezpieczeństwa. Produktu prawidłowo zamontowane nie należy dawać dzieciom do urządzenie, jeżeli znajdują się pod zabawy. Dzieci nie powinny opieką lub zostaną poinstruowane czyścić ani konserwować produktu zakresie bezpiecznego samodzielnie, bez nadzoru. korzystania z urządzenia oraz • Jeśli przewód zasilający jest będą świadome związanych z tym uszkodzony, musi on zostać zagrożeń. Dzieci w wielu od 3 do wymieniony p rzez w ykwalifikowaną...
Seite 39
najmniej 1 m od wylotu powietrza. ostygnięcia. • NIE WOLNO blokować cyrkulacji • Przewód zasilający powinien powietrza wokół grzejnika, na zostać rozwinięty przed użyciem. przykład zasłonami lub meblami, ponieważ może to spowodować przegrzanie i ryzyko pożaru. Patrz ‚Położenie Grzejnika’. • Grzejnik spełnia rygorystyczne normy bezpieczeństwa, ale dla zapewnienia sprawnego działania POWIERZCHNIE GRZEJNIKA STAJĄ SIĘ GORĄCE I NALEŻY UNIKAĆ...
SPECYFIKACJE Model Opis Moc (W) ECO15 7 żeber, termostat, trzy ustawienia ciepła i neon 1500 ECO20 9 żeber, termostat, trzy ustawienia ciepła i neon 2000 ECO25 11 żeber, termostat, trzy ustawienia ciepła i neon 2500 MONTAŻ KÓŁEK WAŻNE - NA GRZEJNIKU NIE WOLNO UMIESZCZAĆ ŻADNYCH PRZEDMIOTÓW ANI ODZIEŻY. OSTRZEŻENIE: Grzejnik może być użytkowany wyłącznie w pozycji pionowej i z zamontowanymi kółkami. Kółka muszą zostać zamontowane na panelu sterowania i na wsporniku znajdującym się na przeciwległym końcu pomiędzy ostatnim i przedostatnim żebrem, jak pokazano na rys.1. Aby zamontować kółka, należy odwrócić grzejnik do góry nogami, umieszczając go na dywanie lub innej miękkiej powierzchni, aby uniknąć uszkodzenia. OSTRZEŻENIE : GRZEJNIK JEST CIĘŻKI – NALEŻY ZAPEWNIĆ MU PODPARCIE, ABY ZAPOBIEC JEGO PRZEWRÓCENIU SIĘ. W razie potrzeby poproś drugą osobę o pomoc. Aby zamontować kółka, należy ustawić płytki kółek (A) w odpowiedniej pozycji i przymocować je za pomocą śrub skrzydełko- wych (B). Na płytce znajdują się prowadnice zapewniające prawidłowe położenie i orientację płytki kółek. Ponownie odwrócić grzejnik tak, aby spoczywał na kółkach. Urządzenie jest teraz gotowe do użycia. Rys.1.
POŁOŻENIE GRZEJNIKA Przy wyborze miejsca ustawienia grzejnika należy upewnić się, że wolna przestrzeń od wszelkich mebli i wyposażenia, wynosi co najmniej 300 mm nad grzejnikiem, 150 mm z każdej strony oraz 300 mm od panelu sterowania i panelu końcowego. Zalecamy maksymalne zwiększenie wolnej przestrzeni tam, gdzie to możliwe. INFORMACJE OGÓLNE Grzejnik przeznaczony jest do pracy przy zasilaniu prądem zmiennym i nadaje się do użytku wewnątrz budynków w pomieszczeniach mieszkalnych i tym podobnych. Grzejnik jest wyposażony w kółka i uchwyt, które ułatwiają jego przemieszczanie. Przełącznik obrotowy umożliwia wybór dostępnej mocy cieplnej, a regulowany termostat pozwala na regulację temperatury w pomieszczeniu.
Seite 42
USTAWIENIA Rys. 2 Thermostat Termostat, patrz rys.2, reguluje moc grzewczą w oparciu o temperaturę w pomieszczeniu. Dzięki temu grzejnik nie będzie wytwarzał niepotrzebnego ciepła, gdy pomieszczenie jest już nagrzane. Aby ustawić żądaną temperaturę, należy przekręcić pokrętło termostatu zgodnie z ruchem wskazówek zegara, aż do osiągnięcia żądanego ustawienia. Aby szybko ogrzać zimne pomieszczenie, można również przekręcić pokrętło termostatu do końca. Gdy pomieszczenie osiągnie żądaną temperaturę, należy przekręcić pokrętło termostatu w kierunku przeciwnym do ruchu wskazówek zegara, aż termostat się wyłączy. Grzejnik będzie teraz automatycznie pracował w tej temperaturze. Termostat posiada również funkcję ochrony przed zamarza- niem oznaczoną ‘ ‘. Funkcja ta jest przydatna w takich miejscach jak garaże, aby zapobiec uszkodzeniom spowodowanym przez mróz. Jeśli ter- mostat jest ustawiony na minimum ‘ ’, grzejnik będzie się włączał i wyłączał, aby utrzymać temperaturę około 5°, co pomoże w ochronie przed mrozem. Uwaga - Jeśli grzejnik nie włączy się przy niskim ustawieniu termostatu, może to być spowodowane faktem, że temperatura w pomieszczeniu jest wyższa od tej ustawionej na termostacie. Przełączniki Ustawień Grzania (rys.2) Wybór mocy cieplnej odbywa się za pomocą przełącznika obrotowego, który umożliwia cztery ustawienia. Moc cieplna może być zmieniana w zależności od zastosowania, warunków oraz w celu zwiększenia oszczędności w eksploatacji. Dostępne są następujące opcje mocy: Ustawienie przełącznika Model ECO15 Urządzenie wyłączone 500 W 1000 W 1500 W ECO20 Urządzenie wyłączone 600 W 1400 W 2000 W ECO25 Urządzenie wyłączone...
Urządzenie to posiada szereg zabezpieczeń. W uzupełnieniu do rozdziału ‘Ważne Wskazówki Bezpieczeństwa’ należy zwrócić uwagę na następujące elementy; Przełącznik Przechyłowy Przełącznik przechyłowy uniemożliwia działanie grzejnika razie przypadkowego przewrócenia go na bok. Jeżeli grzejnik przewróci się, gdy jest gorący, należy odłączyć zasilanie i poczekać, aż ostygnie, a następnie ustawić go po- nownie w pozycji pionowej. Po ponownym podłączeniu zasilania, grzejnik powinien powrócić do normalnej pracy. Zabezpieczenie przed przegrzaniem Grzejnik jest wyposażony w ogranicznik temperatury, który zmniejsza moc grzejnika w przypadku przegrzania z jakiegokolwiek powodu. Produkt powróci do normalnego działania po usunięciu przyczyny przegrzania. INFORMACJE DODATKOWE Przechowywanie Jeżeli grzejnik nie jest używany przez dłuższy czas, np. w okresie letnim, należy go przechowywać w suchym miejscu, najlepiej pod przykryciem, aby zapobiec gromadzeniu się brudu i kurzu. Kabel zasilający powinien być starannie owinięty wokół zwija- cza kabla. WAŻNE Aby zachować czas i zaprogramowane ustawienia, grzejnik musi być podłączony do sieci elektrycznej. W przypadku odłącze- nia od sieci elektrycznej konieczne będzie zresetowanie czasu oraz zaprogramowanych ustawień. CZYSZCZENIE I KONSERWACJA OSTRZEŻENIE - PRZED PRZYSTĄPIENIEM DO CZYSZCZENIA GRZEJNIKA NALEŻY ZAWSZE ODŁĄCZYĆ ZASILANIE. Do czyszczenia obudowy grzejnika nie należy używać żadnego rodzaju detergentów, ściernych proszków czyszczących ani pasty polerskiej. Należy poczekać aż grzejnik ostygnie, a następnie przetrzeć go suchą szmatką w celu usunięcia kurzu oraz wilgotną (nie mokrą) szmatką w celu usunięcia plam. Należy uważać, aby do wnętrza grzejnika nie dostała się wilgoć.
GWARANCJA Niniejsze urządzenie EWT jest objęte gwarancją na (2) lata od daty zakupu przy normalnym użytkowaniu. Gwarancja ® nie obejmuje szkód powstałych bezpośrednio lub pośrednio w wyniku niewłaściwego, lub niestosownego użytkowania, zaniedbania, wypadków, niewłaściwych napraw lub modyfikacji, lub braku konserwacji. Prosimy o zachowanie paragonu/ faktury jako dowodu zakupu. Akcesoria dołączone do urządzenia są częściami eksploatacyjnymi i ich gwarancja jest ograniczona do jednego (1) miesiąca. WYKLUCZENIA Z GWARANCJI • Modyfikacje, demontaż lub połączenie z inną maszyną, lub zespołem w sposób trwały lub półtrwały, • Normalne zużycie części, • Uszkodzenia wynikające z niewłaściwego użytkowania, • Nieprzestrzeganie instrukcji obsługi lub instrukcji konserwacji i bezpieczeństwa, • Uszkodzenia wynikające z niewłaściwej konserwacji lub braku konserwacji, • Uszkodzenia spowodowane czynnikami zewnętrznymi (uderzenie pioruna...), • Nietypowe użytkowanie urządzenia, • Przechowywanie w złych/nieodpowiednich warunkach, • Uderzenia, • Zanurzenie urządzenia • Stosowanie części lub akcesoriów niezatwierdzonych przez Glen Dimplex, • Wygaśnięcie gwarancji RECYKLING URZĄDZENIA Zgodnie z dyrektywą europejską 2012/19/UE dotyczącą zużytego sprzętu elektrycznego i elektronicznego (WEEE), urządzenie to jest oznaczone przekreślonym symbolem kosza na śmieci, co oznacza, że produktu nie...
Seite 45
Identyfikator(y) Modelu: ECO15M ECO20M ECO25M Moc cieplna Nominalna moc cieplna Pnom Minimalna moc cieplna (orientacyjna) Pmin Maksymalna stała moc cieplna Pmax,c Dodatkowe zużycie energii elektrycznej Przy nominalnej mocy cieplnej elmax Przy minimalnej mocy cieplnej elmin W trybie czuwania elSB Typ mocy grzewczej/regulacja temperatury pomieszczenia Z regulacją...
SÄKERHETSANVISNINGAR • VARNING: För undvika nätsladden hängande över fenorna. kvävningsrisk, bort alla • TÄCK INTE eller hindra förpackningsmaterial, särskilt plast inte luftinlopps och EPS, och håll dem på avstånd utloppsöppningarna på något sätt. från sårbara människor, barn och • Använd INTE värmaren på tjocka spädbarn.
Seite 47
grund av oavsiktlig återställning pool i närheten. av den termiska avstängningen får • Använd INTE värmaren om den har denna apparat inte strömsättas tappats på golvet. via en extern omkopplingsenhet, • Använd INTE apparaten om det t.ex. en timer, eller anslutas till en finns synbara tecken på skador på...
Seite 48
• VARNING: Service produktreparationer bör endast utföras av serviceagenter som är godkända tillverkaren. Reparationer bör endast utföras av tillverkaren eller dess serviceagent. • SE TILL att nätsladden inte kan snubblas över. • Om radiatorn välter, koppla ur den och låt den svalna innan du ställer upp den igen.
Seite 49
EGENSKAPER Modell Beskrivning Effekt (W) ECO15 7 fenor, termostat, tre värmeinställningar och Neon 1500 ECO20 9 fenor, termostat, tre värmeinställningar och Neon 2000 ECO25 11 fenor, termostat, tre värmeinställningar och Neon 2500 MONTERING MONTERING AV LÄNKHJULEN VARNING DENNA APPARAT MÅSTE JORDAS VARNING Radiatorn får endast användas när hjulen och länkhjulen har monterats och är i upprätt läge. Länkhjulen måste monteras på kontrollpanelen och på fästet mellan den sista och den nästsista fenan på motsatta änden, som visas i bild 1.
Seite 50
PLACERING AV VÄRMAREN Välj plats för värmaren genom att se till att det finns utrymme mellan alla möbler och tillbehör på minst 300mm ovanför värmaren och 150 mm på vardera sida, och 300 mm från kontroll- och ändpanelen. Vi rekommenderar att maximera avstånden där det är möjligt.
Seite 51
KONTROLLER Bild 2 Termostat Termostaten, se Bild 2, reglerar värmeeffekten enligt rumstemperaturen Detta säkerställer att värmaren inte producerar värme i onödan när rummet är hett. För att ställa in önskad temperatur, vrid termostatknappen medurs till önskad inställning har upp- nåtts. Alternativt, för att värma upp ett kallt rum snabbt, vrid upp termostaten helt. När den önskade temperaturen har nåtts, vrid termostaten moturs tills termostaten klickar av.
Låt värmaren svalna och torka sedan av den med en torr trasa för att ta bort damm och en fuktig trasa (inte våt) för att rengö- ra fläckar. Var noga med att inte släppa in fukt i värmaren. GARANTI Denna EWT -enhet levereras med (2) års garanti från och med inköpsdatumet under normala användningsförhållanden . ®...
Seite 53
AVFALLSHANTERING I enlighet med det europeiska direktivet 2012/19/ EU OM skrot från utrustning elektrisk och elektronisk utrust- ning (WEEE), har detta material en överkryssad papperskorg som symbol för att indikera att produkten inte får kasseras i hushållsavfallet. Ska skrotet överlämnas till en lämplig insamlingsplats för behandling, värdesätt- ning, återvinning av EEE-avfall (fråga i din hemkommun) eller återföras till en distributör enligt principen ”1 mot 1”...
Seite 56
GLEN DIMPLEX FRANCE 12 boulevard du Mont d’Est - 7/10 Porte Neuilly Maille Nord III, Hall A 93160 NOISY-LE-GRAND – France GLEN DIMPLEX DEUTSCHLAND GMBH ewt-Kundendienst +49 (0) 9221 709 719 E-Mail: service@glendimplex.de GLEN DIMPLEX NETHERLANDS Consumer Appliances Europe Saturnus 8 – NL-8448 CC Heerenveen PO Box 219 – NL-8440 AE Heerenveen T. +31(0)513 656500 F. +31(0)513 656501 GDHV Dunleer, Co.