Inhaltsverzeichnis
Werbung
Werbung
Inhaltsverzeichnis

Verwandte Anleitungen für Netvue Vigil Plus Cam


Inhaltszusammenfassung für Netvue Vigil Plus Cam
- Seite 1 Vigil Plus Cam Quick Guide...
- Seite 3 Warning This equipment has been tested and found to comply with the limits for a Class B digital device, pursuant to Part 15 of the FCC Rules. These limits are designed to provide reasonable protection against harmful interference when the equipment is operated in a commercial environment.
- Seite 4 CE RED This product can be used across EU member states. CE RED Das Produkt kann in allen EU-Mitgliedstaaten verwendet werden. CE RED Ce produit peut être utilisé dans tous les États membres de l'UE. CE RED Este producto puede ser usado en todos los estados miembros de la CE RED Questo prodotto può...
-
Seite 5: Inhaltsverzeichnis
4. Battery Charging P. 7-9 5. How To Turn On & Off The Camera P. 10 6. Read Before Installing P. 15 7. Set Up with Netvue App P. 20-21 8. Installation P. 22-31 9. Status Light P. 32-33 10. Netvue Protect Plan P. - Seite 6 4. Carga de la batería P. 7-9 5. Cómo encender y apagar la cámara P. 13 6. Leer antes de instalar P. 18 7. Configurar con la aplicación Netvue P. 20-21 8. Instalación P. 22-31 9. Luz de estado P. 32-33 10.
- Seite 7 4. Ricarica della batteria P. 7-9 5. Come accendere e spegnere la fotocamera P. 14 6. Leggere prima dell'installazione P. 19 7. Configurazione con l'app Netvue P. 20-21 8. Installazione P. 22-31 9. Spia di stato P. 32-33 10. Piano Netvue Protect P.
-
Seite 8: What's In The Box
Ancres Plantilla de perforación Cable USB Tornillos de montaje Anclas Cavo USB Viti di montaggio Ancore Modello di perforazione Vigil Plus Cam Quick Guide Quick Guide Threaded Bracket Kurzanleitung Gewindehalterung Guide rapide Support fileté Guía rápida Soporte roscado Guida veloce Staffa filettata... -
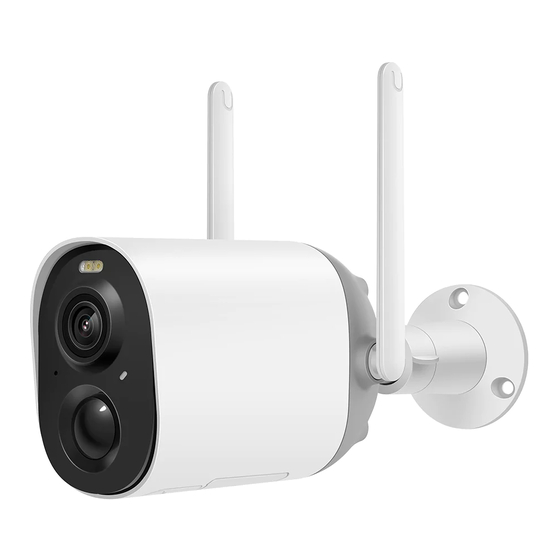
Seite 9: Camera Structure
Camera Structure Antenna Spot Light Antenne Spot-Licht Projecteur Antenne Antena Destacar Antenna Riflettore Lens Linse Microphone Lentille Mikrofon Lente Microphone Lente Micrófono Microfono Status Light Statuslicht Voyant d'état Luz de Estado Luce di stato... - Seite 10 Micro SD Card Slot Micro SD Charging Port Kartensteckplatz Aufladestation Emplacement pour Port de chargement carte micro SD Puerto de carga Ranura para Porta di ricarica tarjeta micro SD Slot per Reset Hole scheda micro SD Loch zurücksetzen Réinitialiser le trou Restablecer agujero Ripristina foro Power Button...
-
Seite 11: Insert Micro Sd Card
Insert Micro SD Card Micro SD Card Slot Micro SD-Kartensteckplatz Emplacement pour carte micro SD Ranura para tarjeta micro SD Slot per scheda micro SD... - Seite 12 Vigil Plus Cam comes with a built-in card slot which supports up to 128GB Micro SD card. Step 1: Open the cover. Step 2: Insert the Micro SD card. Make sure to plug it in right direction. Step 3: Finally, close the cover.
- Seite 13 Paso 2: inserta la tarjeta Micro SD. Asegúrese de enchufarlo en la dirección correcta. Paso 3: Finalmente, cierre la tapa. Vigil Plus Cam è dotato di uno slot per schede integrato che supporta schede Micro SD fino a 128 GB. Passo 1: aprire il coperchio.
-
Seite 14: Battery Charging
Battery Charging... - Seite 15 The batteries inside the camera are not fully charged according to the transportation safety regulations. Please fully charge the camera before using it. Please charge the batteries with a USB Cable (DC5V / 1.5A adapter not included). The status light will be in solid yellow when charging, and will turn to solid green when it is fully charged.
- Seite 16 Las baterías del interior de la cámara no están completamente cargadas de acuerdo con las normas de seguridad para el transporte. Cargue completa- mente la cámara antes de usarla. Cargue las baterías con un cable USB (adaptador de DC5V / 1.5A no incluido). La luz de estado estará...
-
Seite 17: How To Turn On & Off The Camera
How To Turn On & Off The Camera To turn on the camera: Long press the power button for 3s to turn on the camera. Then the Status Light in the front of the camera will be solid blue. Double click the power button to enter the WiFi mode after the prompt tone. -
Seite 18: Ein- Und Ausschalten Der Kamera
Ein- und Ausschalten der Kamera So schalten Sie die Kamera ein: Halten Sie den Netzschalter 3 Sekunden lang gedrückt, um die Kamera einzuschalten. Dann leuchtet die Statusleuchte an der Vorderseite der Kamera durchgehend blau. Doppelklicken Sie auf den Netzschalter, um nach dem Aufforderungston in den WLAN-Modus zu gelangen. - Seite 19 Comment allumer et éteindrel'appareil photo Pour allumer l'appareil: Appuyez longuement sur le bouton d'alimentation pendant 3s pour allumer l'appareil photo. Ensuite, le voyant d'état à l'avant de la caméra sera bleu fixe. Double-cliquez sur le bouton d'alimentation pour entrer en mode WiFi après la tonalité...
- Seite 20 Cómo encender y apagar la cámara Para encender la cámara: Mantenga presionado el botón de encendido durante 3 segundos para encender la cámara. Entonces, la luz de estado en la parte frontal de la cámara será de color azul fijo. Haga doble clic en el botón de encendido para ingresar al modo WiFi después del tono de aviso.
- Seite 21 Come accendere e spegnere la fotocamera Per accendere la fotocamera: Premi a lungo il pulsante di accensione per 3 secondi per accendere la fotocamera. Quindi la spia di stato nella parte anteriore della fotocamera sarà blu fisso. Fare doppio clic sul pulsante di accensione per accedere alla modalità WiFi dopo il segnale acustico.
-
Seite 22: Read Before Installing
Read Before Installing 1. Keep Vigil Plus Cam and all accessories out of reach of children and pets. 2. Make sure the camera has been fully charged (DC5V / 1.5A). 3. Working temperature: -10°C to 50°C (14°F to 122°F) Working relative humidity: 0-95% 4. -
Seite 23: Vor Der Installation Lesen
Vor der Installation lesen 1. Bewahren Sie die Vigil Plus Cam und alle Zubehörteile außerh alb der Reichweite auf Kinder und Haustiere. 2. Stellen Sie sicher, dass die Kamera vollständig aufgeladen ist (DC5V / 1.5A). 3. Arbeitstemperatur: -10 °C bis 50 °C (14 °F bis 122 °F) Arbeitsrelative Luftfeuchtigkeit: 0-95% 4. -
Seite 24: À Lire Avant L'installation
À lire avant l'installation 1. Gardez Vigil Plus Cam et tous les accessoires hors de portée de les enfants et les animaux domestiques. 2. Assurez-vous que la caméra a été complètement chargée (DC5V / 1.5A). 3. Température de fonctionnement : -10°C à 50°C (14°F à 122°F) Humidité... - Seite 25 Leer antes de instalar 1. Mantenga Vigil Plus Cam y todos los accesorios fuera del alcance niños y mascotas. 2. Asegúrese de que la cámara esté completamente cargada (DC5V / 1.5A). 3. Temperatura de trabajo: -10 ° C a 50 ° C (14 ° F a 122 ° F) Humedad relativa de trabajo: 0-95% 4.
-
Seite 26: Leggere Prima Dell'installazione
Leggere prima dell'installazione 1. Tenere Vigil Plus Cam e tutti gli accessori fuori dalla portata di bambini e animali domestici. 2. Assicurati che la fotocamera sia stata completamente caricata (DC5V / 1.5A). 3. Temperatura di esercizio: da -10°C a 50°C (da 14°F a 122°F) Umidità... -
Seite 27: Set Up With Netvue App
Set Up With Netvue App Download Netvue App from App Store or Google Play. Follow the in-app instruction to complete the entire set up process. - Seite 28 Scarica l'app Netvue da App Store o Google Play. Segui le istruzioni in-app per completare l'intero processo di configurazione. Laden Sie die Netvue App aus dem App Store oder von Google Play herunter. Befolgen Sie die Anweisungen in der App, um den gesamten Einrichtungsprozess abzuschließen.
-
Seite 29: Installation
Vigil Plus Cam se ha agregado con éxito a su aplicación Netvue y puede transmitir video. Controlla le seguenti cose prima di praticare dei fori sul muro: 1. Vigil Plus Cam è stata aggiunta con successo alla tua app Netvue ed è in grado di riprodurre video in streaming. - Seite 30 Step 1: Find a good installation spot. Please install the camera in a position where its view is not blocked and ensure that it is within the coverage of the Wi-Fi network.
- Seite 31 Schritt 1: Finden Sie einen guten Installationsort. Bitte installieren Sie die Kamera an einer Position, an der ihre Sicht nicht blockiert wird, und stellen Sie sicher, dass sie sich innerhalb der Reichweite des Wi-Fi-Netzwerks befindet. Étape 1: Trouvez un bon endroit pour l'installation. Veuillez installer la caméra dans une position où...
- Seite 33 Step 2: 1. Use the provided drilling template to mark the position of holes on your wall. Use drill bit (15/64", 6mm) to drill three holes. 2. Install anchors to fix the screws. 3. Install the Threaded Bracket on your wall with the screws provided.
- Seite 34 Schritt 2: 1. Verwenden Sie die mitgelieferte Bohrschablone, um die Position der Löcher an Ihrer Wand zu markieren. Verwenden Sie einen Bohrer (15/64", 6 mm), um drei Löcher zu bohren. 2. Bringen Sie Dübel an, um die Schrauben zu befestigen. 3.
- Seite 36 Step 3: Align the screw hole on the back of the camera with the bracket screw, and then turn it clockwise to tighten it. Schritt 3: Richten Sie das Schraubenloch auf der Rückseite der Kamera mit der Halterungsschraube aus und drehen Sie sie dann im Uhrzeigersinn, um sie festzuziehen.
- Seite 37 Handle Nut Griffmutter Écrou de poignée Tuerca de mango Impugnatura dado...
- Seite 38 Step 4: Rotate the handle nut on the bracket counterclockwise to loosen and adjust the camera angle to cover the surveillance area. Finally tighten the handle nut clockwise. Schritt 4: Drehen Sie die Griffmutter an der Halterung gegen den Uhrzeigersinn, um sie zu lösen und den Kamerawinkel anzupassen, um den Überwachungsbereich abzudecken.
-
Seite 39: Status Light
Status Light This camera uses status light to communicate. Diese Kamera verwendet Statuslicht zur Kommunikation. Cette caméra utilise un voyant d'état pour communiquer. Esta cámara usa la luz de estado para comunicarse. Questa fotocamera utilizza la luce di stato per comunicare. Status Light Description None... - Seite 40 Voyant d'état La description Hors ligne Lumière bleue En ligne Lumière jaune Mode de charge Lumière verte Mode complètement chargé Luz de estado Descripción Ninguno Desconectado Luz azul En línea Luz amarilla Modo de carga Luz verde Modo completamente cargado Spia di stato Descrizione Nessuno...
-
Seite 41: Netvue Protect Plan
Protect Plan Protect Plan provides optional advanced features for those with higher security needs, and each plan supports multiple devices. Protect Plan bietet optionale erweiterte Funktionen für Benutzer mit höheren Sicherheitsanforderungen, und jeder Plan unterstützt mehrere Geräte. Protect Plan fournit des fonctionnalités avancées en option pour ceux qui ont des besoins de sécurité... - Seite 42 Continuous Video Recording Event Video Recording Human Detection Visit my.netvue.com to learn more.
-
Seite 43: Frequently Asked Questions
Frequently Asked Questions Q1: Will the camera show red lights when night vision is activated? A1: The built-in infrared lamp beads make the camera only show some dim red lights when night vision is activated, but the image quality is still clear under no light environment. -
Seite 44: Häufig Gestellte Fragen
Häufig gestellte Fragen F1: Zeigt die Kamera rote Lichter an, wenn die Nachtsicht aktiviert ist? A1: Die eingebauten Infrarotlampenperlen sorgen dafür, dass die Kamera bei aktivierter Nachtsicht nur schwache rote Lichter zeigt, aber die Bildqualität ist auch in keiner Lichtumgebung klar. F2: Was sind die Anforderungen für Wi-Fi? A2: Bitte verwenden Sie ein 2,4-GHz-WLAN. -
Seite 45: Questions Fréquemment Posées
Questions fréquemment posées Q1 : La caméra affichera-t-elle des lumières rouges lorsque la vision nocturne est activée ? A1: Les perles de lampe infrarouge intégrées font que la caméra n'affiche que des lumières rouges tamisées lorsque la vision nocturne est activée, mais la qualité... -
Seite 46: Preguntas Frecuentes
Preguntas frecuentes P1: ¿La cámara mostrará luces rojas cuando se active la visión nocturna? A1: Las perlas de la lámpara infrarroja incorporada hacen que la cámara solo muestre algunas luces rojas tenues cuando se activa la visión nocturna, pero la calidad de la imagen sigue siendo clara en un entorno sin luz. -
Seite 47: Domande Frequenti
Domande frequenti Q1: La fotocamera mostrerà luci rosse quando la visione notturna è attivata? A1: Le perline della lampada a infrarossi integrate fanno sì che la fotocamera mostri solo alcune luci rosse soffuse quando è attivata la visione notturna, ma la qualità... - Seite 48 Feel free to contact us for additional help: Netvue Web Client support@netvue.com Netvue Forum In-App Chat @NetvueTech 1(866)749-0567 netvue.com 240 W Whitter Blvd Ste A, La Habra, CA 90631 © Netvue Inc.
- Seite 49 设计文件须知 产品名称: Vigil Plus Cam 印刷颜色: 单色黑 装帧: 骑马钉 (48页) 日期: 2021-12-03 1.此文件为Netvue市场部出品, 请勿修改相关设计文件, 如有修改请联系设计师 black 2.所有的文件需经相关部门负责人审核校对 2.设计师在交稿之前应对文件仔细校对以确保图纸准确性 说明书尺寸: 材质: 哑粉纸105g 设计师: 林清 3.生产过程中涉及的纸张、 色彩等需与设计师沟通 100mm*100mm...