Inhaltsverzeichnis
Werbung
Quicklinks
Werbung
Inhaltsverzeichnis

Verwandte Anleitungen für Netvue Spotlight Cam


Inhaltszusammenfassung für Netvue Spotlight Cam
- Seite 1 Spotlight Cam Quick Guide...
- Seite 3 Warning This equipment has been tested and found to comply with the limits for a Class B digital device, pursuant to Part 15 of the FCC Rules. These limits are designed to provide reasonable protection against harmful interference when the equipment is operated in a commercial environment.
- Seite 4 CE RED Das Produkt kann in allen EU-Mitgliedstaaten verwendet werden. CE RED Ce produit peut être utilisé dans tous les États membres de l'UE. CE RED Ce produit peut être utilisé dans tous les États membres de l'UE. CE RED Questo prodotto può...
-
Seite 5: Inhaltsverzeichnis
P. 3-4 3. Insert Micro SD Card P. 5-8 4. Install The Antenna P. 9-10 5. Read Before Installation P. 11 6. Set Up With Netvue App P. 16-17 7. Installation P. 18-28 8. Status Light P. 29-30 9. Protect Plan P. - Seite 6 3. Insertar tarjeta Micro SD P. 5-8 4. Instale la antena P. 9-10 5. Leer antes de la instalación P. 14 6. Configurar con la aplicación Netvue P. 16-17 7. Instalación P. 18-28 8. Luz de estado P. 29-30 9. Plan de protección...
- Seite 7 3. Inserire la scheda micro SD P. 5-8 4. Installa l'antenna P. 9-10 5. Leggere prima dell'installazione P. 15 6. Configurazione con l'app Netvue P. 16-17 7. Installazione P. 18-28 8. Spia di stato P. 29-30 9. Proteggi il piano...
-
Seite 8: What's In The Box
What’s In The Box Drilling Temple Power Adapter Bohrschablone Netzteil Gabarit de perçage Adaptateur secteur Plantilla de perforación Adaptador de corriente Modello di perforazione Adattatore di alimentazione Antenna Screws Anchors Antenne Screws Anker Antenne Des vis Ancres Antena Empulgueras Anclas Antenna Viti Ancore... - Seite 9 Hex Spanner Sechskantschlüssel Clé hexagonale Llave hexagonal Chiave esagonale Spotlight Cam Quick Guide Quick Guide Spotlight Cam Kurzanleitung Guide rapide Guía rápida Guida veloce...
-
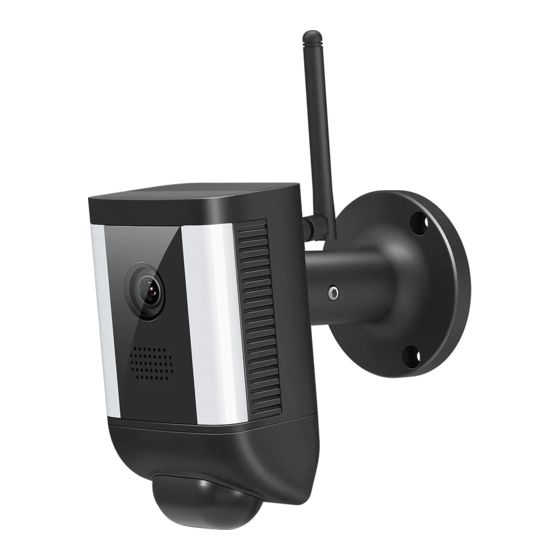
Seite 10: Camera Structure
Camera Structure Antenna LED Light Antenne LED-Licht Antenne Lumière LED Antena Luz LED Antenna Luce a led Lens Linse Lentille Lente Lente Microphone Speaker Mikrofon Lautsprecher Microphone Orateur Micrófono Orador Microfono Altoparlante... - Seite 11 Status Light Statuslicht Voyant d'état Luz de Estado Luce di stato PIR Infrared Passives Infrarot Infrarouge passif Infrarrojos pasivos Infrarossi passivi Wi-Fi Config Button Power Port Wi-Fi-Konfigurationstaste Stromanschluss Bouton de configuration Wi-Fi Port d'alimentation Botón de configuración de Wi-Fi Puerto de alimentación Pulsante di configurazione Wi-Fi Porta di alimentazione...
-
Seite 12: Insert Micro Sd Card
Insert Micro SD Card Micro SD Card Slot Micro SD Kartensteckplatz Emplacement pour carte micro SD Ranura para tarjeta micro SD Slot per scheda micro SD... - Seite 13 Spotlight Cam comes with a built-in card slot which supports up to 128GB Micro SD card. Step 1: Pull the cover off. Step 2: Insert the Micro SD card. Make sure you insert it in the correct direction. Step 3: Finally push back the cover.
- Seite 14 Spotlight Cam est livré avec un emplacement pour carte SD intégré qui prend en charge jusqu'à 128 Go de carte Micro Étape 1 : Retirez le couvercle. Étape 2 : Insérez la carte Micro SD. Assurez-vous de l'insérer dans le bon sens.
- Seite 15 Spotlight Cam è dotato di uno slot per schede SD integrato che supporta schede Micro SD fino a 128 GB. Passo 1 : Rimuovere il coperchio. Passo 2 : Inserire la scheda Micro SD. Assicurati di inserirlo nella direzione corretta.
-
Seite 16: Install The Antenna
Install The Antenna... - Seite 17 Attach the provided antenna counterclockwise to the Spotlight camera. Bringen Sie die mitgelieferte Antenne gegen den Uhrzeigersinn an der Spotlight-Kamera an. Fixez l'antenne fournie dans le sens antihoraire à la caméra Spotlight. Conecte la antena provista en sentido antihorario a la cámara Spotlight.
-
Seite 18: Read Before Installation
1. Keep Spotlight Cam and all accessories out of reach of children and pets. 2. Please note that the Spotlight Cam is 5V input, Please use the power adapter (100V~240V) included in the package. 3. Working temperature: -10°C to 50°C (14°F to 122°F) Working relative humidity: 0-95% 4. -
Seite 19: Vor Der Installation Lesen
1. Bewahren Sie Spotlight Cam und sämtliches Zubehör außerhalb der Reichweite von Kindern und Kindern auf Haustiere. 2. Bitte beachten Sie, dass die Spotlight Cam einen 5V Eingang hat. Verwenden Sie das im Lieferumfang enthaltene Netzteil (100 V ~ 240 V). -
Seite 20: À Lire Avant L'installation
À lire avant l'installation 1. Keep Spotlight Cam and all accessories out of reach of children and pets. 2. Veuillez noter que la Spotlight Cam est une entrée 5V, veuillez utiliser l'adaptateur secteur (100V ~ 240V) inclus dans l'emballage. 3. Température de fonctionnement: -10 ° C à 50 ° C (14 ° F à... - Seite 21 1. Mantenga Spotlight Cam y todos los accesorios fuera del alcance de los niños y mascotas. 2. Tenga en cuenta que la Spotlight Cam tiene una entrada de 5V, utilice el adaptador de corriente (100 V ~ 240 V) incluido en el paquete.
-
Seite 22: Leggere Prima Dell'installazione
1. Tenere Spotlight Cam e tutti gli accessori fuori dalla portata di bambini e animali domestici. 2. Si prega di notare che la Spotlight Cam ha un ingresso di 5V, utilizzare l'adattatore di alimentazione (100V ~ 240V) incluso nella confezione. -
Seite 23: Set Up With Netvue App
Set Up With Netvue App Download Netvue App from App Store or Google Play. Follow the in-app instruction to complete the entire set up process. - Seite 24 Descargue la aplicación Netvue desde App Store o Google Play. Siga las instrucciones de la aplicación para completar todo el proceso de configuración. Scarica l'app Netvue da App Store o Google Play. Segui le istruzioni in-app per completare l'intero processo di configurazione.
-
Seite 25: Installation
Stromkabels und des Ethernet-Kabels gemessen (wenn Sie eine Ethernet-Verbindung verwenden möchten), die Sie benötigen. Vérifiez les éléments suivants avant de percer des trous sur votre mur: 1. Spotlight Cam a été ajouté avec succès à votre application Netvue et est capable de diffuser des vidéos. - Seite 26 Ethernet) dont vous aurez besoin. Verifique lo siguiente antes de perforar agujeros en su pared: 1. Spotlight Cam se ha agregado con éxito a su aplicación Netvue y puede transmitir video. 2. Haber planificado la ruta del cable. Midió la longitud del cable de alimentación y del cable Ethernet (si planea usar una conexión...
- Seite 27 ~2 meters (~6 feet) ~2 meter (~6 fuß) ~2 mètres (~6 pieds) ~2 metros (~6 pies) ~2 metri (~ 6 piedi)
-
Seite 28: Installation
Step 1: Find a good installation spot. • Height of installation from the ground is suggested around 2M (6feet). • PIR setting for lighting on/off automatically is around 9M (27feet). • There is a power outlet nearby. Schritt 1: Finden Sie einen guten Installationsort. •... - Seite 29 Paso 1: Encuentre un buen lugar de instalación. • Se sugiere una altura de instalación desde el suelo alrededor de 2M (6 pies). • El ajuste PIR para encender / apagar la iluminación automática mente es de alrededor de 9M (27 Pies). •...
- Seite 32 Step 2: 1. Use the provided drilling template to mark the position of holes on your wall. Use drill bit (15/64", 6mm) to drill three holes. 2. Install anchors to fix the screws. 3. Tighten the provided screws to secure the camera. Schritt 2: 1.
- Seite 33 Paso 2: 1. Utilice la plantilla de perforación proporcionada para marcar la posición de los agujeros en su pared. Utilice una broca (15/64 ", 6 mm) para perforar tres orificios. 2. Instale anclajes para fijar los tornillos. 3. Apriete los tornillos proporcionados para asegurar la cámara. Passo 2: 1.
- Seite 34 180° 360° Step 3: Use a hex wrench to loosen the screw here counterclockwise to adjust the angle, up to 180°. Then tighten the screw clockwise to fix the camera.
- Seite 35 Schritt 3: Lösen Sie die Schraube hier mit einem Inbusschlüssel gegen den Uhrzeigersinn, um den Winkel auf 180 ° einzustellen. Ziehen Sie dann die Schraube im Uhrzeigersinn an, um die Kamera zu befestigen. Étape 3: Utilisez une clé hexagonale pour desserrer la vis ici dans le sens antihoraire pour ajuster l'angle, jusqu'à...
-
Seite 36: Status Light
Status Light This camera uses status light to communicate. Diese Kamera verwendet Statuslicht zur Kommunikation. Cette caméra utilise un voyant d'état pour communiquer. Esta cámara usa la luz de estado para comunicarse. Questa fotocamera utilizza la luce di stato per comunicare. Status Light Descrition None... - Seite 37 Voyant d'état La description Rien Hors ligne La lumière bleue clignote Mode de configuration Wi-Fi (toutes les 0,2 s) En ligne Blue Light Bolid activé Luz de estado Descripción Ninguno Desconectado La luz azul parpadea (cada 0,2 s) Modo de configuración de Wi-Fi Luz azul encendida En línea Spia di stato...
-
Seite 38: Protect Plan
Protect Plan Protect Plan provides optional advanced features for those with higher security needs, and each plan supports multiple devices. Protect Plan bietet optionale erweiterte Funktionen für Benutzer mit höheren Sicherheitsanforderungen. Jeder Plan unterstützt mehrere Geräte. Protect Plan fournit des fonctionnalités avancées en option pour ceux qui ont des besoins de sécurité... - Seite 39 Protect Plan fornisce funzionalità avanzate opzionali per chi ha esigenze di sicurezza più elevate e ogni piano supporta più dispositivi. Continuous Video Recording Event Video Recording Human Detection Visit my.netvue.com to learn more.
- Seite 40 Feel free to contact us for additional help: Netvue Web Client support@netvue.com Netvue Forum In-App Chat @NetvueTech 1(866)749-0567 netvue.com 240 W Whitter Blvd Ste A, La Habra, CA 90631 © Netvue Inc.
- Seite 41 设计文件须知 产品名称: Spotlight Cam 印刷颜色: 单色黑 装帧: 骑马钉 (40页) 日期: 2021-07-20 1.此文件为Netvue市场部出品, 请勿修改相关设计文件, 如有修改请联系设计师 black 2.所有的文件需经相关部门负责人审核校对 2.设计师在交稿之前应对文件仔细校对以确保图纸准确性 说明书尺寸: 材质: 哑粉纸105g 设计师: 林清 3.生产过程中涉及的纸张、 色彩等需与设计师沟通 72mm*72mm...