Inhaltsverzeichnis
Werbung
Quicklinks
Werbung
Inhaltsverzeichnis

Verwandte Anleitungen für Netvue Birdfy Feeder


Inhaltszusammenfassung für Netvue Birdfy Feeder
- Seite 1 Birdfy Feeder Quick Guide...
- Seite 3 Warning This equipment has been tested and found to comply with the limits for a Class B digital device, pursuant to Part 15 of the FCC Rules. These limits are designed to provide reasonable protection against harmful interference when the equipment is operated in a commercial environment.
-
Seite 4: Inhaltsverzeichnis
P. 11-12 6. How To Turn On & Off The Camera P. 13 7. Read Before Installation P. 18-20 8. Set Up With Netvue App P. 21-22 9. Installation P. 23-40 10. Special Step for Bracket & Tripod Connector Removal P. - Seite 5 6. Cómo encender y apagar la cámara P. 16 7. Leer antes de la instalación P. 18-20 8. Configurar con la aplicación Netvue P. 21-22 9. Instalación P. 23-40 10. Paso especial para la extracción del conector del soporte y del trípode P.
- Seite 6 P. 11-12 6. Come accendere e spegnere la fotocamera P. 17 7. Leggere prima dell'installazione P. 18-20 8. Configurazione con l'app Netvue P. 21-22 9. Installazione P. 23-40 10. Passaggio speciale per la rimozione del connettore della staffa e del treppiede P.
-
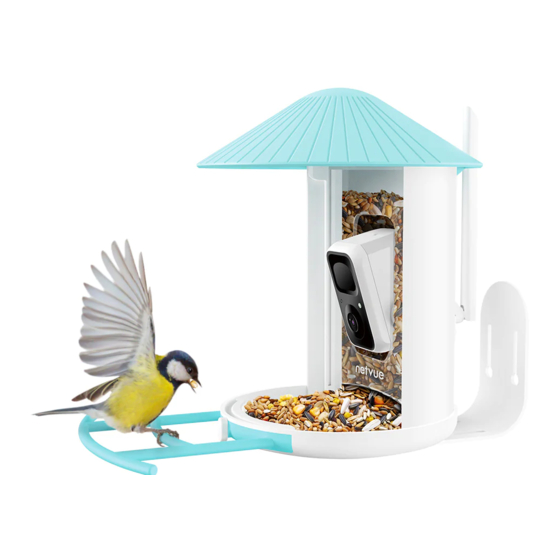
Seite 7: What's In The Box
What’s In The Box Birdfy Feeder Cover Mounting Screws Anchors Couverture de mangeoire à oiseaux Befestigungsschrauben Anker Cubierta del comedero para pájaros Vis de montage Ancres Futterhäuschenabdeckung Tornillos de montaje Anclas Copertura per mangiatoia Birdfy Viti di montaggio ancore Bird Stand... - Seite 8 Connecteur de trépied Perno expulsor Plantilla de perforación Conector de trípode Auswerferstift Modello di perforazione Connettore treppiede Perno di espulsione Birdfy Feeder Quick Guide Quick Guide Type C Power Cable Birdfy Feeder Bracket Kurzanleitung Netzkabel Typ C Vogelfutterhalterung Guide rapide Câble d'alimentation de type C...
-
Seite 9: Camera Structure
Camera Structure Bird Seed Container Vogelfutterbehälter Conteneur de graines pour oiseaux Contenedor de semillas de aves Contenitore per semi di uccelli PIR Infrared Passives Infrarot Infrarouge passif Infrarrojos pasivos Infrarossi passivi Microphone Mikrofon Microphone Micrófono Microfono Status Light Statuslicht Voyant d'état Luz de Estado Luce di stato Bird Stand... - Seite 10 Power Button Reset Hole Micro SD Card Slot Netzschalter Loch zurücksetzen Micro SD-Kartensteckplatz Bouton marche Réinitialiser le trou Emplacement pour carte micro SD Botón de encendido Restablecer agujero Ranura para tarjeta micro SD Pulsante di accensione Ripristina foro Slot per scheda micro SD Antenna Antenne Antenne...
-
Seite 11: Insert Micro Sd Card
Insert Micro SD Card... - Seite 12 Birdfy Cam comes with a built-in card slot which supports up to 128GB Micro SD card. Step 1: Rotate the camera down to the bottom. Step 2: Open the top silicone plug. Insert the Micro SD card. Make sure to plug it in the right direction.
- Seite 13 Birdfy Cam viene con una ranura para tarjeta incorporada que admite tarjetas Micro SD de hasta 128 GB. Paso 1: Gire la cámara hacia abajo. Paso 2: Abre el tapón de silicona superior. Inserte la tarjeta Micro SD. Asegúrese de enchufarlo en la dirección correcta. Paso 3: Finalmente, cubra el tapón de silicona.
-
Seite 14: Assemble Birdfy Feeder
Assemble Birdfy Feeder Assemble Birdfy Feeder Cover Step 1: Face up the side of the cover with the buckles. Align the small pillar on both the left and the right side with the buckles of the white bird seed container. - Seite 15 Montieren Sie die Birdfy Feeder Abdeckung Schritt 1: Schauen Sie die Seite des Gehäuses mit den Schnallen nach. Richten Sie die kleine Säule links und rechts mit den Schnallen am weißen Vogelfutterbehälter aus. Schritt 2: Zum Einfügen nach unten drücken.
- Seite 16 Assemble Bird Stand Use the provided bird stand screw to install the bird stan. Vogelständer zusammenbauen Verwenden Sie die mitgelieferte Vogelständerschraube, um den Vogelständer zu installieren. Assembler le support d'oiseau Utilisez la vis de support d'oiseau fournie pour installer le support d'oiseau. Montar el soporte para pájaros Utilice el tornillo del soporte para pájaros provisto para instalar el soporte para pájaros.
-
Seite 17: Battery Charging
Battery Charging The batteries inside the camera are not fully charged according to the transportation safety regulations. Please fully charge the camera before using it. Please charge the batteries with provided Type C Port Cable (DC5V / 1.5A adapter not included). The status light will be in solid yellow when charging, and will turn to solid green when it is fully charged. - Seite 18 Les batteries à l'intérieur de l'appareil photo ne sont pas complètement chargées conformément aux règles de sécurité relatives au transport. Veuillez charger complète- ment l'appareil photo avant de l'utiliser. Veuillez charger les batteries avec le câble de port de type C fourni (adaptateur DC5V / 1.5A non inclus). Le voyant d'état sera en jaune fixe lors de la charge et deviendra vert fixe lorsqu'il sera complètement chargé.
-
Seite 19: How To Turn On & Off The Camera
How To Turn On & Off The Camera To turn on the camera: Long press the power button for 3s to turn on the camera. Then the Status Light in the front of the camera will be solid blue. Double click the power button to enter WiFi mode after the prompt tone. -
Seite 20: So Schalten Sie Die Kamera Ein Und Aus
So schalten Sie die Kamera ein und aus So schalten Sie die Kamera ein: Halten Sie den Netzschalter 3 Sekunden lang gedrückt, um die Kamera einzuschalten. Dann leuchtet die Statusleuchte an der Vorderseite der Kamera durchgehend blau. Doppelklicken Sie auf den Netzschalter, um nach dem Aufforderungston in den WLAN-Modus zu wechseln. - Seite 21 Comment allumer & Hors de la caméra Pour allumer la caméra : Appuyez longuement sur le bouton d'alimentation pendant 3 secondes pour allumer l'appareil photo. Ensuite, le voyant d'état à l'avant de la caméra sera bleu fixe. Double-cliquez sur le bouton d'alimentation pour entrer en mode WiFi après la tonalité...
- Seite 22 Cómo encender y apagar la cámara Para encender la cámara: Mantenga presionado el botón de encendido durante 3 segundos para encender la cámara. Entonces, la luz de estado en la parte frontal de la cámara será de color azul fijo. Haga doble clic en el botón de encendido para ingresar al modo WiFi después del tono de aviso.
- Seite 23 Come accendere e spegnere la fotocamera Per accendere la fotocamera: Premere a lungo il pulsante di accensione per 3 secondi per accendere la fotocamera. Quindi la spia di stato nella parte anteriore della fotocamera sarà blu fisso. Fare doppio clic sul pulsante di accensione per accedere alla modalità WiFi dopo il segnale acustico.
-
Seite 24: Read Before Installation
Read Before Installation 1. Keep Birdfy Feeder and all accessories out of reach of children and pets. 2. Make sure the camera has been fully charged (DC5V / 1.5A). 3. Working temperature: -10°C to 50°C (14°F to 122°F) Working relative humidity: 0-95% 4. - Seite 25 3. Évitez de placer l'appareil derrière des meubles ou à proximité de produits micro-ondes. Essayez de le garder à portée de votre signal Wi-Fi. 1. Mantenga Birdfy Feeder y todos los accesorios fuera del alcance de los niños y las mascotas. 2. Asegúrese de que la cámara esté completamente cargada (DC5V / 1.5A).
- Seite 26 1. Tenere Birdfy Feeder e tutti gli accessori fuori dalla portata di bambini e animali domestici. 2. Assicurarsi che la fotocamera sia stata completamente caricata (DC5V / 1.5A). 3. Temperatura di esercizio: da -10°C a 50°C (da 14°F a 122°F) Umidità...
-
Seite 27: Set Up With Netvue App
Set Up With Netvue App Download Netvue App from App Store or Google Play. Follow the in-app instruction to complete the entire set up process. - Seite 28 Descargue la aplicación Netvue desde App Store o Google Play. Siga las instrucciones de la aplicación para completar todo el proceso de configuración. Scarica l'app Netvue da App Store o Google Play. Segui le istruzioni in-app per completare l'intero processo di configurazione.
-
Seite 29: Installation
Installation Check the following things before you drill holes on your wall: Birdfy Feeder Cam has been successfully added to your Netvue App and is able to stream video. Überprüfen Sie die folgenden Dinge, bevor Sie Löcher in Ihre Wand bohren: Bird Feeder Camera wurde erfolgreich zu Ihrer Netvue-App hinzugefügt und... - Seite 30 Wi-Fi network. We recommend installing it at a height of 2.2-3.5 meters in an open area to make it easier for birds to find it. Birdfy Feeder provides four installation methods. Please choose the method that works the best for you.
- Seite 31 Wir empfehlen, es in einer Höhe von 2,2-3,5 Metern in einem offenen Bereich zu installieren, um es den Vögeln zu erleichtern, es zu finden. Birdfy Feeder bietet vier Installationsmethoden. Bitte wählen Sie die Methode, die für Sie am besten geeignet ist.
- Seite 32 Wall Installation: Wandinstallation: Installation murale: Instalación en la pared: Installazione a parete:...
- Seite 33 1. Use the provided drilling template to mark the position of holes on your wall. Use drill bit (5/16", 8mm) to drill two holes. 2. Install anchors to fix the screws. 3. Install the Birdfy Feeder Bracket on your wall with the screws provided.
- Seite 34 Ihrer Wand zu markieren. Verwenden Sie einen Bohrer (5/16", 8 mm), um zwei Löcher zu bohren. 2. Bringen Sie Dübel an, um die Schrauben zu befestigen. 3. Bringen Sie die Birdfy Feeder-Halterung mit den mitgelieferten Schrauben an Ihrer Wand Étape 1: 1.Utilisez le gabarit de perçage fourni pour marquer la position des trous sur votre...
- Seite 35 Schieben Sie den Birdfy Feeder durch die Gleitschiene in die Halterung. Étape 2: Faites glisser le Birdfy Feeder dans le support à travers le rail coulissant. Paso 2: Deslice el Birdfy Feeder en el soporte a través del riel deslizante.
-
Seite 36: Installation
Installation de l'arbre : Instalación del árbol: Installazione dell'albero: Step 1: Wrap the Birdfy Feeder Bracket around the tree with a strap (not provided). Schritt 1: Wickeln Sie die Birdfy Feeder-Halterung mit einem Gurt (nicht im Lieferumfang enthalten) um den Baum. - Seite 37 Step 2: Slide the Birdfy Feeder into the bracket. Schritt 2: Schieben Sie den Birdfy Feeder in die Halterung. Étape 2: Faites glisser la mangeoire Birdfy dans le support. Paso 2: Deslice el Birdfy Feeder en el soporte. Passo 2: Far scorrere l'alimentatore Birdfy nella staffa...
- Seite 38 Installazione del supporto: Step 1: The Birdfy Feeder can be placed steadily on a flat surface, but for stability, we recommend that the backplane is installed and fixed on a flat surface. Use the provided drilling template to mark the position of holes on flat surface. Use drill...
- Seite 39 Fläche zu markieren. Verwenden Sie einen Bohrer (5/16", 8 mm), um zwei Löcher zu bohren. Étape 1: Le Birdfy Feeder peut être placé de manière stable sur une surface plane, mais pour plus de stabilité, nous recommandons que le fond de panier soit installé et fixé sur une surface plane.
- Seite 40 Step 2: Install anchors to fix the screws. Schritt 2: Installieren Sie Dübel, um die Schrauben zu befestigen. Étape 2: Installez des ancrages pour fixer les vis. Paso 2: Instale anclajes para fijar los tornillos. Passo 2: Installare gli ancoraggi per fissare le viti.
- Seite 41 Step 3: Install the Birdfy Feeder Bracket on flat surface with the screws provided. Schritt 3: Installieren Sie die Birdfy Feeder-Halterung mit den mitgelieferten Schrauben auf einer ebenen Fläche. Étape 3: Installez le support de mangeoire Birdfy sur une surface plane avec les vis fournies.
- Seite 42 Step 4: Slide the Birdfy Feeder into the bracket. Schritt 4: Schieben Sie den Birdfy Feeder in die Halterung. Étape 4: Faites glisser le Birdfy Feeder dans le support. Paso 4: Deslice el Birdfy Feeder en el soporte. Passo 4: Fai scorrere la mangiatoia Birdfy nella staffa.
- Seite 43 Instalación del trípode: Installazione del treppiede: Make sure you don't have the bracket installed on the bottom of the Birdfy Feeder. If you need to remove it, please take a look at “Special Step for Bracket & Tripod Connector Removal” for instructions on how to remove the bracket.
- Seite 44 Étape 1: Faites glisser la mangeoire Birdfy dans le connecteur du trépied. Asegúrese de no tener el soporte instalado en la parte inferior del Birdfy Feeder. Si necesita quitarlo, consulte el “Paso especial para quitar el soporte y el conector del trípode”...
- Seite 45 Photography Stand (Not provided) Fotoständer (Nicht im Lieferumfang enthalten) Support photo (Non fourni) Soporte de fotografía (No incluido) Supporto fotografico (Non fornito)
- Seite 46 Step 2: Install the bird feeder on the corresponding accessories, such as a photography stand (not provided). Schritt 2: Montieren Sie das Futterhäuschen an entsprechendem Zubehör, wie z. B. einem Fotoständer (nicht im Lieferumfang enthalten). Étape 2: Installez la mangeoire à oiseaux sur les accessoires correspondants, comme un support de photographie (non fourni).
-
Seite 47: Special Step For Bracket & Tripod Connector Removal
Special Step for Bracket & Tripod Connector Removal Pull Tab Slide Rail Zuglasche Gleitschiene Tirette Glissière Lengüeta de arrastre Carril de deslizamiento Tirare la linguetta Guida di scorrimento If you want to remove the bracket from the Birdfy, please pull the pull tab in the center bottom of the bracket first and then slide the bracket off from the Birdfy through the slide rail. - Seite 48 Pull Tab Slide Rail Zuglasche Gleitschiene Tirette Glissière Lengüeta de arrastre Carril de deslizamiento Tirare la linguetta Guida di scorrimento If you want to remove the Tripod Connector from the Birdfy, please pull the pull tab in the center bottom of the Tripod Connector and then slide the connector off from the Birdfy through the slide rail.
-
Seite 49: How To Add Bird Seed
Hebilla Fibbia Step 1: Open up the buckle on the back of the Birdfy Feeder, and turn the Birdfy Feeder cover clockwise to open. Schritt 1: Öffnen Sie die Schnalle auf der Rückseite des Birdfy Feeder und drehen Sie die Birdfy Feeder Abdeckung zum Öffnen im Uhrzeigersinn. - Seite 50 Step 2: You can add bird seed. Finally, close the Birdfy Feeder cover back. Schritt 2: Sie können Vogelfutter hinzufügen. Schließen Sie schließlich die Abdeckung des Birdfy Feeder wieder. Étape 2: Vous pouvez ajouter des graines pour oiseaux. Enfin, refermez le couvercle du Birdfy Feeder.
-
Seite 51: Status Light
Status Light This camera uses status light to communicate. Diese Kamera verwendet die Statusanzeige zur Kommunikation. Cette caméra utilise un voyant d'état pour communiquer. Esta cámara usa la luz de estado para comunicarse. Questa fotocamera utilizza la spia di stato per comunicare. LED Indicator Description Solid Blue... - Seite 52 Indicateur LED La description Bleu uni Travail Rien Veille/Mise hors tension Jaune uni Mise en charge Vert fixe Chargement terminé Indicador LED Descripción Azul solido Laboral Ninguno Dormir / Apagar Amarillo fijo Cargando Verde solido Carga finalizada Indicatore LED Descrizione Blu fisso Lavorando Nessuno...
-
Seite 53: Bird Detection
Bird Detection Protect Plan provides optional advanced features for those with higher security needs, and each plan supports multiple devices. Bird Detection has undergone massive machine learning and uses AI intelligent recognition algorithms to inform you in real time "what species of bird are coming", automatically save the bird images/videos data for you, and also provide bird knowledge learning and so on. - Seite 54 Protect Plan proporciona funciones avanzadas opcionales para aquellos con mayores necesidades de seguridad, y cada plan admite varios dispositivos. Bird Detection se ha sometido a un aprendizaje automático masivo y utiliza algoritmos de reconocimiento inteligente de IA para informarle en tiempo real "qué especies de aves están llegando", guardar automáticamente los datos de imágenes / videos de aves para usted y también proporcionar aprendizaje de conocimiento de aves, etc.
- Seite 55 Continuous Video Recording Event Video Recording Human Detection Learn more on my.netvue.com...
- Seite 56 Feel free to contact us for additional help: Netvue Web Client Netvue Forum support@netvue.com netvue.com/community in-App Chat @NetvueTech 1(866)749-0567 netvue.com 240 W Whitter Blvd Ste A, La Habra, CA 90631 © Netvue Inc.