auna DS-2 Bedienungsanleitung
Inhaltsverzeichnis
Verfügbare Sprachen
Verfügbare Sprachen
Quicklinks
Kapitel
Inhaltsverzeichnis

Verwandte Anleitungen für auna DS-2


Inhaltszusammenfassung für auna DS-2
-
Seite 3: Inhaltsverzeichnis
Sehr geehrter Kunde, wir gratulieren Ihnen zum Erwerb Ihres Geräts. Lesen Sie die folgenden Hinweise sorgfältig durch und befolgen Sie diese, um möglichen Schäden vorzubeugen. Für Schäden, die durch Missachtung der Hinweise und unsachgemäßen Gebrauch entstehen, übernehmen wir keine Haftung. Scannen Sie den QR-Code, um Zugriff auf die aktuellste Bedienungsanleitung und weitere Informationen rund um das Produkt zu erhalten. - Seite 4 WARNUNG VORSICHT: DAS GEHÄUSE NICHT ÖFFNEN, UM EINEN STROMSCHLAG UND ERNSTE PERSONENVERLETZUNGEN ZU VERMEIDEN. IM INNEREN KEINE VOM KUNDEN ZU WARTENDEN KOMPONENTEN. WENDEN SIE SICH AUSSCHLIESSLICH AN QUALIFIZIERTE FACHLEUTE. WARNUNG. UM DIE GEFAHR EINES BRANDS ODER EINES STROMSCHLAGS ZU VERRINGERN, DAS GERÄT NICHT IN WASSER, REGEN ODER FEUCHTIGKEIT AUSZUSETZEN.
-
Seite 5: Sicherheitshinweise
SICHERHEITSHINWEISE Allgemeine Hinweise • Blitzschlag - Wenn Sie das Gerät länger nicht benutzen oder es ein Gewitter gibt, ziehen Sie den Stecker aus der Steckdose oder trennen Sie das Gerät vom Antennenanschluss. Dadurch werden Schäden am Gerät durch Blitzschlag und Überspannung vermieden. •... - Seite 6 Besondere Hinweise zur Bedienung • Kinder ab 8 Jahren, psychisch, sensorisch und körperlich eingeschränkte Menschen dürfen das Gerät nur benutzen, wenn sie vorher von einer für sie verantwortlichen Aufsichtsperson ausführlich mit den Funktionen und den Sicherheitsvorkehrungen vertraut gemacht wurden und die damit verbundenen Risiken verstehen.
-
Seite 7: Geräteübersicht
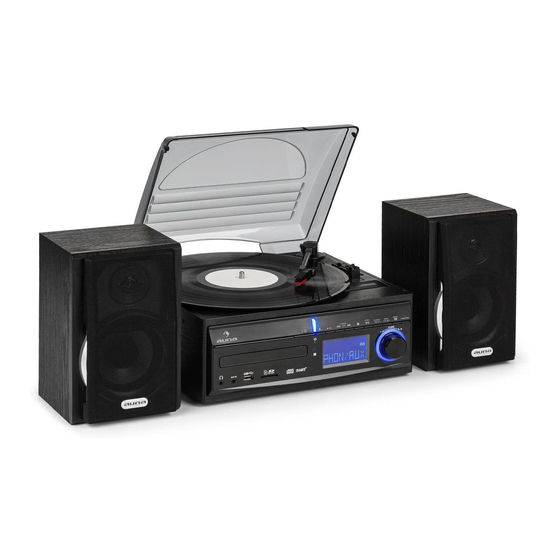
GERÄTEÜBERSICHT Staubschutzabdeckung Sender/VOR-Taste ZURÜCK-Taste AUFNAHME-Taste CD-Fach öffnen/schliessen Betriebs-LED Ein/Aus-Taste Standby-LED CD-Fach Fernbedienungssensor 3.5 mm Kopfhöreranschluss 3.5 mm AUX Eingang USB Steckplatz SD/MMC Kartenschacht STOP-Taste BAND/PLAY/PAUSE-Taste Ordner/Sender Vor-Taste Speicher/Uhr einstellen Taste Equalizer-Taste Funktions-Taste 20 Lautstärke-Tasten LCD Display 22 Schallplattenadapter 23 33/45 RPM Geschwindigkeitsregler 24 Tonarm-Halter 25 Cinch Ausgang (L/R) - Seite 8 Fernbedienung...
-
Seite 9: Fernbedienung
Fernbedienung ON/STANDBY: Drücken Sie diese Taste um das Gerät einzuschalten. FUNCTION: Drücken Sie diese Taste um die Funktionen zu wählen (TUNER/CD/USB/SD/PHON/AUX). DISPLAY: Drücken Sie diese Taste um die Uhrzeit anzuzeigen (Wenn Gerät eingeschaltet ist) : Im CD/mp3 Modus : Vorheriger / nächster Titel. Im Radio Modus: eine Frequenz vor/zurück. -
Seite 10: Installation Und Inbetriebnahme
INSTALLATION UND INBETRIEBNAHME Installation • Entpacken Sie alle Teile und entfernen Sie die Verpackungsmaterialien. • Verbinden Sie das Gerät nicht mit dem Stromnetz, bevor Sie die Spannung geprüft haben und alle andern Komponenten angeschlossen sind. • Verdecken Sie keine Belüftungsöffnungen und stellen Sie sicher, das seinige Zentimeter Platz um das Gerät verbleiben, um eine Belüftung zu gewährleisten. -
Seite 11: Radiofunktionen
RADIOFUNKTIONEN Automatische Sendersuche 1. Drücken Sie die Funktionstaste (19) um den Radiomodus zu aktivieren 2. Drücken und halten Sie die Taste SCAN. Der UKW-Radiosuchlauf startet und speichert automatisch alle empfangenen Sender (max. 30 UKW- Sender). 3. Stellen Sie den gewünschten Sender ein, indem Sie die Taste Zurück oder Vor drücken. -
Seite 12: Cd-Wiedergabe
” auf dem Display angezeigt um zu signalisieren, dass Sie das Programm nun in Stereo empfangen. Hinweise zum besten Empfang Der Empfänger hat eine eingebaute Kabelantenne (26) an der Gehäuserückseite hängend. Dieses Kabel sollte für optimalen Empfang komplett abgewickelt sein. CD-WIEDERGABE Erste Schritte 1. - Seite 13 Für mp3 CDs 1. Nach dem Einlesen der CD wird die Anzahl der Titel und Alben, auf dem Display angezeigt. 2. Drücken Sie die Taste “Ordner/Sender-Vor “ (16) um das jeweilige Album zu wählen. 3. Drücken Sie die “Titel Vor “ oder “Titel zurück “...
-
Seite 14: Wiederholfunktion
mp3 CD/Datei Reihenfolge der Modi: REPEAT 1 (Titel wiederholen) > REPEAT 1 FOLDER (Ordner wiederholen) > REPEAT ALL TRACKS (alle Titel wiederholen) > RANDOM (Zufall) > OFF MODE (Wiederholen/Zufall aus) Modus Displayanzeige REPEAT TRACK REPEAT SINGLE FOLDER REPEAT ALL RANDOM OFF MODE Wiederholfunktion Mit dieser Funktion können Sie den gewünschten Titel oder Ordner... -
Seite 15: Aufnehmen Von Cd Und Schallplatte
Sie die gesamte Playliste löschen. Für mp3 CD/Datei “Ordner/Sender Vor“ Taste (16) um den ersten Titel des nächsten Ordners direkt anzuwählen. Das programmierte Modell wird automatisch beendet, wenn innerhalb von 10 Sekunden nicht die Taste “Speichern/Uhr einstellen“ (17) gedrückt wurde. AUFNEHMEN VON CD UND SCHALLPLATTE Das Gerät kann normale CD´s oder Schallplatten in mp3 Dateien umwandeln und auf Speichermedien am USB- Anschluss aufnehmen und... - Seite 16 • Das Aufnahmeformat ist voreingestellt auf: mp3 BIT RATE : 128 kBPS, SAMPLING RATE : 44.1 kHZ • Während der Umwandlung werden keine Song-Titel aufgenommen. • Um die Aufnahme zu unterbrechen, drücken Sie die “STOP “ Taste (14) während der Umwandlung. •...
- Seite 17 • Wenn der Radioempfang nicht stark genug ist, kann das Gerät den Umwandlungsvorgang nicht starten und der Text “NO GOOD“ erscheint auf dem Display. • Die Aufnahmequalität und –leistung für Radio-Umwandlung schwankt aufgrund von Interferenzen, beim Radioempfang. Dies ist keine Fehlfunktion des Gerätes.
-
Seite 18: Datei Auf Usb Löschen (Per Fb)
3. Drücken Sie die “Titel Vor ” oder “Zurück ” Taste (2) um die gewünschte Bitrate einzustellen. Drücken Sie nochmals die “INFO“ Taste, um die Eingabe zu bestätigen und das Display wechselt zurück zu “ PHON/AUX“. DATEI AUF USB LÖSCHEN (PER FB) Das Gerät kann Dateien auf einem USB-Speicher wie folgt löschen: Einzelne Datei löschen 1. -
Seite 19: Schallplatte Abspielen
SCHALLPLATTE ABSPIELEN Vor dem Abspielen • Entfernen Sie den Schutz von der Schallplattennadel. • Stellen Sie sicher, dass der Tonarm vor der Bedienung von der Tonarmhalterung gelöst ist und sichern Sie ihn wieder, nach Gebrauch. Platte abspielen 1. Stellen Sie den Funktionsschalter (19) auf “ PHON/AUX ” 2. - Seite 20 den Standby-Modus. 4. Um die Funktion abzubrechen/deaktivieren, drücken Sie die “SLEEP” Taste bis Sie den „OFF” Modus erreichen. Anmerkung: Wenn die Sleep-Taste einmal gedrückt ist und der Sleep- Indikator “ “ auf dem Display erscheint, schaltet sich das System nach Ablauf der gewählten Zeitspanne automatisch ab und geht in den Standby- Betrieb.
- Seite 21 steigern. Sie können den gewünschten Effekt erreichen, indem Sie die Taste “PRESET EQ” wiederholt drücken: FLAT > CLASSIC > ROCK > POP > JAZZ. Display Funktionen Drücken Sie die Display-Taste, um die aktuelle Zeit anzuzeigen. Diese Funktion ist in allen Betriebsmodi möglich.
-
Seite 22: Hinweise Zur Entsorgung
HINWEISE ZUR ENTSORGUNG Wenn es in Ihrem Land eine gesetzliche Regelung zur Entsorgung von elektrischen und elektronischen Geräten gibt, weist dieses Symbol auf dem Produkt oder auf der Verpackung darauf hin, dass dieses Produkt nicht im Hausmüll entsorgt werden darf. Stattdessen muss es zu einer Sammelstelle für das Recycling von elektrischen und elektronischen Geräten gebracht werden.