auna Oxford Handbuch
Mini-stereoanlage
Inhaltsverzeichnis
Verfügbare Sprachen
Verfügbare Sprachen
Kapitel
Inhaltsverzeichnis
Fehlerbehebung

Verwandte Anleitungen für auna Oxford


Inhaltszusammenfassung für auna Oxford
-
Seite 3: Inhaltsverzeichnis
Sehr geehrter Kunde, wir gratulieren Ihnen zum Erwerb Ihres Gerä- tes. Lesen Sie die folgenden Hinweise sorgfäl- tig durch und befolgen Sie diese, um möglichen Schäden vorzubeugen. Für Schäden, die durch Missachtung der Hinweise und unsachgemäßen Gebrauch entstehen, übernehmen wir keine Haf- tung. - Seite 4 WARNUNG VORSICHT: DAS GEHÄUSE NICHT ÖFFNEN, UM EINEN STROMSCHLAG UND ERNSTE PERSONENVERLETZUNGEN ZU VERMEIDEN. IM INNEREN KEINE VOM KUNDEN ZU WARTENDEN KOMPONENTEN. WENDEN SIE SICH AUSSCHLIESSLICH AN QUALIFIZIERTE FACHLEUTE. WARNUNG. UM DIE GEFAHR EINES BRANDS ODER EINES STROMSCHLAGS ZU VERRINGERN, DAS GERÄT NICHT IN WASSER, REGEN ODER FEUCHTIGKEIT AUSZUSETZEN.
-
Seite 5: Sicherheitshinweise
SICHERHEITSHINWEISE Lesen Sie sich die Bedienungsanleitung vor der Installation und Inbetriebnahme des Geräts aufmerksam durch und bewahren Sie diese für den zukünftigen Gebrauch auf. Allgemeine Sicherheitshinweise • Achten Sie darauf, dass sich das Gerät und die Gerätebestandteile außerhalb der Reichweite von Kindern befinden. •... - Seite 6 Feuchtigkeit und Wasser • Zur Vermeidung der Brand- und Stromschlaggefahr: • Stellen Sie dieses Gerät nicht in der Nähe von Wasser oder Feuchtigkeit auf. • Stellen Sie dieses Gerät nicht in der Nähe von Badewannen oder Waschbecken, in der Nähe eines Swimmingpools oder an sonstigen orten auf, welche Wasser enthalten oder feucht sind.
-
Seite 7: Geräteübersicht Und Funktionstasten
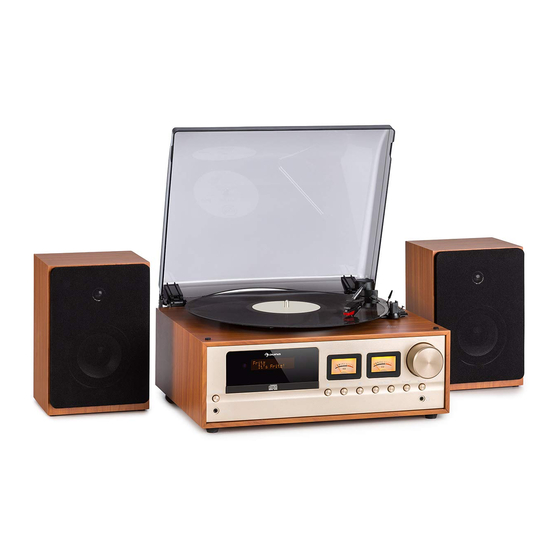
GERÄTEÜBERSICHT UND FUNKTIONSTASTEN Spindeleinsatz Automatischer Stopp des Drehteller mit Drehtellers ein/ aus Drehtellermatte Tonarm Tonarmhebel Tonarmhalter 33/ 45/ 78 RMP Tonabnehmer und Geschwindigkeitsauswahl Nadelschutz des Drehtellers... - Seite 8 13 14 15 Hintergrundbeleuchtung 16 Tune/Skip (vor-/zurückspulen; 10 Standby (Einschalt-/ Standby- überspringen) Taste) 17 Repeat (Gespeicherte Aux-In (AUX-In-Anschluss) Radiosender/ CD wiederholen) 12 CD-Fach 18 Source (Quelle (Phono/ CD/ 13 CD-Fach öffnen/ schließen DAB/ FM-Radio/ BT/ AUX IN)) 14 Wiedergabe/ Pause und 19 Kopfhöreranschluss Verbindung trennen (BT-Modus) 20 Volume (Lautstärkedrehregler)
- Seite 9 Fernbedienung STANDBY (Standby aktivieren/ deaktivieren) MENU (Menü) INFO Sendersuche/ zurückspulen REPEAT/PRESET (wiederholen/ gespeicherte Radiosender aufrufen) STOP VOL- (Lautstärke reduzieren) EJECT (CD-Ausgabe) MODE (Modus (Phono/DAB/FM/CD/BT/AUX) 10 MUTE (Stummschalten) Sendersuche/ vorspulen 12 Wiedergabe/ Pause/ Auswahl 13 PROG (Programmieren) 14 VOL+ (Lautstärke erhöhen) 15 EQ (Equalizer)
-
Seite 10: Aufstellung
AUFSTELLUNG Aufstellort Es ist wichtig, dass Sie sich darüber Gedanken machen, an welchem Ort Sie das Gerät und die Lautsprecher aufstellen möchten. Wenn Sie das Gerät auf der gleichen Oberfläche wie die Lautsprecher und in unmittelbarer Nähe zu diesen platzieren, kann die Tonqualität durch die Luftbewegungen der Lautsprecher und durch Vibration der Abstellfläche, negativ beeinträchtigt werden. -
Seite 11: Inbetriebnahme Und Bedienung
INBETRIEBNAHME UND BEDIENUNG Uhrzeiteinstellung Im Standby-Modus: 1. Drücken Sie lange auf die Taste Repeat. 2. Auf dem Bildschirm blinkt dann „0000“ auf. Drücken Sie die Tasten TUNE/SKIP, um die korrekte Uhrzeit einzustellen und drücken Sie anschließend zum Bestätigen kurz auf die Taste REPEAT. 3. -
Seite 12: Plattenspieler
Sobald die Kopfhörer angeschlossen sind, werden die Lautsprecher deaktiviert und die Tonwiedergabe erfolgt ausschließlich über die Kopfhörer. Hinweis: Hören Sie immer mit vernünftiger Lautstärke Musik. PLATTENSPIELER Vergewissern Sie sich, dass sich das Gerät im Phonomodus befindet. Sollte dies nicht der Fall sein, drücken Sie mehrfach kurz auf die Taste SOURCE, bis der Phonmodus auf dem Bildschirm durch „PH“... -
Seite 13: Cd-Player
5. Wählen Sie mit der Geschwindigkeitsauswahltaste die korrekte Geschwindigkeit für die Schallplatte aus. 6. Aktivieren oder deaktivieren Sie das automatische Stoppen. Tonarmsicherung Tone arm clip 7. Verwenden Sie den Tonarmhebel, um den Tonarm anzuheben. 8. Bewegen Sie den Tonarm über die Schallplatte.. Protective Nadelschutz 9. - Seite 14 der erste Titel auf der CD abgespielt. Die bereits vergangene Zeit wird auf dem Bildschirm angezeigt. Bedienelemente im CD-Betrieb Wiedergabe/ Pause: Drücken Sie zum Pausieren kurz die Taste . Die Titelnummer blinkt im Pausenmodus auf. Drücken Sie zum Fortsetzen der CD erneut die Taste ...
- Seite 15 in Schritt 2 vor. Insgesamt können auf diese Art und Weise 20 Titel in beliebiger Reihenfolge gespeichert werden. Hinweis: Sobald Sie den 20ten Titel gespeichert haben, wird auf dem Bildschirm „FULL“ angezeigt. 4. Drücken Sie zum Bestätigen des letzten Titels, welchen Sie in der Wiedergabeliste speichern möchten, die Taste REPEAT.
-
Seite 16: Fm-Radio
FM-RADIO Falls sich das Gerät nicht bereits im FM-Modus befindet, drücken Sie mehrfach die Taste SOURCE, bis auf dem Bildschirm „FM“ angezeigt wird. Falls Sie, bevor Sie das Gerät in den Standby-Modus versetzt haben, bereits Radio gehört haben, spielt das Gerät bei erneutem einschalten automatisch den zuletzt gehörten Radiosender ab. -
Seite 17: Dab-Radio
Einen gespeicherten FM-Sender auswählen 1. Drücken Sie mehrfach die Taste REPEAT, bis Sie zu der gewünschten Speicherposition (1-30) gelangen. 2. Wenn Sie nach jedem Mal Drücken kurz warten, wird die Frequenz des auf der Speicherposition gespeicherten Radiosenders angezeigt und das Gerät wählt diesen Sender aus und spielt ihn ab. - Seite 18 Sendersuche durchzuführen. Im DAB-Modus:Drücken und halten Sie die Taste STOP des Geräts oder drücken Sie die Taste MENU der Fernbedienung. Drücken Sie kurz die Tasten oder , um die vollständige Sendersuche auszuwählen und drücken Sie zum Starten die Taste ...
-
Seite 19: Signalinformation
ausgewählten Sender ein und beginnt mit der Wiedergabe. Hinweis: Falls auf der ausgewählten Speicherposition kein Sender gespeichert wurde wird auf dem Bildschirm „Empty“ angezeigt und das Gerät spielt automatisch den zuvor gehörten Sender ab. DAB Bildschirminformationen Wenn Sie einen DAB-Sender hören, können Sie die Informationen, welche auf dem Bildschirm angezeigt werden, verändern. -
Seite 20: Bt-Modus
Im DAB-Modus: Die Dynamikbereichssteuerung für jeden Radiosender wird von der Rundfunkanstalt für jeden Sender eingestellt und kann für die verschiedenen ausgestrahlten Programmarten, wie beispielsweise Pop, Klassische Musik oder einer Talkshow, variieren. Die dynamische Frequenzkontrolle wird für jedes Programm parallel mit dem Audiosignal übertragen. - Seite 21 Bedienungsanleitung des mobilen Endgeräts durch. 4. In der Geräteliste des mobilen Endgeräts wird Ihr Plattenspieler als „Oxford“ angezeigt. Wählen Sie „Oxford“ aus, um mit der Kopplung der Geräte zu beginnen. Hinweis: Falls zur Kopplung die Eingabe eines Passworts benötigt wird, geben Sie „0000“...
-
Seite 22: Aux-In-Modus
Hinweis: Wenn Sie die Taste 3 Sekunden lang gedrückt haben, wird das aktuell via BT verbundene Endgerät entkoppelt und ein neues Gerät wird gesucht. Zurückspulen/ Titel überspringen Drücken Sie kurz auf die Taste . Vorspulen/ Titel überspringen Drücken Sie kurz auf die Taste . Hinweis: Wenn Sie das Gerät für circa 20 Minuten pausieren oder nicht verwenden und kein Audiosignal empfangen wird, wechselt das Gerät automatisch in den Standby-Modus. -
Seite 23: Fehlersuche Und Fehlerbehebung
FEHLERSUCHE UND FEHLERBEHEBUNG Kein Strom • Überprüfen Sie, ob der Netzstecker des Geräts in die Steckdose gesteckt wurde. • Drücken Sie kurz die Einschalttaste des Geräts, um dieses einzuschalten. Der Tonarm überspringt Spuren, gleitet über die Platte oder bewegt sich nicht •... -
Seite 24: Hinweise Zur Entsorgung
Audiosignal oder im Pausenmodus in den Standby-Modus wechselt. Drücken Sie kurz die Einschalttaste, um das Gerät wieder einzuschalten. HINWEISE ZUR ENTSORGUNG Befindet sich die linke Abbildung (durchgestrichene Mülltonne auf Rädern) auf dem Produkt, gilt die Europäische Richtlinie 2012/19/EU. Diese Produkte dürfen nicht mit dem normalen Hausmüll entsorgt werden.