AVer AVerVision M90UHD Bedienungsanleitung
Vorschau ausblenden
Andere Handbücher für AVerVision M90UHD:
- Bedienungsanleitung (313 Seiten) ,
- Schnellanleitung (54 Seiten) ,
- Schnellanleitung (68 Seiten)
Inhaltsverzeichnis
Werbung
Verfügbare Sprachen
Verfügbare Sprachen
Quicklinks
Werbung
Kapitel
Inhaltsverzeichnis
Fehlerbehebung

Verwandte Anleitungen für AVer AVerVision M90UHD


Inhaltszusammenfassung für AVer AVerVision M90UHD
- Seite 1 AVerVision M90UHD User Manual...
-
Seite 2: Trademarks
In no event will AVer be liable for direct, indirect, special, incidental, or consequential damages arising out of the use or inability to use this product or documentation, even if advised of the possibility of such damages. - Seite 3 ©2020 of this object belong to AVer Information Inc. Reproduced or transmitted in any form or by any means without the prior written permission of AVer Information Inc. is prohibited. All information or specifications are subject to change without prior notice.
- Seite 4 WARNING To reduce the risk of fire or electric shock, do not expose this appliance to rain or moisture. Warranty will be void if any unauthorized modifications are done to the product. Do not drop the camera or subject it to physical shock. ...
- Seite 5 AVer Information Inc. https://www.aver.com 8F, No.157, Da-An Rd., Tucheng Dist., New Taipei City 23673, Taiwan Tel: +886 (2) 2269 8535 European Headquarters AVer Information Europe B.V. https://www.avereurope.com Westblaak 140, 3012KM, Rotterdam, Netherlands Tel: +31 (0) 10 7600 550 Technical support: eu.rma@aver.com...
-
Seite 6: Inhaltsverzeichnis
Table of Contents Package Contents ....................1 Optional Accessories ..................1 Get Familiar with the AVerVision M90UHD ............2 Right Panel ......................3 Left Panel ........................ 3 Rear Panel ......................4 Control Panel ......................5 Remote Control ....................... 7 Making the Connections ................... 9 Connecting the Power ..................... - Seite 7 Capture Quality ....................34 Capture Type ....................34 Capture Interval ....................34 Storage ......................35 Format ......................35 USB to PC ......................35 MIC Volume ...................... 35 Start Timer ......................36 Pause/Stop Timer ..................... 36 Timer Interval ....................36 System ........................37 Language ......................
-
Seite 8: Package Contents
Make sure the following items are included in the package. VGA Cable USB Cable Power Adapter (5V, 3A) * The power plug will vary depending on the standard AVerVision M90UHD power outlet of the country Remote Control where it is sold. (AAA*2 batteries included) * Including Software, User... -
Seite 9: Get Familiar With The Avervision M90Uhd
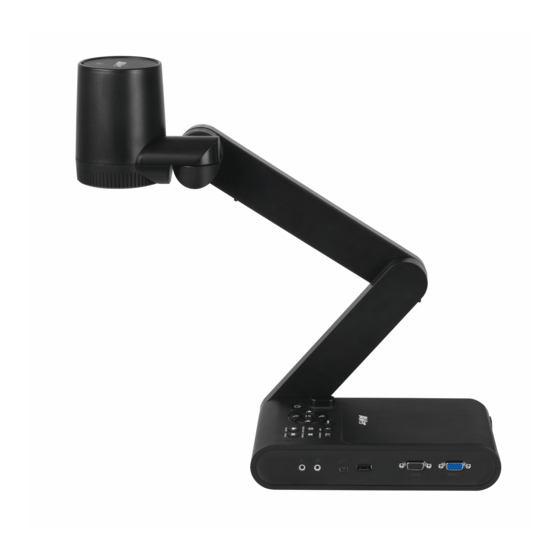
Get Familiar with the AVerVision M90UHD Name Function Camera head Contain the camera sensor. Camera lens Focus the image in the camera. LED light Provide light to enhance the lighting condition. Mechanical arm Provide adjustable viewing coverage. Left panel Micro SD card slot. -
Seite 10: Left Panel
(6) VGA IN port the VGA OUT port only. Connect this port to the VGA output port of a computer. (7) VGA OUT port Connect the AVerVision M90UHD to any display device with VGA cable. Lef t Panel Name Function Insert the Micro SD card with the label facing up. -
Seite 11: Rear Panel
Rear Panel Name Function Connect an external HDMI source as an input via this port. Connect this (1) HDMI IN port port to the HDMI output port of a computer. Output the video signal from the main system on an interactive flat (2) HDMI OUT port panel, an LCD monitor or LCD/DLP projector with HDMI interface using HDMI cable. -
Seite 12: Control Panel
C ontr ol Panel (14) (13) (12) (11) (10) Name Function (1) POWER Turn the unit on/standby mode. Decrease the brightness. - Make a selection in Playback mode and OSD menu. - Start/Pause video playback. - Adjust the focus automatically. Increase the image magnification in the camera and picture playback mode. - Seite 13 Name Function (14) ▲,▼,◄, & ► - Pan and zoom-in image (above digital zoom level) in live mode. - Select options in OSD menu. - Use ▲&▼ to increase and decrease the video playback volume. - Use ◄&► to play the video backward and forward.
-
Seite 14: Remote Control
Remot e Cont r ol The remote control requires two (2) “AAA” size batteries (provided), make sure batteries are installed properly before use. You can access all the features of AVerVision M90UHD with the remote. Name Function POWER Turn the unit on/off/standby... - Seite 15 Name Function Call the Timer submenu. Select to (18) TIMER Start/Pause/Stop the timer (12) countdown. (13) (14) (15) (16) (17) (18) (19) Select Timer Interval to set the timer (20) duration. (10) (21) (11) (22) (23) - Make a selection in Playback (19) mode and OSD menu.
-
Seite 16: Making The Connections
Before making the connection, make sure the power of all devices are turned off. If you are not sure where to connect, simply follow the illustrated connections below and refer to the user manual of the device you are connecting to the AVerVision M90UHD. C onnecting t he Power Connect the power adapter to a standard 100V~240V AC power outlet. -
Seite 17: Connect To A Computer Via Usb
C onnect t o a Comput er vi a USB Locate the USB port of the computer or laptop and connect it to PC port of AVerVision M90UHD. Then your M90UHD can be used as a USB camera, you may select it as your camera when turning on software like Skype, Teams and Zoom etc. -
Seite 18: Connect To A Monitor Or Lcd/Dlp Projector With Vga/Hdmi Output
C onnect t o a M onit or or LCD /D LP P r oj ect or wi t h VG A /H DMI Out put Locate the VGA/HDMI input port of the display device and connect it to VGA/HDMI OUT port of AVerVision M90UHD. * VGA cable connection * HDMI cable connection... -
Seite 19: Connect To A Computer With Vga/Hdmi Input
C onnect t o a Comput er wi th VG A / HDM I Input Locate the VGA/HDMI input port of the display device and connect it to VGA/HDMI out port of AVerVision M90UHD. - Seite 20 On the other side, locate the VGA/HDMI output port of the computer or laptop and connect it to VGA/HDMI in port of AVerVision M90UHD. The video signal from the VGA/HDMI IN port is streamed to VGA/HDMI OUT. [Note] - To display computer image, press Camera/PC button on the control panel or remote control to switch AVerVision M90UHD to computer mode.
-
Seite 21: Connect An Amplified Speaker
C onnect a n Am pli fi ed S peaker Plug a 3.5mm amplified speaker to Line Out ( port. Only the audio from the video playback is supported. [Note] We recommend connecting an amplified speaker to the Line out port. Take caution when using earphones. -
Seite 22: Connect To A Microscope
C onnect t o a Mi cr os cope Connect the AVerVision M90UHD to a microscope enables you to examine microscopic objects on a big screen. Change the image display mode to Microscope. Select IMAGE tab > select Preview Mode > select Microscope... - Seite 23 Remove the microscope eyepiece from the microscope and connect it to the microscope adapter with the rubber coupler inserted. Fasten the 3 bolts until Connecting the adapter secures the eyepiece. plate - For the eyepiece, we suggest Microscope using 33mm eye relief or higher. adapter - Do the adjustment manually to get Microscope...
-
Seite 24: Setting Up Avervision M90Uhd
S ett i ng Up AVerV is i on M 90U H D This section provides useful tips on how to adjust the AVerVision M90UHD to meet your needs. S t or i ng the Docum ent C am er a... -
Seite 25: Shooting Area
S hooti ng A r ea The shooting area can be viewed an area of 420 x 315mm at High Definition preview mode. When camera position is 360.3mm high, the shooting area will be A3 size. - Seite 26 The Camera head can be rotated 90 as below figure shown. -90° 0° +90° To mirror the image, press MENU > select Mirror, press , and select “On”.
-
Seite 27: Overhead Light
O ver head Li ght Press LAMP button on the control panel or remote control to turn on and off light. -
Seite 28: Infrared Sensor
I nf r ar ed S ens or Aim the remote control at the infrared sensor to operate the unit. M ount i ng t he M 90U H D on a F l at S ur face Measure and mark the horizontal of 75 mm from the center line distance between the holes on the flat surface as describe in the illustration below. -
Seite 29: Anti-Glare Sheet
The supported Micro SD card capacity is from 1GB to 32GB (FAT32). Insert a USB Flash Drive Connect the USB flash drive in the USB slot. AVerVision M90UHD can support USB flash drive maximum 32GB. Best to format the USB flash drive using AVerVision M90UHD for better video recording. -
Seite 30: Rs232 Diagram Connection
RS232 Diag r am Connection AVerVision M90UHD can be controlled using a computer or any centralized control panel through RS232 connection. RS232 cable (not supplied) Desktop Laptop... -
Seite 31: Rs-232 Send Command Table
RS-232 Send Command Table Send Format︰0x52 + 0x0B + 0x03 + Data[0] + Data[1] + Data[2] + 0x53 + Checksum Success Receive Format︰0x53 + 0x00 + 0x02+ *2 + 0x00 + 0x52 + Checksum Abnormal Receive Format︰0x53 + 0x00 + 0x01+ *3 + 0x52 + Checksum *1 :Checksum = 0x0B xor 0x03 xor Data[0] xor Data[1] xor Data[2] xor 0x53 *2 :Receive data ok : 0x0B, Not Command : 0x03 *3 :ID error: 0x01, Checksum error: 0x02, Function fail = 0x04... - Seite 32 Function Data[0] Data[1] Data[2] Checksum PREVIEW MODE: INFINITE 0x0A 0x05 0x00 0x54 PREVIEW MODE: NORMAL 0x0A 0x06 0x00 0x57 PREVIEW MODE: HIGH QUALITY 0x0A 0x07 0x00 0x56 PREVIEW CAPTURE 0x0B 0x00 0x00 0x50 PLAYBACK DELETE 0x0C 0x00 0x00 0x57 PLAYBACK FULL SCREEN 0x0D 0x00 0x00...
- Seite 33 Function Data[0] Data[1] Data[2] Checksum FLICKER: 60Hz 0x18 0x01 0x00 0x42 RECORD: OFF 0x23 0x00 0x00 0x78 RECORD: ON 0x23 0x01 0x00 0x79 MOVIE FAST REWIND 0x25 0x00 0x00 0x7e MOVIE FAST FORWARD 0x25 0x01 0x00 0x7f MOVIE VOL INC 0x26 0x00 0x00...
- Seite 34 Function Data[0] Data[1] Data[2] Checksum CAPTURE QUALITY: NORMAL 0x37 0x00 0x00 0x6c CAPTURE QUALITY: HIGH 0x37 0x01 0x00 0x6d CAPTURE QUALITY: FINEST 0x37 0x02 0x00 0x6e AUTO FOCUS 0x40 0x00 0x00 0x1b MENU 0x41 0x00 0x00 0x1a ARROW - DOWN 0x42 0x00 0x00...
-
Seite 35: Rs-232 Get Command Table
RS-232 Get Command Table Send Format︰0x52 + 0x0A + 0x01 + Data[0] + 0x53 + Checksum Receive Format︰0x53 + 0x0C + 0x01 + ReData[0] + 0x52 + ReChecksum *1 :ReChecksum = 0x0C xor 0x01 xor ReData[0] xor 0x52 *2 :Power Status Receive Data = 0x51 + 0xFF + 0x01 + 0x0A + 0x51 + 0xA5 Function Data[0] Checksum... -
Seite 36: Osd Menu
OSD MENU There are 3 main options on the OSD menu: IMAGE, SETTING and SYSTEM. SETTING IMAGE SYSTEM... -
Seite 37: Navigate The Menu And Submenu
N avi gat e t he M enu and S ubm enu 1. Press MENU button on the remote or control panel. 2. Press ►, ◄, ▲ and ▼ to choose a selection in the menu list. 3. Press to make a selection. 4. -
Seite 38: Preview Mode
Menu Screen Function Preview Mode Select from the various image display settings. Normal - adjust the gradient of image. Motion – high refresh rate upon a motion image. High Quality - high resolution with the best quality. Microscope - automatically adjust optical zoom for microscopic viewing. -
Seite 39: Exposure Setup
Menu Screen Function Exposure Setup Select AUTO to automatically adjust the white balance and exposure setting and correct the color and exposure compensation. Select MANUAL to enable advanced settings for manual exposure and WB. Manual Exposure MANUAL - manually adjust the exposure level. -
Seite 40: Manual Wb Red
Menu Screen Function Manual WB Red Manually adjust the red color level. The color level can be adjusted up to 255. Focus Manually fine-tune the image. -
Seite 41: Setting
S ett i ng Menu Screen Function Capture Resolution Select the capture size. In 13M setting, the capture resolution size is 4208 x 3120. Select Normal, the capture size is based on the resolution settings. Capture Quality Select the capture compression setting. Select the Finest to get the best quality capture compression. -
Seite 42: Storage
Format Format to delete all the data in the selected memory. USB to PC Select status of the AVerVision M90UHD when it is connected to the computer via USB cable. Camera - can be used as a computer webcam or with our bundled software to record video and capture still image. -
Seite 43: Start Timer
Menu Screen Function Start Timer Start the timer. The timer automatically counts up after the countdown reaches zero to show the elapsed time. Pause/Stop Timer Press Menu button during timing to pause or stop timing. Timer Interval Set the timer duration up to 2 hours. -
Seite 44: System
S ys t em Menu Screen Function Language Change and select a different language. M90UHD supports up to 12 languages. Output Display Set the resolution to display the image on screen. The output device resolution detected automatically and configured to the highest resolution. -
Seite 45: Flicker
Menu Screen Function Flicker Select between 50Hz or 60Hz. Some display devices cannot handle high refresh rates. The image will flicker a couple of times as the output is switched to another refresh rate. Information Display the product information. Default Restore all the settings into original factory default setting. -
Seite 46: Playback
Pl ay back You can use the playback feature to configure the saved images or videos. Menu Screen Function Slide Show Start or Stop the Slide Show. Interval Set the interval between playing images or videos. Storage Choose the images or videos from Storage, including Embedded, SD Card or USB Drive. -
Seite 47: Transfer Captured Images/Videos To A Computer
Tr ansfer Captur ed Images/Videos to a computer This enables you to transfer the captured image from the built-in memory, SD or USB drive to a computer. Two ways to save images/videos: a. Built-in memory+SD card b. Built-in memory+USB drive The instruction below MUST be read and followed BEFORE connecting the USB cable. -
Seite 48: Technical Specifications
Technical Specifications Image Sensor 1/3.06" CMOS Pixel Count 13 megapixels Frame Rate 60 fps (max.) White Balance Auto/Manual Exposure Auto/Manual Image mode Normal, High Frame, High Quality, Microscope, Infinity, Marco Effect Color/B/W/Negative RGB output 1280×720, 1024×768, 1080P HDMI Output 4K, 1080p, 720p Image Capture 200 Frames Optics... -
Seite 49: External Storage
External Storage Micro SD Card Max 32GB (FAT32) USB Flash Drive Max 32GB (FAT32) *please note that this specification depends on certain order. -
Seite 50: Troubleshooting
There is no computer signal on presentation screen. 1. Check all the cable connections among the display device, AVerVision M90UHD and your PC. 2. Connect your PC to the AVerVision M90UHD first before you power on your computer. -
Seite 51: Limited Warranty
You as the original purchaser. Except for the foregoing, the Product is provided “AS IS.” In no event does AVer warrant that You will be able to operate the Product without problems or interruptions, or that the Product is suitable for your purposes. Your exclusive remedy and the entire liability of AVer under this paragraph shall be, at AVer’s option, the repair or replacement... - Seite 52 Governing Law and Your Rights This warranty gives you specific legal rights; You may also have other rights granted under state law. These rights vary from state to state. For warranty period, please refer to the warranty card.
- Seite 53 AVer M90UHD 使用手冊...
- Seite 54 免 責 聲 明 對於產品品質、效能、適銷性或特定用途之適用性,本文件內容皆不代表任何明示或暗示保固或陳 述。本文資訊經過仔細詳查,內容可靠無誤;雖然如此,若有任何錯誤,恕不負責。本文所含資訊 如有變更,恕不另行通知。 若因使用或不當使用本產品或本文,導致任何直接、間接、特殊、意外或後續損害,即使本公司已 事先告知此類損害之可能性,亦不負任何賠償責任。 商 標 AVer 為圓展科技股份有限公司之商標。因本內容之描述出現的商標分屬個別公司所有且均受智慧財 產權相關法令保護。本文內所有提及之產品或企業名稱僅供識別與說明用途,且為各自擁有者之商 標或註冊商標。 著 作 權 ©2020 圓展科技 版權所有 本內容相關權利係圓展科技股份有限公司所有,任何人未得事先書面同意不得就本內容為一部或全 部之重製、改作、或任何型式之散布行為 。圓展科技股份有限公司保留變更產品規格及內容的權利 無須另為通知。 若產品上標有打叉記號的滾輪垃圾桶,表示不得將產品與其他家用垃圾一同丟棄。請將廢 棄的設備交由指定之廢電機電子設備回收站處理。關於處理廢棄設備之詳細資訊,請洽當 地的家庭垃圾處理服務處或您購買產品的商家。 警告使用者 這是甲類的資訊產品,在居住的環境中使用時,可能會造成射頻干擾,在這種情況下,使用者會被要求 採取某些適當的對策 遙控器電池安全資訊 - 請 將 電 池 存 放 在 涼 爽 與 乾 燥 的 位 置 。...
- Seite 55 警告 為降低火災或觸電風險,請勿將本產品暴露在雨中或潮濕環境中。如果對產品進 行任何未經授權的修改,保固將無效。 請勿使機器掉落或受到撞擊。 請使用正確的電源電壓以避免損壞機器。 請勿將機器放在容易被踩到電源線的地方,否則可能會導致電源線或插頭磨損或 損壞。 請用雙手握住機器底部以移動機器。 請勿往左右相反方向拉扯機械臂和機 請勿抓住鏡頭或機械臂來移動機器。 器本體。 請勿將攝影機頭移動超過 110°,避免 請勿將機械臂拉至低於60° , 避免磨損 磨損攝影機頭。 攝影機。...
- Seite 56 Note 2:“○” indicates that the percentage content of the restricted substance does not exceed the percentage of reference value of presence. 備考 3.〝-〞係指該項限用物質為排除項目。 Note 3:The “−” indicates that the restricted substance corresponds to the exemption. 資訊 技術問題、技術支援、軟體和使用手冊下載,請連結下面網址: 文件/檔案/軟體下載: https://www.aver.com/download-center 技術支援:https://www.aver.com/technical/support 連絡資訊 圓展科技股份有限公司 https://www.aver.com 23673 新北市土城區大安路 157 號 8 樓 電話:(02)2269-8535...
- Seite 57 目錄 包裝內容物 ......................1 選購配件 ....................... 1 AVer M90UHD 零件介紹 ..................2 右側面板 ........................3 左側面板 ........................4 後端面板 ........................4 控制面板 ........................5 遙控器 ........................7 設備連接 ....................... 9 電源連接 ........................9 以 USB 傳輸線連接電腦 ..................10 連接 VGA/HDMI 介面的顯示器或 LCD/DLP 投影機 ..........11 以...
- Seite 58 瀏覽選單和子選單 ....................30 影像 ........................30 明亮度 ....................... 30 對比值 ....................... 30 飽和度 ....................... 31 預覽模式 ......................31 效果 ........................31 鏡射 ........................32 曝光設定 ......................32 手動曝光 ......................32 手動白平衡藍 ....................33 手動白平衡紅 ....................33 對焦 ........................33 設定 ........................34 拍照解析度...
- Seite 59 預設 ........................38 播放 ........................39 幻燈片 ....................... 39 間隔 ........................39 儲存 ........................39 刪除全部 ......................39 將拍攝的圖片/影片傳送至電腦 ................40 技術規格 ......................41 影像 ........................41 光學 ........................41 電源 ........................41 光源 ........................41 輸入/輸出 ......................41 尺寸 ........................42 外部儲存裝置...
-
Seite 60: 包裝內容物
包 裝 內 容 物 請確定包裝中附有下列項目的物品。 VGA 連接線 USB 連接線 變壓器(5V, 3A) *變壓器類型視販售國家之標 AVer M90UHD 準電源插座而異。 遙控器(含電池) * 給非美國地區,包含軟體、 保固卡 快速安裝指南 使用手冊及快速安裝指南 選 購 配 件 RS-232 連接線 手提袋 防眩光片 連接板 顯微鏡轉接器 (含 28mm 聯軸器和 34mm 聯軸器) -
Seite 61: Aver M90Uhd 零件介紹
AVer M90UHD零 件 介 紹 名稱 功能 攝影機頭 含有攝影機感應器。 攝影機鏡頭 對準攝影機中的影像焦距。 LED 燈 提升周圍照明亮度。 機械臂 可調整觀看範圍。 左側面板 Micro SD 記憶卡槽。 控制面板 輕鬆使用各種功能。 連接電源、外接 HDMI 輸出/輸入顯示設備和防盜 Kensington 安全鎖 後端面板 的相容插槽。 連接電腦 、 外接 VGA 輸出/輸入顯示設備和電腦 USB 埠 、 迷你 USB 埠 、... -
Seite 62: 右側面板
介面章節。 配)* (2) 音源連接埠 連接多媒體喇叭以播放錄製的影音檔。 (3) MIC 連接埠 連接使用外部麥克風。 (4) 迷你 USB 埠 利用 USB 連接線連接至電腦 USB 埠,並將 AVer M90UHD 當做 USB 鏡頭 或將記憶體來源之擷取影像/影片傳至電腦。 (5) USB 埠 插入 USB 隨身碟,將照片/影像直接存入。 輸入電腦或其他來源之訊號,並傳至 VGA 輸出埠。本埠連接電腦的 VGA (6) VGA 輸入埠 輸出埠。 (7) VGA 輸出埠... -
Seite 63: 左側面板
左 側 面 板 名稱 功能 (1) Micro SD 記憶卡 插入 Micro SD 記憶卡,標籤朝上。Micro SD 記憶卡可以儲存擷取影像及 插槽 影片。 後 端 面 板 名稱 功能 (1) HDMI 輸入埠 連接其他 HDMI 設備來源之訊號輸入 。 本埠連接到電腦的 HDMI 輸出埠 。 使用 HDMI 連接線,透過 HDMI 介面,將輸出的影片信號傳送到互動觸 (2) HDMI 輸出埠... -
Seite 64: 控制面板
控 制 面 板 (14) (13) (12) (11) (10) 名稱 功能 (1) 電源 本機開機或待機。 減少亮度。 - 於播放模式與 OSD 選單中進行選取。 - 開始或暫停播放影片。 - 自動調整焦距。 在攝影機和圖片播放模式中放大影像。 (5) MENU 開啟或離開 OSD 選單與子選單。 - 在攝影機模式中暫停或繼續顯示影像。 FREEZE/STOP - 在播放模式中停止播放影音。 開啟或關閉頂燈。 LAMP 透過 VGA 或 HDMI 輸入埠,可切換源自攝相機或電腦的影片訊號。 CAMERA / PC 觀看和播放圖片和影片。... - Seite 65 名稱 功能 開始或停止錄音和錄影。音檔或影片檔僅可存至SD卡或USB隨身碟(請 (11) RECORDING 參考外部記憶體儲存章節)。 (12) 增加亮度。 在攝影機和圖片播放模式中縮小影像。 (13) (14) ▲,▼, ◄ , & ► - 在即時模式中,左右轉動並放大影像(上述數位變焦等級)。 - 在 OSD 選單中選擇選項。 - 使用▲或▼來調高或降低播放影片的音量。 - 使用或來倒轉或快轉播放影片。...
-
Seite 66: 遙控器
遙 控 器 遙控器需使用兩(2)顆 AAA 尺寸的電池(隨附),使用前請確定已正確安裝電池。可以用遙控器 使用 AVer M90UHD 的所有功能。 名稱 功能 POWER 本機開機或待機。 (12) CAMERA 攝影機模式顯示內建攝影的影片訊號。 (13) RECORD (14) 開始或停止錄音和錄影。錄製的影片 (15) 只能儲存在 SD 記憶卡或 USB 隨身碟 (16) (17) 中。 (18) CAPTURE (19) 在攝影機模式中拍攝靜態影像。在連 拍模式中,再按一次此按鍵即可停止 拍攝。 (20) VISOR 不支援此功能。 (10) - Seite 67 名稱 功能 (16) SPLIT SCREEN 不支援此功能。 (12) (17) MODE 有六種模式可供選擇:一般、運動、 高 (13) (14) 畫質、顯微鏡、微距及遠距。 (15) (16) TIMER 呼叫計時器(Timer)子選單。選擇開始/ (17) 暫停/停止倒數。 (18) (19) (20) (10) (21) (11) (22) (23) 設定計時器間隔時間。 - 於圖片播放模式與 OSD 選單中進行 (18) 選取。 - 開始/暫停播放影片。 (19) LAMP 開啟/關閉頂燈。 (20) BRIGHTNESS +/- 調整亮度。...
-
Seite 68: 設備連接
設 備 連 接 接線前,請確定已關閉所有裝置的電源。如果不確定接線位置,只要依下圖所示來連接,並 請參閱正要與 AVer M90UHD 連接的裝置的使用手冊。 電 源 連 接 連接電源轉換器至標準 100V~240V AC 電源輸出孔。一旦接上電源後,本設備將會自動進入 待機模式。按 開啟電源。 *電源插座類型視地區而異。... -
Seite 69: 以 Usb 傳輸線連接電腦
以 USB傳 輸 線 連 接 電 腦 確認電腦或筆記型電腦的 USB 埠,並連至 AVer M90UHD 的 USB 埠。如此 M90UHD 可以 用作 USB 相機,您可以在打開 Skype、Teams 和 Zoom 等軟體時將其選為相機。... -
Seite 70: 連接 Vga/Hdmi 介面的顯示器或 Lcd/Dlp 投影機
連 接 V GA/HDM I介 面 的 顯 示 器 或 LCD /D LP投 影 機 找到裝置的 VGA/HDMI 埠,並連至 AVer M90UHD 的 VGA/HDMI 輸出埠。 * 連接 VGA * 連接 HDMI... -
Seite 71: 以 Vga/Hdmi 埠連接電腦
以 V G A/HDM I埠 連 接 電 腦 找到裝置的 VGA/HDMI 輸入埠,並連至 AVer M90UHD 的 VGA/HDMI 輸出埠。... - Seite 72 找到電腦或筆記型電腦的 VGA/HDMI 輸出埠 , 並連至 AVer M90UHD 的 VGA/HDMI 輸入埠。 VGA/HDMI 輸入埠的影片將匯至 VGA/HDMI 輸出埠。 [註] - 若要顯示電腦影像,請按控制面板或遙控器上的「Camera/PC」鍵,將 AVer M90UHD 切 換至電腦模式。 - 若要在筆記型電腦輸出顯示影像,請使用鍵盤指令(FN+F5)切換顯示模式。如需不同指令, 請參閱筆記型電腦的手冊。...
-
Seite 73: 連接多媒體喇叭
連 接 多 媒 體 喇 叭 使用 3.5mm 插頭並將多媒體喇叭插入 連接埠中。僅支援所播放影片的聲音。 [註] 我們建議連接多媒體(主動式,需外接電源)喇叭到音源輸出連接埠。使用耳機時請小心,請透 過遙控器的上下鍵來調整音量大小,以避免音量過大造成聽力受損。 連 接 外 部 麥 克 風 將 3.5mm 單音麥克風插入音源連接埠 中。... -
Seite 74: 連接顯微鏡
連 接 顯 微 鏡 將 AVer M90UHD 連接顯微鏡後,便可在大螢幕上檢驗顯微鏡物體。 變更影像顯示模式為顯微鏡。按選單 「MENU」> 影像 > 預覽模式 > 顯微 鏡模式 並按 鍵確認。 將鏡頭對準最遠點,再按下自動對焦 (AUTO FOCUS)鍵。 調整顯微鏡焦距。 選擇聯軸器,其尺寸合於顯微鏡目鏡,並 裝入顯微鏡轉接器內。... - Seite 75 將接目鏡自顯微鏡移除,並將裝有聯軸器 的顯微鏡轉接器裝上。轉緊三個螺絲,確 認接目鏡裝妥。 - 關於接目鏡,建議使用時視距(eye relief) 33mm 或以上。 - 手動調整來獲得更佳的物體影像。 利用連接板,將顯微鏡轉接器裝至 AVer 的鏡頭上。接著連接 AVer 和顯微鏡。 請確定鏡頭和顯微鏡轉接器上的箭頭對 齊,才進行安裝,接著往左旋轉後,兩個 箭頭會分開,並確認鎖上。...
-
Seite 76: 設定 Aver M90Uhd
設 定 AVer M90UHD 本章節將提供一些實用技巧,如何調整 AVer M90UHD 以便符合個人的使用需求。 儲 存 和 處 理 請參照下圖收起 AVer M90UHD。... -
Seite 77: 攝影範圍
攝 影 範 圍 此拍攝區域在高畫質模式時可觀賞最大範圍在 420 x 315mm 內。 當鏡頭高度為 360.3mm 時,攝影範圍為 A3 尺寸。... - Seite 78 如下圖所示,攝影機頭可 90°旋轉。 欲鏡射圖片時,按影像 > 鏡射 > 開啟。...
- Seite 79 頂 燈 按下面板上或遙控器上的「LAMP」鍵可開啟或關閉燈光。...
-
Seite 80: 紅外線感應器
紅 外 線 感 應 器 將遙控器對準紅外線感應器即可操作裝置。 如 何 將 固 定 安 裝 在 平 面 上 如 何 將 固 定 安 裝 在 平 面 上 如下圖所示,M90UHD 底部周圍有 4 個固定孔,量好並做好標記,左右和上下兩個固定孔距 離 75 mm。使用 2 個或 4 個 6mm 固定孔專用的 M4.0 螺絲釘,將 M90UHD 固定安裝在 平坦表面上。... -
Seite 81: 防眩光片
卡 插 入 記 憶 卡 將接觸端子朝下插入記憶卡,直到插到底為止。若要取出記憶卡,只要按下就可以退出,然 (FAT32) 後將記憶卡拔出。支援的 SD 記憶卡容量從 1GB 到 32GB 。 插 入 隨 身 碟 插 入 隨 身 碟 將 USB 隨身碟插入 USB 插槽。AVer M90UHD 支援高達 32GB 的 USB 隨身碟。強烈建議使 用 AVer M90UHD 來格式化隨身碟,以確保錄影品質。... -
Seite 82: 使用 Rs-232 介面
使 用 RS-232 介 面 使用電腦或任何中央控制面板透過 RS-232*可以控制 AVer M90UHD。 *選配,僅提供配備 RS-232 的 M90UHD 使用。... -
Seite 83: Rs-232 指 令 表
RS-232 指 令 表 傳送格式︰0x52 + 0x0B + 0x03 + 資料[0] + 資料[1] + 資料[2] + 0x53 + 總和檢查 接收格式︰0x53 + 0x00 + 0x02+ *2 + 0x00 + 0x52 + Checksum 非正常接收格式︰0x53 + 0x00 + 0x01+ *3 + 0x52 + Checksum *1 :總和檢查... - Seite 84 功能 資料[0] 資料[1] 資料[2] 總和檢查碼 PREVIEW MODE: INFINITE 0x0A 0x05 0x00 0x54 PREVIEW MODE: NORMAL 0x0A 0x06 0x00 0x57 PREVIEW MODE: HIGH QUALITY 0x0A 0x07 0x00 0x56 PREVIEW CAPTURE 0x0B 0x00 0x00 0x50 PLAYBACK DELETE 0x0C 0x00 0x00 0x57 PLAYBACK FULL SCREEN 0x0D 0x00 0x00...
- Seite 85 功能 資料[0] 資料[1] 資料[2] 總和檢查碼 FLICKER: 60Hz 0x18 0x01 0x00 0x42 RECORD: OFF 0x23 0x00 0x00 0x78 RECORD: ON 0x23 0x01 0x00 0x79 MOVIE FAST REWIND 0x25 0x00 0x00 0x7e MOVIE FAST FORWARD 0x25 0x01 0x00 0x7f MOVIE VOL INC 0x26 0x00 0x00...
- Seite 86 功能 資料[0] 資料[1] 資料[2] 總和檢查碼 CAPTURE QUALITY: NORMAL 0x37 0x00 0x00 0x6c CAPTURE QUALITY: HIGH 0x37 0x01 0x00 0x6d CAPTURE QUALITY: FINEST 0x37 0x02 0x00 0x6e AUTO FOCUS 0x40 0x00 0x00 0x1b MENU 0x41 0x00 0x00 0x1a ARROW - DOWN 0x42 0x00 0x00...
-
Seite 87: Rs-232 取 得 指 令 表
RS-232 取 得 指 令 表 傳送格式︰0x52 + 0x0A + 0x01 + 資料[0] + 0x53 + 總和檢查 接收格式︰0x53 + 0x0C + 0x01 + ReData[0] + 0x52 + ReChecksum *1 :ReChecksum = 0x0C xor 0x01 xor ReData[0] xor 0x52 *2 :Power Status Receive Data = 0x51 + 0xFF + 0x01 + 0x0A + 0x51 + 0xA5 功能... -
Seite 88: Osd 選單
OSD選 單 OSD 選單上有 3 個索引標籤:影像、設定和系統。 設定選單 影像選單 系統選單... -
Seite 89: 瀏覽選單和子選單
瀏 覽 選 單 和 子 選 單 1. 按下遙控器或控制面板上的「MENU」鍵。 2. 按▲和▼可在選單上進行選取。 3. 按 確認選項。 4. 按▲和▼可調整設定或進行選取。 5. 按 進入子選單。 影 像 選單畫面 功能 明亮度 手動調整亮度等級,範圍從 0 到 255。 對比值 在明亮或黑暗的環境下,手動調整對比度等 級,範圍從 0 到 255。... -
Seite 90: 飽和度
選單畫面 功能 飽和度 手動調整飽和度等級,範圍從 0 到 255。 預覽模式 進行不同的影像顯示設定。 一般模式 - 調整影像漸層。 運動模式 - 動態影像的刷新率。 高畫質模式 - 最佳品質的高畫質 顯微鏡模式 - 自動調整用顯微鏡觀看時的 變焦。 微距模式 - 近拍影像使用。 遠距模式 - 遠拍影像使用。 效果 將影像轉換為彩色、黑白或負片。... -
Seite 91: 曝光設定
選單畫面 功能 鏡射 選擇翻轉影像。 曝光設定 自動:自動調整白平衡和曝光設定、並自動 校正顏色和曝光補償。 手動:手動調整曝光等級與白平衡。 手動曝光 手動:手動調整曝光等級。曝光可調整範圍 從 0 到 99。 白平衡設定 選擇用於多種光線條件或色溫的白平衡設 定。 自動:自動調整白平衡。 手動:手動調整色階。選擇手動調整進階白 平衡設定。... -
Seite 92: 手動白平衡藍
選單畫面 功能 手動白平衡藍 手動調整藍色色階。色階可調整至最高達 255。 手動白平衡紅 手動調整紅色色階。色階可調整至最高達 255。 對焦 手動調整焦距。... -
Seite 93: 拍照解析度
設 定 選單畫面 功能 拍照解析度 選擇擷取之影像尺寸。選擇 13M 設定,擷取 影像解析度為 4208x 3120。選擇一般設定, 擷取尺寸取決於解析度設定。 拍照品質 選擇拍攝壓縮設定。選擇最佳取得最佳拍照壓 縮。 儲存型態 選擇拍攝類型。 單一:僅拍攝一張圖片。 連續:拍攝連續圖片。可按任何鍵停止連續拍 攝。選擇連續設定拍照間隔。 拍照間隔 設定連拍的時間間隔。間隔長度最高可達 600 秒(10 分鐘)。... -
Seite 94: 格式化
選單畫面 功能 儲存 變更儲存位置。錄製的影音只能儲存在內建記 憶體、SD 記憶卡或 USB 隨身碟中。 格式化 格式化會刪除所選擇記憶體中的所有資料。 儲存至電腦 透過 USB 連接電腦時 , 請選擇 AVer M90UHD 的狀態。 攝影機:可作為電腦的網路攝影機,或配合我 們銷售的軟體來錄影與拍攝靜態影像。 儲存記憶體:將拍攝的圖片/影片從記憶體傳 送到電腦的硬碟。 麥克風音量 調整錄影輸入聲音和 USB 聲音輸入數值。... -
Seite 95: 計時器
選單畫面 功能 計時器 開始計時。計時器會自動計時,到數計時至 0 後會顯示經過的時間。 暫停/停止計時器 計時期間按下 Menu 鍵開暫停/停止計時。 計時器間隔 設定計時器間隔,最高可達兩小時。... -
Seite 96: 輸出顯示
系 統 選單畫面 功能 語言 變更與選擇不同的語言。M90UHD 支援高達 12 種語言。 輸出顯示 設定在畫面上顯示影像的解析度。此選項在電 視輸出模式中停用。自動偵測輸出裝置的解析 度並將其配置為最高解析度。1024x768 用於 VGA 配置。 備份 將影像從內建記憶體複製到 SD 記憶卡或 USB 隨身碟中。 儲存設定 將目前設定(亮度、對比度、飽和度、預覽模 式等)儲存在所選擇的設定檔編號中。 恢復設定 將設定還原回所選擇的設定檔編號。... - Seite 97 選單畫面 功能 閃爍 選擇 50Hz 或 60Hz。有些顯示裝置無法處理 高畫面更新率。影像會閃爍數次,因為輸出 已切換成其他更新率。 資訊 顯示產品資訊。 預設 將所有設定還原為原始出廠預設值。所有儲存 設定將會被刪除。...
-
Seite 98: 幻燈片
播 放 使用播放功能來配置儲存的圖像或影片。 選單畫面 功能 幻燈片 開始或停止播放幻燈片。 間隔 設定顯示下一張圖片/影片之前的間隔時間。 儲存 從儲存來源選擇影像,包含內建記憶體、SD 記憶卡或 USB 隨身碟。 刪除全部 永久刪除所選擇記憶來源中的所有資料。... -
Seite 99: 將拍攝的圖片/影片傳送至電腦
將 拍 攝 的 圖 片 /影 片 傳 送 至 電 腦 本功能可讓您將拍攝的圖片/影片從內建記憶體、SD 記憶卡或 USB 隨身碟傳送到電腦中。 兩種方式儲存圖片/影片 a. 內建記憶體+SD 記憶卡 b. 內建記憶體+USB 隨身碟 連接 USB 傳輸線之前,請務必閱讀並遵守以下說明。 1. 連接 USB 線前,請務必將「儲存至電腦」設定為「儲存」 。 2. 當投影屏右下角顯示「大量儲存記憶體開始」 ,便可以接上 USB 線。 3. 接上 USB 線後,系統將會自動偵測新的可移除磁碟機。接下來可將擷取影像自 M90UHD 內建記憶體、SD 記憶卡或... -
Seite 100: 技術規格
技 術 規 格 影像 感應器 1/3.06" CMOS 有效畫素 1300 萬畫素 畫格速率 60 fps (最高) 白平衡 自動/手動 曝光 自動/手動 影像模式 一般/運動/高畫質/顯微鏡/微距/遠距 效果 彩色/黑白/負片 RGB 輸出 1280×720, 1024×768, 1080P HDMI 輸出 4K, 1080p, 720p 影像擷取 200 張數 光學 對焦 自動/手動 拍攝範圍 420 x 315mm 縮放倍數... -
Seite 101: 外部儲存裝置
音源輸出 3.5mm 插孔 麥克風 MIC 連接埠 電源輸入(DC 5V) 電源插孔 Kensington 安全鎖 有 *RS-232 (選購) Mini-DIN 插孔(使用 RS-232 連接線(選購)) 尺寸 使用時 481.3mm(L) x 159mm(W) x 469.9mm(H) 收起後 319.0mm(L) x 176mm(W) x 112mm(H) 重量 2.2 +/-0.5 公斤 ( 5.732 磅) 外部儲存裝置 Micro SD 記憶卡 最大... -
Seite 102: 故障排除
投影畫面上沒有圖片。 1. 請依照本手冊說明,重新檢查所有連接線接頭。 2. 確認顯示輸出裝置的設定值。 3. 如果是使用筆記型電腦或電腦透過顯示輸出裝置投影,請檢查電腦的 RGB(VGA)輸出到 AVer M90UHD 的 RGB 輸入的連線,並確認 AVer M90UHD 在電腦模式。 4. 對於 HDMI 顯示輸出,在等待顯示設備和 M90UHD 同步時會發生延遲。大概需等待 4 至 7 秒鐘, 才會在螢幕上看到攝影機圖像。 投影畫面上的影像有失真或者影像模糊不清。 1. 必要時 , 請將所有設定回復為原廠設定值 。 請按 MENU 鍵 > 系統 > 預設 , 接著於選單中選擇 「是」 。... -
Seite 103: 有限保固
有 限 保 固 保固期限係指產品購買日起之特定時間,時間長短依 AVer Information Inc.於保固卡上聲明之「AVer 產 品保固期」 為準。自適用產品購買日開始至 「AVer 產品保固期間」 一節規定日期為止,AVer Information Inc. ( 「AVer」 )保證在此期間內,適用產品( 「產品」 )在本質上符合 AVer 產品說明文件的規定,且其 製造與零組件在正常使用下沒有材料與工藝上的瑕疵。本協議中以「您」表示使用或安裝產品之個人或 企業實體。此有限保固書之效力僅限原始購買人。除前述條件外,本產品依「現狀」提供。AVer 對於您 是否具備操作本產品之能力或者是否可能產生任何干擾,或本產品之個人用途適用性,恕不提供擔保。 根據本段內容,AVer 對您之唯一賠償責任為:經本公司定奪後,可決定提供修復或更換同款或同級產品。 此保固書不適用於以下條件:(a) 產品序號模糊、經過修改或遭移除,或者 (b) 本產品之紙箱、提袋、 電池、機箱、膠帶或其他隨附配件。此保固書亦不適用於因 (a) 意外、濫用、誤用、疏忽、火災、水災、 閃電或其他天災、商業或工業用途、未經授權改裝或未遵守產品說明書所造成之損壞、效能惡化或故障 產品、(b) 經製造商代表以外的人員進行維修之產品、(c) 任何因運送導致產品損壞(此等索賠請向貨運... - Seite 104 法律依據法以及您的權利 本擔保書提供特定之法律權利;視各地法令而定,您亦可能享有其他地法律權利。...
- Seite 105 AVerVision M90UHD ユーザー・マニュアル...
- Seite 106 お 使 い に な る ま え に ~ 安 全 の た め に 必 ず お 読 み く だ さい~ 本機を安全に正しくお使いいただき、お使いになる方や他の方への危害、財産への損害を未然に防止するために守っていただきたい事 項が記入されております。ご使用前によく読んで大切に保管してください。 以下の表示の意味をよく理解した上で本文をお読みください。 本書に記載する記号について この表示を無視して誤った取扱をすると、死亡または重傷を負う可能性が想定される内容を 警告 示しています。 この表示を無視して誤った取扱をすると、傷害を負う可能性、または物的損傷の発生が想 注意 定される内容を示しています。 表示の例 △記号は注意を促す内容が記入されていることを示しています。図のなかに具体的な注意 注意 内容(左の記号の場合は高温注意)が記入されています。 記号は禁止行為が記入されています。図中やその周辺に具体的な禁止内容(左の記 禁止 号の場合は分解禁止)が記入されています。...
- Seite 107 警告 電源プラグの刃や取付面にほこりが付着している場合は、機器本体の電源スイッチを切り電源プラグを抜 いてから、ほこりを取り除く。電源プラグの絶縁低下により、火災の原因となります。 電池の液が目に入ったときは、失明などの障害の恐れがありますので、こすらずにすぐに水道水などの多 量のきれいな水で十分に洗ったあと、医師の治療を受けてください。 小さなお子様の手の届くところには、設置・保管しないでください。取り外した電池を小さなお子様の手の 届く場所に放置しないでください。飲み込んだり、のどに詰まらせることがあります。万一、飲み込んだ場合 は直ちに医師にご相談ください。 電池の+と-を逆にして使用しないでください。電池を漏液、発熱、破裂させるおそれがあります。 電池の液をなめた場合には、すぐにうがいをして医師に相談してください。 電池の液が皮膚や衣服に付着した場合には、皮膚に障害を起こす恐れがありますので、すぐに多量の水 道水などのきれいな水で洗い流してください。 種類の異なる電池、新しい電池と使用済みの電池、古い電池などを混ぜて使用しないでください。電池 を漏液、発熱、破裂させるおそれがあります。 使い切った電池はすぐにリモコンから取り出してください。 使い切った電池をリモコンにセットしたまま長時間放置しますと、電池から発生するガスにより、電池を漏 液、発熱、破裂させたり、リモコンを破損させるおそれがあります。 長時間リモコンを使用しない場合には、リモコンから電池を取り出してください。電池から発生するガスによ り、電池を漏液させたり、リモコンを破損させるおそれがあります。 電池の外装ラベルやパッケージの注意書に従って正しく使用してください。電池の使い方を誤ると、電池が 漏液、発熱、破損したりケガや機器故障の原因となります。 電池は加熱したり、火や水の中に投げ込まないでください。 電池を廃棄するときは、地域の回収ルールに従ってください。 機械の分解、改造は絶対におこなわないでください。感電や火災のおそれがあります。 機器の裏ぶた、カバーは外さないでください。内部には電圧の高い部分があり、感電の原因となります。内 部の点検・整備・修理は、販売店にご依頼ください。...
- Seite 108 この装置は、クラス A 情報技術装置です。この装置を家庭環境で使用すると電波妨害を引き起こすことがあります。この 場合には使用者が適切な対策を講ずるよう要求されることがあります。VCCI-A 登録商標について Windows 7、Windows8、Windows10 は、米国 Microsoft Corporation の米国およびその他の国における登録商標で す。 Macintosh、iMac は米国アップルコンピュータ社の登録商標です。 IBM PC、XGA、SVGA、VGA は、International Business Machines Corporation の登録商標です。...
- Seite 109 あります。 警告- これは Class A 製品です。本製品を室内で使用すると無線干渉を引き起こすことがあり、使 用者には適切な手段を講じるよう求められることがあります。 C E C l a s s A ( E M C ) 本製品は電磁気両立性指令 2014/30/EU に関する加盟諸国の法律の近似化の議会 指令で制定された条件に適合していることが確認されています。 警告- これは Class A 製品です。本製品を室内で使用すると無線干渉を引き起こすこと があり、使用者にはこの干渉を解消する適切な手段を講じるよう求められることがあります。 免 責 本書の内容、品質、商品性、特定の目的への適合性に関して、明示的か暗示的かを問わず、いか なる保証または責任を放棄します。本書が提供する情報の信頼性は慎重に確認されていますが、正 確性に欠いたとしても一切責任を負いません。本書に含まれる情報は予告なしに変更されることがあり ます。 AVer は、本製品または本書の使用または不使用によって発生したいかなる直接的、間接的、特別、 付随的、または結果的な損害に対して、たとえこのような損害が生じる可能性について報告を受けて いたとしても、一切責任を負いません。...
- Seite 110 AVerVision は AVer Information Inc.社の登録商標です。IBM PC は IBM 社の登録商標です。 Macintosh は Apple Computer 社の登録商標です。Microsoft および Windows はそれぞれ Microsoft 社の登録商標および商標です。本書に記載されている他のすべての製品名または会社名 は認証および説明目的のためだけで、各社の商標または登録商標となっている場合があります。 著 作 権 © 2020 by AVer Information Inc. 全権留保。本書の一部または全部を AVer Information Inc.社 の文書による許可なしに、いかなる手段でも、再発行、転送、検索システムへ保存、他の言語へ翻訳 することを禁止します。 V C C I - A この装置は、クラス A 機器です。この装置を住宅環境で使用すると電波妨害を引き起こすことがあり...
- Seite 111 使用上のご注意 機器を雨や湿気にさらさないでください。火災や感電の危険性があります。機器に不正な改造 が確認された場合、製品保証は無効となります。 機器を落としたり、衝撃を加えたりしないでください。 機器故障を防ぐため、正しい電圧の電源を使用してください。 電源コードを踏むような場所にカメラを置かないでください。ケーブルの断線や電源プラグが損 傷する恐れがあります。 カメラの底面を手で持ち、カメラを動かして アーム部とカメラ部を、可動方向と反対の ください。カメラを動かす時はカメラ部分やア 方向に引っ張らないでください。故障の原 ーム部分を持ちながら移動させてないでく 因となります。 ださい。 カメラ・ヘッドの摩耗を防ぐため、カメラ・ヘッ カメラの損傷を防ぐため、アーム部を 60°よ ドを 110°以上動かさないでください。 り低く引っ張らないでください。...
- Seite 112 連絡先 日本 アバー・インフォメーション株式会社 https://jp.aver.com/default.aspx 〒160-0023 東京都新宿区西新宿 3-2-26 立花新宿ビル 7 階 TEL:03-5989-0290 Support.EDU.JP@aver.com...
- Seite 113 内容 パッケージ内容 ................. 1 オプション販売品 ................1 AVerVision M90UHD 製品外観 ............2 右面パネル ........................ 3 左面パネル ........................ 3 背面パネル ........................ 4 コントロール・パネル ..................... 5 リモコン ........................6 機器の接続 ..................8 電源を接続 ....................... 8 コンピューターとの USB 接続 ..................9 VGA/HDMI 出力でモニターまたは LCD/DLP プロジェクターとの接続 ....... 10 PC からの...
- Seite 114 設定 ........................33 システム ........................36 再生 ........................38 撮影した画像やビデオのコンピューターへの転送 .......... 39 主な仕様 ..................39 画像 ........................39 光学 ........................39 電源 ........................40 照明 ........................40 入力/出力 ......................40 寸法、重量 ......................40 外部ストレージ ......................40 トラブルシューティング ............... 41 製品保証について ................42...
-
Seite 115: パッケージ内容
パッケージ内容 以下のアイテムがパッケージに含まれていることを確認してください。 USB ケーブル VGA ケーブル 電源アダプタ(5V 3A) *電源コードは、販売する国のコン リモコン セントによって異なります。 AVerVision M90UHD 本体 (単 4 形電池 2 本が含まれていま す) ソフトウェア CD *ソフトウェア、ユーザー・マニュア クイックガイド 保証書 ル、クイックガイドを含みます。 オプション販売品 RS-232 ケーブル 反射防止シート キャリングバッグ 連結プレート 顕微鏡アダプタ (28 ㎜と 34 ㎜のゴム・カプラーが含まれています。)... -
Seite 116: Avervision M90Uhd 製品外観
AVerVision M90UHD 製品外観 名称 機能 カメラ・ヘッド カメラ・センサー内蔵ユニット カメラ・レンズ 被写体の撮影用レンズ LED ライト 照明条件を高めるための追加照明ランプ メカニカル・アーム 可動範囲内で撮影範囲を調整 左面パネル マイクロ SD カード挿入口 コントロール・パネル カメラ操作用の各ボタン搭載 DC 5V 差込口、HDMI 出力/入力ポート、および盗難防止用 Kensington セキュリテ 背面パネル ィ・ロック互換スロット VGA 入力/出力ポート、USB ポート、ミニ USB ポート、マイクロホン入力、スピーカー 右面パネル 出力、RS-232(オプション)ポート リモコン受光部 リモコンの赤外線信号受光部... -
Seite 117: 右面パネル
右 面パネ ル 名称 機能 RS-232 オプション使用(シリアル通信によるカメラ制御) スピーカー出力 アンプ付きスピーカーと接続して、録音されたオーディオとビデオ音声を再生 マイクロホン入力 外部マイクと接続 USB ケーブルでコンピューターの USB ポートに接続し、AVerVision M90UHD を USB ミニUSBポート カメラとして使用するか、撮影した画像/ビデオをメモリソースからコンピューターに転送 USB フラッシュ・ドライブから画像/ビデオを直接保存するには、USB フラッシュ・ドライブ USBポート を挿入 コンピューターまたは他のソースからの信号を入力し、VGA 出力端子にのみパスさせま VGA入力 す。このポートをコンピューターの VGA 出力ポートに接続 VGA出力 AVerVision M90UHD を VGA ケーブルで任意のディスプレイ・デバイスに接続 左 面パ ネル... -
Seite 118: 背面パネル
背 面パ ネル 名称 機能 このポートを介して外部 HDMI ソースを入力として接続します。このポートをコンピューター HDMI 入力 の VGA/HDMI 出力ポートと接続 メインシステムからのビデオ信号を、インタラクティブ・フラット・パネル、LCD モニター、または HDMI 出力 HDMI ケーブルを使用して HDMI インターフェース付きの LCD/DLP プロジェクターに出 力 DC 5V このポートに電源アダプタを接続 盗難防止スロット Kensington 互換のセキュリティ・ロックまたは盗難防止デバイスを取り付く... -
Seite 119: コントロール・パネル
コント ロール・パ ネ ル (14) (13) (12) (11) (10) 名称 機能 電源 本体の電源ををオン、または待機モード 映像の明るさを調整(-) - 再生モードと OSD メニューで選択を行う - ビデオ再生を開始/一時停止 オートフォーカス - フォーカスを自動的に調整 ズーム・イン カメラおよび画像再生モードで画像の倍率を調整(+) メニュー OSD メニューとサブ・メニューを開くまたは閉じる - カメラ・モードで画像表示を一時停止または再開 フリーズ/停止 - 再生モードでオーディオとビデオの再生を停止 LED ライトをオン/オフ 照明 VGA 入力ポートまたは HDMI 入力ポートからカメラまたはコンピューター間でビデオ カメラ/PC 信号を切り替え... -
Seite 120: リモコン
リ モ コン リモコンには「単 4 形」の電池 2 個(付属品)が必要です。使用する前に電池が正しく取り付けられている こと確認してください。リモコンで AVerVision M90UHD のすべての機能にアクセスできます。 名称 機能 電源 本体の電源をオン/オフ/待機 (12) カメラ・モードは、内蔵カメラからのビデオ信号 カメラ (13) を表示 (14) オーディオとビデオの録画を開始/停止しま (15) 録画 す。ビデオ録画は、SD メモリ・カードまたは (16) USB フラッシュ・ドライブにのみ保存 (17) (18) カメラ・モードで静止画像を撮影します。連 (19) 撮影 続撮影モードでこのボタンをもう一度押すと 撮影を停止 マスク 非対応 (20) 回転... - Seite 121 名称 機能 タイマー・サブメニューを呼び出します。タイマ ーのカウントダウンの開始/一時停止/停 (12) 止を選択し、タイマーの継続時間を設定 (13) (14) (15) (16) (17) (18) (19) (18) タイマー (20) (10) (21) (11) (22) (23) - 再生モードと OSD メニューで選択を行う (19) - ビデオの再生を再生/一時停止 (20) 照明 LED ライトをオン/オフ (21) 明るさ+/- 映像の明るさを調整 (22) 初期化 工場出荷時の設定にリセット (23) 削除 再生モードで選択した画像/ビデオを削除...
-
Seite 122: 機器の接続
機器の接続 接続する前に、すべての機器の電源がオフの状態であることを確認してください。接続する場所がわからない場合は、 下図の接続に従って、AVerVision M90UHD に接続するデバイスのユーザー・マニュアルを参照してください。 電 源を接 続 電源アダプタを標準の 100V〜240V AC 電源コンセントに接続します。電源が接続されると、ユニットは自動的に待機 モードになります。 ボタンを押してオンにします。 ※コンセント形状は地域によって異なり... -
Seite 123: コンピューターとの Usb 接続
コン ピュー ターと の U SB 接 続 コンピューターまたはノートパソコンの USB ポートを AVerVision M90UHD の PC ポート(ミニ USB ポート)に接 続すると M90UHD を USB カメラとして使用できます。Skype、Teams、Zoom などのソフトウェア上でカメラとして 選択できます。... -
Seite 124: Vga/Hdmi 出力でモニターまたは Lcd/Dlp プロジェクターとの接続
VGA/ HD MI 出 力でモニ ターま たは LC D/ DL P プロジェ クタ ーと の接続 ディスプレイ・デバイスの VGA/HDMI 入力ポートを AVerVision M90UHD の VGA/HDMI 出力ポートに接続します。 ※VGA ケーブル接続 ※HDMI ケーブル接続... -
Seite 125: Pc からの Vga/Hdmi 信号をパススルー出力する場合の接続
P C からの VGA/ HDMI 信 号をパ ススルー 出力す る場 合の接続 ディスプレイ・デバイスの VGA/HDMI 入力ポートを AVerVision M90UHD の VGA/HDMI 出力ポートに接続します。... - Seite 126 反対側で、コンピューターまたはノートパソコンの VGA/HDMI 出力ポートを AVerVision M90UHD の VGA/HDMI 入 力ポートに接続します。VGA/HDMI 入力ポートからのビデオ信号は、VGA/HDMI 出力ポートに出力されます。 [注意] コンピューターの画像を表示するには、コントロール・パネルまたはリモコンのカメラ/PC ボタンを押して、 AVerVision M90UHD をコンピューター・モードに切り替えます。 ノートパソコンでディスプレイ映像を出力するには、キーボード・コマンド(例えば FN+F5)を使用して表示モードを 切り替えます。別のコマンドについては、ノートパソコンのマニュアルを参照してください。...
-
Seite 127: アンプ内蔵スピーカーを接続
アン プ内蔵 スピ ーカーを 接続 アンプ内蔵スピーカーの 3.5 ㎜プラグをスピーカー出力( )ポートに接続します。ビデオ再生からのオーディオのみが対 応されます。 [注意] アンプ内蔵スピーカーをスピーカー出力ポートに接続することをお勧めします。イヤホンを使用するときは注意してください。 大音量による聴覚障害を防ぐために、リモコンを使用してボリュームを下げてください。 マイ クを接続 マイクロホンの 3.5 ㎜プラグをマイクロホン入力( )ポートに接続します。... -
Seite 128: 顕微鏡に接続
顕 微鏡に 接続 AVerVision M90UHD を顕微鏡と接続し、大画面で微細な物体を観察できます。 画像表示モードを顕微鏡に変更します。メニューボ タンを押して、イメージタブ>モード>(顕微鏡)を 選択して、 を押します。 カメラ・ヘッドを最も遠い位置に向け、オートフォーカ スボタンを押します。 顕微鏡の焦点を調節します。 顕微鏡の接眼部に適したサイズのゴム・カプラーを 選択し、顕微鏡アダプタに挿入します。... - Seite 129 顕微鏡から接眼部を取り外し、ゴム・カプラーを挿 入した状態で顕微鏡アダプタに接続します。アダプ タが接眼部に固定されるまで、ネジ 3 本を締めま す。 接眼部には、33 ㎜以上のアイレリーフを 使用することをお勧めします。 手動で調整を行い、より良い画像ビュー を取得します。 顕微鏡アダプタを接続プレートで AVerVision カメ ラ・ヘッドに取り付けます。次に AVerVision と顕微 鏡に接続します。 カメラと顕微鏡アダプタの矢印が揃っていて、左に回 転してロックされていることを確認します。...
-
Seite 130: Avervision M90Uhd のセットアップ
AVerVision M90UHD のセットアップ 本節では、AVerVision M90UHD の調整方法に関する役立つヒントを提供します。 書 画 カ メ ラの保 管 書画カメラを保管する場合は下図の手順に従い、アームを収納してください。... -
Seite 131: 撮影範囲
撮 影 範 囲 HD プレビュー・モードの撮影可能な範囲は 420×315 ㎜です。 カメラ位置の高さが 360.3 ㎜の場合、撮影範囲は A3 サイズになります。... - Seite 132 下図のように、カメラ・ヘッドを-90 から+90 まで回転できます。 -90° 0° +90° カメラ映像をミラーリングするには、メニューボタンを押し>ミラーリングを選択して、 ボタンを押し、「On オン」を選択し ます。...
-
Seite 133: Led ライト
L E D ライ ト コントロール・パネルまたはリモコンの照明ボタンを押すと、LED ライトのオン/オフ切り替えが可能です。... -
Seite 134: リモコン受光部
リ モ コン 受 光 部 リモコンをリモコン受光部に向けて、ユニットを操作します。 M 9 0 U H D を 平 面 に 取 り 付 け 下図に示すように、平面上の穴間の中心線水平距離 75 ㎜を測定してマークします。6 ㎜の穴に 2 個または 4 個の M4.0 ネジを使用して、M90UHD を平面に固定します。 75.00... -
Seite 135: 反射防止シート
反 射 防 止 シ ー ト 反射防止シートは特別なコーティングが施されたフィルムです。光沢のある被写体、または雑誌や写真などの光沢のあ る表面を表示する場合の反射を防止します。反射防止シートを光沢のある書類の上に乗せるだけで、反射光が低減 することができます。 外 部 メモ リ ・ スト レ ー ジ AVerVision M90UHD は、マイクロ SD メモリ・カードと USB フラッシュ・ドライブの両方を対応しており、より多くの画像 撮影とオーディオおよびビデオの録画が可能です。AVerVision M90UHD は、外部ストレージ・メディアの存在を検出し、 前回検出されたストレージに自動的に切り替えることができます。外部ストレージが接続されていない場合、撮影した すべての静止画像は、内蔵メモリに保存されます。 マイクロSDカードの挿入 カードの端子面が下になるように奥まで差し込みます。カードを取り外すには、カード押してその一部を出してから、カー ドを引き出します。※対応マイクロ SD カード容量:1GB〜32GB(FAT32)。 USBフラッシュ・ドライブの挿入 USB フラッシュ・ドライブを USB スロットに接続します。※対応 USB フラッシュ・ドライブ容量:最大 32GB。ビデオ録画... -
Seite 136: Rs-232 インターフェースの使用
RS-232 インターフェースの使用 AVerVision M90UHD は、コンピューターまたは RS-232 接続を介した集中制御パネルを使用して制御できます。... -
Seite 137: Rs-232 送信コマンド表
RS-232 送信コマンド表 送信フォーマット︰0x52 + 0x0B + 0x03 + Data[0] + Data[1] + Data[2] + 0x53 + Checksum 成功受信フォーマット︰0x53 + 0x00 + 0x02+ + 0x00 + 0x52 + Checksum 異常受信フォーマット︰0x53 + 0x00 + 0x01+ + 0x52 + Checksum *1: Checksum = 0x0B xor 0x03 xor Data[0] xor Data[1] xor Data[2] xor 0x53 *2: Receive data ok = 0x0B, Not Command = 0x03 *3: ID error = 0x01, Checksum error = 0x02, Function fail = 0x04 *4: Checksum = 0x00 xor 0x02 xor... - Seite 138 機能 Data[0] Data[1] Data[2] Checksum PREVIEW MODE: NORMAL 0x0A 0x06 0x00 0x57 PREVIEW MODE: HIGH QUALITY 0x0A 0x07 0x00 0x56 PREVIEW CAPTURE 0x0B 0x00 0x00 0x50 PLAYBACK DELETE 0x0C 0x00 0x00 0x57 PLAYBACK FULL SCREEN 0x0D 0x00 0x00 0x56 MIRROR OFF 0x0E 0x00 0x00...
- Seite 139 機能 Data[0] Data[1] Data[2] Checksum RECORD: OFF 0x23 0x00 0x00 0x78 RECORD: ON 0x23 0x01 0x00 0x79 MOVIE FAST REWIND 0x25 0x00 0x00 0x7e MOVIE FAST FORWARD 0x25 0x01 0x00 0x7f MOVIE VOL INC 0x26 0x00 0x00 0x7d MOVIE VOL DEC 0x26 0x01 0x00...
- Seite 140 機能 Data[0] Data[1] Data[2] Checksum CAPTURE QUALITY: HIGH 0x37 0x01 0x00 0x6d CAPTURE QUALITY: FINEST 0x37 0x02 0x00 0x6e AUTO FOCUS 0x40 0x00 0x00 0x1b MENU 0x41 0x00 0x00 0x1a ARROW - DOWN 0x42 0x00 0x00 0x19 ARROW - UP 0x42 0x01 0x00...
-
Seite 141: Rs-232 受信コマンド表
RS-232 受信コマンド表 送信フォーマット︰0x52 + 0x0A + 0x01 + Data[0] + 0x53 + Checksum 受信フォーマット︰0x53 + 0x0C + 0x01 + ReData[0] + 0x52 + ReChecksum *1: ReChecksum = 0x0C xor 0x01 xor ReData[0] xor 0x52 *2: Power Status Receive Data = 0x51 + 0xFF + 0x01 + 0x0A + 0x51 + 0xA5 機能... -
Seite 142: Osd メニュー
OSD メニュー OSD メニューには、「イメージ」、「設定」、「システム」の 3 つの主なオプションがあります。 設定 イメージ システム... -
Seite 143: メニューとサブ・メニューのナビゲート
メニ ュ ーと サ ブ ・ メニ ュ ー のナ ビ ゲ ート リモコンまたはコントロール・パネルの「メニュー」ボタンを押します。 ▶、◀、▲ および ▼ を押して、メニュー・リストから機能を選択します。 を押して決定します。 ▲と▼を使用して設定を調整または選択します。 を押してサブ・メニューに入ります。 イ メ ージ メニュー画面 機能 明るさ 明るさレベルを 0~255 の間に手動で調整します。 コントラスト 明るい環境と暗い環境では、コントラスト・レベルを 0~ 255 の間に手動で調整します。 彩度 彩度レベルを 0~255 の間に手動で調整します。... - Seite 144 メニュー画面 機能 撮影モード 撮影モードを下記項目から選択します。 標準 – 標準の撮影モードです。 モーション – 映像のフレーム数を優先します。 高画質 – 最高画質の高解像度。 顕微鏡 – 顕微鏡接続用に光学ズームを自動的に調整 します。 マクロ – 近い被写体を撮影する際に使用します。 無限遠 – 遠い被写体を撮影する際に使用します。 画像効果 画像をカラー(24 ビット・カラー)、モノクロ(白黒)、または ネガに転換します。 ミラー 選択すると、映像の左右が反転します。...
- Seite 145 メニュー画面 機能 露出制御 「自動」を選択して、露出値を自動的に調整します。 「手動」を選択すると、露出値の手動設定が有効になり ます。 露出値 手動 – 露出レベルを手動で調整します。露出は 0~99 の間に調整できます。 ホワイトバランス 様々な照明条件や色温度に合わせてホワイトバランス設 定を選択します。 自動 – ホワイトバランスを自動的に調整します。 手動 – カラー・レベルを手動で調整します。「手動」を選 択すると、ホワイトバランスの手動設定が有効になります。...
- Seite 146 メニュー画面 機能 WB 補正ブルー 青みのカラー・レベルを手動で調整します。カラー・レベル は 255 まで調整できます。 WB 補正アンバー 赤みのカラー・レベルを手動で調整します。カラー・レベル は 255 まで調整できます。 フォーカス カメラのフォーカスを手動で微調整します。...
- Seite 147 設 定 メニュー画面 機能 キャプチャー解像度 撮影解像度を選択します。13M 設定では、撮影解像度 は 4208×3120 です。 標準を選択すると、撮影解像度は映像の解像度設定と 同じ解像度で撮影されます。 キャプチャー画質 撮影時の画質設定を選択します。 最高画質を選択すると、最高画質の撮影画質が得られま す。 キャプチャータイプ キャプチャータイプを選択します。 撮影 – 静止画を1枚のみ、撮影を行います。 連写 – 連続する画像を撮影し、任意のキーを押して連続 撮影を停止します。「連続」を選択すると、撮影間隔の設 定が有効になります。 キャプチャー間隔 連続撮影の時間間隔を設定します。長さは最大 600 秒 (10 分)に設定できます。...
- Seite 148 メニュー画面 機能 保存先 データの保存先を変更します。オーディオとビデオの記録 は、内蔵メモリ、SD カード、または USB メモリにのみ保存 できます。 フォーマット 選択したメモリのすべてのデータを削除(フォーマット)します。 USB から PC へ AVerVision M90UHD とコンピューターを USB ケーブルで 接続する場合の動作モードを選択します。 カメラ – コンピューターのウェブカメラとして、または付属のソ フトウェアと組み合わせて使用して、ビデオを録画し、静止 画像を撮影できます。 保存先 – 撮影した画像やビデオをメモリからコンピューター のハードディスクに転送します。 入力ボリューム 録音入力または USB オーディオ入力のボリュームを調整し ます。...
- Seite 149 メニュー画面 機能 タイマー開始 タイマーを開始します。タイマーは、カウントダウンがゼロに達 すると自動的にカウントアップして、経過時間を示します。 タイマー一時停止/停止 計時中にメニューボタンを押すと、タイマーを一時停止また は停止します。 タイマー間隔 タイマーの時間を最大 2 時間に設定します。...
-
Seite 150: システム
シス テ ム メニュー画面 機能 言語 別の言語を変更して選択します。M90UHD は 12 国言語 に対応します。 ビデオ出力解像度 画面に画像を表示する解像度を設定します。出力デバイ スの解像度は自動的に検出され、一番高い解像度に設 定されます。1024×768 は VGA 構成用です。 保存 内蔵メモリから SD カードまたは USB メモリに画像をコピー します。 設定内容保存 現在の設定(明るさ、コントラスト、彩度、プレビュー・モー ドなど)を選択したプロファイル番号に保存します。... - Seite 151 メニュー画面 機能 設定内容呼び出し 設定を選択したプロファイル番号に戻します。 電源周波数 50Hz または 60Hz から選択します。一部のディスプレイ・デ バイスは、高いリフレッシュ・レートを処理できません。出力 が別のリフレッシュ・レートに切り替えられると、画像が数回 ちらつきます。 機器情報 製品情報を表示します。 初期化 すべての設定を工場出荷時の初期値に戻します。保存さ れたすべての構成が削除されます。...
- Seite 152 再 生 再生機能を使用して、保存された画像またはビデオを設定できます。 メニュー画面 機能 スライドショー スライドショーを開始または一時停止します。 間隔 画像または動画の再生間隔を設定します。 保存先 内蔵メモリ、SD カード、USB メモリなどの保存先から画像 またはビデオを選択します。 全て削除 保存されたすべての画像または動画を削除するには、この オプションを選択します。...
-
Seite 153: 撮影した画像やビデオのコンピューターへの転送
撮影した画像やビデオのコンピューターへの転送 これにより、撮影した画像を内蔵メモリ、SD カードまたは USB フラッシュ・ドライブからコンピューターに転送できます。 画像やビデオを保存する二つの方法: 内蔵メモリ+SD カード 内蔵メモリ+USB フラッシュ・ドライブ USB ケーブルを接続する前に、以下の指示に必ず従ってください。 1. USB ケーブルに接続する前に、「USB から PC へ」を「保存先」として設定する必要があります。 画面の右下隅に「ストレージ」が表示された時点で、USB ケーブルを接続します。 3. USB ケーブルを接続すると、システムは自動的に新しいリムーバブル・ディスクを検出します。撮影した映像または ビデオを M90UHD 内蔵メモリ、SD カードまたは USB フラッシュ・ドライブからコンピューターのハードディスクに転送 できます。 主な仕様 画 像 センサー 1/3.06" CMOS 画素数 1300 万画素 フレーム・レート 最大... -
Seite 154: 入力/出力
ズーム方式 最大 322 倍(14 倍光学ズーム、23 倍デジタル・ズーム) 電 源 電源 DC 5V/3A, AC 100-240V, 50-60Hz 消費電力 10 ワット(ランプ点灯時)、9 ワット(ランプ消灯時) 照 明 ランプ種類 LED 照明 入 力/出 力 HDMI 入力 あり(HDMI、パススルー) HDMI 出力 あり(HDMI、パススルー) VGA 入力 あり(15 ピン D-sub、パススルー) VGA 出力 あり(15 ピン D-sub、パススルー) USB-A ポート... -
Seite 155: トラブルシューティング
トラブルシューティング この節では、AVerVision M90UHD の使用中に一般的な問題を解決する方法について解説します。 プレゼンテーション画面に画像が表示されません。 本書に記述されたすべてのコネクタが正しく接続されているかどうか確認してください。 ディスプレイ出力装置側の解像度設定を確認してください。 AVerVision M90UHD 経由で、ノートパソコンまたはコンピューターから表示出力装置にパススルー出力を行う場 合、コンピューターの VGA(VGA)出力から AVerVision M90UHD の VGA 入力へのケーブル接続を確認し、 AVerVision M90UHD が PC モードであることを確認してください。 HDMI ディスプレイ出力の場合、ディスプレイ・デバイスと M90UHD の両方が同期するのを待つ間に遅延が発生 します。画面にカメラの画像が表示されるまで、4~7 秒ほどお待ちください。 プレゼンテーション画面に歪んだ画像や不鮮明な画像が表示されます。 可能であれば、変更した設定をすべて元の工場出荷時のデフォルト設定にリセットしてください。リモコンの「初期 化」ボタンを押すか、OSD メニュー「システム」タブで「デフォルト」を選択します。 可能な場合は、明るさまたはコントラストのメニュー機能を使用し、歪みを修正してください。 不鮮明な画像や焦点が合わない画像が表示された場合は、コントロール・パネルまたはリモコンの「オートフォーカ ス」ボタンを押してください。 プレゼンテーション画面にコンピューター信号が表示されません。 ディスプレイ・デバイス、AVerVision M90UHD、およびコンピューター間のすべてのケーブル接続を確認します。 コンピューターの電源を入れる前に、まず PC を AVerVision M90UHD に接続します。... -
Seite 156: 製品保証について
製品保証について 該当する製品の購入日から「Warranty Period of AVer Product Purchased(購入された AVer 製品の保証期間)」 セクションに定める期間、AVer Information Inc.(「AVer」)は、該当する製品(「製品」)が、AVer の製品向け文書に 実質的に適合し、通常の使用では、その製造とコンポーネントに材料および仕上がりの欠陥がないことを保証します。 この契約で使用される「使用者」は使用者個人、または該当の製品を使用またはインストールする対象となる事業体 を意味します。この制限付き保証は本来の購入者としての使用にのみ限定されます。前述の場合を除き、製品は「現 状のまま」提供されます。AVer はいかなる状況でも、使用者が問題または中断なく製品を操作できること、または製 品が使用者の目的に適合していることを保証するものではありません。この節における使用者の唯一の救済および AVer の全責任は、AVer の選択で、同じまたは同等の製品で、製品の修理または交換を行うことです。この保証は、 (a)製品のシリアル番号が判別不能だったり、修正されたり、外されたりした場合、または(b)本製品と一緒に使用され るカートン、ケース、バッテリ、キャビネット、テープ、アクセサリには適用されません。この保証は、(a)事故、乱用、誤用、 粗略な取扱い、火災、水害、落雷などの自然災害、商業的または工業的使用、不適切な改造、製品に含まれる 指示に従わないこと、(b)製造元の担当者以外の者によるサービスの誤用、(c)出荷による損傷(そうした賠償は運送 業者に請求しなければならない)、または(d)製品の不具合に関係のない他の原因によって、損傷、機能悪化、異常 が生じた製品には適用されません。製品を修理または交換する保証期間は、(a)本来の保証期間、または(b)修理 または交換した製品の出荷日から 30 日以内とします。 保証の制限 AVer はいかなる第三者に対しても保証する責任を負いません。製品の使用または不使用によって使用者様に要求 されたすべての賠償、損害、返済、費用、弁護費用については、使用者の責任となります。この保証は、製品が AVer の仕様に従って設置、操作、保守、使用された場合にのみ適用されます。特に、保証は、(ⅰ)事故、異常な 物理的、電気的、電磁気的ストレス、粗略な取扱い、誤用、(ⅱ)AVer の仕様の範囲を超える電力の変動、(ⅲ) AVer または同社の正規代理店によって提供されたのではないアクセサリやオプションの併用、または(ⅳ)AVer または... - Seite 157 P/N: 300APM50-EGA...
- Seite 158 AVerVision M90UHD Bedienungsanleitung...
-
Seite 159: Haftungsausschluss
Zusammenhang mit der Nutzung oder Unmöglichkeit der Nutzung der Software oder der schriftlichen Unterlagen entstehen, selbst wenn über die Möglichkeit solcher Schäden informiert wurde. WARENZEICHEN „AVer" ist ein Warenzeichen von AVer Information Inc. Andere in diesem Dokument genannten Warenzeichen dienen lediglich der Information und sind Eigentum der entsprechenden Unternehmen. -
Seite 160: Urheberrecht
URHEBERRECHT © 2020 by AVer Information Inc. Alle Rechte vorbehalten. Kein Teil dieser Publikation darf in jedweder Form und durch jedwede Mittel ohne schriftliche Genehmigung von AVer Information Inc. reproduziert, übertragen, umgesetzt, in Abrufsystemen gespeichert oder in jegliche Sprachen übersetzt werden. - Seite 161 WARNUNG Zur Vermeidung der Brandgefahr bzw. von Elektroschocks setzen Sie das Gerät weder Regen noch Feuchtigkeit aus. Die Gewährleistung verfällt, wenn am Produkt unautorisierte Änderungen vorgenommen werden. Die Kamera keinen Schlägen oder starker Vibration aussetzen. Die richtige Stromspannung wählen, um Schäden an der Kamera zu vermeiden. Die Kamera muss so aufgestellt werden, dass niemand auf das Kabel treten ...
-
Seite 162: Kontaktinformationen
AVer Information Inc. https://www.aver.com 8F, No.157, Da-An Rd., Tucheng Dist., New Taipei City 23673, Taiwan Tel: +886 (2) 2269 8535 European Headquarters AVer Information Europe B.V. https://www.avereurope.com Westblaak 140, 3012KM, Rotterdam, Netherlands Tel: +31 (0) 10 7600 550 Technischer support:... - Seite 163 Inhaltsverzeichnis Inhalt der Verpackung ..................1 Optionales Zubehör ................... 1 Erste Schritte mit der AVerVision M90UHD ............. 1 Rechte Seite ......................3 Linke Seite ....................... 3 Rückseite ......................... 4 Bedienfeld ....................... 5 Fernbedienung ......................6 Verbindungsherstellung ..................8 Anschluss an die Stromversorgung ................. 8 Computer-Anschluss über USB ................
- Seite 164 Erfassungsqualität .................... 33 Erfassungstyp ....................33 Erfassungsintervall ................... 33 Speicherung ...................... 34 Format ......................34 USB an PC ....................... 34 Mikrofonlautstärke .................... 34 Start Timer ......................35 Pause/Stopp-Timer ................... 35 Timer-Intervall ....................35 System ........................36 Sprache ......................36 Ausgabeanzeige ....................36 Sicherung......................
-
Seite 165: Inhalt Der Verpackung
AVerVision M90UHD Verkaufsland üblichen Fernbedienung Steckdosen. (AAA*2 Batterien beiliegend) *Einschließlich Software, Schnellanleitung Garantiekarte Bedienungsanleitung und Schnellanleitung, nur für Regionen außerhalb der USA. Optionales Zubehör RS232-Kabel Tragetasche Blendschutz Anschlussplatte Mikroskopadapter (28-mm- und 34-mm-Gummikupplung beiliegend) Erste Schritte mit der AVerVision M90UHD... -
Seite 166: Funktion
Name Funktion Kamerakopf Enthält den Kamerasensor. Kameraobjektiv Bildfokussierung in der Kamera. LED-Leuchte Beleuchtung zur Verbesserung der Lichtverhältnisse. Mechanischer Verstellbarer Sichtwinkel. Linke Seite Micro SD-Kartenschlitz. Bedienfeld Einfacher Zugriff auf viele Funktionen. Anschlüsse für Strom, HDMI, Ausgang/Eingang für externes Rückseite Anzeigegerät und Kensington-Diebstahlsicherung. Anschlüsse für Computer, VGA Eingang/Ausgang für externes Rechte Seite Anzeigegerät und USB-Anschluss, Mini-USB, Mic-Ein, Line Out und... -
Seite 167: Linke Seite
über den VGA-OUT-Anschluss. Stellen Sie die (6) VGA EIN-Anschluss Verbindung zwischen dem VGA-Ausgangsanschluss und Computer über diesen Anschluss her. (7) VGA AUS-Anschluss Verbinden Sie die AVerVision M90UHD mit einem VGA-Kabel mit einem Anzeigegerät. L ink e Se ite Name Funktion Führen Sie die Mikro SD-Karte mit dem Etikett nach oben ein. -
Seite 168: Rückseite
Rü ck se ite Name Funktion Anschluss der externen HDMI-Quelle als Eingang über diesen Anschluss. Stellen Sie die Verbindung zwischen dem (1) HDMI EIN-Anschluss HDMI-Ausgangsanschluss und Computer über diesen Anschluss her. Videosignalausgabe vom Hauptsystem an einen interaktiven (2) HDMI AUS-Anschluss Flachbildschirm, LCD-Monitor oder LCD/DLP-Projektor mit HDMI-Schnittstelle und HDMI-Kabel. -
Seite 169: Bedienfeld
Be d ie nfe ld (14) (13) (12) (11) (10) Name Funktion STROM Das Gerät einschalten, in den Standby-Modus schalten Helligkeit verringern. - Treffen Sie eine Auswahl im Wiedergabemodus und im OSD-Menü. - Start/Pause Videowiedergabe. - Automatische Fokusjustierung. Bildvergrößerung in der Kamera und des Bildes im Wiedergabemodus. -
Seite 170: Fernbedienung
F er nb ed ien un g Für die Fernbedienung werden zwei (beiliegende) „AAA“-Batterien benötigt. Diese müssen richtig eingelegt werden. Sie können mit der Fernbedienung auf alle Funktionen der AVerVision M90UHD zugreifen. Name Funktion Das Gerät einschalten/in den STROM Standby-Modus schalten... - Seite 171 Name Funktion (16) GETEILTER Nicht unterstützt BILDSCHIRM (12) (13) Drücken Sie diese Taste, um (17) MODUS (14) zwischen den Modi „Normal“; „High (15) Frame“, „Hohe Qualität“, „Mikroskop, (16) „Unendlich“ oder (17) „Makro“ umzuschalten. (18) Aufruf des Timer-Submenüs. (19) (18) TIMER Auswahl für Start/Pausieren/Stoppen des Timer-Countdowns.
-
Seite 172: Verbindungsherstellung
Vergewissern Sie sich bitte, dass die Stromversorgung aller Geräte ausgeschaltet ist. Wenn Sie sich hinsichtlich der Anschlüsse nicht sicher sollten, ziehen Sie bitte die nachstehenden Abbildungen sowie das Handbuch des Gerätes heran, das Sie mit der AVerVision M90UHD verbinden. An sc h lus s a n d ie Stro mve r so rgu ng Verbinden Sie den Netzadapter mit einer normalen 100-V- bis 240-V-Wechselstromsteckdose. -
Seite 173: Computer-Anschluss Über Usb
Co mput er-An sc h lus s ü be r U SB Verbinden Sie den USB-Anschluss am Computer oder Laptop mit dem PC-Anschluss von AVerVision N M90UHD. Dann kann Ihre M90UHD als USB-Kamera verwendet werden. Sie können sie auch als Kamera nutzen, wenn Sie Software, wie Skype, Team, Zoom usw. nutzen. -
Seite 174: Anschluss An Einen Monitor Oder Lcd-/Dlp-Projektor Mit Vga/Hdmi-Ausgang
An sc h lus s a n e inen M on ito r od er LCD- /DL P- Pro jek to r mit VGA /HD M I-A usg an g Verbinden Sie den VGA/HDMI-Eingang des Grafikanzeigegeräts mit dem VGA/HDMI-OUT-Anschluss von AVerVision M90UHD. *VGA-Kabelverbindung *HDMI-Kabelverbindung... -
Seite 175: Anschluss An Einen Computer Mit Vga/ Hdmi-Eingang
An sc h lus s a n e inen Co mput er mit VGA / HD M I- Einga ng Verbinden Sie den VGA/HDMI-Eingang des Grafikanzeigegeräts mit dem VGA/HDMI-OUT-Anschluss von AVerVision M90UHD. - Seite 176 Laptop und verbinden Sie ihn mit dem VGA/ HDMI-IN-Anschluss an der AVerVision M90UHD. Das Videosignal des VGA/HDMI-IN-Anschlusses wird an den VGA/RGB-OUT-Anschluss gestreamt. [Hinweis] - Für die Anzeige des Computerbilds drücken Sie die Taste Kamera/PC am Bedienfeld oder der Fernbedienung, um die AVerVision M90UHD in den Computermodus zu schalten.
-
Seite 177: Anschluss Eines Verstärkerlautsprechers
An sc h lus s e ines Ve rs tär ke r lautsp re che rs Verbinden Sie einen Verstärkerlautsprecher mit 3,5-mm-Stecker mit dem Line-Out ( Anschluss. Es wird nur Audio aus der Videowiedergabe unterstützt. [Hinweis] Wir empfehlen den Anschluss des Verstärkerlautsprechers am Line-Out-Ausgang. Lassen Sie bei der Verwendung von Ohrhörern Vorsicht walten. -
Seite 178: Anschluss An Ein Mikroskop
An sc h lus s a n e in M ik rosk op Wenn Sie die AVerVision M90UHD mit einem Mikroskop verbinden, können Sie mikroskopisch kleine Objekte auf einem großen Bildschirm anzeigen. Bildanzeigemodus zu Mikroskop ändern. Wählen Sie die Registerkarte IMAGE (BILD) >... - Seite 179 Nehmen Sie das Okular vom Mikroskop und verbinden Sie es mit dem Mikroskopadapter mit der eingesetzten Gummikupplung. Befestigen Sie den Adapter und das Okular mit den drei Schrauben. - Für das Okular empfehlen wir einen Augenabstand von 33 mm. - Für die Verbesserung der Sicht nehmen Sie die Anpassung manuell vor.
-
Seite 180: Einrichtung Von Avervision M90Uhd
Ein r ic htu ng vo n AVe rVis ion M90UHD Dieses Kapitel enthält nützliche Tipps für die Anpassung der AVerVision M90UHD gemäß Ihren Bedürfnissen. Au fbew ahru ng de r Do ku me ntka mera Angaben zur Aufbewahrung der Dokumentkamera entnehmen Sie bitte der nachstehenden... -
Seite 181: Aufnahmebereich
Au fna h meb er e ich Der Aufnahmebereich kann mit High-Definition-Vorschau maximal 420 x 315 mm betragen. Wenn die Kameraposition eine Höhe von 360,3mm hat, ist der Aufnahmebereich A3-Größe. - Seite 182 Der Kamerakopf kann um 90 gedreht werden, wie nachstehend gezeigt.. -90° 0° +90° Um das Bild zu spiegeln, drücken Sie MENU (MENÜ) > Mirror (Spiegel). Betätigen Sie und dann „On“ (Ein).
-
Seite 183: Overhead-Licht
O ve r he ad-L icht Drücken Sie am Bedienfeld oder auf der Fernbedienung die LAMPEN-Taste, um das Licht ein- und auszuschalten. -
Seite 184: Infrarotsensor
In fra ro ts en so r Richten Sie die Fernbedienung auf den Infrarotsensor, um das Gerät zu bedienen. M 90UHD- Mo ntag e au f e ine r f lach en Obe rf lä ch e Messen und kennzeichnen Sie auf einer flachen Oberfläche in einer geraden Linie horizontal 75 mm zwischen den Löchern;... -
Seite 185: Blendschutz
Licht zu reduzieren. Ext er ne r Sp e ic her AVerVision M90UHD unterstützt eine externe Mikro SD-Speicherkarte sowie ein USB Flash-Laufwerk, um die Speicherkapazität für Bild- und Audio-/Videoaufnahmen zu erhöhen. AVerVision M90UHD erkennt das externe Speichermedium und schaltete automatisch zu dem zuletzt erkannten Speicher um. -
Seite 186: Rs232-Anschlussdiagramm
RS232-Anschlussdiagramm AVerVision M90UHD kann über den RS-232-Anschluss über einen Computer oder ein zentrales Bedienteil gesteuert werde. -
Seite 187: Rs-232 Senden-Befehl-Tabelle
RS-232 Senden-Befehl-Tabelle Senden-Format︰0x52 + 0x0B + 0x03 + Data[0] + Data[1] + Data[2] + 0x53 + Checksum Format Empfang erfolgreich︰0x53 + 0x00 + 0x02+ *2 + 0x00 + 0x52 +Checksum Format Empfang abnormal︰0x53 + 0x00 + 0x01+ *3 + 0x52 + Checksum *1 :Checksum = 0x0B x oder 0x03 x oder Data[0] x oder Data[1] x oder Data[2] x oder 0x53 *2 :Datenempfang OK: 0x0B, Not Befehl: 0x03 *3 :ID Fehler: 0x01, Checksum Fehler: 0x02, Funktion fehlgeschlagen = 0x04... - Seite 188 Funktion Data[0] Data[1] Data[2] Checksum VORSCHAUMODUS: NORMAL 0x0A 0x06 0x00 0x57 VORSCHAUMODUS: HOHE QUALITÄT 0x0A 0x07 0x00 0x56 VORSCHAU ERFASSEN 0x0B 0x00 0x00 0x50 WIEDERGABE LÖSCHEN 0x0C 0x00 0x00 0x57 WIEDERGABE VOLLBILD 0x0D 0x00 0x00 0x56 SPIEGEL AUS 0x0E 0x00 0x00 0x55 SPIEGEL EIN...
- Seite 189 Funktion Data[0] Data[1] Data[2] Checksum AUFNAHME: EIN 0x23 0x01 0x00 0x79 FILM SCHNELL ZURÜCKSPULEN 0x25 0x00 0x00 0x7e VIDEO SCHNELL VORWÄRTS SPULEN 0x25 0x01 0x00 0x7f FILM LAUTER 0x26 0x00 0x00 0x7d FILM LEISER 0x26 0x01 0x00 0x7c SPEICHER: EINGEBETTET 0x28 0x00 0x00...
- Seite 190 Funktion Data[0] Data[1] Data[2] Checksum AUTOFOKUS 0x40 0x00 0x00 0x1b MENÜ 0x41 0x00 0x00 0x1a PFEIL - NACH UNTEN 0x42 0x00 0x00 0x19 PFEIL NACH OBEN 0x42 0x01 0x00 0x18 PFEIL- LINKS 0x42 0x02 0x00 0x1b PFEIL - RECHTS 0x42 0x03 0x00 0x1a...
-
Seite 191: Rs-232 Get-Befehl-Tabelle
RS-232 Get-Befehl-Tabelle Sendenformat︰0x52 + 0x0A + 0x01 + Data[0] + 0x53 + Checksum Empfangsformat︰0x53 + 0x0C + 0x01 + ReData[0] + 0x52 + ReChecksum *1 :ReChecksum = 0x0C x oder 0x01 x oder ReData[0] x oder 0x52 *2 :Power Status Empfang Daten = 0x51 + 0xFF + 0x01 + 0x0A + 0x51 + 0xA5 Funktion Data[0] Checksum... -
Seite 192: Osd-Menü
OSD-MENÜ Im OSD-Menü stehen 3 Optionen zur Verfügung: IMAGE (BILD), SETTING (EINSTELLUNG) und SYSTEM. EINSTELLUNG BILD SYSTEM... -
Seite 193: Menü Bildschirm
Na vig a t io n im M en ü u nd im Sub men ü 1. Betätigen Sie die MENU-Taste am Bedienfeld oder der Fernbedienung. 2. Betätigen Sie ►, ◄, ▲ und ▼, um Ihre Auswahl in der Menüliste zu treffen. 3. -
Seite 194: Vorschaumodus
Menü-Bildschirm Funktion Vorschaumodus Auswahl aus verschiedenen Bildanzeigeeinstellungen. Normal - Bildgradient anpassen. Motion – hohe Aktualisierungsrate für ein bewegtes Bild. High Quality - hohe Auflösung mit der besten Qualität. Mikroskop - automatische Anpassung des optischen Zooms für die mikroskopische Ansicht Macro – Nahaufnahme. Infinity –... -
Seite 195: Belichtungseinrichtung
Menü-Bildschirm Funktion Belichtungseinrichtung Wählen Sie „AUTO" für die automatische Anpassung von Weißabgleich, Belichtung, Farbkorrektur und Belichtungskorrektur. Wählen Sie „MANUAL“ für die erweiterten Belichtungs- und Weißabgleicheinstellungen. Manuelle Beleuchtung MANUAL - Manuelle Anpassung des Belichtungspegels. Die Belichtung kann von 0 bis 99 angepasst werden. Weißabgleich-Einrichtung Auswahl der Weißabgleich-Einstellung für unterschiedliche Lichtbedingungen und... -
Seite 196: Manuell Wb Blau
Menü-Bildschirm Funktion Manuell WB Blau Manuelle Anpassung des blauen Farbniveaus Die Farbstufe kann bis 255 angepasst werden. Manuell WB Rot Manuelle Anpassung des roten Farbniveaus Die Farbstufe kann bis 255 eingestellt werden. Fokus Manuelle Feinabstimmung des Bildes. -
Seite 197: Einstellung
Ein ste llung Menü-Bildschirm Funktion Erfassungsauflösung Mit dieser Auswahl erfassen Sie die Größe. Bei der 13M-Einstellung ist die Auflösung 4208 x 3120. Wählen Sie Normal für die Erfassungsgröße basierend auf den Auflösungseinstellungen. Erfassungsqualität Mit dieser Auswahl wird die Erfassungskomprimierung ausgewählt. Wählen Sie Finest (am Feinsten) für die beste Erfassungskomprimierung. -
Seite 198: Speicherung
Menü-Bildschirm Funktion Speicherung Speicherort ändern. Audio- und Videoaufnahmen können nur auf einer integrierten SD Karte oder einem USB-Laufwerk gespeichert werden. Format Formatieren, um alle Daten im gewählten Speicher zu löschen. USB an PC Auswahl des Status von AVerVision M90UHD bei der Verbindung über USB-Kabel. -
Seite 199: Start Timer
Menü-Bildschirm Funktion Start Timer Timer starten. Der Timer zählt automatisch hoch, sobald er Null erreicht, und zeigt die abgelaufene Zeit an. Pause/Stopp-Timer Während der Zeitaufnahme die „Menü“-Taste drücken, um die Zeitvorgabe zu pausieren oder zu stoppen. Timer-Intervall Legen sie die Timer-Dauer mit bis zu 2 Stunden fest. -
Seite 200: System
S ys t e m Menü-Bildschirm Funktion Sprache Ändern und Auswahl der Sprache. M90UHD unterstützt bis zu 12 Sprachen. Ausgabeanzeige Festlegen der Auflösung für die Bildanzeige am Bildschirm. Das Auflösung des Ausgabegerätes wird automatisch erkannt und entsprechend der höchsten Auflösung konfiguriert. -
Seite 201: Einstellung Aufrufen
Menü-Bildschirm Funktion Einstellung aufrufen Wiederherstellung der Einstellungen für die ausgewählte Profilnummer. Flicker Auswahl zwischen 50 Hz oder 60 Hz. Einige Anzeigegeräte können höhere Aktualisierungsraten verarbeiten. Das Bild flackert kurz, während die Ausgabe auf eine andere Aktualisierungsrate umgeschaltet wird. Information Produktinformationen anzeigen Defauölt Zurücksetzen aller Einstellungen auf die Werkseinstellungen. -
Seite 202: Wiedergabe
Wied er gabe Sie können die gespeicherte Bilder oder Videos mit der Playback-Funktion konfigurieren. Menü-Bildschirm Funktion Diashow Diashow starten oder stoppen. Intervall Auswahl des Intervall für die Bild- oder Videowiedergabe. Speicher Auswahl von Bildern oder Videos aus dem Speicher, einschließlich Embedded, SD-Karte oder USB-Laufwerk. -
Seite 203: Transfer Captured Images/Videos To A Computer
Transfer Captured Images/Videos to a computer Hier können Sie das erfasste Bild vom eingebauten Speicher von einer SD-Karte oder einem USB-Laufwerk auf einen Computer übertragen. Für die Speicherung von Bildern/Videos bieten sich zwei Möglichkeiten: a. Integrierter Speicher und SD-Karte b. Integrierter Speicher und USB-Laufwerk Lesen Sie UNBEDINGT die nachstehende Anleitung, BEVOR Sie das USB-Kabel anschließen. -
Seite 204: Technische Daten
Technische Daten Bild Sensor 1/3,06 Zoll CMOS Pixel 13 Megapixel Bildrate 60 fps (max.) Weißabgleich Automatik/Manuell Belichtung Automatik/Manuell Bildmodus Normal, Bewegung, Hohe Qualität, Mikroskop, Unendlichkeit, Makro Effekt Farbe/SW/Negativ RGB-Ausgang 1280×720, 1024×768, 1080P HDMI-Ausgang 4K, 1080p, 720p Bilderfassung 200 Frames Optik Fokussierung Automatik/Manuell Aufnahmebereich... -
Seite 205: Externer Speicher
Externer Speicher Micro SD-Karte Max. 32GB (FAT32) USB Flash-Laufwerk Max. 32GB (FAT32) *Beachten Sie bitte, dass diese Spezifikation auftragsabhängig ist. -
Seite 206: Fehlerbehebung
1. Überprüfung Sie die Kabelverbindungen zwischen dem Anzeigegerät, der AVerVision M90UHD und Ihrem PC. 2. Verbinden Sie Ihren PC mit der AVerVision M90UHD, bevor Sie ihn einschalten. 3. Am Notebook drücken Sie mehrmals FN+F5, um zwischen den Anzeigemodi umzuschalten und das Computerbild auf dem Präsentationsbildschirm anzuzeigen. -
Seite 207: Garantie
Garantie Für die Zeit ab dem Kauf des zutreffenden Produkts und, wie im Abschnitt “Warranty Period of AVer Product Purchased (Garantiezeit erworbener AVer-Produkte)” erweiternd festgelegt ist, garantiert AVer Information Inc. (“AVer”), dass das zutreffende Produkt (“Produkt”) im Wesentlichen mit AVers Dokumentation für das Produkt übereinstimmt und... -
Seite 208: Haftungseinschränkungen
AVer auf die Möglichkeit solcher Schäden hingewiesen wurde. AVers Gesamthaftung für Schäden jeglicher Art übersteigt in keinem Fall und unabhängig von der Art des Vorgangs den Betrag, den Sie an AVer für das jeweilige Produkt, auf welches sich die Haftung bezieht, gezahlt haben. Das Gesetz und Ihre Rechte Diese Garantie verleiht Ihnen bestimmte gesetzliche Rechte;... - Seite 209 AVerVision M90UHD Mode d'emploi...
-
Seite 210: Marques Commerciales
été prévenu de la possibilité de tels dommages. MARQUES COMMERCIALES « AVer » est une marque commerciale propriété d'AVer Information Inc. Les autres marques commerciales mentionnées dans ce document à seule fin descriptive appartiennent à leurs sociétés respectives. - Seite 211 COPYRIGHT © 2020 par AVer Information Inc. Tous droits réservés. Aucune portion de ce document ne peut être reproduite, transmise, enregistrée ou stockée dans un système de restitution, ni traduite en aucune langue que ce soit, par quelque moyen que ce soit, sans l'autorisation écrite préalable de AVer Information Inc.
- Seite 212 AVERTISSEMENT Pour réduire les risques d’incendie ou d’électrocution, n’exposez pas l’appareil à la pluie ou à l'humidité. La garantie sera annulée si des modifications non autorisées sont apportées à l’appareil. Ne laissez pas tomber la caméra et évitez les chocs physiques. ...
-
Seite 213: Coordonnées De Contact
AVer Information Inc. https://www.aver.com 8F, No.157, Da-An Rd.,Tucheng Dist., New Taipei City 23673, Taiwan Tel: +886 (2) 2269 8535 Siège européen AVer Information Europe B.V. https://www.avereurope.com Westblaak 140, 3012KM, Rotterdam, Netherlands Tel: +31 (0) 10 7600 550 Assistance technique: eu.rma@aver.com... - Seite 214 Table des matières Contenu de l'emballage ..................1 Accessoires en option ..................1 Familiarisez-vous avec l'AVerVision M90UHD ..........2 Panneau droit ........................ 3 Panneau gauche ......................3 Panneau arrière ......................4 Panneau de commande ....................5 Télécommande ......................6 Branchements ....................8 Branchement de l’alimentation ..................
- Seite 215 Mise au point ....................32 Réglage ........................33 Résolution de la capture ................... 33 Qualité de la capture ..................33 Type de capture ....................33 Capture d’intervalle ................... 33 Stockage ......................34 Format ......................34 USB à PC ......................34 Volume du micro ....................
-
Seite 216: Contenu De L'emballage
Vérifiez que les éléments suivants se trouvent bien dans l’emballage. Câble VGA Câble USB Adaptateur secteur (5V, 3A) *L’adaptateur secteur sera différent selon le type de prise AVerVision M90UHD de courant utilisé dans le Télécommande (2 piles AAA pays où il est vendu. incluses) * Logiciel, manuel de... -
Seite 217: Familiarisez-Vous Avec L'avervision M90Uhd
Familiarisez-vous avec l'AVerV ision M90UHD Fonction Bloc de caméra Contient le détecteur de caméra. Objectif de la Mise au point de la caméra. caméra Lampe LED Fournit de la lumière pour améliorer les conditions d'éclairage. Bras mécanique Permet de régler le cadrage. Panneau gauche Emplacement pour carte micro SD Panneau de... -
Seite 218: Panneau Droit
Connexion à un microphone externe. (4) Mini port USB Connexion au port USB d'un ordinateur grâce au câble USB et utilise AVerVision M90UHD comme caméra USB ou transfère les images / vidéos capturées de la source mémoire à l'ordinateur. (5) Port USB Insérer une clé... -
Seite 219: Panneau Arrière
Panneau ar r i èr e Fonction Connexion d’une source HDMI externe comme entrée via ce port. (1) Port HDMI IN Connexion de ce port au port de sortie HDMI d'un ordinateur. Transmission du signal vidéo du système principal sur un écran plat (2) Port HDMI OUT interactif, un moniteur LCD ou un projecteur LCD / DLP avec interface HDMI à... -
Seite 220: Panneau De Commande
Panneau de com mande (14) (13) (12) (11) (10) Fonction (1) POWER Mise en marche/arrêt/veilleuse Réduction de la luminosité. - Sélection en mode Lecture et dans le menu OSD. - Marche/Pause de la lecture de la vidéo - Réglage automatique de la mise au point. Augmentation de l'agrandissement de l'image dans la caméra et le mode de lecture d'image. -
Seite 221: Télécommande
T él écomm ande La télécommande nécessite deux (2) piles de taille «AAA» (fournies), assurez-vous que les piles sont correctement installées avant utilisation. Vous pouvez accéder à toutes les fonctionnalités de AVerVision M90UHD à l’aide de la télécommande. Fonction POWER Mise en marche/arrêt/veille... - Seite 222 Fonction Qualité supérieure, Microscope, Infini ou Macro. (12) Affiche le sous-menu Minuterie. (18) TIMER (13) Sélectionnez pour démarrer/ (14) suspendre/arrêter le compte à (15) rebours de la minuterie. (16) (17) (18) (19) (20) (10) (21) Sélectionnez Intervalle de minuterie (11) (22) pour en définir la durée.
-
Seite 223: Branchements
à l'AVerVision M90UHD. B r anchem ent de l’ali m ent at i on Branchez l’adaptateur d'alimentation à une prise de courant alternatif standard 100 V~240 V AC. -
Seite 224: Branchement À Un Ordinateur Via Usb
Repérez le port USB de l'ordinateur de bureau ou portable et raccordez-le au port PC de l'AVerVision M90UHD. Ainsi, votre M90UHD peut être utilisé comme caméra USB, vous pouvez le sélectionner comme caméra lorsque vous allumez des logiciels comme Skype,... -
Seite 225: Branchement À Un Moniteur Ou À Un Projecteur Lcd/Dlp Par Interface Vga/Hdmi
B r anchem ent à un m onit eur ou à un pr oj ecteur LC D /D LP par i nt er face VG A /H DM I Repérez le port d'entrée VGA/HDMI de l'appareil d'affichage et raccordez-le au port VGA/HDMI OUT de l’AVerVision M90UHD. * Raccordement du câble VGA * Raccordement du câble HDMI... -
Seite 226: Branchement À Un Ordinateur Via Entrée Vga/Hdmi
B r anchem ent à un or di nateur v i a ent r ée VGA /HDM I Repérez le port d'entrée VGA/HDMI de l'appareil d'affichage et raccordez-le au port de sortie VGA/HDMI de AVerVision M90UHD. - Seite 227 De l'autre côté, repérez le port de sortie VGA/HDMI de l'ordinateur ou du portable et raccordez-le au port d’entrée VGA/HDMI de AVerVision M90UHD. Le signal vidéo provenant du port VGA/HDMI IN est diffusé au port VGA / HDMI OUT. [Note] - Pour afficher l'image sur l'ordinateur, appuyez sur le bouton Camera/PC du panneau de commande ou de la télécommande pour passer AVerVision M90UHD en mode...
-
Seite 228: Branchement D'un Haut-Parleur Amplifié
B r anchem ent d’un haut - par l eur ampli fi é Branchez un haut-parleur amplifié muni d’une prise jack de 3,5 mm sur le port Line Out ). Seul le son de la lecture vidéo est pris en charge. [Note] Nous vous recommandons de brancher un haut-parleur amplifié... -
Seite 229: Branchement À Un Microscope
B r anchem ent à un mi cr oscope Connecter AVerVision M90UHD à un microscope vous permet d'examiner des objets microscopiques sur un grand écran. Modifiez le mode d'affichage de l'image sur Microscope. Sélectionnez l'onglet IMAGE > sélectionnez Preview Mode >... - Seite 230 Retirez l'oculaire du microscope et raccordez-le à l'adaptateur du microscope grâce au coupleur en caoutchouc inséré. Serrez les 3 vis jusqu'à ce que l'oculaire tienne dans l’adaptateur. - Nous recommandons d'utiliser des oculaires de 33 mm ou plus d’eye relief (séparation admissible entre l'œil et l’oculaire) - Effectuez l'ajustement manuellement pour obtenir une...
-
Seite 231: Configuration De Avervision M90Uhd
C onfi gur at i on de AVerV i sion M 90UH D Cette section propose des conseils utiles quant à la façon d'ajuster AVerVision M90UHD pour répondre à vos besoins. R angem ent de l a cam ér a pour document s... -
Seite 232: Champ De La Caméra
C ham p de l a camér a La taille du champ peut atteindre jusqu’à 420 x 315 mm en mode prévisualisation haute définition. Lorsque la caméra est positionnée à une hauteur de 360,3 mm, la taille du champ correspondra au format A3. - Seite 233 Le bloc caméra peut être tourné de 90 comme illustré ci-dessous. -90° 0° +90° Pour activer l’effet miroir, appuyez sur MENU > sélectionnez Miroir, appuyez sur et sélectionnez «On».
-
Seite 234: Lampe Zénithale
Lam pe z éni t hal e Appuyez sur le bouton LAMP (lampe) du panneau de commande ou de la télécommande pour allumer ou éteindre l’éclairage. -
Seite 235: Capteur Infrarouge
C a pteur inf r ar ouge Dirigez la télécommande vers le capteur infrarouge pour faire fonctionner l'appareil. M onta ge du M 90UH D s ur une s ur face pl at e. Mesurez et marquez le segment de 75 cm correspondant à la distance entre les trous tel qu’indiqué... -
Seite 236: Feuille Antireflet
S t ocka ge en m ém oi r e ext er ne AVerVision M90UHD prend en charge aussi bien la carte mémoire Micro SD que la clé USB pour plus de capture d'images et d'enregistrements audio et vidéo. AVerVision M90UHD détecte la présence d'un support de stockage externe et utilise automatiquement le dernier... -
Seite 237: Schéma De Connexion De Rs232
Schéma de connexion de RS232 AVerVision M90UHD peut être commandé depuis un ordinateur ou de tout panneau de commande centralisé via une connexion RS232. -
Seite 238: Tableau Des Commandes D'envoi Rs-232
Tableau des commandes d’envoi RS-232 Format d’envoi︰0x52 + 0x0B + 0x03 + Donnée[0] + Donnée[1] + Donnée[2] + 0x53 + Somme de contrôle Format de réception avec succès︰0x53 + 0x00 + 0x02+ *2 + 0x00 + 0x52 + Somme de contrôle*4 Format de réception anormale︰0x53 + 0x00 + 0x01+ *3 + 0x52 + Somme de contrôle*5 *1 :Somme de contrôle = 0x0B xor 0x03 xor Donnée[0] xor Donnée[1] xor Donnée[2] xor 0x53 *2 :Données reçues ok : 0x0B, Pas de commande : 0x03... - Seite 239 Somme de Fonction Donnée[0] Donnée[1] Donnée[2] contrôle MACRO-INDICATEURS MODE PREVISUAL : INFINI 0x0A 0x05 0x00 0x54 MODE PREVISUAL : NORMAL 0x0A 0x06 0x00 0x57 MODE PREVISUAL : HAUTE QUALITÉ 0x0A 0x07 0x00 0x56 PREVISUAL CAPTURE 0x0B 0x00 0x00 0x50 EFFACER LECTURE 0x0C 0x00 0x00...
- Seite 240 Somme de Fonction Donnée[0] Donnée[1] Donnée[2] contrôle PAPILLOTEMENT : 50 Hz 0x18 0x00 0x00 0x43 PAPILLOTEMENT : 60 Hz 0x18 0x01 0x00 0x42 ENREGISTREMENT : DESACTIVE 0x23 0x00 0x00 0x78 ENREGISTREMENT : ACTIVE 0x23 0x01 0x00 0x79 RETOUR RAPIDE VIDEO 0x25 0x00 0x00...
- Seite 241 Somme de Fonction Donnée[0] Donnée[1] Donnée[2] contrôle DIAPORAMA : ACTIVE 0x34 0x01 0x00 0x6e QUALITE CAPTURE : NORMALE 0x37 0x00 0x00 0x6c QUALITE CAPTURE : HAUTE 0x37 0x01 0x00 0x6d QUALITE CAPTURE : SUPERIEURE 0x37 0x02 0x00 0x6e MISE AU POINT AUTOMATIQUE 0x40 0x00 0x00...
-
Seite 242: Tableau Des Instructions De Requête Rs-232
Tableau des instr uctions de r equête RS-232 Format d’envoi︰0x52 + 0x0A + 0x01 + Donnée[0] + 0x53 + Somme de contrôle Format de réception︰0x53 + 0x0C + 0x01+ ReDonnée 0x52 + ReSomme de contrôle*1 *1 :ReSomme de contrôle = 0x0C xor 0x01 xor ReDonnée[0] xor 0x52 *2 :Données reçues statut alimentation = 0x51 + 0xFF + 0x01 + 0x0A + 0x51 + 0xA5 Somme de Fonction... -
Seite 243: Menu Osd
Menu OSD Le menu OSD se compose de 3 onglets: IMAGE, REGLAGES et SYSTEME. REGLAGES IMAGE SYSTEME... -
Seite 244: Navigation Dans Le Menu Et Les Sous-Menus
N avi gati on dans l e m enu et l es sous -m enus 1. Appuyez sur la touche MENU de la télécommande ou du panneau de commandes. 2. Appuyez sur ►, ◄, ▲ et ▼ pour choisir une sélection dans la liste du menu. 3. -
Seite 245: Mode De Prévisualisation
Écran de menu Fonction Mode de prévisualisation Sélectionnez parmi les divers paramétrages d’affichage des images. Normal - réglez le gradient de l’image. Motion (vidéo) – augmentez le nombre d’images/seconde. Haute Qualité - haute résolution avec la meilleure qualité. Microscope - réglage automatique du zoom optique pour l'utilisation avec un microscope. -
Seite 246: Réglage De L'exposition
Écran de menu Fonction Réglage de l’exposition Sélectionnez AUTO pour régler automatiquement la balance des blancs et le paramètre d'exposition et corriger la couleur et la compensation d'exposition. Sélectionnez MANUAL pour activer les paramètres avancés pour l'exposition manuelle et balance des blancs. Exposition manuelle MANUEL - réglez manuellement l’exposition. -
Seite 247: Balance Des Blancs Bleu
Écran de menu Fonction Balance des blancs Bleu Réglez manuellement le niveau de bleu. Le niveau de couleur peut être ajusté jusqu'à 255. Balance des blancs Rouge Réglez manuellement le niveau de rouge. Le niveau de couleur peut être ajusté jusqu'à... -
Seite 248: Résolution De La Capture
R ég l a ge Écran de menu Fonction Résolution de la capture Sélectionnez la taille de la capture. Pour la valeur 13M, la taille de résolution de la capture est 4208 X 3120. Sélectionnez Normal, la taille de la capture est basée sur les paramètres de résolution. -
Seite 249: Stockage
Écran de menu Fonction Stockage Changez le lieu de stockage. Les enregistrements audio et vidéo ne peuvent être enregistrés que dans une mémoire intégrée, une carte de mémoire SD ou une clé USB. Format Formatez pour effacer toutes les données de la mémoire sélectionnée. -
Seite 250: Démarrage De La Minuterie
Écran de menu Fonction Démarrage de la minuterie Démarrez la minuterie. La minuterie amorce un comptage automatique, une fois que le décompte atteint zéro, et afficher le temps écoulé. Pause/Arrêt de la minuterie Appuyez sur le bouton Menu pendant le compte à... -
Seite 251: Système
S ys t èm e Écran de menu Fonction Langue Changez et sélectionnez une autre langue. M90UHD prend en charge jusqu’à 12 langues. Affichage de sortie Paramétrer la résolution pour l’affichage de l’image sur l’écran. La résolution du périphérique de sortie est détectée automatiquement et configurée à... -
Seite 252: Rétablir Les Réglages
Écran de menu Fonction Rétablir les réglages Restaurer les réglages du nº de profil sélectionné. Papillotement Sélectionnez 50 Hz ou 60 Hz. Certains écrans ne peuvent pas prendre en charge des fréquences d'actualisation élevées. L’image clignotera quelques instants lorsque vous changerez la fréquence d’actualisation du signal de sortie. -
Seite 253: Lecture
Lect ur e Vous pouvez utiliser la fonction de lecture pour configurer les images ou vidéos enregistrées. Écran de menu Fonction Diaporama Démarrer ou arrêter le diaporama. Intervalle Régler l’intervalle avant l’affichage de la photo ou vidéo suivante. Stockage Choisissez les images ou les vidéos du stockage, y compris de la mémoire intégrée intégré, la carte SD ou la clé... -
Seite 254: Transférez Des Images / Vidéos Capturées Sur Un Ordinateur
Tr ansfér ez des images / vidéos capturées sur un or dinateur. Cela vous permet de transférer l'image capturée depuis la mémoire intégrée, du lecteur SD ou USB vers un ordinateur. Deux manières d'enregistrer des images / vidéos : a. Mémoire intégrée + carte SD b. -
Seite 255: Caractéristiques Techniques
Car actéristiques techniques Image Capteur 1/3.06" CMOS Nombre de pixels 13 Méga Cadence d’images 60 images par seconde (max.) Balance des blancs Auto/manuelle Exposition Auto/manuelle Mode image Normal, Vidéo, Haute qualité, Microscope, Macro, Infini Effet Couleur/N/B/Négatif Sortie RVB 1280×720, 1024×768, 1080P Sortie HDMI 4K, 1080p, 720p Capture d’image... -
Seite 256: Dimensions
Dimensions En service 481,3mm (L) x 159mm (l) x 469,9mm (H) Plié 319,0mm (L) x 176mm (l) x 112mm (H) Poids 2.2 +/- 0,5 Kg (environ 5.732 lbs) Stockage externe Carte micro SD Max 32 Go (FAT32) Clé USB Max 32 Go (FAT32) *Notez que cette caractéristique est fonction de la commande. -
Seite 257: Guide De Dépannage
Il n’y a aucun signal d’ordinateur sur l’écran de présentation. 1. Vérifiez toutes les connexions de câble entre l’appareil d’affichage, l’AVerVision M90UHD et votre 2. Connectez d’abord votre PC à l’AVerVision M90UHD avant d’allumer votre PC. -
Seite 258: Garantie Limitée
Produit. La présente garantie limitée s’applique uniquement à Vous, l’acheteur d’origine. Sauf pour ce qui suit, le Produit est fourni « TEL QUEL ». En aucun cas AVer ne garantie que vous serez capable d’utiliser le Produit sans problèmes ou interruptions, ou que le Produit conviendra à... -
Seite 259: Limitation De Responsabilité
MÊME SI LA POSSIBILITÉ DE TELS DOMMAGES EST STIPULÉE DANS LE CONTRAT OU LE DROIT, INCLUANT SANS RESTRICTIONS LA NÉGLIGENCE OU N’IMPORTE QUELLE AUTRE THÉORIE LÉGALE, MÊME SI AVER A ÉTÉ AVERTI DE LA POSSIBILITÉ DE TELS DOMMAGES. L’UNIQUE ET ENTIÈRE RESPONSABILITÉ DE AVER, DANS LE CAS D’UN DOMMAGE DE QUELQUE SORTE QUE CE SOIT ET CELA MALGRÉ... - Seite 260 AVerVision M90UHD Manual del usuario...
-
Seite 261: Exención De Responsabilidad
Marcas comerciales «AVer» es una marca comercial propiedad de AVer Information Inc. Otras marcas comerciales utilizadas en este documento con fines descriptivos pertenecen exclusivamente a sus empresas correspondientes. - Seite 262 Copyright © 2020 AVer Information Inc. Todos los derechos reservados. Todos los derechos de este objeto pertenecen a AVer Information Inc. Se prohibe la reproducción o transmisión en cualquier forma o por cualquier medio sin la previa autorización por escrito de AVer Information Inc. AVer Information Inc. se reserva el derecho a modificar sus productos, incluso sus especificaciones, y cualquier otra información aquí...
- Seite 263 ADVERTENCIA Para reducir el riesgo de incendio o descarga eléctrica, no exponga el dispositivo a la lluvia o la humedad. En caso de realizarse modificaciones no autorizadas en el producto, se invalidará la garantía. No deje caer la cámara ni la someta a golpes. ...
-
Seite 264: Información De Contacto
AVer Information Inc. https://www.aver.com 8F, No.157, Da-An Rd., Tucheng Dist., New Taipei City 23673, Taiwan Tel: +886 (2) 2269 8535 Sede europea AVer Information Europe B.V. https://www.avereurope.com Westblaak 140, 3012KM, Rotterdam, Netherlands Tel: +31 (0) 10 7600 550 Soporte técnico:... - Seite 265 Índice Contenido del paquete ..................1 Accesorios opcionales ..................1 Familiarizarse con la AVerVision M90UHD ............2 Panel derecho ........................ 3 Panel izquierdo ......................3 Panel posterior ....................... 4 Panel de control ......................5 Mando a distancia ......................6 Realizar las conexiones ..................8 Conexión de la alimentación ..................
- Seite 266 Configuración del balance de blancos .............. 31 Azul de balance de blancos manual ..............32 Rojo de balance de blancos manual ..............32 Enfocar ......................32 Configuración ....................... 33 Resolución de captura ..................33 Calidad de captura .................... 33 Tipo de captura ....................33 Intervalo de captura ..................
-
Seite 267: Contenido Del Paquete
Compruebe que el paquete contenga los artículos siguientes: Cable VGA Cable USB Adaptador de corriente (5V, * El enchufe variará en AVerVision M90UHD función de la toma de Mando a distancia corriente estándar del país en (2 pilas AAA incluidas) el que se venda el producto. -
Seite 268: Familiarizarse Con La Avervision M90Uhd
Familiarizar se con la AVerVision M90UHD Nombre Función (1) Cabezal de la cámara Contiene el sensor de la cámara. (2) Lente de la cámara Enfoca la imagen en la cámara. (3) Luz LED Proporciona luz para mejorar las condiciones de iluminación. -
Seite 269: Panel Derecho
Conecte este puerto a un micrófono externo. (4) Puerto mini USB Conecte este puerto a un puerto USB de un ordenador mediante un cable USB y utilice la AVerVision M90UHD como una cámara USB o transfiera las imágenes/vídeos capturados de la fuente de memoria al ordenador. -
Seite 270: Panel Posterior
Panel pos t eri or Nombre Función Conecte una fuente HDMI externa como una entrada a través de (1) Puerto de entrada HDMI este puerto. Conecte este puerto al puerto de salida HDMI de un ordenador. Emita la señal de vídeo del sistema principal en un panel plano (2) Puerto de salida HDMI interactivo, monitor LCD o proyector LCD/DLP con interfaz HDMI mediante un cable HDMI. -
Seite 271: Panel De Control
Panel de cont r ol (14) (13) (12) (11) (10) Nombre Función ENCENDIDO/APAGADO Enciende la unidad o la pone en modo de espera. Disminuye el brillo. - Realiza una selección en el modo de reproducción y el menú OSD. - Inicia/Pausa la reproducción de un vídeo. - Ajusta el enfoque automáticamente. -
Seite 272: Mando A Distancia
El mando a distancia requiere dos (2) pilas de tamaño «AAA» (incluidas). Asegúrese de que las pilas se hayan insertado correctamente antes de utilizar el producto. Puede acceder a todas las funciones de la AVerVision M90UHD con el mando. Nombre Función... - Seite 273 Nombre Función Normal / Alta velocidad / Alta calidad / Microscopio / Infinito / Marco (12) Abre el submenú Temporizador. (18) TIMER (13) Seleccione para (14) iniciar/pausar/detener la cuenta (15) atrás. (16) (17) (18) (19) (20) (10) (21) Seleccione Intervalo de (11) (22) temporizador para establecer la...
-
Seite 274: Realizar Las Conexiones
Si no está seguro de cómo realizar una conexión, simplemente siga las instrucciones de conexión ilustradas a continuación y consulte el manual del usuario del dispositivo al que va a conectar la AVerVision M90UHD. C onexi ón de l a alim ent aci ón Conecte el adaptador de corriente a una toma de corriente 100V~240V CA estándar. -
Seite 275: Conexión De Un Ordenador Mediante Usb
Localice el puerto USB del ordenador de sobremesa o portátil y conéctelo al puerto PC de la AVerVision M90UHD. A continuación, podrá usar su M90UHD como una cámara USB y seleccionarla como su cámara cuando utilice software como Skype, Teams, Zoom, etc. -
Seite 276: Conexión De Un Monitor O Proyector Lcd/Dlp Con Salida Vga/Hdmi
C onexi ón de un moni t or o pr oyect or LC D /D LP con s ali da VG A /H DMI Localice el puerto de entrada VGA/HDMI del dispositivo de visualización y conéctelo al puerto de salida VGA/HDMI de la AVerVision M90UHD. * Conexión de cable VGA * Conexión de cable HDMI... -
Seite 277: Conexión De Un Ordenador Con Entrada Vga/Hdmi
C onexi ón de un or denador con entr ada VG A /H DM I Localice el puerto de entrada VGA/HDMI del dispositivo de visualización y conéctelo al puerto de salida VGA/HDMI de la AVerVision M90UHD. - Seite 278 Localice el puerto de salida VGA/HDMI del ordenador de sobremesa o portátil y conéctelo al puerto de entrada VGA/HDMI de la AVerVision M90UHD. La señal de vídeo del puerto de entrada VGA/HDMI se transferirá al puerto de salida VGA/HDMI. [Nota] - Para visualizar la imagen del ordenador de sobremesa, pulse el botón Camera/PC...
-
Seite 279: Conexión De Un Altavoz Amplificado
C onexi ón de un altavo z am pli fi cado Conecte un altavoz amplificado con conector de 3,5 mm al puerto de salida de línea ( Solo se admite el audio del vídeo reproducido. [Nota] Recomendamos conectar un altavoz amplificado al puerto de salida de línea. Tenga cuidado si utiliza auriculares. -
Seite 280: Conexión De Un Microscopio
C onexi ón de un micr os copio Conecte la AVerVision M90UHD a un microscopio para examinar objetos microscópicos en una pantalla grande. Cambie el modo de visualización de imagen a Microscopio. Seleccione la ficha IMAGEN > Modo de vista previa >... - Seite 281 Retire el ocular del microscopio y conéctelo al adaptador de microscopio con el acoplador de goma insertado. Apriete los tres pernos hasta que el adaptador asegure el ocular. - Para el ocular, recomendamos utilizar un relieve ocular de 33 mm o superior.
-
Seite 282: Preparación De La Avervision M90Uhd
P r epar aci ón de l a AVerV i sion M 90UH D En esta sección, se proporcionan consejos prácticos sobre cómo ajustar la AVerVision M90UHD para satisfacer sus necesidades. A lm acenam ient o de l a cám ar a de docum ent os Siga las indicaciones proporcionadas en la figura a continuación para guardar la cámara de documentos. -
Seite 283: Área De Disparo
Á r ea de di s par o El área de disparo puede verse en un área de 420 x 315 mm en el modo de vista previa de alta definición. Cuando la cámara se encuentra a una altura de 360,3 mm, el área de disparo se corresponde a un tamaño A3. - Seite 284 El cabezal de la cámara puede rotarse 90 tal y como se muestra en la imagen. -90° 0° +90° Para reflejar la imagen, pulse MENU > seleccione Espejo, pulse y seleccione «On».
-
Seite 285: Luz Superior
Luz s uper i or Pulse el botón LAMP en el panel de control o mando a distancia para encender y apagar la luz. -
Seite 286: Sensor De Infrarrojos
S ens or de i nf r ar r oj os Apunte con el mando a distancia al sensor de infrarrojos para utilizar la unidad. M ontaj e de l a M 90U HD en una s uper f ici e pl ana Mida y marque en una superficie plana la línea horizontal de 75 mm correspondiente a la distancia entre los dos orificios, tal como se muestra en la imagen. -
Seite 287: Lámina Antirreflectante
(FAT32) de capacidad. Inserción de una unidad flash USB Conecte la unidad flash USB en la ranura USB. La AVerVision M90UHD admite unidades flash USB de un máximo de 32 GB. Se recomienda formatear la unidad flash USB con la AVerVision M90UHD para una óptima grabación de vídeo. -
Seite 288: Diagrama De Conexiones Rs232
Diag r ama de conexiones RS232 La AVerVision M90UHD se puede controlar con un ordenador o cualquier panel de control centralizado a través de una conexión RS232. -
Seite 289: Tabla De Comandos De Envío De Rs-232
Tabla de comandos de envío de RS-232 Formato de envío︰0x52 + 0x0B + 0x03 + Data[0] + Data[1] + Data[2] + 0x53 + Checksum Formato de recepción correcta︰0x53 + 0x00 + 0x02+ *2 + 0x00 + 0x52 + Checksum Formato de recepción anómala︰0x53 + 0x00 + 0x01+ *3 + 0x52 + Checksum *1 :Checksum = 0x0B xor 0x03 xor Data[0] xor Data[1] xor Data[2] xor 0x53 *2 :Recepción de datos ok: 0x0B, Ningún comando: 0x03 *3 :Error de ID: 0x01, Error de checksum: 0x02, Fallo de función = 0x04... - Seite 290 Función Data[0] Data[1] Data[2] Checksum MODO DE VISTA PREVIA: INFINITO 0x0A 0x05 0x00 0x54 MODO DE VISTA PREVIA: NORMAL 0x0A 0x06 0x00 0x57 MODO DE VISTA PREVIA: ALTA CALIDAD 0x0A 0x07 0x00 0x56 VISTA PREVIA DE CAPTURA 0x0B 0x00 0x00 0x50 ELIMINACIÓN DE REPRODUCCIÓN 0x0C...
- Seite 291 Función Data[0] Data[1] Data[2] Checksum PARPADEO: 60Hz 0x18 0x01 0x00 0x42 GRABAR: OFF 0x23 0x00 0x00 0x78 GRABAR: ON 0x23 0x01 0x00 0x79 RETROCESO RÁPIDO DE PELÍCULA 0x25 0x00 0x00 0x7e AVANCE RÁPIDO DE PELÍCULA 0x25 0x01 0x00 0x7f AUM. VOL. DE PELÍCULA 0x26 0x00 0x00...
- Seite 292 Función Data[0] Data[1] Data[2] Checksum CALIDAD DE CAPTURA: ALTA 0x37 0x01 0x00 0x6d CALIDAD DE CAPTURA: MÁXIMA 0x37 0x02 0x00 0x6e ENFOQUE AUTOMÁTICO 0x40 0x00 0x00 0x1b MENÚ 0x41 0x00 0x00 0x1a FLECHA - ABAJO 0x42 0x00 0x00 0x19 FLECHA - ARRIBA 0x42 0x01 0x00...
-
Seite 293: Tabla De Comandos De Recepción De Rs-232
Tabla de comandos de r ecepción de RS-232 Formato de envío︰0x52 + 0x0A + 0x01 + Data[0] + 0x53 + Checksum Formato de recepción︰0x53 + 0x0C + 0x01 + ReData[0] + 0x52 + ReChecksum *1 :ReChecksum = 0x0C xor 0x01 xor ReData[0] xor 0x52 *2 :Recepción de datos con estado de alimentación = 0x51 + 0xFF + 0x01 + 0x0A + 0x51 + 0xA5 Función Data[0]... -
Seite 294: Menú Osd
MENÚ OSD Existen tres opciones principales en el menú OSD: IMAGEN, CONFIGURACIÓN y SISTEMA. CONFIGURACIÓN IMAGEN SISTEMA... -
Seite 295: Desplazamiento Por El Menú Y Submenú
D es pl az am i ent o por el m enú y s ubmenú 1. Pulse el botón MENU en el mando o panel de control. 2. Pulse ►, ◄, ▲ y ▼ para elegir una selección en la lista del menú. 3. -
Seite 296: Modo De Vista Previa
Pantalla del menú Función Modo de vista previa Seleccione entre los distintos ajustes de visualización de imagen. Normal: ajusta el gradiente de la imagen. Movimiento: alta frecuencia de actualización en una imagen en movimiento. Alta calidad: alta resolución con la mejor calidad. -
Seite 297: Configuración De Exposición
Pantalla del menú Función Configuración de exposición Seleccione AUTO para ajustar automáticamente la configuración de exposición y balance de blancos y corregir el color y la compensación de exposición. Seleccione MANUAL para activar la configuración avanzada para la exposición manual y el balance de blancos. Exposición manual MANUAL: ajuste manualmente el nivel de exposición. -
Seite 298: Azul De Balance De Blancos Manual
Pantalla del menú Función Azul de balance de blancos manual Ajuste manualmente el nivel de color azul. El nivel de color puede ajustarse hasta un valor de 255. Rojo de balance de blancos manual Ajuste manualmente el nivel de color rojo. El nivel de color puede ajustarse hasta un valor de 255. -
Seite 299: Configuración
C onfi gur aci ón Pantalla del menú Función Resolución de captura Seleccione el tamaño de captura. En el ajuste 13M, el tamaño de la resolución de captura es de 4.208 x 3.120. Si se selecciona Normal, el tamaño de la captura se basará... -
Seite 300: Almacenamiento
Pantalla del menú Función Almacenamiento Cambie la ubicación del almacenamiento. La grabación de audio y video solo puede guardarse en la memoria integrada, en una tarjeta SD o en una unidad USB. Formatear Formatee para eliminar todos los datos en la memoria seleccionada. -
Seite 301: Iniciar Temporizador
Pantalla del menú Función Iniciar temporizador Inicie el temporizador. El temporizador cuenta automáticamente hacia delante cuando la cuenta atrás llega a cero para mostrar el tiempo transcurrido. Pausar/Detener temporizador Pulse el botón Menu mientras el temporizador está en marcha para pausarlo o detenerlo. -
Seite 302: Sistema
Si s t em a Pantalla del menú Función Idioma Cambie y seleccione un idioma distinto. La M90UHD admite hasta 12 idiomas. Visualización de salida Establezca la resolución con la que se mostrará la imagen en la pantalla. La resolución del dispositivo de salida se detecta automáticamente y se configura con la máxima resolución. -
Seite 303: Recuperar Configuración
Pantalla del menú Función Recuperar configuración Restablezca la configuración del número de perfil seleccionado. Parpadeo Seleccione entre 50 Hz o 60 Hz. Algunos dispositivos de visualización no admiten frecuencias de actualización elevadas. La imagen parpadeará un par de veces al cambiar a otra frecuencia de actualización. -
Seite 304: Reproducción
Repr oducci ón Puede utilizar la función de reproducción para configurar las imágenes o vídeos guardados. Pantalla del menú Función Presentación Inicie o detenga la presentación. Intervalo Establezca el intervalo entre las imágenes o vídeos. Almacenamiento Elija las imágenes o los vídeos de Storage: Integrado, Tarjeta SD o Unidad USB. -
Seite 305: Transferencia De Imágenes/Vídeos Capturados A Un Ordenador
Tr ansfer encia de imágenes/vídeos captur ados a un or denador Permite transferir la imagen capturada de la memoria integrada, una tarjeta SD, una unidad USB o un ordenador. Puede guardar sus imágenes/vídeos de dos formas: a. Memoria integrada + Tarjeta SD b. -
Seite 306: Especificaciones Técnicas
Especificaciones técnicas Imagen Sensor CMOS 1/3,06" Número de píxeles 13 megapíxeles Velocidad de 60 fps (máx.) fotogramas Balance de blancos Auto/Manual Exposición Auto/Manual Normal, Movimiento, Alta calidad, Microscopio, Macro, Modo de imagen Infinito Efecto Color/B&N/Negativo Salida RGB 1280×720, 1024×768, 1080P Salida HDMI 4K, 1080p, 720p Captura de imagen... -
Seite 307: Almacenamiento Externo
Plegada 319,0 mm (largo) x 176 mm (ancho) x 112 mm (alto) Peso 2,2 +/-0,5 kg (aprox. 5,732 libras) Almacenamiento externo Tarjeta micro-SD 32 GB máx. (FAT32) Unidad flash USB 32 GB máx. (FAT32) *tenga en cuenta que esta especificación depende de cierto orden. -
Seite 308: Solución De Problemas
3. Si está realizando una presentación desde un ordenador portátil o de sobremesa a través del dispositivo de salida de visualización, compruebe la conexión del cable de la salida RGB (VGA) del ordenador a la entrada RGB de la M90UHD y asegúrese de que la AVerVision M90UHD esté en el modo de PC. -
Seite 309: Garantía Limitada
Toda la responsabilidad de aver por los daños de cualquier tipo, independiente de la forma de acción, no superará en ningún caso el importe pagado por usted a aver por el producto específico en el que se basa esta responsabilidad. - Seite 310 Legislación vigente y sus derechos Esta garantía le otorga derechos legales específicos; Usted también puede tener otros derechos otorgados por la legislación estatal. Estos derechos pueden variar en función del estado. Para obtener información sobre el período de garantía, consulte la tarjeta de garantía.
- Seite 311 AVerVision M90UHD Manuale dell’utente...
-
Seite 312: Marchi Commerciali
MARCHI COMMERCIALI “AVer” è un marchio registrato da AVer Information Inc. Altri marchi commerciali qui usati unicamente a scopo descrittivo appartengono alle rispettive aziende. - Seite 313 COPYRIGHT ©2020 Tutti i diritti di questo oggetto appartengono ad AVer Information Inc. La riproduzione o la trasmissione in qualsiasi forma, o con qualsiasi mezzo senza disporre del previo consenso di AVer Information Inc. è vietata. Tutte le informazioni o le specifiche sono...
- Seite 314 AVVERTENZA Per ridurre il rischio di incendio o di scosse elettriche, non esporre questo dispositivo alla pioggia o all’umidità. La garanzia decade qualora vengano apportate modifiche non autorizzate al prodotto. Non lasciar cadere la telecamera e non sottoporla a urti fisici. ...
-
Seite 315: Informazioni Di Contatto
AVer Information Inc. https://www.aver.com 8F, No.157, Da-An Rd., Tucheng Dist., New Taipei City 23673, Taiwan Tel: +886 (2) 2269 8535 European Headquarters AVer Information Europe B.V. https://www.avereurope.com Westblaak 140, 3012KM, Rotterdam, Netherlands Tel: +31 (0) 10 7600 550 Assistenza tecnica:... - Seite 316 Contenuti Contenuto della confezione ................1 Accessori opzionali ................... 1 Acquisire familiarità con il dispositivo AVerVision M90UHD ......2 Pannello destro ......................3 Pannello sinistro ......................3 Pannello posteriore ......................4 Pannello di controllo ...................... 5 Telecomando ......................... 6 Eseguire i collegamenti ..................8 Collegamento dell'alimentazione ...................
- Seite 317 Manuale WB Blu (Manual WB Blue) ..............32 Manuale WB Rosso (Manual WB Red) ............. 32 Messa a fuoco (Focus) ..................32 Impostazione ....................... 33 Risoluzione di Cattura (Capture resolution) ............33 Qualità di cattura (Capture Quality) ..............33 Tipo di cattura (Capture Type) ................33 Intervallo di cattura (Capture Interval) ...............
-
Seite 318: Contenuto Della Confezione
Verificare che la confezione contenga quanto segue. Cavo VGA Cavo USB Alimentatore di corrente (5V, 3A) * La spina di alimentazione AVerVision M90UHD Telecomando varia a seconda della presa di (2 batterie AAA fornite in corrente standard del paese dotazione) in cui viene venduta. -
Seite 319: Acquisire Familiarità Con Il Dispositivo Avervision M90Uhd
Acquisir e familiarità con il dispositivo AVerVision M90UHD Nome Funzione Testa della Contiene il sensore della telecamera. videocamera Obiettivo della Mette a fuoco l’immagine della telecamera. telecamera Spia LED Fornisce luce per migliorare le condizioni di illuminazione. Braccio Fornisce una copertura regolabile della visualizzazione. -
Seite 320: Pannello Destro
(6) Porta IN da VGA porta d’uscita VGA OUT. Collegare questa porta alla porta d'uscita VGA del computer. (7) Porta OUT da VGA Collegare il dispositivo AVerVision M90UHD a qualsiasi dispositivo display con cavo VGA. Pa nne llo sin istr o Nome Funzione Inserire la scheda Micro SD con l’etichetta rivolta verso l’alto. -
Seite 321: Pannello Posteriore
Pa nne llo po ste r io re Nome Funzione Collegare una sorgente HDMI esterna come ingresso tramite questa (1) Porta IN da HDMI porta. Collegare questa porta alla porta d'uscita HDMI del computer. Emette il segnale video dal sistema principale su un pannello piatto (2) Porta OUT da HDMI interattivo, su un monitor LCD oppure su un proiettore LCD/DLP con interfaccia HDMI servendosi di un cavo HDMI. -
Seite 322: Pannello Di Controllo
Pa nne llo di c ont ro llo (14) (13) (12) (11) (10) Nome Funzione (1) ALIMENTAZIONE Accendere l’unità / metterla in modalità standby. Diminuisce la luminosità. - Eseguire una selezione in modalità Riproduzione e menu OSD. - Avvia/mette in pausa la riproduzione del video. - Regolare automaticamente la messa a fuoco. -
Seite 323: Telecomando
Il telecomando richiede due (2) batterie “AAA” (fornite in dotazione); si prega di verificare che le batterie siano state installate correttamente prima di cominciare a utilizzarle. Sarà possibile accedere a tutte le funzioni del dispositivo AVerVision M90UHD servendosi del telecomando. - Seite 324 Nome Funzione (14) FREEZE / STOP - Fissa le immagini dal vivo. - Interrompe la riproduzione del (12) video. (13) (14) (15) SPOTLIGHT Non supportato (15) (16) Non supportato (16) SPLIT SCREEN (17) Premere per alternare fra Normale, (17) MODALITÀ (18) Frame elevato, e Alta qualità, (19)
-
Seite 325: Eseguire I Collegamenti
Prima di eseguire i collegamenti, verificare che nessuna unità sia alimentata. Qualora non si fosse certi di come eseguire i collegamenti sarà sufficiente attenersi alle immagini di seguito indicate. Se si sta eseguendo il collegamento a di AVerVision M90UHD consultare il relativo manuale. -
Seite 326: Collegamento A Un Computer Tramite Usb
Co lleg amen to a un Co mput er t ra mit e U SB Localizzare la porta USB del computer o del laptop e collegarla alla porta PC di AVerVision M90UHD. Quindi, il proprio dispositivo M90UHD può essere usato come telecamera USB; sarà... -
Seite 327: Collegamento A Un Monitor O A Un Proiettore Lcd/Dlp Con Uscita Vga/Hdmi
Co lleg amen to a un Mo n it or o a u n Pr o ietto re LCD /DL P co n u sc it a VGA /HD M I Localizzare la porta di ingresso VGA/HDMI del dispositivo display e collegarlo alla porta di USCITA VGA/HDMI del dispositivo AVerVision M90UHD. RS232 Proiettore LCD/DLP... -
Seite 328: Collegare A Un Computer Con Ingresso Vga/Hdmi
Co lleg are a un co mpu te r co n in gr es so VGA /HD M I Localizzare la porta di ingresso VGA/HDMI del dispositivo display e collegarlo alla porta di USCITA VGA/HDMI del dispositivo AVerVision M90UHD. Computer fisso... - Seite 329 Sull’altro lato, localizzare la porta di uscita VGA/HDMI del computer o del laptop e collegarla alla porta di ingresso VGA/HDMI del dispositivo AVerVision M90UHD. Il segnale video dalla porta di INGRESSO VGA/HDMI viene trasmesso in streaming all’uscita VGA/HDMI. [Nota] - Per visualizzare l’immagine del computer, premere il pulsante Telecamera/PC sul pannello di controllo o sul telecomando per portare il dispositivo AVerVision M90UHD in modalità...
-
Seite 330: Collegare Una Cassa Amplificata
Co lleg are u na cas sa a mp lif ica ta Collegare una cassa amplificata da 3.5mm alla porta di Uscita di Linea ( . È supportato solo l’audio dalla riproduzione video. [Nota] Consigliamo di collegare un altoparlante amplificato alla porta di uscita di linea. Prestare attenzione quando si usano le cuffie. -
Seite 331: Collegamento A Un Microscopio
Co lleg amen to a un mic ro sco p io Collegare il dispositivo AVerVision M90UHD a un microscopio per esaminare oggetti microscopici sul grande schermo. Impostare la modalità di visualizzazione immagine su Microscopio. Selezionare la scheda IMMAGINE > selezionare Modalità... - Seite 332 Togliere l’oculare del microscopio dal microscopio e collegarlo all’adattatore del microscopio con l’accoppiatore in gomma inserito. Serrare i 3 bulloni fino a che l’adattatore non fissa l’oculare. Piastra di collegamento - Suggeriamo di utilizzare un Adattatore per oculare da 33mm o superiore microscopio riposante per gli occhi.
-
Seite 333: Configurazione Del Dispositivo Avervision M90Uhd
Co nf igu raz io ne de l d isp os it ivo AVer Vis io n M 90UHD Questa sezione fornisce consigli utili su come regolare il dispositivo AVerVision M90UHD in modo tale che soddisfi le proprie esigenze. Co ns er va zio ne de lla vid e o ca mer a p er docu ment i... -
Seite 334: Area Di Ripresa
A rea d i r ipr es a L'area di ripresa prevede un’area di 420 x 315mm nella modalità di anteprima ad alta definizione. Quando la posizione della telecamera è alta 360.3mm, l’area di ripresa sarà in dimensione A3. - Seite 335 La testa della telecamera può essere ruotata di 90 come nella figura di seguito indicata. -90° 0° +90° Per riflettere l’immagine, premere MENU > selezionare Specchio, premere e selezionare “On”.
-
Seite 336: Luce Proiettore
Luce pr oiet t or e Premere il tasto LAMP sul pannello di controllo o sul telecomando per accendere e spegnere la luce. -
Seite 337: Sensore A Infrarossi
S ens or e a i nf r ar os si Puntare il telecomando verso il sensore a infrarossi per azionare l’unità. I ns t all azione del di s posi ti vo M 90UHD s u una s uper fi cie pi at t a Misurare e contrassegnare in orizzontale 75 mm dalla linea di centro fra i fori sulla superficie piatta secondo quanto descritto nella seguente illustrazione. -
Seite 338: Foglio Anti-Riflesso
Supporto di memoria esterno Il dispositivo AVerVision M90UHD supporta sia le schede di memoria Micro SD che i drive flash USB per offrire più spazio per catturare immagini ed eseguire registrazioni audio-video. -
Seite 339: Schema Di Collegamento Rs232
Schema di colle gamento RS232 Il dispositivo AVerVision M90UHD può essere controllato con un computer o un qualsiasi pannello di controllo centralizzato servendosi di un collegamento RS232. RS232 Cavo RS232 (cavo non fornito in dotazione) Computer fisso Computer portatile... -
Seite 340: Rs-232 Invio Tabella Dei Comandi
RS-232 Invio tabella dei comandi Formato di invio︰0x52 + 0x0B + 0x03 + Dati[0] + Dati[1] + Dati[2] + 0x53 + Checksum*1 Esito positivo - Formato di ricezione︰0x53 + 0x00 + 0x02+ *2 + 0x00 + 0x52 + Checksum *4 Anomalo - Formato di ricezione︰0x53 + 0x00 + 0x01+ *3 + 0x52 + Checksum *5 *1 :Checksum = 0x0B xoppure 0x03 xoppure Dati[0] xoppure Dati[1] xoppure Dati[2] xoppure 0x53 *2 :Ricezione dati ok︰0x0B, Nessun comando : 0x03... - Seite 341 Funzione Dati[0] Dati[1] Dati[2] Checksum MODALITÀ ANTEPRIMA: INFINITO 0x0A 0x05 0x00 0x54 MODALITÀ ANTEPRIMA: NORMALE 0x0A 0x06 0x00 0x57 MODALITÀ ANTEPRIMA: ALTA QUALITÀ 0x0A 0x07 0x00 0x56 ANTEPRIMA CATTURA 0x0B 0x00 0x00 0x50 RIPRODUZIONE ELIMINA 0x0C 0x00 0x00 0x57 RIPRODUZIONE SCHERMO INTERO 0x0D 0x00 0x00...
- Seite 342 Funzione Dati[0] Dati[1] Dati[2] Checksum SFARFALLIO: 60Hz 0x18 0x01 0x00 0x42 REGISTRA: OFF 0x23 0x00 0x00 0x78 REGISTRA: ON 0x23 0x01 0x00 0x79 FILMATO RIAVVOLGIMENTO RAPIDO 0x25 0x00 0x00 0x7e FILMATO AVANZAMENTO RAPIDO 0x25 0x01 0x00 0x7f FILMATO AUMENTO VOLUME 0x26 0x00 0x00...
- Seite 343 Funzione Dati[0] Dati[1] Dati[2] Checksum QUALITÀ DI CATTURA: NORMALE 0x37 0x00 0x00 0x6c QUALITÀ DI CATTURA: ALTO 0x37 0x01 0x00 0x6d QUALITÀ DI CATTURA: PIÙ FINE 0x37 0x02 0x00 0x6e MESSA A FUOCO AUTOMATICA 0x40 0x00 0x00 0x1b MENU 0x41 0x00 0x00 0x1a...
-
Seite 344: Rs-232 Ottieni Tabella Dei Comandi
RS-232 Ottieni tabella dei comandi Formato di invio︰0x52 + 0x0A + 0x01 + Dati[0] + 0x53 + Checksum Formato di ricezione︰0x53 + 0x0C + 0x01 + ReDati[0] + 0x52 + ReChecksum *1 :ReChecksum = 0x0C xoppure 0x01 xoppure ReDati[0] xoppure 0x52 *2 :Stato di Alimentazione Ricezione Dati = 0x51 + 0xFF + 0x01 + 0x0A + 0x51 + 0xA5 Funzione Dati[0]... -
Seite 345: Menu Osd
MENU OSD Ci sono 3 opzioni principali nel menu OSD: IMMAGINE, IMPOSTAZIONE e SISTEMA. IMPOSTAZIONE IMMAGINE SISTEMA... -
Seite 346: Spostarsi Nel Menu E Nel Sottomenu
S pos t ar si nel M enu e nel Sot t om enu 1. Premere il pulsante MENU sul telecomando o sul pannello di controllo. 2. Premere ►, ◄, ▲ e ▼ per scegliere una selezione nell’elenco dei menu. 3. -
Seite 347: Modalità Anteprima (Preview Mode)
Menu Screen Funzione Modalità anteprima Selezionare fra le diverse impostazioni di visualizzazione dell’immagine. Normale - regolare il gradiente dell’immagine. Movimento - alta velocità di aggiornamento su un'immagine in movimento. Alta qualità - alta risoluzione con la migliore qualità. Microscopio - regolare automaticamente lo zoom ottico per la visualizzazione microscopica. -
Seite 348: Configurazione Dell'esposizione (Exposure Setup)
Menu Screen Funzione Configurazione dell’esposizione Selezionare AUTO per regolare in modo automatico il bilanciamento dei bianchi e le impostazioni di esposizione; corregge inoltre il colore e la compensazione di esposizione. Selezionare MANUAL per attivare le impostazioni avanzate per esposizione manuale e WB. Esposizione manuale MANUALE - regolazione manuale del livello dell’esposizione. -
Seite 349: Menu Screen
Menu Screen Funzione Manuale WB Blu Regola manualmente il livello del colore blu. È possibile regolare il livello di colore fino a un valore Massimo di 255. Manuale WB Rosso Regola manualmente il livello del colore rosso. È possibile regolare il livello di colore fino a un valore Massimo di 255. -
Seite 350: Impostazione
I m pos t azi one Menu Screen Funzione Risoluzione di Cattura Seleziona le dimensioni di cattura. Nell’impostazione 13M, le dimensioni della risoluzione di cattura sono 4208 x 3120. Selezionare Normale, le dimensioni di cattura sono basate sulle impostazioni della risoluzione. -
Seite 351: Archiviazione (Storage)
Formattare per eliminare tutti i dati dalla memoria selezionata. Da USB a PC Selezionare lo stato del dispositivo AVerVision M90UHD quando è connesso al computer tramite cavo USB. Fotocamera - può essere usato come webcam da computer oppure con il nostro pacchetto software per registrare video e catturare immagini fisse. -
Seite 352: Timer (Avvia Timer)
Menu Screen Funzione Avvia timer Avviare il timer. Il timer conta automaticamente il tempo trascorso dopo che il conto alla rovescia raggiunge lo zero per mostrare il tempo trascorso. Metti in pausa/Stop Timer Premere il pulsante menu durante la funzione timer per mettere in pausa o fermare il conto alla rovescia. -
Seite 353: Sistema
Si s t em a Menu Screen Funzione Lingua Modificare e selezionare una lingua diversa. M90UHD supporta fino a 12 lingue. Display di uscita Impostare la risoluzione con cui visualizzare l’immagine a video. La risoluzione del dispositivo di uscita viene rilevata automaticamente e configurata alla massima risoluzione. -
Seite 354: Richiama Impostazioni (Recall Settings)
Menu Screen Funzione Richiama impostazioni Riporta le impostazioni a quelle associate al numero di profilo selezionato. Sfarfallio Selezionare fra 50Hz or 60Hz. Alcuni dispositivi display non sono in grado di supportare frequenze di aggiornamento elevate. L’immagine ondulerà un paio di volte mentre l'uscita viene impostata su un’altra frequenza di aggiornamento. -
Seite 355: Riproduzione
R i pr oduzione Sarà possibile utilizzare la funzione di riproduzione per configurare le immagini o i video salvati. Menu Screen Funzione Presentazione Avviare o interrompere la presentazione. Intervallo Impostare l'intervallo tra la riproduzione di immagini o video. Archiviazione Scegliere le immagini o i video da Archiviazione, inclusi quelli integrati, Scheda SD o Drive USB. -
Seite 356: Trasferimento Delle Immagini/Video Catturati Su Un Computer
2. Quando compare “Archiviazione di massa” nell’angolo inferiore destro della schermata di presentazione sarà possibile collegare il cavo USB. 3. Dopo aver collegato il cavo USB, il sistema rileva in modo automatico il nuovo disco rimovibile. Sarà possibile trasferire l’(le) immagine(immagini) catturata(i) oppure i video... -
Seite 357: Specifiche Tecniche
Specifiche tecniche Immagine Sensore 1/3.06" CMOS Conteggio pixel 13 megapixel Frame Rate 60 fps (max.) Bilanciamento dei Auto/Manuale bianchi Esposizione Auto/Manuale Modalità immagine Normale, Movimento, Alta Qualità, Microscopio, Macro, Infinito Effetto Colore/B/W/Negativo uscita RGB 1280×720, 1024×768, 1080P Uscita HDMI 4K, 1080p, 720p Cattura immagine 200 Frame Ottica... -
Seite 358: Dimensioni
Dimensioni 481,3mm(lunghezza) x 159mm(larghezza) x Funzionamento 469,9mm(altezza) Chiuso 319,0mm(lunghezza) x 176mm(larghezza) x 112mm(altezza) Peso: 2.2 +/-0.5Kg Dispositivo di stoccaggio esterno Scheda Micro SD Max 32GB (FAT32) Drive Flash USB Max 32GB (FAT32) *si prega di notare che questa specifica dipende da un certo ordine. -
Seite 359: Guida Alla Risoluzione Dei Problemi
Non c'è alcun segnale del computer sullo schermo di presentazione. 1. Controllare tutti i collegamenti dei cavi tra il dispositivo di visualizzazione, AVerVision M90UHD e il vostro PC. 2. Collegare il PC all'AVerVision M90UHD prima di accendere il computer. -
Seite 360: Garanzia Limitata
(ii) fluttuazioni dell'energia elettrica oltre le specifiche AVer, (iii) uso del Prodotto con accessori o opzioni non forniti da AVer o dai suoi agenti autorizzati, o (iv) installazione, alterazione o riparazione del Prodotto da parte di persone diverse da AVer o dai suoi agenti autorizzati. - Seite 361 TA L I D A N N I . L A R E S P O N S A B I L I T À T O TA L E E A G G R E G ATA D I AV E R P E R D A N N I D I Q U A L S I A S I N AT U R A , I N D I P E N D E N T E M E N T E D A L L A F O R M A D I A Z I O N E , N O N S U P E R E R À...