Webasto Air Top Evo 40 Installationsanleitung
Vorschau ausblenden
Andere Handbücher für Air Top Evo 40:
- Einbauanweisung (102 Seiten) ,
- Bedienungsanweisung (12 Seiten) ,
- Bedienungsanleitung (11 Seiten)
Inhaltsverzeichnis
Werbung
Verfügbare Sprachen
Verfügbare Sprachen
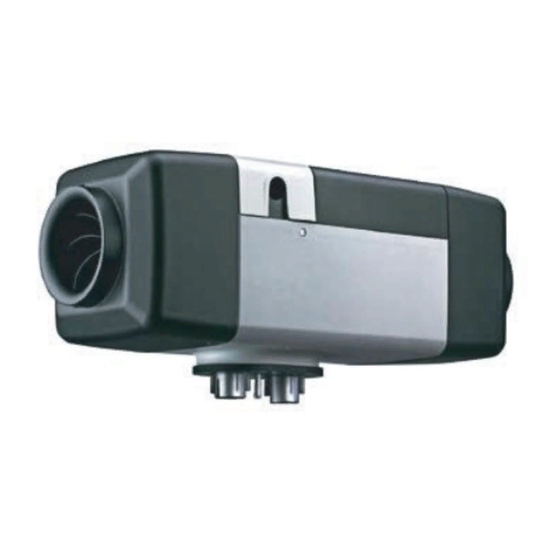
Installation Instructions Air Top Evo System
Air heaters
Air Top Evo 40 | Air Top Evo 55
*1
*2
English
Deutsch
Required, order separately:
*1 : Rotary switch
*2 : Room temperature sensor
Valid for Air Top Evo 40/55 Scope of delivery as from change index B.
HD scope of delivery
RV scope of delivery
– 9027980B
– 9029235B
– 9027981B
– 9029236B
– 9027979B
– 9029244B
– 9027985B
– 9029245B
– 9027986B
– 9027983B
Erforderlich, separat bestellen:
*1 : Drehwähler
*2 : Raumtemperatursensor
Gültig für Air Top Evo 40/55 Lieferumfänge ab Änderungsindex B.
HD Lieferumfänge
– 9027980B
– 9027981B
– 9027979B
– 9027985B
– 9027986B
– 9027983B
RV Lieferumfänge
– 9029235B
– 9029236B
– 9029244B
– 9029245B
Werbung
Inhaltsverzeichnis

Verwandte Anleitungen für Webasto Air Top Evo 40


Inhaltszusammenfassung für Webasto Air Top Evo 40
-
Seite 9: Zu Diesem Dokument
Repara turen – das Beiblatt „Wichtige Hinweise zur Bedienungs- und ■ Verwendung von Nicht-Originalersatzteilen Ein bauanweisung“ lesen. – die Einbauanweisung des Air Top Evo 40 | Air Top Evo 55 ■ Umbau des Geräts ohne Zustimmung von Webasto lesen. Sicherheit –... -
Seite 10: Vorbereiten Kabelbaum
Vorbereiten Kabelbaum System installieren Schaltpläne beachten (siehe Kapitel 7). Kabelbaum vorbereiten (siehe Kapitel 3.2) Heizgeräte nach Einbauanweisung Air Top Evo 40 | Air Top Evo Anschluss des Kabels aus Air Top Evo System am 55 einbauen. Standardkabelbaum des Master-Heizgeräts: Elektrische Anschlüsse am Master-Heizgerät und Slave-Heizgerät gemäß... -
Seite 11: Zubehör Anschließen
Slave-Heizgerät nach einer Zeit < 5 Minuten ein. Geschieht dies nicht, muss der Vorgang wiederholt werden. Mit PC-Diagnose: Master / Slave Funktion zurücksetzen Webasto PC-Diagnoseschnittstelle mit Softwareversion ab WTT 3.0 anschließen: ACHTUNG Fehler/Heizgeräteverriegelung löschen. Zum Zurücksetzen der Heizgeräte Bedienelement und externer Raumtemperatursensor abklemmen. -
Seite 12: 7 Anhang
Benennung Bemerkung Pos. Bemerkung Plus von Klemme 15/75 an Anschluss 10: Dauer heizbetrieb ist bei Sofortheizen Heizgerät Air Top Evo 40 / 55 möglich, solange die Zündung eingeschaltet ist. Steuergerät Steuergerät 1580 Alle Heizgerätevarianten: Anschluss W-Bus PC-Dia gnose UniBox –... - Seite 13 Air Top Evo 40 und Air Top Evo 55, 12 V / 24 V, „Master-Heizgerät“ X9(c) X15a rt 0,5mm² br 0,5mm² X9(a) rt 0,5mm² sw 0,5mm² bl 0,5mm² ws 0,5mm² Fig. 02: Schaltplan Air Top Evo 40 und Air Top Evo 55, 12 V / 24 V, „Master-Heizgerät“ Air Top Evo System...
- Seite 16 In multilingual versions the German language is binding. The telephone number of the respective country can be obtained from the Webasto service point flyer or the homepage of your respective Webasto country representative. Bei mehrsprachiger Ausführung ist Deutsch verbindlich. Die Telefonnummer des jeweiligen Landes entnehmen Sie bitte dem Webasto Servicestellen-Faltblatt oder der Webseite Ihrer jeweiligen Webasto-Landesvertretung.