WolfVision VZ-8light3 Bedienungsanleitung

Verwandte Anleitungen für WolfVision VZ-8light3


Inhaltszusammenfassung für WolfVision VZ-8light3
-
Seite 19: Vorsichtsmaßnahmen
DEUTSCH Vorsichtsmaßnahmen WARNUNG! Elektroschockrisiko gefährliche Spannungen im Geräteinneren Angeführte Vorsichtsmaßnahmen unbedingt beachten: Das Gerät nur mit der auf dem Typenschild angegebenen Spannung betreiben! Das Gerät vor Hitze und Feuchtigkeit schützen! Das Gerät vor Erschütterung schützen! Bitte darauf achten, dass eine ausreichende Luftzirkulation zur Kühlung des Gerätes möglich ist! Bei jeder Art von Störungsanzeichen (abnormale Geräusche, Geruch, Rauchentwicklung, etc.) das Gerät abschalten. - Seite 20 Ganzes noch in Teilen mit irgendwelchen Mitteln kopiert, reproduziert oder übertragen werden. Ausgenommen sind Kopien, die vom Benutzer zu Sicherungszwecken aufbewahrt werden. Im Interesse einer ständigen Produktverbesserung behält sich WolfVision das Recht vor, die Produktspezifikationen ohne Ankündigung zu ändern. Änderungen an diesem Dokument bleiben vorbehalten.
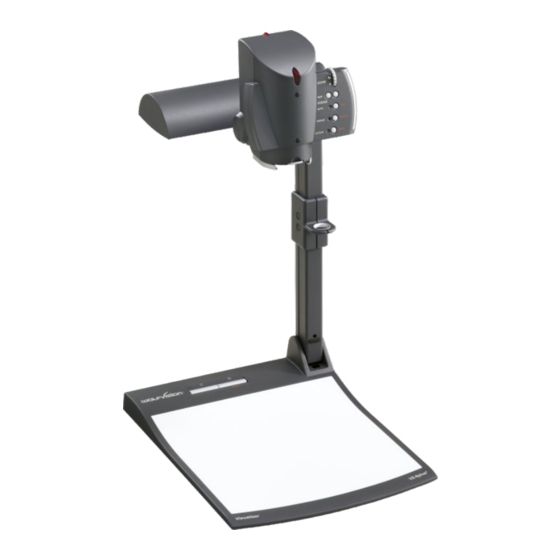
- Seite 21 #1 Anschlüsse (auf Geräterückseite, siehe unten) #2 Power und Licht ein/aus Taste (siehe Seite 4) #3 Kameratasten, Zoomrad (siehe Seite 4) #4 IR-Fernbedienung nur VZ-8plus³ (siehe Seite 5) #5 IR-Empfänger nur VZ-8plus³ (2x am Kamerakopf und 1x am Arm, unten) #6 Ziehvorrichtung für den Arm (siehe Seite 6) #7 Betriebsstatus LED #8 Kamerakopf (siehe Seite 4, 6 und 7)
- Seite 22 (siehe Seite 8). Kamerakopf Das Bedienkonzept der portablen WolfVision Visualizer sieht vor, dass sich am Gerät selbst nur die wichtigsten Tasten befinden. Dadurch kann jeder den Visualizer sofort auch ohne Einschulung bedienen. Für erfahrene Anwender gibt es zusätzliche Funktionen auf der Fernbedienung beim VZ-8plus³.
-
Seite 23: Infrarot-Fernbedienung
Infrarot Fernbedienung nur VZ-8plus³ #31 ZOOM-Tasten Die ZOOM-Tasten arbeiten wie das ZOOM-Rad am Kamerakopf des Visualizers. Durch Drücken einer der ZOOM- Tasten (Rad) wird die Autoiris wieder aktiviert. TELE WIDE #32 LASER POINTER-Taste Wichtig: Blicken Sie nicht direkt in den Laserstrahl! PRESETS IMAGE TURN Dies wäre schlecht für Ihre Augen! -
Seite 24: Aufstellen Des Visualizers
- Wenn das Raumlicht Reflexionen auf der Overheadfolie verursacht Externe WolfVision Lichtboxen (optional) Schließen Sie das Stromkabel der WolfVision Lichtbox an den DC-Ausgang (#23) auf der Rückseite des Visualizers an. Mit der LIGHT-Taste (#25) kann nun zwischen dem Licht für die Arbeitsfläche und dem Licht der WolfVision Lichtbox umgeschaltet werden. -
Seite 25: Aufnahmen Außerhalb Der Arbeitsfläche
Aufnahmen außerhalb der Arbeitsfläche Nahlinse Um Objekte außerhalb der Arbeitsfläche aufzunehmen, muss die Nahlinse (#5) entfernt werden. In diesem Fall klappen Sie die Nahlinse vom Kamerakopf weg. Es ist nicht möglich, die Linse komplett zu entfernen, somit kann diese nicht verloren gehen. Um wieder Aufnahmen auf der Arbeitsfläche machen zu können, klappen Sie die Nahlinse wieder in die ursprüngliche Position (vor der Kameraoptik). -
Seite 26: Autofokus
Autofokus Bitte beachten Sie, dass kontrast-schwache Objekte (z.B. ein leeres Blatt Papier) einem Autofokus immer Probleme bereiten. In einem solchen Fall bewegen Sie das Objekt leicht. Für spezielle Anwendungen kann der Autofokus mit der AF-Taste (#28 oder #36) abgeschaltet werden. Der Autofokus wird ebenfalls abgeschaltet, sobald die manuellen FOKUS-Tasten (#27 oder #37) verwendet werden. -
Seite 27: Text Modus (Kontrastanhebung Für Text)
Bildspeicher für 9 Bilder nur VZ-8plus³ Sie können bis zu 9 Bilder einspeichern und diese durch kurzes Drücken einer der Nummern-Tasten (#43) der Fernbedienung abrufen: Speichern eines Bildes: Drücken Sie eine der Nummern- Tasten (#43) länger als 2 Sekunden Aufrufen eines Bildes: Drücken Sie kurz die gewünschte Schnellansicht von 9 gesp. -
Seite 28: Diebstahlschutz 2: Tisch Fixiereinheit
Diebstahlschutz 1: T-Lock ® Der Visualizer kann mit einem Kabel T-Lock (Kensington Lock) vor Diebstahl geschützt werden. Folgen Sie den Anweisungen des Schloss-Herstellers. Diebstahlschutz 2: Tisch Fixiereinheit Bitte beachten Sie die maximale Einschraubtiefe von 8mm! W e i t e r e s E i n s c h r a u b e n Scheibe 6.4/17x3 beschädigt das Gerät. -
Seite 29: Auswahl Des Richtigen Ausgangs-Modus
Auswahl des richtigen Ausgangs-Modus Der DVI- und RGB-Ausgang (#16 and #17) kann folgende Signalformate ausgeben: VZ-8light³ - XGA (4:3 - 1024x768 Pixel) bei 60Hz - SXGA- (4:3 - 1280x960 pixels) at 60Hz - tatsächliche Auflösung - WXGA (16:9 Widescreen - 1360x768 Pixel) bei 60Hz - WXGA* (16:10 Widescreen - 1280x800 pixels) at 60Hz - tatsächliche Auflösung - 720p... -
Seite 30: Pal/Ntsc Video Ausgänge
Visualizer mit Grafikanwendungen wie Photoshop verwendet, oder an Interaktiven Whiteboards (Smart Boards) angeschlossen wird. Der schnelle USB 2.0 Anschluss ermöglicht die Ausgabe bewegter Bilder. Die WolfVision Connectivity Software kann AVI-Dateien abspeichern und beinhaltet einen Video Capture Treiber. Damit kann das Livebild der Visualizer mit nahezu jedem modernen... - Seite 31 Die nachfolgenden Kapitel sind nur für technisch versierte Anwender: ON-SCREEN MENÜ (Kamera Menü) / ON-SCREEN HILFE Für Standardanwendungen des WolfVision Visualizers ist es nicht notwendig, Einstellungen im On-Screen Menü vorzunehmen. Unerfahrene Anwender sollten hier keine Änderungen durchführen. Drücken Sie die MENU-Taste (#30 oder #44) eine Sekunde lang um in das On-Screen Menü...
-
Seite 32: Firmware Updates
RS232-Schnittstelle aktualisiert werden. Firmwareupdates können gratis unter www.wolfvision.com/support herunter geladen werden. Für ein Update über USB benötigen Sie die WolfVision Connectivity Software und für ein Update über RS232 das WolfVision Firmware Update Utility. Beide Programme finden Sie ebenso auf der WolfVision Homepage. -
Seite 33: Reinigung
Setzen Sie die Lampe vorsichtig in den Sockel 5. Montieren Sie die Lampenabdeckung in umgekehrter Reihenfolge (3 bis 1). Lampentyp: Hochfrequenzlampe mit 9W bei einer mittleren Lebensdauer von 10.000 h WolfVision Artikelnummer: 100040 Reinigung Gehäuse: Staub und Schmutz mit einem weichen Tuch abwischen. Linsen: Staub und Schmutz mit einem weichen, fusselfreien Tuch abwischen (keine Papiertücher!). -
Seite 34: Technische Daten
Technische Daten VZ-8light³ VZ-8plus³ 1-CCD 1/3" Progressive Scan Kamera Kamera / Technologie 30 Bilder (=Vollbilder) Bilder pro Sekunde (von der Kamera aufgenommen) Effektive Pixel (=Pixel, die tatsächlich für die Bildinformation 1280 x 960 (=1.228.800) verwendet werden) 1.320.000 Gesamte Pixel auf dem CCD Verarbeitete Pixel pro Sekunde (=Effektive Pixel x Bilder pro 36.864.000 Sekunde) -
Seite 35: Codes - Fernbedienung
CODES One Push Weißabgleich: Drücken Sie die LICHT-Taste (#25) für 2 Sekunden um einen One- Push-Weißabgleich durchzuführen. WHITE Aktivieren des On-Screen Menüs: Drücken Sie die MENU-Taste (#30) (EXTERN-Taste) am Kamerakopf für 2 Sekunden um das On-Screen Menu zu aktivieren. Verwenden Sie das ZOOM-Rad (#26) und die FOKUS-Tasten (#27) zum Navigieren.