Inhaltsverzeichnis
Werbung
Verfügbare Sprachen
Verfügbare Sprachen
Quicklinks
Puerta para gatos Staywell
Chatière Staywell
classique à fonctionnement magnétique et à 4 positions
®
Staywell
clásica con sistema de cierre magnético y con 4 posiciones de cierre
®
Porta Staywell
Please read this entire guide before beginning.
Veuillez lire ce manuel en entier avant de commencer.
Gelieve deze gids volledig door te lezen voordat u begint.
Por favor, lea detenidamente este manual antes de empezar.
Si prega di leggere attentamente la guida al uso prima di utilizzare il collare.
Bitte lesen Sie die gesamte Betriebsanleitung vor dem Train.
Staywell
Classic Magnetic 4-Way Locking Cat Flap
®
4 sluitposities klassiek magnetisch kattenluik
®
classica per gatti con sistema di chiusura magnetica
®
Staywell
Klassische Magnetische Katzenklappe
®
Installation Guide
Guide d'installation
Montagehandleiding
Manual de instalación
Manuale di installazione
Montageanleitung
con 4 modalità di bloccagio
mit vier Verschlussoptionen
900
Series
Série
Serie
Serie
Serie
Serie
Werbung
Inhaltsverzeichnis

Verwandte Anleitungen für Petsafe Staywell 900-Serie


Inhaltszusammenfassung für Petsafe Staywell 900-Serie
- Seite 1 Installation Guide Guide d’installation Montagehandleiding Manual de instalación Manuale di installazione Montageanleitung Staywell Classic Magnetic 4-Way Locking Cat Flap ® Chatière Staywell classique à fonctionnement magnétique et à 4 positions ® Staywell 4 sluitposities klassiek magnetisch kattenluik ® Puerta para gatos Staywell clásica con sistema de cierre magnético y con 4 posiciones de cierre ®...
-
Seite 2: Important Safety Information
Hereinafter Radio Systems Corporation, Radio Systems PetSafe Europe Ltd., Radio Systems Australia Pty Ltd. and any other affiliate or Brand of Radio Systems Corporation may be referred to collectively as “We” or “Us”. When children are present in the home, it is important to... - Seite 3 To get the most protection out of your warranty, please register your a companionship that includes memorable moments and a shared product within 30 days at www.petsafe.net. By registering and keeping understanding together. Our products and training tools enhance your receipt, you will enjoy the product’s full warranty and should you the relationship between pets and their owners.
-
Seite 4: Tools Required
There should be a level area in front of the cat flap outside Not to scale - for best results you should refer which is sufficient for the cat to stand with all four paws on the to the enclosed cutting template. same level. www.petsafe.net... - Seite 5 b) In PVC/uPVC/Metal PVC/uPVC/Metal** c) In Glass Glass windows & doors, single and double glazed* **Magnetic Cat Flaps will NOT WORK if installed directly into a * It is not possible to cut holes in toughened glass or double glazed surface containing metal.
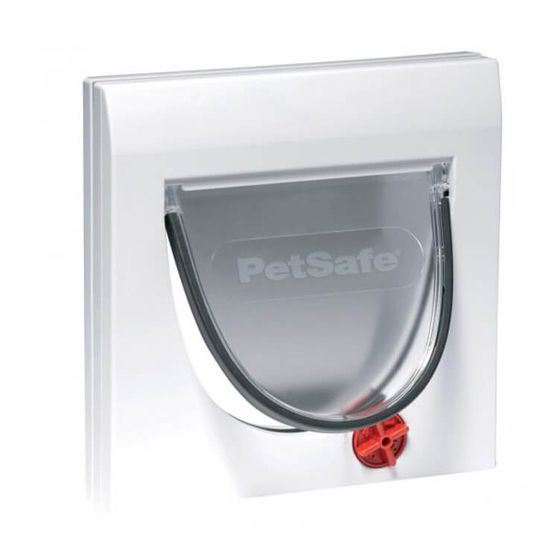
- Seite 6 Fitting your cat flap FIG.8 Your PetSafe cat flap is fitted with the red 4-way lock on the ® inside of your house. a) In Doors and Walls Less Than 57 mm Thick Temporarily place the cat flap in the hole and position the exterior frame on the outside of the house.
- Seite 7 The fixed tunnel is an integral part of the mechanism and MUST NOT be cut or damaged, as it will affect the operation of the latch mechanism (Fig.10). Operates by magnetism and requires no batteries. Your PetSafe ® • 3: Out only •...
- Seite 8 Only when the cat is comfortable going in and out of the cat flap whilst the comfortable in its new indoor environment. Cats can develop long flap has been propped open, (in line with the general training tips in the lasting fears in unfamiliar surroundings. www.petsafe.net...
- Seite 9 4-Way Lock to the desired setting. Replacement flaps are available online at www.petsafe.net or by contacting the Customer Care Centre. For a listing of Customer Care Centre telephone numbers, visit our website at www.petsafe.net.
-
Seite 10: Warranty
Centre at: your local Customer Care Centre. Radio Systems Australia Pty Ltd. Europe – Radio Systems PetSafe Europe Ltd., 2nd Floor, Elgee Building, PO Box 7266, Gold Coast Mail Centre QLD 9726, Australia Market Square, Dundalk, Co. Louth, Ireland Australia Residents: 1800 786 608 Canada –... - Seite 11 4. Limitation of Liability warranty is in addition to other rights and remedies available to you under the law. Radio Systems goods come with guarantees that cannot In no event shall Radio Systems Corporation or any of its associated companies be liable for (i) any indirect, punitive, incidental, special or be excluded under the Australia Consumer Law.
- Seite 12 Radio Systems Corporation, Radio Systems PetSafe Europe Ltd., Radio Systems Australia Pty Ltd. et tout autre filière ou marque de Radio Systems Corpora- tion peuvent-être collectivement désignées par « nous » à partir de la lecture de ce document. Si vous avez des enfants, veillez à ne pas oublier CONSIGNES DE SÉCURITÉ...
- Seite 13 ® doit être faite de moments mémorables et d’une complicité mutuelle. votre article sous 30 jours sur le site www.petsafe.net. En enregistrant Nos produits et nos outils de dressage permettent aux animaux et à votre produit et en conservant votre reçu, vous bénéficierez d’une leurs propriétaires d’avoir de meilleures relations.
-
Seite 14: Outils Nécessaires
Il doit y avoir meilleurs résultats, consultez le modèle de une surface plate devant la chatière suffisament grande pour que le découpage inclus. chat puisse poser ses quatres pattes au même niveau. www.petsafe.net... - Seite 15 b) Dans le PVC, le PVC rigide ou c) Dans le verre Fenêtres et portes en verre à simple ou double vitrage* PVC, PVC rigide ou métal** le métal * Il n’est pas possible de découper du verre trempé ou un double vitrage sauf au moment de la fabrication.
- Seite 16 Mise en place de votre chatière Recouvrez ensuite les trous des vis à l’aide des bouchons d’obturation sur l’encadrement extérieur pour un fini soigneux (Fig. 8). Votre chatière PetSafe se met en place à l’aide des verrous ® rouges à 4 positions sur le côté intérieur de votre maison.
- Seite 17 DOIT PAS être coupé ou endommagé parce que cela pourrait avoir des conséquences sur le fonctionnement du mécanisme de verrouillage (Fig. 10). Magnétique, il fonctionne sans pile. Votre chatière PetSafe ® • 3 Sortie uniquement • 4 Entrée ou sortie FIG.10...
- Seite 18 À titre la chatière en place. Amenez votre animal dehors en le surveillant et en d’illustration, essayez de pousser la trappe avec votre main lorsque l’aimant le gardant en laisse, et assurez-vous qu’il se sent également en sécurité et www.petsafe.net...
- Seite 19 4 positions dans la position voulue. Les battants de rechange sont disponibles sur notre site internet www.petsafe.net ou auprès du service clientèle. Pour connaître les numéros de téléphone du Service clientèle, visitez notre site Internet www.petsafe.net. Battants de rechange disponibles sur notre site internet...
-
Seite 20: Garantie
(ii) ni pour des dommages Europe – Radio Systems PetSafe Europe Ltd., 2nd Floor, Elgee Building, occasionnés ou associés à l’utilisation ou à l’utilisation inappropriée de ce Market Square, Dundalk, Co. Louth, Irlande produit. -
Seite 21: Belangrijke Veiligheidsinformatie
Hiernavolgend worden aan Radio Systems Corporation, Radio Systems PetSafe Europe Ltd., Radio Systems Australia Pty Ltd. en andere zustermaatschap- pijen of merken van Radio Systems Corporation gerefereerd met de woorden “we” of “wij”. Wanneer er kinderen in het huis aanwezig zijn,... - Seite 22 De garantie biedt u de meeste bescherming als u uw product binnen een vriendschap waard met onvergetelijke momenten en in een goede 30 dagen registreert op www.petsafe.net. Door te registeren en uw verstandhouding. Onze producten en trainingsmiddelen versterken de aankoopbon te bewaren, hebt u volledige garantie op het product en relatie tussen huisdieren en hun baasjes.
-
Seite 23: Benodigd Gereedschap
Lees de volgende stap-voor-stap AFB.1 AFB.2 instructies aandachtig door voor u uw kattenluik installeert. Benodigd gereedschap • Schilderstape Een gat voor kattenluik boren • Waterpas • Potlood • Liniaal a) In hout Houten deuren • Decoupeerzaag of sleutelgatzaag Voor het bevestigen van het luik maakt u een vierkante uitsnijding met de •... - Seite 24 Houten frame Geschikt voor bakstenen muren Volg de instructies voor “Hout”, door gebruik te maken van het meegeleverde uitsnijdsjabloon. Vergeet a.u.b. niet dat aanvullend gereedschap, materialen als ook een goede doe-het-zelf kennis voor dit werk nodig kunnen zijn. PVC/uPVC/metalen deur www.petsafe.net...
- Seite 25 Montage van kattenluik AFB.8 Uw PetSafe kattenluik wordt met de rode 4 standen ® vergrendelslot aan de binnenkant van uw huisdeur bevestigd. a) In deuren en wanden van maximaal 57 mm dik Plaats de flap tijdelijk in het gat en bevestig vervolgens de buitenframe aan de buitenkant van het huis.
-
Seite 26: Magnetische Tunnel
MAG NIET worden doorgesneden of beschadigd aangezien dat de werking van het slotmechanisme zal aantasten (Afb. 10). Werkt op magnetisme en er zijn geen batterijen nodig. Uw PetSafe ® kattenluik is nu • 3: Alleen uit • 4: In of uit klaar voor gebruik. -
Seite 27: Uw Magnetische Sleutel Testen
Uw magnetische sleutel testen dat het dier zich ook binnenshuis veilig en gemakkelijk voelt, Katten kunnen een langdurige angst voor een onbekende omgeving ontwikkelen. Plaats de 4 standen slot in de ‘in of uit’ positie. Plaats de halsbandsleutel Wanneer u het kattenluik eenmaal hebt gemonteerd, laat het een tijdje in het midden van de tunnel. - Seite 28 4-standenvergrendeling in de gewenste instelling. herhalen totdat uw kat volledig gewend is geraakt aan het kattenluik. Vervangende flappen zijn beschikbaar online op www.petsafe.net of via ons Klantenservicecentrum. Voor een lijst van telefoonnummers van de klantenservice kunt u onze website bezoeken op www.petsafe.net.
-
Seite 29: Gebruiksvoorwaarden En Beperking Van Aansprakelijkheid
Radio Systems Corporation zal in geen geval aansprakelijk zijn voor (i) enige directe, indirecte, financiële, incidentele, speciale of gevolgschade, voorwaarden ervan vindt u op www.petsafe.net en/of zijn verkrijgbaar of (ii) enige andere schade die voortvloeit uit of in verband staat met het bij de klantenservice van uw regio. -
Seite 30: Información De Seguridad Importante
A partir de ahora en este documento, Radio Systems Corporation, Radio Systems PetSafe Europe Ltd., Radio Systems Australia Pty Ltd. y cualquier otra afiliación a la marca de Radio Systems Corporation se referirá en forma colectiva como “nosotros” o “con nosotros”. - Seite 31 30 días a partir de la compra en mutuo. Nuestros productos y herramientas de adiestramiento www.petsafe.net. Al registrarse y conservar su recibo de compra, mejoran la relación entre las mascotas y sus propietarios. Si tiene disfrutará...
-
Seite 32: Herramientas Necesarias
El suelo frente la puerta para gatos debe ser llano y lo suficientemente amplio para adjunta para recortar el agujero. que el gato pueda tenerse con las cuatro patas al mismo nivel. www.petsafe.net... - Seite 33 b) En PVC/uPVC/Metal c) En vidrio PVC/uPVC/metal** Puertas y ventanas de vidrio o cristal sencillo o doble* **Las puerta para gatoss magnéticas NO FUNCIONARÁN si se * Salvo durante la fabricación, es imposible hacer agujeros en vidrio instalan en superficies que contienen metal. Debe aislar la unidad de templado o en cristal doble.
- Seite 34 Cómo instalar la puerta para gatos FIG.8 La puerta para gatos de PetSafe se instala con las cerraduras ® rojas de cuatro sentidos en la parte interior de su casa. a) En puertas y paredes con menos de 57 mm...
- Seite 35 Funciona a base de imanes; no se requieren pilas. Ya la puerta para • 3: Sólo para salir • 4: Para salir o entrar gatos de PetSafe ® está lista para su uso. Puertas abatibles de repuesto disponibles en nuestro sitio Internet...
- Seite 36 Si este es su caso, asegúrese de que su gato conozca bien su nuevo no está en el túnel. entorno antes de instalar la puerta para gatos. Sáquelo a pasear con correa por el nuevo vecindario. Asegúrese también de que se encuentre www.petsafe.net...
- Seite 37 Para asegurar que este sea el caso, debería poder leerse la palabra “PetSafe ”...
-
Seite 38: Condiciones De Uso Y Limitación De Responsabilidad
Puede encontrar toda la información de la garantía aplicable asociadas será responsable por (i) ningún daño indirecto, punitivo, a este producto, así como sus términos, en www.petsafe.net y también accidental, especial o consecuente, o (ii) cualquier daño que resulte de estarán disponibles al contactar con su Centro de atención al cliente local. - Seite 39 Di seguito useremo le espressioni “Noi” faccendo riferimento a Radio Systems Corporation, Radio Systems PetSafe Europe Ltd., Radio Systems Australia Pty Ltd. e tutte le altre succursali o marchi di Radio Systems Corporation. Se nella casa sono presenti dei bambini, è importante...
- Seite 40 Per usufruire della massima copertura della nostra garanzia, è ® meritate un’amicizia fatta di momenti indimenticabili e di comprensione necessario registrare il prodotto entro 30 giorni sul sito www.petsafe. reciproca. I nostri prodotti e strumenti di addestramento permettono net. La registrazione e la conservazione della ricevuta consentono di di migliorare il rapporto tra gli animali domestici e i loro proprietari.
-
Seite 41: Attrezzi Necessari
Prima di installare la porta per FIG.1 FIG.2 gatti, leggere attentamente le seguenti istruzioni passo passo. Attrezzi necessari • Nastro per Come praticare l’ apertura per mascheratura o per pittore • Livella la porta per gatti • Matita Porte di legno •... - Seite 42 Per muri Adatto per muri di mattoni Seguire le istruzioni per “Legno”, usando la sagoma per l’apertura da praticare in dotazione. Si noti che potrebbero essere necessari altri Porta in PVC/uPVC/metallo attrezzi, materiali e competenza nel “fai da te”. www.petsafe.net...
- Seite 43 Montaggio della porta per gatti FIG.8 La porta per gatti PetSafe è dotata di serrature rosse a 4 ® modalità situate all’interno della casa. a) In porte e pareti di spessore inferiore a 57 mm Collocare temporaneamente la porta per gatti nell’apertura e mettere il coperchio esterno fuori dell’abitazione.
- Seite 44 NON DEVE essere tagliato o danneggiato, per evitare che venga modificato il meccanismo della serratura (Fig. 10). Il funzionamento è magnetico e non richiede batterie. La porta per gatti PetSafe è ora ® • 3: Solo uscita • 4: Ingresso o uscita pronta per l’uso.
- Seite 45 Come testare la porta per Molti proprietari di gatti montano le porte per gatti quando traslocano. Se questo è il caso, accertatevi che il vostro gatto si familiarizzi con gatti magnetica i dintorni prima di montare la porta per gatti. Portatelo a fare delle passeggiate fuori al guinzaglio e accertatevi che si senta a proprio agio La serratura a 4 modalità...
- Seite 46 Le porte basculanti di ricambio sono disponibili sul nostro sito internet bisogna elogiarlo molto! Ripetete l’operazione finché il gatto non è in grado www.petsafe.net o presso il centro di attenzione al cliente. Per un elenco di passare per la porta per gatti a proprio agio.
-
Seite 47: Garanzia
Informazioni esaurienti sulla garanzia di questo prodotto e le sue da o collegati al semplice uso o all’uso improprio di questo prodotto. condizioni sono disponibili sul sito web: www.petsafe.net e/o possono L’acquirente si assume tutti i rischi e le responsabilità per l’uso di questo essere richieste al Centro assistenza clienti di fiducia. -
Seite 48: Wichtige Sicherheitsinformation
Hinfort werden Radio Systems Corporation, Radio Systems PetSafe Europe Ltd., Radio Systems Australia Pty Ltd. sowie jede andere Konzerngesellschaft oder Marke von Radio Systems Corporation zusammen als “Wir” oder “Uns” bezeichnet. Wenn sich Kinder im Haus befinden, ist es wichtig, die WICHTIGE SICHERHEITSINFORMATION Haustiertür bei der Kindersicherung zu berücksichtigen. - Seite 49 Damit Sie den maximalen Schutz aus Ihrer Garantie erhalten, registrieren ® verdienen eine Freundschaft, zu der unvergessliche Momente Sie bitte Ihr Produkt innerhalb von 30 Tagen auf www.petsafe.net. Indem und ein gegenseitiges Verstehen gehören. Unsere Produkte und Sie Ihr Produkt anmelden und die Quittung aufbewahren, können Sie Trainingsgeräte verbessern die Beziehung zwischen Haustieren...
-
Seite 50: Werkzeuge Erforderlich
Bei magnetischen Katzenklappen ist es wichtig, dass die Katze sich sollten Sie die beiliegende Schneidevorlage ungehindert der Klappe nähern kann. Vor der Katzenklappe sollte sich an der Außenseite eine ebene Fläche befinden, auf der die Katze mit heranziehen. allen vier Pfoten auf gleicher Höhe stehen kann. www.petsafe.net... - Seite 51 b) Für PVC/PVC-U/Metall c) Für Glas Einzelne und doppelte Glasfenster & -türen* PVC/PVC-U/Metall** **Magnetische Katzenklappen FUNKTIONIEREN NICHT, wenn sie * Es ist nicht möglich, Löcher in gehärtete oder Doppelglasscheiben direkt in eine Metall enthaltende Oberfläche installiert werden. Die zu schneiden, außer zur Zeit der Herstellung. Beim Einbau eines Einheit muss durch einen Holzrahmen (nicht mitgeliefert) von solchen magnetischen Modells in Doppelglasscheiben muss ein Abstandhalter Materialien isoliert werden.
- Seite 52 Einbau Ihrer Katzenklappe ABB.8 Ihre PetSafe -Katzenklappe wird mit dem roten ® Vierwegeschloss ins Hausinnere weisend eingesetzt. a) In Türen und Wänden mit maximal 57 mm Dicke Setzen Sie die Katzenklappe vorübergehend in das Loch ein und positionieren Sie die Außenklappe an der Außenseite des Hauses.
-
Seite 53: Magnetischer Tunnel
Der fixe Tunnel ist ein integrierter Teil des Mechanismus und DARF NICHT geschnitten oder beschädigt werden, da dies die Funktion des Verschlussmechanismus beeinträchtigen könnte (Abb. 10). Magnetische Funktionsweise, keine Batterien nötig. Ihre PetSafe ® • 3: Nur aus • 4: Ein oder aus Katzenklappe ist nun gebrauchsfertig. - Seite 54 Innenrahmen befestigt ist. Sie sollten den Verschlussmechanismus „klicken“ hören. (Achten Sie bitte darauf, dass dies nur bei vollständig installierter Viele Katzenbesitzer installieren eine Katzenklappe, wenn sie umziehen. Katzenklappe funktioniert). Falls dies auf Sie zutrifft, sorgen Sie dafür, dass Ihre Katze mit ihrer www.petsafe.net...
- Seite 55 Falls Ihre Katze sich eben erst an das Benutzen einer Katzenklappe gewöhnt hat, kann etwas Geduld nötig sein, um Ihrer Katze die Ersatzklappen sind online ueber www.petsafe.net erhaeltlich oder Funktionsweise des Magnets beizubringen. Loben Sie Ihre Katze Sie koenen gerne unseren Kundendienst kontaktieren. Ein Liste mit den ausführlich, wenn sie Fortschritte macht.
-
Seite 56: Reinigung Der Katzenklappe
Details der Garantie, die für dieses Produkt gilt, und deren in keinem Fall für (i) etwaige direkte, indirekte, Straf-, Zufalls-, Sonder- oder Bedingungen finden Sie unter www.petsafe.net und/oder erhalten Sie bei Folgeschäden und/oder (ii) jedwede Verluste oder Schäden haftbar, die Ihrer Kundenbetreuung vor Ort. - Seite 60 Schäden oder Unannehmlichkeiten, die durch ungewolltes Eindringen von Tieren in Ihr Haus verursacht werden. Gemäß den anerkannten Normen der elterlichen Aufsicht sollten Kinder jederzeit beaufsichtigt werden. Radio Systems Corporation Radio Systems PetSafe Europe Ltd. 10427 PetSafe Way, Knoxville, TN 37932 USA 2nd Floor, Elgee Building, Market Square (865)777-5404 Dundalk, Co.
- Seite 61 DO NOT PRINT THIS PAGE RSC Part #: 400-985-19 Description: MANUAL CLASSIC MAGNETIC CAT FLAP Created by: TL The world leader in pet training products Material: 80g Wood Free Paper Initial Creation Date: October 13, 2012 Color: White Approved by: K. Stansell Printing: Black + Pantone 152C Date Approved: February 27, 2015 Finishing: Die Cut, Fold,...