Epson SC-F7200 series Installationshandbuch
Setup Guide
EN
Guide d'installation
FR
Installationshandbuch
DE
Installatiehandleiding
NL
Guida di installazione
IT
ES
Guía de instalación
Manual de instalação
PT
EN
Assembly
FR
Assemblage
DE
Montage
14
NL
Montage
EN
Loading Media
FR
Chargement des supports
DE
Einlegen von Medien
29
NL
Media invoeren
EN
Installing the Software
FR
Installation du logiciel
DE
Installation der Software
40
NL
De software installeren
EN
Seeing the Online Guide
FR
Consultation du guide en ligne
DE
Lesen des Online-Handbuchs
44
NL
De online handleiding bekijken
IT
Montaggio
ES
Montaje
PT
Montagem
IT
Caricamento supporto
ES
Carga de materiales
PT
Carregar Papel
IT
Installazione del software
ES
Instalación del software
PT
Instalar o Software
IT
Visualizzazione della guida online
ES
Consulta de la guía online
PT
Ver o Guia Online
Inhaltsverzeichnis

Verwandte Anleitungen für Epson SC-F7200 series


Inhaltszusammenfassung für Epson SC-F7200 series
- Seite 1 Assembly Montaggio Assemblage Montaje Montage Montagem Montage Loading Media Caricamento supporto Chargement des supports Carga de materiales Einlegen von Medien Carregar Papel Media invoeren Installing the Software Installazione del software Setup Guide Installation du logiciel Instalación del software Installation der Software Instalar o Software Guide d’installation De software installeren...
- Seite 2 Introductions Introductions Illustrations Illustrations The printer shown in the illustrations in this guide differs in some respects from the actual product, L’imprimante figurant sur les illustrations de ce guide diffère du produit fourni sur quelques points, but these differences have no effect on the assembly process. mais ces différences n’ont aucune influence sur le processus d’assemblage.
- Seite 3 Einleitung Inleiding Abbildungen Illustraties Der auf diesen Abbildungen zu sehende Drucker unterscheidet sich in einigen Punkten De in de illustraties getoonde printer verschilt op sommige vlakken van het werkelijke product, maar vom tatsächlichen Produkt, diese Unterschiede haben jedoch keine Auswirkungen auf den deze verschillen hebben geen invloed op de montage.
- Seite 4 Introduzioni Introducción Illustrazioni Ilustraciones La stampante mostrata nelle illustrazioni di questa guida è differente per alcuni aspetti dal prodotto La impresora que aparece en las ilustraciones de esta guía difiere en algunos aspectos del producto reale, ma tali differenze non hanno alcun effetto sulla procedura di montaggio. actual, sin que tales diferencias afecten al proceso de montaje.
- Seite 5 Introduções Ilustrações A impressora mostrada nas ilustrações deste guia difere em alguns aspectos do produto real, mas as diferenças não afectam o processo de montagem. Instruções de Segurança Leia estas instruções antes de usar a sua impressora. Certifique-se também de que segue todos os avisos e instruções marcados na impressora.
- Seite 6 Choosing a Place for the Printer Choix d’un emplacement pour l’imprimante Auswahl eines Standorts für den Drucker Een plaats voor de printer kiezen Scegliere un luogo per la stampante Selección del lugar de instalación de la impresora Escolher um Local para a Impressora Instructions pour le placement de l’imprimante Laissez suffisamment d’espace comme indiqué...
- Seite 7 Choosing a Place for the Printer Choix d’un emplacement pour l’imprimante Auswahl eines Standorts für den Drucker Een plaats voor de printer kiezen Scegliere un luogo per la stampante Selección del lugar de instalación de la impresora Escolher um Local para a Impressora Instructies voor het plaatsen van de printer Instrucciones al instalar la impresora Laat voldoende ruimte vrij zoals weergegeven in de tabel voor het installeren van de printer.
- Seite 8 Unpacking Déballage Auspacken Uitpakken Disimballare Desembalaje Desempacotar The dashed border indicates parts for the Ink Supply System and the Ink Supply System Cover. De onderdelen binnen de stippellijn zijn voor het inkttoevoersysteem en de afdekplaat van het inkttoevoersysteem. Les pièces incluses dans le cadre en pointillés appartiennent au système d’alimentation en encre et au couvercle du système Il bordo tratteggiato indica parti del Sistema di erogazione inchiostro e del Coperchio per Sistema di erogazione inchiostro.
- Seite 9 Unpacking Déballage Auspacken Uitpakken Disimballare Desembalaje Desempacotar The Maintenance Kit is not used during setup. For information on using the Maintenance Kit, see the User’s Guide (PDF). Le kit de maintenance n’est pas utilisé lors de l’installation. Pour plus d’informations concernant l’utilisation du kit de maintenance, reportez-vous au Guide d’utilisation (fichier PDF). Das Wartungs-Set wird bei der Einrichtung nicht verwendet.
-
Seite 10: Setup Flow
Setup Flow Flux de configuration Contact a service engineer to attach the “Ink Supply System” and “Ink Supply System Cover”. Contactez un technicien pour fixer le "système d’alimentation en encre" et le "couvercle du Attempting to perform these tasks yourself could result in product malfunction or damage to the système d’alimentation en encre". - Seite 11 Installationsablauf Debiet instellen Um „Ink Supply System“ und „Ink Supply System Cover“ anzubringen, wenden Sie sich an einen Neem contact op met een servicetechnicus om het inkttoevoersysteem en de afdekplaat van het Servicetechniker. Sollten Sie versuchen, diese Arbeiten selbst durchzuführen, kann dies zu inkttoevoersysteem te bevestigen.
- Seite 12 Flusso di configurazione Flujo de instalación Rivolgersi ad un tecnico dell'assistenza per montare il “Sistema di erogazione inchiostro” e il Póngase en contacto con un ingeniero de mantenimiento para instalar el “Sistema de suministro de "Coperchio per Sistema di erogazione inchiostro". Se si tenta di eseguire queste operazioni da soli, si tinta”...
- Seite 13 Fluxo de configuração Contacte um engenheiro de serviço para colocar o “Sistema de fornecimento da tinta” e a “Estrutura de encaixe do sistema de fornecimento da tinta”. Tentar a execução destas tarefas por conta própria pode causar mau funcionamento ou danos na máquina, anulando a sua garantia. Siga os procedimentos abaixo indicados.
-
Seite 14: Montage
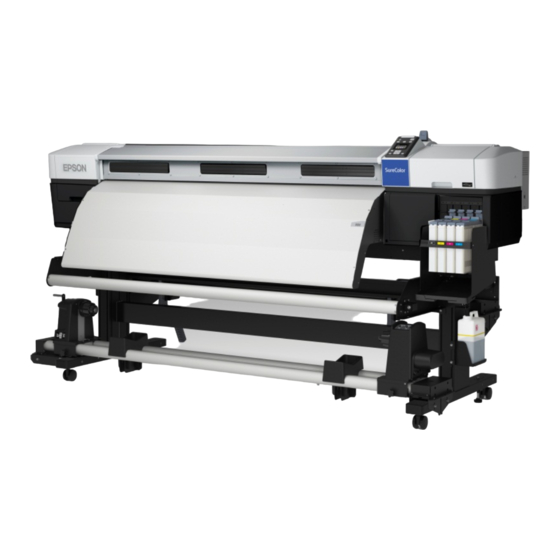
Assembly Assemblage Montage Montage Montaggio Montaje Montagem Stand Support Ständer Onderstel Base Soporte Suporte It is recommended to assemble the stand by a group of three. Trois personnes sont nécessaires à l’assemblage du support. Es wird empfohlen, den Ständer mit einer Gruppe von drei Personen zu montieren. Het is raadzaam het onderstel door drie mensen te laten monteren. - Seite 15 Assembly Assemblage Montage Montage Montaggio Montaje Montagem Printer Installation Installation de l’imprimante Druckerinstallation Printerinstallatie Installazione della stampante Instalación de la impresora Instalação da Impressora...
- Seite 16 Assembly Assemblage Montage Montage Montaggio Montaje Montagem Before using the printer, be sure the stand is fixed in place. Be sure the casters are not floating in air. When moving the printer, rotate the stand fixing screws in the opposite direction to raise them and then unlock the casters.
- Seite 17 Assembly Assemblage Montage Montage Montaggio Montaje Montagem When reassembling the printer and legs after transporting, you need the parts that you removed during disassembly. Store them in a safe place. Lors du réassemblage de l’imprimante et des pieds après le transport, vous avez besoin des pièces retirées lors du démontage. Stockez-les dans un lieu sûr.
- Seite 18 Assembly Assemblage Montage Montage Montaggio Montaje Montagem Caution Be careful not to trap your hands or fingers when opening or closing the front cover. Attention Veillez à ne pas vous coincer les mains ou les doigts lorsque vous ouvrez ou fermez le capot avant. Achten Sie darauf, Ihre Hände oder Finger beim Öffnen oder Schließen der vorderen Abdeckung nicht Vorsicht einzuklemmen.
- Seite 19 Assembly Assemblage Montage Montage Montaggio Montaje Montagem Media Feeding Unit Unité chargement papier Medieneinzugseinheit Mediadoorvoer eenheid Unità di alimentazione supporto Unidad alimentadora de documentos Unidade de alimentação de papel Carry the Media Feeding Unit (approx. 34.3 kg) using two persons, each holding the two bars as shown in the figure on the right. Prévoyez deux personnes pour porter l’Unité...
- Seite 20 Assembly Assemblage Montage Montage Montaggio Montaje Montagem Keep the four screws in the figure on the right provisionally tightened until parallel adjustment is completed. Maintenez temporairement les quatre vis de la figure de droite serrées jusqu’à ce que le réglage parallèle de l’espace soit terminé.
- Seite 21 Assembly Assemblage Montage Montage Montaggio Montaje Montagem Auto Take-up Reel Unit Enrouleur papier Automatique Aufrolleinheit Automatische oproleenheid Riavvolgitore automatico Unidad de recogida automatica Unidade de rebobinagem automática...
- Seite 22 Assembly Assemblage Montage Montage Montaggio Montaje Montagem Carry the Auto Take-up Reel Unit (approx. 34.3 kg) using two persons, each holding the two bars as shown in the figure on the right. Prévoyez deux personnes pour porter l’Enrouleur papier Automatique (approx. 34,3 kg), chacune tenant les deux barres comme illustré sur la figure de droite.
- Seite 23 Assembly Assemblage Montage Montage Montaggio Montaje Montagem Keep the four screws in the figure on the left provisionally tightened until parallel adjustment is completed. Maintenez temporairement les quatre vis de la figure de gauche serrées jusqu’à ce que le réglage parallèle de l’espace soit terminé.
- Seite 24 Assembly Assemblage Montage Montage Montaggio Montaje Montagem Contact a service engineer to attach the “Ink Supply System”. Do not assemble the “Media Guide Bar” as described in the following section until the service engineer’s work is complete. Attempting to perform these tasks yourself could result in product malfunction or damage to the product and will void the product warranty. Contactez un technicien pour fixer Contactez un technicien pour fixer le “système d’alimentation en encre”.
- Seite 25 Assembly Assemblage Montage Montage Montaggio Montaje Montagem Media Guide Bar Barre de guidage du support Medienführungsschiene Materiaalgeleider Barra della guida di supporto Barra de guía del papel Barra guia de papel The media guide bar is heavy. A minimum of two persons is required for assembly.
- Seite 26 Assembly Assemblage Montage Montage Montaggio Montaje Montagem Keep the two screws shown in the figure temporarily tightened until the parallel adjustment is completed. Maintenez temporairement les deux vis de la figure serrées jusqu’à ce que le réglage parallèle de l’espace soit terminé. Ziehen Sie die zwei abgebildeten Schrauben vorübergehend an, bis die parallele Ausrichtung beendet wurde.
- Seite 27 Assembly Assemblage Montage Montage Montaggio Montaje Montagem Waste Ink Bottle Bidon d'encre résiduelle Resttintenbehälter Inktfles Tanica di scarico inchiostro Recipiente para tinta sobrante Frasco de desperdicio de tinta The lid of the Waste Ink Bottle is required when disposing of the waste ink. Keep the lid. Do not throw it away. Vous devez utiliser le couvercle du Bidon d'encre résiduelle lorsque vous jetez l’encre résiduelle.
-
Seite 28: Connexion Du Câble D'alimentation
Assembly Assemblage Montage Montage Montaggio Montaje Montagem In case the caution label for your language is bundled, place it over the English label already placed. Si l’étiquette d’avertissement dans votre langue est fournie, placez-la sur l’étiquette en langue anglaise déjà collée. Wenn der Warnaufkleber in Ihrer Sprache nur mitgeliefert worden ist, setzen sie ihn über das bereits vorhandene englische Label. - Seite 29 Loading Media Chargement des supports Einlegen von Medien Media invoeren Caricamento supporto Carga de materiales Carregar Papel Before loading the media, mark the loading position on the left end of the media using the procedure below. Loading the media without aligning the left end position may result in feeding that is not straight. Avant le changement du support, marquez la position de chargement à...
- Seite 30 Loading Media Chargement des supports Einlegen von Medien Media invoeren Caricamento supporto Carga de materiales Carregar Papel Position the rolled side of the film at the top, and insert it into the printer. Positionnez le côté enroulé du film vers le haut, puis insérez-le dans l’imprimante. Halten Sie die Folie mit der aufgerollten Seite nach oben und führen Sie sie in den Drucker ein.
- Seite 31 Loading Media Chargement des supports Einlegen von Medien Media invoeren Caricamento supporto Carga de materiales Carregar Papel Pull the film straight down, and place it over the label on the front bar of the Media Feeding Unit. Use a marker such as an oil-based pen to mark the left end position of the film on the label.
- Seite 32 Loading Media Chargement des supports Einlegen von Medien Media invoeren Caricamento supporto Carga de materiales Carregar Papel Caution Because the media is heavy, it should not be carried by one person. Loading Media Comme le support est lourd, il ne doit pas être porté par une seule personne. Attention Chargement des supports Weil das Medium schwer ist, sollte es nicht von einer Person getragen werden.
- Seite 33 Loading Media Chargement des supports Einlegen von Medien Media invoeren Caricamento supporto Carga de materiales Carregar Papel If the handle shaft of the right side roll holder is pressed in, turn it to the front until the handle can no longer be turned. Si l’axe de la poignée du support du rouleau du côté...
- Seite 34 Loading Media Chargement des supports Einlegen von Medien Media invoeren Caricamento supporto Carga de materiales Carregar Papel This section describes how to load media printable side out. Cette section décrit la manière de charger le support avec la face imprimable vers l’extérieur. In diesem Abschnitt wird beschrieben, wie Medien mit der bedruckbaren Seite nach außen eingelegt werden.
- Seite 35 Loading Media Chargement des supports Einlegen von Medien Media invoeren Caricamento supporto Carga de materiales Carregar Papel Turn the handle until part A in the upper left figure is hidden. Once part A is hidden, do not turn the handle any further. Tournez la poignée jusqu’à...
- Seite 36 Loading Media Chargement des supports Einlegen von Medien Media invoeren Caricamento supporto Carga de materiales Carregar Papel [10] If the left end of the media is not at the center of the rectangular area as shown in the figure on the right, return to step [4]. Si l’extrémité...
- Seite 37 Loading Media Chargement des supports Einlegen von Medien Media invoeren Caricamento supporto Carga de materiales Carregar Papel [11] [12] [13] [14] If the media is loaded printable side in, press the d button to rewind the media. We recommend that you press the r button in the control panel and set Media Suction to 2.
- Seite 38 Loading Media Chargement des supports Einlegen von Medien Media invoeren Caricamento supporto Carga de materiales Carregar Papel [15] [16] [17] Pressing the tabs on the sides of the media holding plates, slide the plates to the edges of the media. Tout en appuyant sur les languettes situées sur les côtés des plaques de maintien du support, faites glisser le plateau sur les bords du support.
- Seite 39 Loading Media Chargement des supports Einlegen von Medien Media invoeren Caricamento supporto Carga de materiales Carregar Papel [18] Position the left and right plates so that the edges of the media can be seen at the centers of all three holes. Release the tabs to lock the plates in place.
-
Seite 40: Installation Der Software
Installing the Software Installation du logiciel Installation der Software De software installeren Installazione del software Instalación del software Instalar o Software Network Follow the on-screen instructions to complete the installation. Suivez les instructions à l’écran pour terminer l’installation. Windows Folgen Sie den Bildschirmanweisungen um die Installation abzuschließen. Volg de instructies op het scherm om de installatie te voltooien. - Seite 41 Si cette boîte de dialogue apparaît, assurez-vous que l’éditeur est bien SEIKO EPSON, puis cliquez sur Débloquer. Wenn dieses Dialogfeld angezeigt wird, vergewissern Sie sich, dass der Verlag SEIKO EPSON ist , und klicken Sie dann auf Freigeben. Als het dialoogvenster verschijnt, controleer of de uitgever SEIKO EPSON betreft en klik vervolgens op Deblokkeren.
- Seite 42 Installing the Software Installation du logiciel Installation der Software De software installeren Installazione del software Instalación del software Instalar o Software In a network connection, continue by setting a password for protecting the network settings. Do not forget the administrator password. For information on what to do if you forget the password, see “Problem Solver” in the User’s Guide. Dans une connexion réseau, poursuivez en définissant un mot de passe pour protéger les paramètres du réseau.
- Seite 43 Installing the Software Installation du logiciel Installation der Software De software installeren Installazione del software Instalación del software Instalar o Software In Optional, click Password. Dans Optionnel, cliquez sur Mot de passe. In Optional klicken Sie auf Passwort. Klik in Optioneel op Wachtwoord. In Opzionale, cliccare Password.
- Seite 44 Seeing the Online Guide Consultation du guide en ligne Lesen des Online-Handbuchs De online handleiding bekijken Visualizzazione della guida online Consulta de la guía online Ver o Guia Online Windows Mac OS X De volgende online handleidingen zijn inbegrepen op de meegeleverde software CD. Nadat u de map met daarin de handleidingen hebt geopend, kunt u ze kopiëren naar uw computer.