Abicor Binzel CAT3 PRO Beipackzettel
Schalterwechsel
Verfügbare Sprachen
Verfügbare Sprachen
Quicklinks
T E C H N O L O G Y
DE Beipackzettel / EN Instruction leaflet /
FR Fiche d'instruction / ES Manual de instrucciones
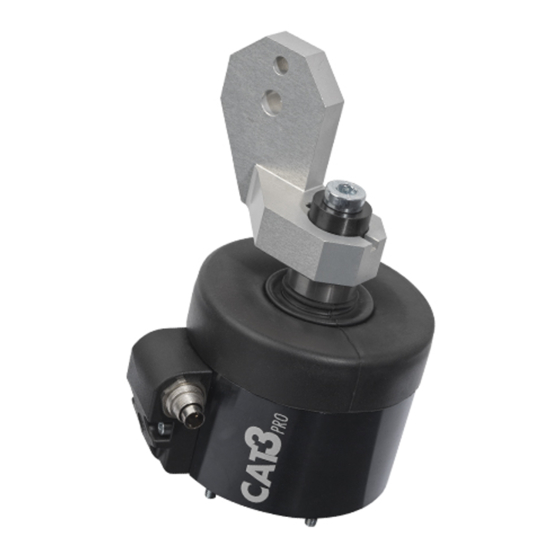
DE Schalterwechsel CAT3 PRO
EN Switch Replacement for CAT3 PRO
FR Changement de l'interrupteur CAT3 PRO
ES Sustitución del interruptorCAT3 PRO
1
DE
1
Gewindestift (M4 × 6) Set screw (M4 × 6)
CAT3 PRO Schalter
2
Einstellmutter Schalter
3
4
Flanschstecker 3-polig 3-pole flange plug
5
Mutter (SW 14)
6
Halteblech
7
2 × Zylinderschrauben
(M3 × 6)
8
Steckergehäuse
9
2 × Zylinderschrauben
(M3 ×16)
Abb. / Fig. 1
BEI.0369.0 • 2021-02-16
F O R
T H E
2
3
4
EN
FR
Vis sans tête (M4 × 6)
CAT3 PRO Switch
CAT3 PRO Interrupteur CAT3 PRO Interruptor
Adjusting nut for
Écrou de réglage de
switch
l'interrupteur
Prise encastrable
3 pôles
Nut (SW 14)
Écrou
(ouverture de clé 14)
Retaining sheet
Tôle butée
2 × cylinder head
2 × vis cylindriques
screws (M3 × 6)
(M3 × 6)
Connector housing
Boîtier de la fiche
2 × cylinder head
2 × vis cylindriques
screws (M3 × 16)
(M3 × 16)
W E L D E R ´ S
5
6
7
8
W O R L D .
www.binzel-abicor.com
9
ES
Tornillo prisionero
(M4 × 6)
Tuerca de ajuste del
interruptor
Clavija de brida de
3 polos
Tuerca
(tamaño de llave 14)
Lámina de apoyo
2 tornillos cilíndricos
(M3 × 6)
Carcasa del conector
2 tornillos cilíndricos
(M3 × 16)
1

Verwandte Anleitungen für Abicor Binzel CAT3 PRO

Inhaltszusammenfassung für Abicor Binzel CAT3 PRO
- Seite 1 DE Beipackzettel / EN Instruction leaflet / FR Fiche d'instruction / ES Manual de instrucciones www.binzel-abicor.com DE Schalterwechsel CAT3 PRO EN Switch Replacement for CAT3 PRO FR Changement de l'interrupteur CAT3 PRO ES Sustitución del interruptorCAT3 PRO Gewindestift (M4 × 6) Set screw (M4 × 6) Vis sans tête (M4 ×...
- Seite 2 1 Schalterwechsel Schalterwechsel CAT3 PRO HINWEIS • Für den Schalterwechsel und jegliche Reparaturen wird das Ersatzteil-Set 780.2190.1 benötigt. • Alle Bauteile der Schaltereinheit müssen demontiert und ausgetauscht werden. Einzelne Bauteile können nicht weiterverwendet werden. • Der Austausch und Einbau der Schaltereinheit erfolgt nach dieser Anleitung.
-
Seite 3: Schalter Demontieren
Schalterwechsel CAT3 PRO 1 Schalterwechsel 1.1 Schalter demontieren 1 Mutter mit Ringschlüssel (SW 14) von Flanschstecker lösen. 2 Zylinderschauben (M3 × 16) mit Innensechskantschlüssel (SW 2,5) lösen und entfernen. 3 Flanschstecker in Steckergehäuse schieben und Steckergehäuse entfernen. 4 Zylinderschrauben (M3 × 6) mit Innensechskantschlüssel (SW 2,5) lösen... - Seite 4 1 Schalterwechsel Schalterwechsel CAT3 PRO 5 Halteblech demontieren. 6 Gewindestift (M4 × 6) mit Innensechskantschlüssel (SW 2) lösen. 7 Schalter mit Flanschstecker entnehmen. DE - 4 BEI.0369.0 • 2021-02-16...
-
Seite 5: Schalter Einsetzen
1.2 Schalter einsetzen 1 Darauf achten, dass neuer Schalter ca 0,7 mm Überstand zur Einstellmutter hat. 2 Neuen Schalter mit Flanschstecker in CAT3 PRO einsetzen bis Schalter einrastet. 3 Halteblech einsetzen. 4 Halteblech mit Zylinderschrauben (M3 × 6) vormontieren (SW 2,5, Anzugsdrehmoment 0,3 Nm). -
Seite 6: Schaltpunkt Einstellen Und Schalter Montieren
Die Verwendung einer geeigneten Vorrichtung erleichtert die Einstell- und Montagearbeiten erheblich. • Für die Einstell- und Montagearbeiten benötigen Sie ein Multimeter. Mit Vorrichtung 1 CAT3 PRO in Vorrichtung einsetzen. 2 CAT3 PRO in Z-Richtung 1,10 mm (±0,1 mm) mittels passender Vorrichtung auslenken. Z-Richtung Eine Umdrehung des Spannhebels in... - Seite 7 Uhrzeigersinn drehen, bis kurz vor den Punkt an dem ein elektrischer Durchgang zwischen PIN2 und PIN3 gemessen werden kann. 5 CAT3 PRO aus Vorrichtung entnehmen. 6 Gewindestift mit Innensechskantschlüssel (SW 2) anziehen (Anzugsdrehmoment 2,2 Nm) und darauf achten, dass sich Schaltpunkt nicht ändert.
- Seite 8 8 Wir empfehlen, die Stellung des Schalters mit Siegellack zu markieren. 9 Kabel in Steckergehäuse legen. Darauf achten, dass Kabel zwischen Schaltergehäuse und CAT3 PRO Gehäuse nicht eingeklemmt werden. 10Mutter mit Ringschlüssel (SW 14) an Flanschstecker montieren (Anzugsdrehmoment 1 Nm).
- Seite 9 Schalterwechsel CAT3 PRO 1 Schalterwechsel 12 Schutzkappe an Flanschstecker anbringen. Ohne Vorrichtung 1 Mit Hilfe des Multimeters Durchgangsprüfung an PIN2 (BN) und BN (Braun) PIN3 (WH) am Flanschstecker der WH (Weiß) CAT3 PRO durchführen. Fall 1: Elektrischer Durchgang zwischen PIN2 und PIN3 messbar.
- Seite 10 (SW 2,5) anziehen (Anzugsdrehmoment 1,3 Nm). 5 Wir empfehlen, die Stellung des Schalters mit Siegellack zu markieren. 6 Kabel in Steckergehäuse legen. Darauf achten, dass Kabel zwischen Schaltergehäuse und CAT3 PRO Gehäuse nicht eingeklemmt werden. DE - 10 BEI.0369.0 • 2021-02-16...
- Seite 11 Schalterwechsel CAT3 PRO 1 Schalterwechsel 7 Mutter mit Ringschlüssel (SW 14) an Flanschstecker montieren (Anzugsdrehmoment 1 Nm). 8 Steckergehäuse montieren und Zylinderschrauben (M3x16) mit Innensechskantschlüssel (SW 2,5) montieren (Anzugsdrehmoment 0,4 Nm). 9 Schutzkappe an Flanschstecker anbringen. BEI.0369.0 • 2021-02-16 DE - 11...
- Seite 42 Notizen/Notes/Notas Notizen/Notes/Notas BEI.0369.0 • 2021-02-16...
- Seite 43 Notizen/Notes/Notas Notizen/Notes/Notas BEI.0369.0 • 2021-02-16...
- Seite 44 T E C H N O L O G Y F O R T H E W E L D E R ´ S W O R L D . Alexander Binzel Schweisstechnik GmbH & Co. KG Kiesacker · 35418 Buseck · GERMANY T +49 64 08 / 59-0 F +49 64 08 / 59-191 info@binzel-abicor.com...