Miele Conactivity XKM 2000 DA Montage- Und Installationsanweisung
Inhaltsverzeichnis
Quicklinks
Con|ctivity
XKM 2000 DA
DA 7090 W
DA 7000 D
de Montage- und Installationsanweisung
en Fitting and installation instructions
fr
Notice de montage et d'installation
it
Istruzioni di montaggio e installazione
es
Instrucciones de montaje e instalación
nl
Montage- en installatie-aanwijzing
da Monterings- og installationsanvisning
ru
Èíñòðóêöèÿ ïî ïîäêëþ÷åíèþ è ìîíòàæó
DE, BE, CH, DK, ES, FR, GB, IT, NL, RU
M.-Nr. 07 953 870
Inhaltsverzeichnis

Verwandte Anleitungen für Miele Conactivity XKM 2000 DA


Inhaltszusammenfassung für Miele Conactivity XKM 2000 DA
- Seite 1 Con|ctivity XKM 2000 DA DA 7090 W DA 7000 D de Montage- und Installationsanweisung en Fitting and installation instructions Notice de montage et d'installation Istruzioni di montaggio e installazione Instrucciones de montaje e instalación Montage- en installatie-aanwijzing da Monterings- og installationsanvisning Èíñòðóêöèÿ...
-
Seite 2: Inhaltsverzeichnis
Inhalt de - Montage ............5 en - Fitting. - Seite 3 Con|ctivity und Miele|home ........
- Seite 4 Con|ctivity en Miele|home ........
-
Seite 5: De - Montage
de - Montage ^ Diese Montageanweisung beschreibt die Arbeitsschritte bei Erstmontage der Dunstabzugshaube. Beachten Sie dazu die Gebrauchsan- weisung und den Montageplan der DA 7090 W / 7000 D. Soll das Kommunikationsmodul in die bereits installierte Dunstabzugs- haube montiert werden, ist dies nur durch den Kundendienst möglich. -
Seite 6: En - Fitting
en - Fitting ^ These installation instructions describe the steps required when fitting the module with a new (not yet installed) cooker hood. See also the Operating instructions and the installation diagram for the DA 7090 W / 7000 D. If the communication module is being fitted to a cooker hood that has already been installed, this must... -
Seite 7: Fr - Montage
fr - Montage ^ Cette notice de montage décrit les étapes de travail lors du premier montage de la hotte. Veuillez consulter le mode d'emploi et la notice de montage de la DA 7090 W / 7000 D. Si le module de communication doit être monté... -
Seite 8: It - Montaggio
DA 7090 W / 7000 D. Se il modulo di comunicazione deve essere installato in una cappa già montata, rivolgersi al servizio di assi- stenza tecnica Miele autorizzato. ^ Quando si posano i cavi elettrici fare attenzione a non piegarli né schiac- ciarli. -
Seite 9: Es - Montaje
es - Montaje ^ Estas Instrucciones de montaje descir- ben los pasos de trabajo del primer montaje de la campana extractora. Observe las instrucciones de manejo y el plano de montaje DA 7090 W / 7000 D. En caso de que fuese necesario montar el módulo de comunicación en la campana extractora previa- mente instalada, sólo podrá... -
Seite 10: Nl - Montage
7000 D in acht. Moet de communicatiemodule wor- den gemonteerd in een afzuigkap die al is geïnstalleerd, mag dat al- leen door een Miele-technicus ge- beuren. ^ Let er bij het aanleggen van de elek- trische kabels op dat deze niet in el-... -
Seite 11: Dk - Montering
Se brugsanvisningen og monterings- anvisningen til DA 7090 W / 7000 D. Montering af kommunikationsmodu- let i en allerede monteret emhætte kan kun foretages af Miele Teknisk Service. ^ Vær opmærksom på, at de elektriske ledninger ikke anbringes med knæk eller klemmes sammen. -
Seite 12: Be - Montage
Als de communicatiemodule moet worden ingebouwd in een reeds geïnstalleerde dampkap, mag dit al- leen door de dienst Herstellingen aan huis van Miele worden uitge- voerd. ^ Zorg ervoor dat elektrische leidingen niet worden geplet of geknikt wan- neer u ze verplaatst. -
Seite 13: Ru - Ìîíòàæ
ru - Ìîíòàæ ^ Èíñòðóêöèÿ ïî ìîíòàæó ïîøàãîâî îïèñûâàåò ïåðâè÷íûé ìîíòàæ âû- òÿæêè. Äëÿ ýòîãî ïðî÷èòàéòå èí- ñòðóêöèþ ïî ýêñïëóàòàöèè è ìîí- òàæíûé ïëàí ê DA 7090 W / 7000 D. Åñëè êîììóíèêàöèîííûé ìîäóëü íåîáõîäèìî âìîíòèðîâàòü â óæå óñòàíîâëåííóþ âûòÿæêó, òî ýòî âîçìîæíî... -
Seite 14: Da 7090 W
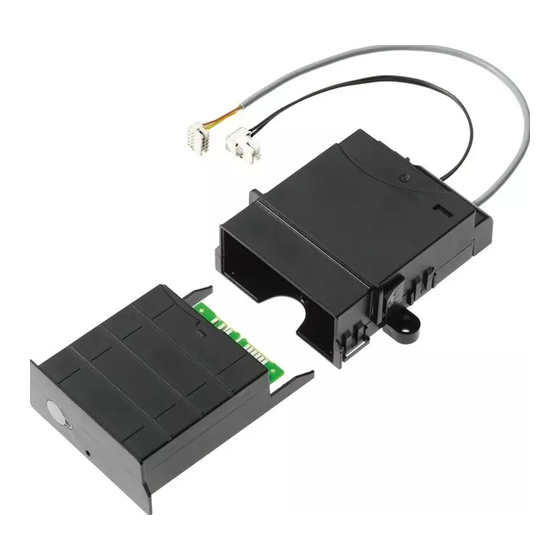
DA 7090 W de - Einbau des Kommunikationsmoduls en - Fitting the communication module fr - Montage du module de communication it - Incasso del modulo di comunicazione es - Empotramiento del módulo de comunicación nl - Het inbouwen van de communicatiemodule da - Indbygning/montering af kommunikationsmodulet... - Seite 15 DA 7090 W...
- Seite 16 DA 7090 W...
- Seite 17 DA 7090 W...
- Seite 18 DA 7090 W...
- Seite 19 DA 7090 W...
- Seite 20 DA 7090 W...
- Seite 21 DA 7090 W...
- Seite 22 DA 7090 W...
- Seite 23 DA 7090 W...
-
Seite 24: De - Einbau Des Kommunikationsmoduls
DA 7000 D de - Einbau des Kommunikationsmoduls en - Fitting the communication module fr - Montage du module de communication it - Incasso del modulo di comunicazione es - Empotramiento del módulo de comunicación nl - Het inbouwen van de communicatiemodule da - Indbygning/montering af kommunikationsmodulet... - Seite 25 DA 7000 D...
- Seite 26 DA 7000 D...
- Seite 27 DA 7000 D...
- Seite 28 DA 7000 D...
- Seite 29 DA 7000 D...
- Seite 30 DA 7000 D...
- Seite 31 DA 7000 D...
- Seite 32 DA 7000 D...
- Seite 33 DA 7000 D...
-
Seite 34: De - Kommunikation Herstellen
de - Kommunikation herstellen ^ Zum Aktivieren des Automatikbetrie- Damit sich die Dunstabzugshaube und das Kochfeld für die Kommunikation bes die Sensortaste 4 drücken. "finden", müssen beide Geräte ange- Der Anmeldevorgang startet, die Kon- meldet werden. trolllampen der Gebläsestufen 2 und 3 Voraussetzung ist, dass beide Geräte blinken abwechselnd. -
Seite 35: An-/Abmeldung Kontrollieren
de - Kommunikation herstellen An-/Abmeldung kontrollieren Abmelden Wenn Sie prüfen wollen, ob die Dunst- Zum Abmelden der Dunstabzugshaube: abzugshaube an- oder abgemeldet ist: ^ Schalten Sie Gebläse und Kochstel- ^ Schalten Sie Gebläse und Kochstel- lenbeleuchtung aus. lenbeleuchtung aus. ^ Berühren Sie die Nachlauf-Taste m ^ Berühren Sie die Nachlauf-Taste m ca. -
Seite 36: Con|Ctivity Und Miele|Home
Betrieb von Con|ctivity in Verbin- dung mit Miele|home Wollen Sie Con|ctivity in einer vorhan- denen Miele|home-Umgebung betrei- ben, sind Dunstabzugshaube und Kochfeld im Miele|home-System anzu- melden. ^ Starten Sie am InfoControl bzw. SuperVision-Gerät den Menüpunkt "Gerät anmelden" bzw. "Weiteres Ge- rät anmelden". -
Seite 37: En - Establishing Communication
en - Establishing communication ^ Press the sensor 4 to activate auto- To enable the cooker hood and hob to "locate" each other so that they can matic mode. establish communication, both The signing on process will start and appliances need to be signed on. the indicator lamps for fan power levels Both appliances must be installed and 2 and 3 will flash alternately. -
Seite 38: Checking Whether The Cooker Hood Is Signed On Or Signed Off
en - Establishing communication Checking whether the cooker hood is Signing off signed on or signed off To sign off the cooker hood: If you want to check whether the cooker ^ Switch off the fan and the hob hood is signed on or signed off: lighting. -
Seite 39: Con|Ctivity And Miele|Home
If you want to operate Con|ctivity with an existing Miele|home system, the cooker hood and the hob must be signed on to the Miele|home system. ^ Start the "Sign on appliance" or "Sign on additional appliances" option on the InfoControl unit or the SuperVision appliance. -
Seite 40: Fr - Etablir La Communication
fr - Etablir la communication ^ Pressez la touche sensitive 4 pour Afin que la hotte et la table de cuisson se "trouvent" pour la communication, les activer le mode automatique. deux appareils doivent être connectés. Le procédé de connexion commence, La condition est que les deux appareils les diodes des allures 2 et 3 clignotent soient installés, équipés des modules... -
Seite 41: Contrôler La Connexion/Déconnexion
fr - Etablir la communication Contrôler la connexion/déconnexion Déconnexion Si vous souhaitez vérifier si la hotte est Pour déconnecter la hotte : connectée ou déconnectée, ^ arrêtez l'aspiration et l'éclairage de la ^ arrêtez l'aspiration et l'éclairage de la table de cuisson. table de cuisson. -
Seite 42: Con|Ctivity Et Miele|Home
Fonctionnement de Con|ctivity avec Miele|home Si vous voulez faire fonctionner Con|ctivity dans un environnement Miele|home existant, la hotte et la table de cuisson doivent être connec- tées au système Miele|home. ^ Démarrez l'option "Connexion appa- reil" ou "Connexion autre appareil" sur l'InfoControl ou l'appareil SuperVi- sion. -
Seite 43: It - Avviare La Comunicazione
it - Avviare la comunicazione ^ Per attivare la modalità automatica Perché cappa aspirante e piano di cot- tura riescano a comunicare è necessa- premere il tasto sensore 4. rio che entrambi gli apparecchi siano La procedura di connessione è avviata, connessi. -
Seite 44: Controllo Connessione/Disconnessione
it - Avviare la comunicazione Controllo Disconnessione connessione/disconnessione Disconnettere la cappa aspirante: Per verificare se la cappa è connessa o ^ Spegnere la ventola e l'illuminazione meno: della cappa. ^ Spegnere la ventola e l'illuminazione ^ Toccare il sensore m per circa 10 della cappa. -
Seite 45: Con|Ctivity E Miele|Home
Miele|home Per operare con Con|ctivity in un am- biente Miele|home esistente, cappa aspirante e piano di cottura devono es- sere connessi al sistema Miele|home. ^ Presso l'InfoControl o l'apparecchio SuperVision accedere alla voce di menù "Connessione apparecchi" o "Connettere un altro apparecchio". -
Seite 46: Es - Establecimiento De Comunicación
es - Establecimiento de comunicación ^ Para activar el funcionamiento auto- Para poder establecer la comunicación entre la campana extractora y la placa mático pulse la tecla sensora 4. de cocción, ambos aparatos deberán El proceso de registro se inicia, los pi- estar registrados. -
Seite 47: Controlar El Registro/La Desconexión
es - Establecimiento de comunicación Controlar el registro/la desconexión Cerrar sesión Si desea comprobar si la campana ex- Para desconectar la campana extractora: tractora está registrada o desconectada: ^ Desconecte el extractor y la ilumina- ^ Desconecte el extractor y la ilumina- ción de la placa de cocción. -
Seite 48: Con|Ctivity Y Miele|Home
Funcionamiento de Con|ctivity en combinación con Miele|home Si desea poner en funcionamiento Con|ctivity en un entorno Miele|home- ya establecido, la cam- pana extractora y la placa de cocción deberán ser registradas en el sistema Miele|home. ^ Active en InfoControl o en el aparato SuperVision el punto de menú... -
Seite 49: Nl - Communicatie Tot Stand Brengen
nl - Communicatie tot stand brengen ^ Druk op de sensortoets 4 om de au- De afzuigkap en de kookplaat moeten met elkaar communiceren en daarom tomatische bediening te activeren. moeten ze worden "aangemeld". Het aanmelden begint. Voorwaarden zijn dat beide apparaten De controlelampjes van de afzuigver- zijn geïnstalleerd, met de bijbehorende mogens 2 en 3 knipperen afwisselend. -
Seite 50: Controle
nl - Communicatie tot stand brengen Controle Het afmelden van de afzuigkap ^ Schakel de afzuiging en de kook- Wanneer u wilt controleren of de afzuig- kap is aangemeld of afgemeld, doe plaatverlichting uit. dan het volgende. ^ Tip ca. 10 seconden de m - toets ^ Schakel de afzuiging en de kook- aan, totdat toets 1 gaat branden. -
Seite 51: Con|Ctivity En Miele|Home
- Communicatie tot stand brengen Con|ctivity en Miele|home Gebruik van Con|ctivity in combina- tie met Miele|home Wilt u gebruik maken van Con|ctivity in een al aanwezige Miele|home-omge- ving, moeten afzuigkap en kookplaat bij het Miele|home-systeem worden aan- gemeld. ^ Start aan het InfoControl resp. -
Seite 52: Da - Kommunikation Etableres
da - Kommunikation etableres ^ Den automatiske drift aktiveres ved at For etablering af kommunikationen mel- lem emhætte og kogeplade skal begge trykke på tasten 4. produkter være tilmeldt. Tilmeldingsprocessen starter, kontrol- En forudsætning er, at begge produkter lamperne for blæsertrin 2 og 3 blinker er installeret og forsynet med de til- skiftevis. -
Seite 53: Til-/Afmelding Kontrolleres
da - Kommunikation etableres Til-/Afmelding kontrolleres Afmelding Ønsker man at kontrollere, om emhæt- Emhætten afmeldes: ten er til- eller frameldt: ^ Sluk blæseren og kogezonebelysnin- ^ Sluk blæseren og kogezonebelysnin- gen. gen. ^ Berør efterudsugningstasten m i ca. ^ Berør efterudsugningstasten m i ca. 10 sekunder, indtil tasten 1 lyser. -
Seite 54: Con|Ctivity Og Miele|Home
Con|ctivity og Miele|home Anvendelse af Con|ctivity i forbin- delse med Miele|home Ønsker man at anvende Con|ctivity sammen med et eksisterende Miele|home-system, skal emhætten og kogepladen tilmeldes i Miele|home-sy- stemet. ^ Start menupunktet "Produkt tilmeldes" eller "Tilmeld yderligere et produkt." på InfoControl eller SuperVision-pro- duktet. -
Seite 55: Be - Communicatie Tot Stand Brengen
be - Communicatie tot stand brengen ^ Druk op de sensortoets 4 om de au- Om de wasemkap en het kookvlak met elkaar te laten communiceren, moeten tomatische besturing in te schakelen. beide toestellen worden aangemeld. Het aanmeldingsproces wordt gestart. Hiertoe moeten beide toestellen zijn De controlelampjes van de geïnstalleerd en met de bijhorende... -
Seite 56: Aan-/Afmelding Controleren
be - Communicatie tot stand brengen Aan-/afmelding controleren Afmelden Voer de volgende stappen uit als u wilt Voer de volgende stappen uit om de wa- controleren of de wasemkap aan- of semkap af te melden: afgemeld is: ^ Schakel de ventilator en de kookvlak- ^ Schakel de ventilator en de kookvlak- verlichting uit. -
Seite 57: Con|Ctivity En Miele|Home
Werking van Con|ctivity in combina- tie met Miele|home Als u Con|ctivity in een reeds aanwezige Miele|home-omgeving ge- bruikt, moeten de wasemkap en het kookvlak bij het Miele|home-systeem worden aangemeld. ^ Selecteer op het InfoControl- of SuperVision-toestel het menupunt "Apparaat/toestel aanmelden" of "An- der apparaat/toestel aanmelden". -
Seite 58: Ru - Ñîçäàíèå Êîììóíèêàöèè
ru - Ñîçäàíèå êîììóíèêàöèè Äëÿ òîãî ÷òîáû âûòÿæêà è âàðî÷íàÿ Åñëè àâòîìàòè÷åñêèé ðåæèì íå àêòè- ïàíåëü "íàõîäèëèñü" â êîììóíèêàöèè, âèðîâàí, òî îäíîâðåìåííî ìèãàþò îáà ïðèáîðà äîëæíû áûòü èíäèêàòîðû ñòóïåíåé ðàáîòû âåíòè- çàðåãèñòðèðîâàíû. ëÿòîðà 2 è 3. Êîììóíèêàöèÿ ñîçäàåòñÿ ïðè óñëî- ^ Äëÿ... -
Seite 59: Êîíòðîëü Ðåãèñòðàöèè
ru - Ñîçäàíèå êîììóíèêàöèè Êîíòðîëü ðåãèñòðàöèè Îòìåíà ðåãèñòðàöèè Åñëè Âû õîòèòå ïðîâåðèòü, Äëÿ îòìåíû ðåãèñòðàöèè âûòÿæêè: çàðåãèñòðèðîâàíà âûòÿæêà èëè íåò: ^ Âûêëþ÷èòå âåíòèëÿòîð è ìåñòíîå ^ Âûêëþ÷èòå âåíòèëÿòîð è ìåñòíîå îñâåùåíèå. îñâåùåíèå. ^ Íàæèìàéòå êíîïêó îñòàòî÷íîãî ^ Íàæèìàéòå êíîïêó îñòàòî÷íîãî õîäà... -
Seite 60: Con|Ctivity È Miele|Home
òàíèè ñ Miele|home Åñëè Âû õîòèòå ýêñïëóàòèðîâàòü Con|ctivity â ñî÷åòàíèè ñ èìåþùåéñÿ ñèñòåìîé Miele|home, òî çàðåãèñòðèðóéòå âûòÿæêó è âàðî÷- íóþ ïàíåëü â ñèñòåìå Miele|home. ^ Çàïóñòèòå â ïðèáîðå InfoControl èëè ïðèáîðå SuperVision ïóíêò ìåíþ "Ðåãèñòðàöèÿ ïðèáîðà" èëè "Ðåãèñòðàöèÿ äðóãîãî ïðèáîðà". - Seite 64 Änderungen vorbehalten / 3910 M.-Nr. 07 953 870 / 00...