Inhaltsverzeichnis
Werbung
Verfügbare Sprachen
Verfügbare Sprachen
Quicklinks
Werbung
Kapitel
Inhaltsverzeichnis

Verwandte Anleitungen für Pelgrim GK7 Serie


Inhaltszusammenfassung für Pelgrim GK7 Serie
- Seite 1 GK7... manual handleiding - notice d’utilisation - anleitung...
- Seite 2 inhoud handleiding..........3 – 26 notice d’utilisation .
-
Seite 3: Inhaltsverzeichnis
Inhalt Ihre Gaskochmulde Beschreibung ..........52 Einleitung . -
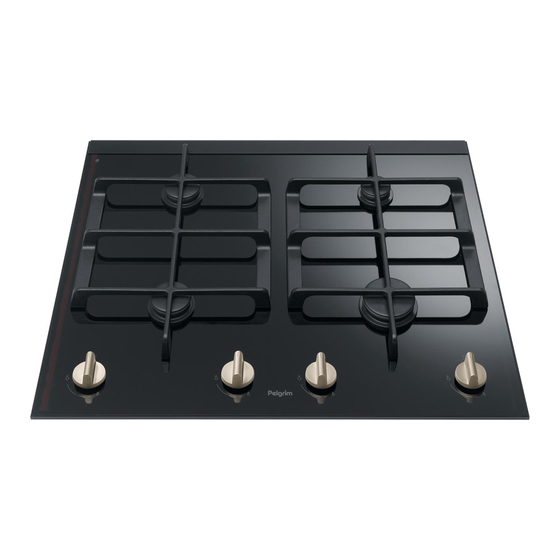
Seite 4: Ihre Gaskochmulde
Ihre Gaskochmulde Beschreibung GK764ONY 1. Starkbrenner 2. Normalbrenner 3. Sparbrenner 4. Wokbrenner 5. Superstarkbrenner 6. Kochmulde 7. Topfrost 8. Topfrost Wok GK795ONY GK731ONY GK732ONY... -
Seite 5: Einleitung
Ihre Gaskochmulde Einleitung Diese Gaskochmulde wurde für die echten Hobbyköche entworfen. Die unterschiedlichen Brennerleistungen sorgen dafür, dass Sie jedes Gericht zubereiten können. Durch die in den Bedienungsknöpfen integrierte Funkenzündung zünden und bedienen Sie die Knöpfe mit einer Hand. Dieses Gerät entspricht allen Anforderungen, die für das Kochgütezeichen gelten. -
Seite 6: Sicherheit
Sicherheit Bitte lesen Sie die gesonderten Sicherheitsvorschriften bevor Sie das Gerät in Betrieb nehmen! -
Seite 7: Bedienung
Bedienung Zünden und Einstellen Jeder Brenner ist stufenlos zwischen Groß- und Kleinstellung einstellbar. 0-Stellung/Positionsstellung Drücken Sie den entsprechenden Knebel ein und drehen Sie ihn nach links. Großstellung Der Brenner zündet. Kleinstellung... -
Seite 8: Bequem Kochen
Bequem kochen Die optimale Benutzung der Kochmulde Sorgen Sie immer dafür, dass die Flammen unter dem Topf bleiben. Wenn die Flammen um den Topf züngeln, geht viel Energie verloren. Zudem können die Griffe zu heiß werden. Zum Sautieren, Braten, Durchkochen von großen Mengen und Frittieren ... - Seite 9 Bequem kochen Die optimale Benutzung der Kochmulde Wokbrenner (GK731 und GK795) Mit dem Wokbrenner können Gerichte bei sehr hoher Temperatur bereitet werden. Es ist dabei wichtig, dass Sie: die Zutaten zuvor in Streifen, Scheiben oder Stückchen schneiden; beim Sautieren ein Qualitätsöl verwenden, wie Oliven-, Mais-, ...
-
Seite 10: Pflege
Pflege Allgemeines Ihr Gerät ist aus hochwertigen Materialien hergestellt und lässt sich einfach reinigen. Brennerteile dürfen nicht im Geschirrspüler gereinigt werden. Die Teile können durch das Geschirrspülmittel angegriffen werden! Verwenden Sie nicht zu viel Feuchtigkeit, da sie in den Brenner oder die Lüftungsöffnungen eindringen kann. - Seite 11 Pflege Sorgen Sie dafür, dass die Brennerkopf Brennerteile flach liegen. Brennerkopf innen Gaskörpern Brennkörpern Zündkerze Thermo-element (wenn erforderlich) Regelmäßige Reinigung und Pflege sofort nach Benutzung des Gerätes verhindert, dass übergekochte Essensreste lange einwirken können und hartnäckige, schwer zu entfernende Flecken verursachen. Sie können am besten ein mildes Reinigungsmittel verwenden.
- Seite 12 Pflege Hartnäckige Flecken auf Email (Topfroste, Brennerdeckel) Hartnäckige Flecken mit flüssigem Scheuerpulver oder Scheuerschwamm aus Kunststof entfernen. Verwenden Sie keine Scheuermittel, Scheuerkissen, spitze Gegenstände oder ätzende Reinigungsmittel. Hartnäckige Flecken auf der Glasplatte Reinigen Sie die Glasplatte mit einem Spezialreinigungsmittel für Glaskeramik- Kochfelder.
-
Seite 13: Störungen
Störungen Tabelle Wenn das Gerät nicht einwandfrei funktioniert, heißt das nicht immer, daß es defekt ist. Versuchen Sie erst, die Störung selbst zu beheben. Wenn nachsteh- ende Hinweise nicht helfen, rufen Sie dann den Kundendienst. Nur anerkannte Installateure dürfen Arbeiten am gas- und elektrotechnischen Teil ausführen. Abhilfe Störung Ursache... - Seite 14 Störungen Tabelle Störung Ursache Abhilfe Der Brenner brennt nicht egal. - Brennerteile nicht richtig - Setzen Sie die Brennerteile über aufgesetzt. die Zentriernocken zusammen und sorgen Sie dafür, dass sie flach aufeinander liegen. - Brennerteile verschmutzt/ - Reinigen/trocknen Sie die feucht.
-
Seite 15: Umweltaspekte
Umweltaspekte Verpackung und Gerät entsorgen Bei der Herstellung dieses Gerätes wurden dauerhafte Werkstoffe verwendet. Die Verpackung des Gerätes ist wiederverwendbar. Verwendet können sein: Pappe; Papier; Polyethylenfolie (PE); CFK-freies Polystyrol (PS-Hartschaum); Polypropylenband (PP). Diese Werkstoffe sind ordnungsgemäß und gemäß den behördlichen Vorschriften zu entsorgen. -
Seite 16: Installationsanweisung
Installationsanweisung Allgemeines Dieses Gerät darf nur von einem qualifizierten Gasinstallateur angeschlossen werden. Achtung: Gasart und Land, wofür sich das Gerät eignet, sind auf dem Typenschild angegeben. Dies ist ein Klasse-3-Gerät. Gasanschluß Der Gasanschluß muß den nationalen und kommunalen Vorschriften entsprechen. Wir empfehlen, das Kochgerät mit einer festen Leitung anzuschließen. -
Seite 17: Stromversorgung
Installationsanweisung Stromversorgung 230 V - 50 Hz - 0,6 VA Der elektrische Anschluß muß den nationalen und kommunalen Vorschriften entsprechen. Steckdose und Stecker müssen immer gut zugänglich sein. Wenn Sie einen festen Anschluß anbringen möchten, sorgen Sie bitte dafür, daß in der Zuführungsleitung ein omnipolarer Schalter mit einem Kontaktabstand von mindestens 3 mm angebracht wird. -
Seite 18: Einbauen
Installationsanweisung Einbauen Kochmulde vorbereiten 1/2" ISO 228 (gerade) 1/2" ISO 7/1 (konisch) Abdichtring 1/2" ISO 228 (gerade) 1/2" ISO 228 Nur für Frankreich: (gerade) Abdichtring Entfernen Sie die Schutzfolie des Dichtungsstreifens (A) und kleben Sie den Dichtungsstreifen in die Rille der Aluminiumprofile oder an die untere Seite der Glasplatte. - Seite 19 Installationsanweisung Einbauen Ausschnitt in die Arbeitsplatte sägen Sägen Sie den Ausschnitt in die Arbeitsplatte. Verfahren Sie dabei sorgfältig (siehe Einbaumaße). Sägen Sie eventuell vorhandene Trennwände auch aus. Der Abstand vom Ausschnittmaß bis zur Rückwand und / oder Seitenwand ist aus der Tabelle ersichtlich. Versiegeln Sie die Schmalseiten der Arbeitsplatte, wenn es sich um eine Hartfaserplatte mitKunststoffbeschichtung handelt, mit Lack, um zu verhindern, daß...
- Seite 20 Installationsanweisung Einbauen Einbaumaße GK731/732 1*) Befestigungspunkt Montagebügel Vorderseite voorzijde min.50 Vorderseite voorzijde G1/2"...
- Seite 21 Installationsanweisung Einbauen Abmessung Ausschnitt in die Arbeitsplatte Koppelprofil Koppelprofiel min. 50 * Wenn die Geräte sehr dicht nebeneinander montiert werden müssen, verwenden Sie das mitgelieferte Koppelprofil. Wenn das Koppelprofil nicht verwendet wird, halten Sie einen Mindestabstand von 60 cm zwischen den Aussparungen.
- Seite 22 Installationsanweisung Einbauen Einbaumaße GK764 1*) Befestigungspunkt Montagebügel Vorderseite voorzijde min.50 Vorderseite voorzijde G1/2"...
- Seite 23 Installationsanweisung Einbauen Einbaumaße GK795 Vorderseite voorzijde min.50 Vorderseite voorzijde G1/2"...
- Seite 24 Installationsanweisung Einbauen Einbausituationen GK795 in 60-cm-Schrank X < 41,3 mm : Y = 41,3 mm - X X >= 41,3 mm Y = 0 mm...
- Seite 25 Installationsanweisung Einbauen Benötigter Freiraum Eine Gaskochmulde entwickelt Wärme. Sorgen Sie für ausreichenden Freiraum zu nicht-hitzebeständigen Materialien. min. 600 mm (GK764) min. 900 mm (GK790) min. 650 mm min. 450 mm min. 100 mm min. 100 mm Die Gaskochmulde darf neben nur einer senkrechten Wand eingebaut werden. Achtung Die Unterseite der Kochplatte wird heiß.
-
Seite 26: Gastechnische Daten
Installationsanweisung Gastechnische Daten G25/25 mbar G20/20 mbar G25/20 mbar G30/29 mbar G31/29 mbar G31/37 mbar G30/50 mbar G31/50 mbar Brennertyp (kW) (kW) (kW) (kW / g/h) (kW / g/h) (kW / g/h) (kW / g/h) (kW / g/h) Sparbrenner 1.00 1.00 0.90 0.90 / 65... - Seite 52 plak hier het toestel-identificatieplaatje placez ici la plaque d’identification de l’appareil kleben Sie hier das Gerätetypenschild ein stick the appliance identification card here Dit plaatje bevindt zich aan de bovenzijde van het toestel. Cette plaque se trouve sur le dessus de l’appareil. Dieses Schild befindet sich an der Oberseite des Gerätes.