Herunterladen Inhalt Inhalt Diese Seite drucken

Werbung

Verfügbare Sprachen
  • DE

Verfügbare Sprachen

  • DEUTSCH, seite 1
Baltrum
Baltrum Flow
Konvektorheizung
Convector Heater
Radiateur à convection
Calefactor por convección
Stufa a convezione
10035033 10035034

Werbung

Inhaltsverzeichnis
loading

Inhaltszusammenfassung für Klarstein Baltrum

  • Seite 1 Baltrum Baltrum Flow Konvektorheizung Convector Heater Radiateur à convection Calefactor por convección Stufa a convezione 10035033 10035034...
  • Seite 3: Inhaltsverzeichnis

    Sehr geehrter Kunde, wir gratulieren Ihnen zum Erwerb Ihres Gerätes. Lesen Sie die folgenden Hinweise sorgfältig durch und befol- gen Sie diese, um möglichen Schäden vorzubeugen. Für Schäden, die durch Missachtung der Hinweise und unsachgemäßen Gebrauch entstehen, übernehmen wir keine Haftung. Scannen Sie den QR-Code, um Zugriff auf die aktuellste Bedienungsanleitung und weitere Informationen rund um das Produkt zu erhalten.
  • Seite 4: Sicherheitshinweise

    SICHERHEITSHINWEISE Lesen und befolgen Sie die folgenden Sicherheitshinweise, selbst wenn Sie sich mit dem Gerät vertraut fühlen. Bewahren Sie die Bedienungsanleitung zum künftigen Nachschlagen auf. Bei der Verwendung eines elektrischen Gerätes müssen die Sicherheitshinweise befolgt werden, einschließlich der Folgenden: • Verwenden Sie ausschließlich die Spannung, die auf dem Typenschild des Gerätes angegeben ist.
  • Seite 5 Wahrscheinlichkeit Wärme bildet und ausreicht, um eine Gefahr darzustellen. • Die Verwendung eines Verlängerungskabels wird bei diesem Gerät nicht empfohlen. • Ziehen Sie nicht den Netzstecker, bevor das Gerät ausgeschaltet ist. • Ziehen Sie nicht den Netzstecker aus der Steckdose, indem Sie am Netzkabel ziehen.
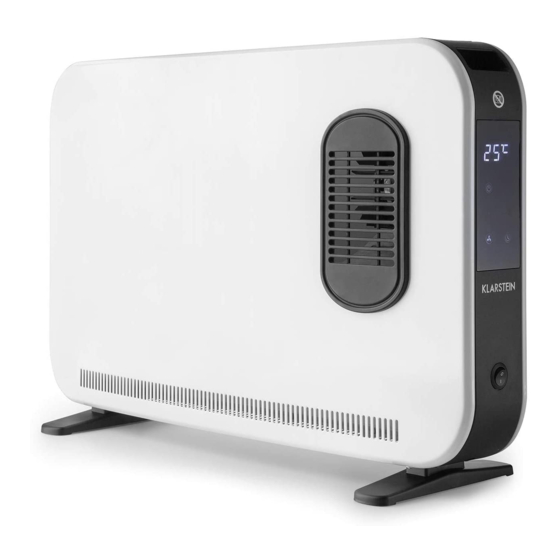
  • Seite 6: Übersicht

    ÜBERSICHT Modell 10035033 Modell 10035034 Lufteinlass Luftauslass Turboventilator Griffe Bedienfeld Netzschalter Standfüße...
  • Seite 7: Aufstellung

    AUFSTELLUNG 1. Entnehmen Sie das Gerät aus der Verpackung und entfernen Sie das gesamte Verpackungsmaterial. Platzieren Sie das Gerät entweder in vertikaler oder horizontaler Position auf einem stabilen Untergrund. 2. Stecken Sie den Netzstecker des Geräts in eine Steckdose. Sie können das Gerät nun verwenden.
  • Seite 8: Bedienung

    BEDIENUNG Bedienfeld 10035033 Anzeige Modus Ein/Standby erhöhen senken Timer Temperatur Bedienfeld 10035034 Anzeige Ein/Aus Modus Temperatur senken Temperatur erhöhen Ventilator Timer...
  • Seite 9 Vorsicht: Gefahr einer Verbrennung Fassen Sie das Heizgerät während des Betriebs nicht an. Das Gehäuse wird heiß. 1. Drücken Sie die Taste . Wenn keine andere Einstellung vorgenommen wurde läuft das Gerät auf der höchsten Stufe (die werkseitig eingestellte Temperatur liegt bei 24 °C).
  • Seite 10 Die werkseitig voreingestellte Temperatur ist 24 °C. Durch Drücken der Tasten + und – kann die Temperatur angepasst werden. Wenn anschließend innerhalb von 5 Sekunden keine Eingabe erfolgt wird dieser Wert automatisch gespeichert. Timer (Modell 10035033 und 10035034) 1. Wenn Sie die Timer-Taste drücken, können Sie die Zeit bis zum automatischen Ausschalten des Geräts einstellen.
  • Seite 11 1. Wenn keine Temperatureinstellung oder Timereinstellung vorgenommen wurde, leuchten die Tasten + und – nur schwach und reagieren nicht, wenn sie gedrückt werden. 2. Wenn eine Temperatur- und/oder Timereinstellung vorgenommen wurde, leuchten die Taste + und – auf und sind aktiviert. 3.
  • Seite 12: Reinigung Und Pflege

    REINIGUNG UND PFLEGE Warnung: Gefahr eines Stromschlags Ziehen Sie vor der Reinigung des Staubbehälters den Netzstecker. 1. Schalten Sie das Gerät aus und ziehen Sie den Netzstecker aus der Steckdose. Lassen Sie das Gerät vollständig abkühlen. 2. Reinigen Sie die Geräteoberflächen mit einem weichen Tuch, wenn diese nur wenig verschmutzt sind.
  • Seite 13: Hersteller

    HERSTELLER Chal-Tec GmbH, Wallstraße 16, 10179 Berlin...
  • Seite 14: Technische Parameter

    TECHNISCHE PARAMETER Modellkennung(en) 10035033, 10035034 Angabe Symbol Wert Einheit Angabe Einheit Wärmeleistung Nur bei elektrischen Speicher-Einzelraumheizgeräten: Art der Regelung der Wärmezufuhr Nennwärmeleistung 1,83 Manuelle Regelung der Wärmezufuhr nein mit integriertem Thermostat Mindestwärmeleistung 0,85 Manuelle Regelung der Wärmezufuhr nein (Richtwert) mit Rückmeldung der Raum- und/ oder Außentemperatur Maximale kontinuierliche 2,18...
  • Seite 15: Technical Data

    Dear Customer, Congratulations on purchasing this equipment. Please read this manual carefully and take care of the following hints to avoid damages. Any failure caused by ignoring the mentioned items and cautions mentioned in the instruction manual are not covered by our warranty and any liability.
  • Seite 16: Safety Instructions

    SAFETY INSTRUCTIONS Read and follow all the instructions in this manual even if you feel you are familiar with the product, and find a place to keep it handy for future reference. Read all instructions before using this appliance and keep them for future reference. •...
  • Seite 17 • The use of an extension cord with this appliance is not recommended. • Do not remove plug from power socket until the appliance has been switched off. • Do not remove plug from power socket by pulling the supply cord-always grip plug. •...
  • Seite 18: Product Description

    PRODUCT DESCRIPTION Modell 10035033 Modell 10035034 Air-inlet grille Air-out grille Turbo air outlet grille Handles Control panel Power switch Feet...
  • Seite 19: Setup

    SETUP 1. Unpack the packing and pull the convector out gently, place on a steady plane on either vertical or horizontal position. 2. Insert the power plug, ready to use. Note: The air inlet should not be too close with the wall, which will affect the air flow in, and then affect the use effect.
  • Seite 20: Bedienung

    OPERATION Control panel on item 10035033 Display screen ON/Standby Mode Decrease Increase Timer Temperature Control panel on item 10035034 Display screen ON/Standby Mode Decrease Increase Timer...
  • Seite 21 Caution: Danger of Scalding. Do not touch the heater during operation. The housing will become hot. ON/Standby (all items) 1. Click on the key . If no other setting has been made, the unit runs at the highest level (the factory-set temperature is 24 °C). The key lights up and the screen displays „24 °C“.
  • Seite 22 The factory preset temperature is 24 °C. The temperature can be adjusted by pressing the + and - keys. If no entry is made within 5 seconds, this value is automatically stored. Timer (all items) 1. If you press the Timer button, you can set the time until the unit switches off automatically.
  • Seite 23 Increase/ Decrease (Modell 10035034) 1. If no temperature setting or timer setting has been made, the + and - buttons light up only dimly and do not react when pressed. 2. If a temperature and/or timer setting has been made, the + and - buttons light up and are activated.
  • Seite 24: Care And Cleaning

    CARE AND CLEANING Warning: Danger of electric shock Unplug the power cord before cleaning. 1. Switch off the unit and unplug the power cord from the wall outlet. Let the appliance cool down completely. 2. Clean the surfaces of the unit with a soft cloth if they are only slightly dirty. For stubborn dirt, use a cloth soaked in lukewarm water and a little washing-up liquid.
  • Seite 25: Technical Parameters

    TECHNICAL PARAMETERS Model identifier(s): 10035033, 10035034 Item Symbol Value Unit Item Unit Heat output Type of heat input, for electric storage local space heaters only Nominal heat output 1.83 manual heat charge control, with integrated thermostat Minimum heat output 0.85 manual heat charge control with room (indicative) and/or outdoor temperature feedback...
  • Seite 27: Fiche Technique

    Chère cliente, cher client, Toutes nos félicitations pour l’acquisition de ce nouvel appareil. Veuillez lire attentivement et respecter les ins- tructions de ce mode d’emploi afin d’éviter d’éventuels dommages. Nous ne saurions être tenus pour responsa- bles des dommages dus au non-respect des consignes et à...
  • Seite 28: Consignes De Sécurité

    CONSIGNES DE SÉCURITÉ Lisez et suivez les consignes de sécurité ci-dessous, même si vous vous sentez à l‘aise avec l‘appareil. Conservez le mode d‘emploi pour vous y référer ultérieurement. Lorsque vous utilisez un appareil électrique, les consignes de sécurité doivent être respectées, notamment les suivantes : •...
  • Seite 29 Tenez toujours la fiche. • Débranchez la fiche secteur lorsque l‘appareil n‘est pas utilisé. • Cet appareil ne convient pas pour une utilisation sur des tapis à poils longs ou des tapis flocati. • Ne laissez pas le cordon d‘alimentation entrer en contact avec des surfaces chaudes pendant le fonctionnement.
  • Seite 30: Aperçu

    APERÇU Modèle 10035033 Modèle 10035034 Entrée d'air Sortie d'air Turbo ventilateur Poignées Panneau de commande Interrupteur secteur Pieds de support...
  • Seite 31: Installation

    INSTALLATION 1. Retirez l'appareil de son emballage et retirez tout le matériel d'emballage. Placez l'appareil en position verticale ou horizontale sur une surface stable. 2. Insérez la fiche secteur de l'appareil dans une prise. Vous pouvez maintenant utiliser l'appareil. Remarque : L'entrée d'air ne doit pas être trop près du mur car cela pourrait limiter la prise d'air et affecter négativement l'efficacité...
  • Seite 32: Utilisation

    UTILISATION Panneau de commande 10035033 Affichage Mode Allumé / veille Augmenter Réduire Minuterie Température Panneau de commande 10035034 Affichage Allumé / arrêté Mode Réduire la température Augmenter la température Ventilateur Minuterie...
  • Seite 33 Attention : risque de brûlure Ne touchez pas le radiateur pendant son fonctionnement. Le boîtier devient chaud. 1. Appuyez sur la touche . Si vbous ner faites aucun autre réglage, l'appareil démarre à la vitesse la plus élevée (la température par défaut est réglée sur 24 °C). La touche [X] s'allume et l'écran affiche 24 °C.
  • Seite 34 Minuterie (Modèles 10035033 und 10035034) 1. Appuyez sur la touche de la minuterie pour régler la durée jusqu'à l'arrêt automatique de l'appareil. L'indicateur de minuterie s'allume. La durée apparaît à l'écran, les deux premiers chiffres indiquent les heures et le dernier emplacement l'unité...
  • Seite 35 3. La touche de température doit être activée avant de pouvoir régler la température. Augmenter / réduire (Modèle 10035034) 1. Si vous n'avez effectué aucun réglage de température ou de minuterie, les touches + et - ne s'allument que faiblement et ne réagissent pas. 2.
  • Seite 36: Nettoyage Et Entretien

    NETTOYAGE ET ENTRETIEN Mise en garde : risque de choc électrique Avant de nettoyer le bac à poussière, débranchez la fiche secteur. 1. Éteignez l'appareil et débranchez la fiche secteur. Laissez l'appareil refroidir complètement. 2. Nettoyez les surfaces de l'appareil avec un chiffon doux si elles ne sont que légèrement sales.
  • Seite 37: Fabricant

    FABRICANT Chal-Tec GmbH, Wallstraße 16, 10179 Berlin...
  • Seite 38: Fiche De Données Produit

    FICHE DE DONNÉES PRODUIT Référence (s) du produit 10035033, 10035034 Donnée Symbole Valeur Unité Donnée Unité Puissance calorifique Uniquement pour les radiateurs électriques à accumulation : Type de régulation de l'apport de chaleur Puissance calorifique 1,83 Régulation manuelle de l'apport de nominale chaleur avec thermostat intégré...
  • Seite 39: Datos Técnicos

    Estimado cliente: le felicitamos por la compra de su dispositivo. Por favor, lea las siguientes instrucciones con atención y sígalas para evitar posibles daños. No aceptamos ninguna responsabilidad por los daños causados por el incumpli- miento de las instrucciones y el uso indebido. Escanee el siguiente código QR para acceder al último manual de usuario y otra información sobre el producto.
  • Seite 40: Instrucciones De Seguridad

    INSTRUCCIONES DE SEGURIDAD Lea y siga las siguientes instrucciones de seguridad, aunque esté familiarizado con el dispositivo. Guarde el manual de instrucciones para futuras consultas. Cuando utilice un aparato eléctrico, siga las instrucciones de seguridad, incluyendo las siguientes: • Utilice sólo el voltaje indicado en la placa de identificación del equipo. •...
  • Seite 41 Agarre siempre del enchufe. • Desenchufe el cable de alimentación cuando la máquina no esté en uso. • Esta unidad no es adecuada para su uso en alfombras de pelo largo o de Flokati. • No deje el cable de alimentación en contacto con superficies calientes durante el funcionamiento.
  • Seite 42: Descripción Del Producto

    DESCRIPCIÓN DEL PRODUCTO Modelo 10035033 Modelo 10035034 Rejilla de entrada de aire Parrilla de salida de aire Rejilla de salida de aire turbo Manijas Panel de control Interruptor de encendido Pies...
  • Seite 43: Configuración

    CONFIGURACIÓN 1. Desembale el embalaje y saque el convector suavemente, colóquelo en un plano estable en posición vertical u horizontal. 2. Inserte el enchufe de alimentación y listo para usar. Nota: La entrada de aire no debe estar demasiado cerca de la pared, esto afectará al flujo de aire que entra, y luego afectará...
  • Seite 44: Funcionamiento

    FUNCIONAMIENTO Panel de control del artículo 10035033 Pantalla de visualización Modo Modo de espera Aumentar Disminuir Temporizador Temperatura Panel de control del artículo 10035034 Pantalla de visualización Modo Modo de espera Disminuir Aumentar Ventilador Temporizador...
  • Seite 45 Atención: riesgo de quemaduras No toque el radiador durante el funcionamiento. La vivienda se calienta. 1. Haga clic en la tecla . Si no se ha realizado ningún otro ajuste, la unidad funciona al nivel más alto (la temperatura ajustada de fábrica es de 24 °C). La tecla se ilumina y en la pantalla aparece "24 °C".
  • Seite 46 muestra “°C”. La temperatura preestablecida en fábrica es de 24 °C. La temperatura se puede ajustar con las teclas + y -. Si no se realiza ninguna entrada en 5 segundos, este valor se almacena automáticamente. Temporizador (Modelos 10035033 und 10035034) 1.
  • Seite 47 Aumento/Disminución (Modelo 10035033) 1. Si no se ha realizado ningún ajuste de temperatura o de temporizador, los botones + y - se iluminan sólo de forma tenue y no reaccionan cuando se pulsan. 2. Si se ha realizado un ajuste de temperatura y/o temporizador, los botones + y - se iluminan y se activan.
  • Seite 48: Cuidado Y Limpieza

    CUIDADO Y LIMPIEZA Atención: Riesgo de choque eléctrico Antes de limpiar la bandeja de polvo, desenchufe el enchufe. 1. Apague la unidad y desenchufe el cable de alimentación de la toma de corriente. Deje que el aparato se enfríe completamente. 2.
  • Seite 49: Fabricante

    FABRICANTE Chal-Tec GmbH, Wallstraße 16, 10179 Berlín, Alemania.
  • Seite 50: Hoja De Datos Del Producto

    HOJA DE DATOS DEL PRODUCTO Denominación del modelo 10035033, 10035034 Datos Símbolo Valor Unidad Datos Unidad Potencia térmica Solo con disposítivos de acumulación de calor eléctricos para abastecimiento local: Tipo de regulación del abastecimiento de calor Potencia térmica nominal Pnom 1,83 Regulación manual del abastecimiento de calor con termostato integrado:...
  • Seite 51: Dati Tecnici

    Gentile Cliente, La ringraziamo per aver acquistato il dispositivo. La preghiamo di leggere attentamente le seguenti istruzioni per l’uso e di seguirle per evitare possibili danni tecnici. Non ci assumiamo alcuna responsabilità per danni scaturiti da una mancata osservazione delle avverten- ze di sicurezza e da un uso improprio del dispositivo.
  • Seite 52: Avvertenze Di Sicurezza

    AVVERTENZE DI SICUREZZA Leggere e rispettare le avvertenze di sicurezza, anche se si ha confidenza con il dispositivo. Conservare il manuale per future consultazioni. Durante l’utilizzo di dispositivi elettrici, è necessario rispettare le avvertenze di sicurezza, incluse le seguenti: • Utilizzare solamente la tensione indicata sulla targhetta del dispositivo. •...
  • Seite 53 Impugnare sempre la spina stessa. • Staccare la spina se il dispositivo non è in uso. • Questo dispositivo non è adatto all’utilizzo su tappeti a pelo lungo o in floccato. • Non lasciare che il cavo di alimentazione entri in contatto con superfici bollenti. •...
  • Seite 54: Descrizione Del Prodotto

    DESCRIZIONE DEL PRODOTTO Modello 10035033 Modello 10035034 Ingresso dell’aria Uscita dell’aria Ventola turbo Impugnature Pannello di controllo Interruttore di rete Piedi d’appoggio...
  • Seite 55: Posizionamento

    POSIZIONAMENTO 1. Togliere il dispositivo dalla confezione e rimuovere tutto il materiale d’imballaggio. Posizionare il dispositivo in verticale o orizzontale su un fondo stabile. 2. Inserire la spina nella presa elettrica e il dispositivo è pronto all’uso. Nota: l’ingresso dell’aria non deve trovarsi troppo vicino a una parete, altrimenti si ostacola l’aspirazione d’aria, con effetti negativi sull’efficacia del dispositivo.
  • Seite 56: Funzionamento

    FUNZIONAMENTO Pannello di controllo 10035033 Schermo Modalità Standby Aumentare Diminuire Timer Temperatura Pannello di controllo 10035034 Schermo Modalità Standby Diminuire Aumentare Ventola Timer...
  • Seite 57 Attenzione: pericolo di ustione Non toccare il dispositivo durante l’uso. L’alloggiamento diventa estremamente caldo. 1. Premere . Se non si imposta nulla, il dispositivo funziona ai massimi regimi (la temperatura predefinita in fabbrica è di 24°C). Il tasto si illumina e sullo schermo compare “24 °C”.
  • Seite 58 Timer (modelli 10035033 e 10035034) 1. Se si preme Timer, è possibile impostare il tempo fino allo spegnimento automatico. L’indicazione del timer si illumina. Sullo schermo viene mostrata l’ora nelle prime due posizioni e l’unità “h” nell’ultima posizione. 2. I tasti + e – sono illuminati. Regolare il tempo con + e -. Se non si premono tasti entro 5 secondi, l’impostazione viene confermata automaticamente.
  • Seite 59 debolmente e non reagiscono se vengono premuti. 2. Se sono stati impostati temperatura e timer, i tasti + e – si illuminano e sono attivi. 3. Se si premono contemporaneamente + e – subito dopo aver impostato la temperatura, è possibile cambiare tra “°C” e “°F”. Allo steso modo è possibile passare di nuovo da “°F”...
  • Seite 60: Pulizia E Manutenzione

    PULIZIA E MANUTENZIONE Avvertenza: pericolo di scosse elettriche Staccare la spina prima della pulizia. 1. Spegnere il dispositivo, staccare la spina e lasciarlo raffreddare completamente. 2. Pulire le superfici del dispositivo con un panno morbido, se sono solo leggermente sporche. In caso di sporco ostinato, utilizzare un panno immerso in acqua tiepida e detersivo per piatti.
  • Seite 61: Produttore

    PRODUTTORE Chal-Tec GmbH, Wallstraße 16, 10179 Berlino, Germania.
  • Seite 62: Scheda Informativa Del Prodotto

    SCHEDA INFORMATIVA DEL PRODOTTO Identificazione del modello (i) 10035033, 10035034 Indicazione Simbolo Valore Unità Indicazione Unità Potenza termica Solo per gli apparecchi per il riscaldamento d'ambiente locale elettrici ad accumulo: Tipo di controllo dell´apporto termico Potenza termica nominale Pnom 1,83 Controllo manuale del carico termico con termostato integrato Potenza termica minima...

Diese Anleitung auch für:

Baltrum flow1003503310035034

Inhaltsverzeichnis