Herunterladen Inhalt Inhalt Diese Seite drucken
Keysight U1251B Schnellstart Handbuch

Keysight U1251B Schnellstart Handbuch

Digitale handmultimeter
Vorschau ausblenden Andere Handbücher für U1251B:

Werbung

Verfügbare Sprachen
  • DE

Verfügbare Sprachen

  • DEUTSCH, seite 38
Downloaded from
www.Manualslib.com
Keysight U1251B and
U1252B Handheld
Digital Multimeter
manuals search engine
Quick Start
Guide

Werbung

Inhaltsverzeichnis
loading

Inhaltszusammenfassung für Keysight U1251B

  • Seite 1 Keysight U1251B and U1252B Handheld Digital Multimeter Quick Start Guide Downloaded from www.Manualslib.com manuals search engine...
  • Seite 2 WARNING notice until the indicated conditions are fully understood and met. For further safety information details, refer to the Keysight U1251B and U1252B Handheld Digital Multimeter User’s Guide. Keysight U1251B and U1252B Quick Start Guide Downloaded from www.Manualslib.com manuals search engine...
  • Seite 3 ✔ Alligator clips ✔ Printed Quick Start Guide ✔ Certificate of Calibration ✔ 9 V alkaline battery (for U1251B only) ✔ Rechargeable 8.4 V battery (for U1252B only) ✔ Power cord and AC adapter (for U1252B only) If anything is missing or damaged, please contact the nearest Keysight Sales Office.
  • Seite 4: Charging The Battery

    24 V DC output and the over current limitation to a value more than 0.5 A. Ensure that the polarity of the connection is correct. Keysight U1251B and U1252B Quick Start Guide Downloaded from www.Manualslib.com manuals search engine...
  • Seite 5 This is a normal phenomenon with rechargeable batteries. Remove the rechargeable battery from the device, reinsert it, and repeat the charging procedure. Keysight U1251B and U1252B Quick Start Guide Downloaded from www.Manualslib.com manuals search engine...
  • Seite 6: Functions And Features

    Views the logged data Press for > 1 s, press scroll through the logged data. Clears the logged data Press for > 1 s, press for >1 s. Keysight U1251B and U1252B Quick Start Guide Downloaded from www.Manualslib.com manuals search engine...
  • Seite 7 < 0.3 A short circuit Resistance current Capacitance Temperature Current (μA and mA) µA.mA 440 mA/1000 V 30 kA/fast-acting fuse Current (A) 11 A/1000 V 30 kA/fast-acting fuse Keysight U1251B and U1252B Quick Start Guide Downloaded from www.Manualslib.com manuals search engine...
  • Seite 8 V. mV (red) and COM (black) respectively. 3 Probe the test points and read the display. 4 Press to display dual measurements. Parameter can be switched consecutively. Keysight U1251B and U1252B Quick Start Guide Downloaded from www.Manualslib.com manuals search engine...
  • Seite 9 Filter to verify the presence of hazardous DC voltages. Displayed DC voltages can be influenced by high frequency AC components and must be filtered to assure an accurate reading. Keysight U1251B and U1252B Quick Start Guide Downloaded from www.Manualslib.com manuals search engine...
  • Seite 10 µA.mA (red) and COM (black) or A (blue) and COM (black) respectively. 3 Probe the test points in series with the circuit and read the display. Keysight U1251B and U1252B Quick Start Guide Downloaded from www.Manualslib.com manuals search engine...
  • Seite 11 µA.mA (red) and COM (black). – If the current is > 440 mA, connect the red and black test leads to input terminals A (red) and COM (black). Keysight U1251B and U1252B Quick Start Guide Downloaded from www.Manualslib.com manuals search engine...
  • Seite 12 3 Probe the test points (by shunting the resistor) and read the display. 4 Press to scroll through audible continuity, conductance, and resistance tests as shown. Keysight U1251B and U1252B Quick Start Guide Downloaded from www.Manualslib.com manuals search engine...
  • Seite 13 3 Connect the red test lead to the positive terminal of the capacitor, and the black test lead to the negative terminal. 4 Read the display. Keysight U1251B and U1252B Quick Start Guide Downloaded from www.Manualslib.com manuals search engine...
  • Seite 14 2 Plug the thermocouple adapter (with the thermocouple probe connected to it) into input terminals (red) and COM (black). 3 Touch the measurement surface with the thermocouple probe. 4 Read the display. Keysight U1251B and U1252B Quick Start Guide Downloaded from www.Manualslib.com manuals search engine...
  • Seite 15 1. This accommodates for higher frequency range of up to 985 kHz. 3 Connect the red and black test leads to input terminals V (red) and COM (black) respectively. Keysight U1251B and U1252B Quick Start Guide Downloaded from www.Manualslib.com manuals search engine...
  • Seite 16 AC power line systems. – For input more than 30 Vpp, you are required to use frequency measurement mode available under the current or voltage measurement instead of frequency counter. Keysight U1251B and U1252B Quick Start Guide Downloaded from www.Manualslib.com manuals search engine...
  • Seite 17 256 steps and each step is 0.390625%. The display only indicates the best resolution with 0.001%. Pressing is the same as pressing NOTE Keysight U1251B and U1252B Quick Start Guide Downloaded from www.Manualslib.com manuals search engine...
  • Seite 18 THIS PAGE HAS BEEN INTENTIONALLY LEFT BLANK. Keysight U1251B and U1252B Quick Start Guide Downloaded from www.Manualslib.com manuals search engine...
  • Seite 19 Keysight U1251B et U1252B Multimètres numériques portables Kurzanleitung Downloaded from www.Manualslib.com manuals search engine...
  • Seite 20 IV, 600 V 600 V Pour de plus amples informations concernant la sécurité, consultez le Guide d’utilisation et de maintenance des Multimètres numériques portables Keysight U1251B et U1252B. Keysight U1251B et U1252B Kurzanleitung Downloaded from www.Manualslib.com manuals search engine...
  • Seite 21 ✔ Sondes de 4 mm ✔ Pinces crocodile ✔ Guide de mise en route imprimé de l’instrument ✔ Certificat d'étalonnage ✔ Pile alcaline 9 V (modèle U1251B uniquement) ✔ Batterie rechargeable 8,4 V (modèle U1252B uniquement) ✔ Cordon d’alimentation et adaptateur secteur (modèle U1252B uniquement)
  • Seite 22: Charge De La Batterie

    CC pour définir la sortie sur 24 V CC et la limite de surintensité sur une valeur supérieure à 0,5 A. Vérifiez la bonne polarité de la connexion. Keysight U1251B et U1252B Kurzanleitung Downloaded from www.Manualslib.com manuals search engine...
  • Seite 23 C'est un phénomène normal pour des piles rechargeables. Retirez la pile rechargeable de l'appareil et réinsérez-la, puis répétez la procédure de charge. Keysight U1251B et U1252B Kurzanleitung Downloaded from www.Manualslib.com manuals search engine...
  • Seite 24 Appuyez sur pendant plus d’une seconde, puis sur pour faire défiler les données enregistrées. Efface les données enregistrées Appuyez sur pendant plus d’une seconde, puis sur pendant plus d’une seconde. Keysight U1251B et U1252B Kurzanleitung Downloaded from www.Manualslib.com manuals search engine...
  • Seite 25 < 0,3 A Résistance Capacité Température Courant (μA et mA) Fusible 440 mA/1000 V μA.mA 30 kA à réaction rapide Courant (A) Fusible 11 A/1000 V 30 kA à réaction rapide Keysight U1251B et U1252B Kurzanleitung Downloaded from www.Manualslib.com manuals search engine...
  • Seite 26: Mesures De Tension

    (rouge) et COM (noire). 3 Sondez les points de test et lisez l'affichage. 4 Appuyez sur pour afficher les mesures. Il est possible de passer d'un paramètre à l'autre. Keysight U1251B et U1252B Kurzanleitung Downloaded from www.Manualslib.com manuals search engine...
  • Seite 27 éléments du menu jusqu'à ce que FiLtE s'affiche sur l'affichage secondaire. 3 Appuyez sur ou sur pour activer le filtre. 4 Appuyez sur pour enregistrer vos modifications. Keysight U1251B et U1252B Kurzanleitung Downloaded from www.Manualslib.com manuals search engine...
  • Seite 28 CC dangereuses. Des tensions CC affichées peuvent être influencées par des composants CA haute fréquence et doivent être filtrées pour garantir une lecture exacte. Keysight U1251B et U1252B Kurzanleitung Downloaded from www.Manualslib.com manuals search engine...
  • Seite 29: Mesures De Courant

    2 Reliez les cordons de test rouge et noir aux bornes d’entrée µA.mA (rouge) et COM (noire) ou A (bleue) et COM (noire). 3 Sondez les points de test en série avec le circuit et lisez l'affichage. Keysight U1251B et U1252B Kurzanleitung Downloaded from www.Manualslib.com manuals search engine...
  • Seite 30 µA.mA (rouge) et COM (noire). – Avec un courant > 440 mA, reliez les cordons de test rouge et noir aux bornes d'entrée A (rouge) et COM (noire). Keysight U1251B et U1252B Kurzanleitung Downloaded from www.Manualslib.com manuals search engine...
  • Seite 31 3 Sondez les points de test (en dérivation de la résistance) et lisez l'affichage. 4 Appuyez sur pour faire défiler les tests de continuité avec signal sonore, de conductance et de résistance, comme indiqué. Keysight U1251B et U1252B Kurzanleitung Downloaded from www.Manualslib.com manuals search engine...
  • Seite 32 (rouge) et COM (noire). 3 Connectez le cordon de test rouge à la borne positive du condensateur et le cordon noir à la borne négative. 4 Lisez l'affichage. Keysight U1251B et U1252B Kurzanleitung Downloaded from www.Manualslib.com manuals search engine...
  • Seite 33 2 Branchez l’adaptateur de thermocouple (la sonde à thermocouple étant connectée) aux bornes d’entrée (rouge) et COM (noire). 3 Touchez la surface à mesurer avec la sonde à thermocouple. 4 Lisez l'affichage. Keysight U1251B et U1252B Kurzanleitung Downloaded from www.Manualslib.com manuals search engine...
  • Seite 34 « —1— » sur l’affichage secondaire signifie que la fréquence du signal en entrée est divisée par 1. Cela permet d’obtenir une gamme de fréquences supérieure pouvant atteindre 985 kHz. Keysight U1251B et U1252B Kurzanleitung Downloaded from www.Manualslib.com manuals search engine...
  • Seite 35 – Pour une entrée de plus de 30 Vpp, utilisez le mode de mesure de fréquence disponible sous la mesure de courant ou de tension au lieu du fréquencemètre. Keysight U1251B et U1252B Kurzanleitung Downloaded from www.Manualslib.com manuals search engine...
  • Seite 36 Celui-ci est réglable par 256 pas de 0,390625% chacun. L’affichage indique seulement la meilleure résolution avec 0,001%. Appuyer sur revient à appuyer sur REMARQUE Keysight U1251B et U1252B Kurzanleitung Downloaded from www.Manualslib.com manuals search engine...
  • Seite 37 Keysight U1251B und U1252B Digitale Handmultimeter Schnellstarthandbuch Downloaded from www.Manualslib.com manuals search engine...
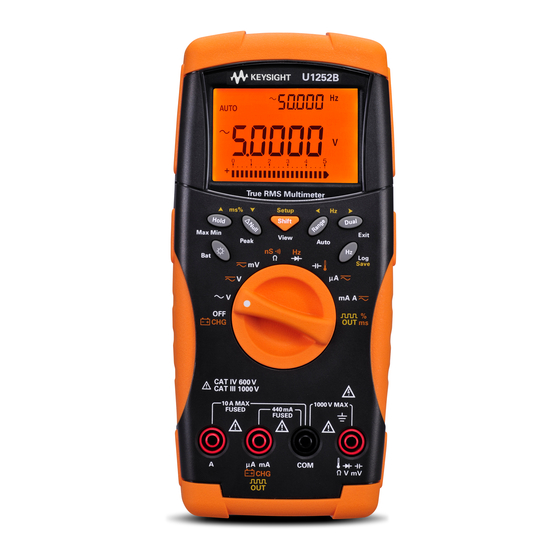
  • Seite 38 Kategorie III 1000 V 1000 V Überspannungsschutz CAT IV Kategorie IV 600 V 600 V Überspannungsschutz Weitere Sicherheitsinformationen finden Sie im Benutzer-und Servicehandbuch zu den Digitale Handmultimeter Keysight U1251B und U1252B. Keysight U1251B und U1252B Schnellstarthandbuch Downloaded from www.Manualslib.com manuals search engine...
  • Seite 39 ✔ Silizium-Testleitungen ✔ 4-mm-Sonden ✔ Abgreifklemmen ✔ Gedrucktes Schnellstarthandbuch ✔ Zertifikat für die Kalibrierung ✔ Alkalibatterie mit 9 V (nur für U1251B) ✔ Wiederaufladbarer Akku mit 8,4 V (nur für U1252B) ✔ Stromkabel und Wechselstromadapter (nur für U1252B) Wenn etwas fehlt oder beschädigt sein sollte, wenden Sie sich an das nächste Keysight Sales...
  • Seite 40: Laden Des Akkus

    COM. Der DC-Adapter kann durch ein DC-Netzteil ersetzt werden, um den 24-V-DC-Ausgang und die Überstrombegrenzung auf einen Wert über 0,5 A einzustellen. Achten Sie auf richtige Polarität der Verbindung. Keysight U1251B und U1252B Schnellstarthandbuch Downloaded from www.Manualslib.com manuals search engine...
  • Seite 41 Akku vollständig geladen ist. Dies ist bei Akkus völlig normal. Nehmen Sie den Akku aus dem Gerät, legen Sie ihn erneut ein und wiederholen Sie den Ladevorgang. Keysight U1251B und U1252B Schnellstarthandbuch Downloaded from www.Manualslib.com manuals search engine...
  • Seite 42: Merkmale Und Funktionen

    Taste > 1 Sek. gedrückt. Drücken Sie , um durch die protokollierten Daten zu navigieren. Löscht die protokollierten Daten Drücken Sie für > 1 Sek. auf drücken Sie für > 1 Sek. Keysight U1251B und U1252B Schnellstarthandbuch Downloaded from www.Manualslib.com manuals search engine...
  • Seite 43 1000 V R.M.S Diode 1000 V R.M.S < 0,3 A Kurzschlussstrom Widerstand Kapazität Temperatur Stromstärke (μA und mA) µA.mA 440 mA/1000 V 30 kA/flink Stromstärke (A) 11 A/1000 V 30 kA/flink Keysight U1251B und U1252B Schnellstarthandbuch Downloaded from www.Manualslib.com manuals search engine...
  • Seite 44: Durchführen Von Spannungsmessungen

    Eingabeanschlüssen V. mV (rot) und COM (schwarz). 3 Testen Sie die Testpunkte und lesen Sie die Anzeige. 4 Drücken Sie auf , um Doppelmessungen anzuzeigen. Die Parameter können wechselweise angezeigt werden. Keysight U1251B und U1252B Schnellstarthandbuch Downloaded from www.Manualslib.com manuals search engine...
  • Seite 45 , um durch die Menüoptionen zu scrollen, bis FiLtE in der Sekundäranzeige angezeigt wird. 3 Drücken Sie auf oder , um den Filter zu aktivieren. 4 Drücken Sie zum Speichern der Änderungen Keysight U1251B und U1252B Schnellstarthandbuch Downloaded from www.Manualslib.com manuals search engine...
  • Seite 46 Verletzungen zu vermeiden, aktivieren Sie den Filter, um das Vorhandensein gefährlicher Gleichspannungen zu überprüfen. Angezeigte Gleichspannungen können durch hochfrequente Wechselstromkomponenten beeinflusst werden und müssen gefiltert werden, um eine präzise Ablesung sicherzustellen. Keysight U1251B und U1252B Schnellstarthandbuch Downloaded from www.Manualslib.com manuals search engine...
  • Seite 47: Durchführen Einer Stromstärkenmessung

    Messleitungen entsprechend mit den Eingabeanschlüssen µA.mA (rot) und COM (schwarz) bzw. A (blau) und COM (schwarz). 3 Messen Sie die Testpunkte hintereinander innerhalb des Schaltkreises und lesen Sie die Anzeige. Keysight U1251B und U1252B Schnellstarthandbuch Downloaded from www.Manualslib.com manuals search engine...
  • Seite 48 Eingangsanschlüssen µA.mA (rot) und COM (schwarz). – Wenn die Stromstärke > 440 mA ist, verbinden Sie die roten und schwarzen Testleitungen mit den Eingangsanschlüssen A (rot) und COM (schwarz). Keysight U1251B und U1252B Schnellstarthandbuch Downloaded from www.Manualslib.com manuals search engine...
  • Seite 49: Durchführen Von Messwiderstands-, Leitfähigkeits-Und Durchgangsmessungen

    3 Testen Sie die Testpunkte (durch Parallelschalten des Widerstands), und lesen Sie die Anzeige. 4 Drücken Sie , um wie dargestellt durch akustischen Durchgangstest, Leitfähigkeit und Widerstandstest zu wechseln. Keysight U1251B und U1252B Schnellstarthandbuch Downloaded from www.Manualslib.com manuals search engine...
  • Seite 50: Durchführen Von Kapazitäts-Und Temperaturmessungen

    (rot) und COM (schwarz). 3 Verbinden Sie die rote Testleitung mit dem positiven Eingangsanschluss des Kondensators und die schwarze Testleitung mit dem negativen Anschluss. 4 Lesen Sie die Anzeige. Keysight U1251B und U1252B Schnellstarthandbuch Downloaded from www.Manualslib.com manuals search engine...
  • Seite 51 2 Schließen Sie den Thermoelementadapter (mit der angeschlossenen Thermoelementsonde) an die Eingangsanschlüsse (rot) und COM (schwarz) an. 3 Berühren Sie die Messoberfläche mit der Thermoelementsonde. 4 Lesen Sie die Anzeige. Keysight U1251B und U1252B Schnellstarthandbuch Downloaded from www.Manualslib.com manuals search engine...
  • Seite 52: Frequenz-Und Frequenzzählermessungen

    , um die Frequenzzählerfunktion (Hz) auszuwählen. „—1—“ auf der Sekundäranzeige bedeutet, dass die Eingabesignalfrequenz durch 1 dividiert wird. Dies ist für einen höheren Frequenzbereich von bis zu 985 kHz geeignet. Keysight U1251B und U1252B Schnellstarthandbuch Downloaded from www.Manualslib.com manuals search engine...
  • Seite 53 WARNUNG Niedrigspannungsanwendungen. Verwenden Sie den Frequenzzähler nie für Netzleitungssysteme. – Bei einem Eingangswert höher als 30 Vpp müssen Sie den Frequenzmessungsmodus für Stromstärke- oder Spannungsmessungen statt den Frequenzzähler verwenden. Keysight U1251B und U1252B Schnellstarthandbuch Downloaded from www.Manualslib.com manuals search engine...
  • Seite 54: Rechteckwellenausgabe (Nur Für U1252B)

    256 Schritte eingerichtet werden, und jeder Schritt beträgt 0,390625%. Die Anzeige gibt nur die beste Auflösung mit 0,001% an. Drücken von ist identisch mit Drücken auf HINWEIS Keysight U1251B und U1252B Schnellstarthandbuch Downloaded from www.Manualslib.com manuals search engine...
  • Seite 55 Keysight U1251B e U1252B Multimetri digitali palmari Guida rapida Downloaded from www.Manualslib.com manuals search engine...
  • Seite 56 Categoria IV 600 V per la 600 V protezione da sovratensioni Per maggiori informazioni sulla sicurezza, consultare la Guida all'uso e alla manutenzione dei Multimetri digitali palmari Keysight U1251B e U1252B. Keysight U1251B e U1252B Guida rapida Downloaded from www.Manualslib.com manuals search engine...
  • Seite 57 ✔ Cavo di alimentazione e adattatore CA (solo per il modello U1252B) In caso di componenti mancanti o danneggiati, contattare il reparto vendite Keysight più vicino. Il multimetro è in grado di registrare i dati da NOTA remoto. Per utilizzare questa funzione, è necessario...
  • Seite 58: Caricamento Della Batteria

    24 V CC e un limite per la sovracorrente su un valore superiore a 0,5 A. Accertarsi che la polarità del collegamento sia esatta. Keysight U1251B e U1252B Guida rapida Downloaded from www.Manualslib.com manuals search engine...
  • Seite 59 Ciò è normale con le batterie ricaricabili. Rimuovere la batteria ricaricabile dal dispositivo, reinserirla e ripetere la procedura di caricamento. Keysight U1251B e U1252B Guida rapida Downloaded from www.Manualslib.com manuals search engine...
  • Seite 60 Visualizza i dati registrati Premere per > 1 secondo, premere per scorrere i dati registrati. Elimina i dati registrati Premere per > 1 s, premere per > 1 secondo. Keysight U1251B e U1252B Guida rapida Downloaded from www.Manualslib.com manuals search engine...
  • Seite 61 Corrente (μA e mA) µA.mA Fusibile a intervento rapido da 440 mA/ 1000 V 30 kA Corrente (A) Fusibile a intervento rapido da 11 A/1000 V 30 kA Keysight U1251B e U1252B Guida rapida Downloaded from www.Manualslib.com manuals search engine...
  • Seite 62 V. mV (rosso) e COM (nero). 3 Misurare i punti di test e leggere il display. 4 Premere per visualizzare le doppie misurazioni. Il parametro può essere commutato consecutivamente. Keysight U1251B e U1252B Guida rapida Downloaded from www.Manualslib.com manuals search engine...
  • Seite 63 CC pericolose. Le tensioni CC visualizzate possono essere influenzate da componenti CA ad elevata frequenza. Pertanto, per ottenere una lettura corretta, è necessario utilizzare il filtro. Keysight U1251B e U1252B Guida rapida Downloaded from www.Manualslib.com manuals search engine...
  • Seite 64 µA.mA (rosso) e COM (nero) o A (blu) e COM (nero). 3 Misurare i punti di test in serie con il circuito, quindi leggere il display. Keysight U1251B e U1252B Guida rapida Downloaded from www.Manualslib.com manuals search engine...
  • Seite 65 µA.mA (rosso) e COM (nero). – Se la corrente è > 440 mA, collegare i puntali di misura rosso e nero ai terminali di ingresso A (rosso) e COM (nero). Keysight U1251B e U1252B Guida rapida Downloaded from www.Manualslib.com manuals search engine...
  • Seite 66 3 Misurare i punti di test (mettendo in parallelo il resistore), quindi leggere il display. 4 Premere per scorrere i test relativi alla continuità con segnalazione acustica, alla conduttanza e alla resistenza come illustrato. Keysight U1251B e U1252B Guida rapida Downloaded from www.Manualslib.com manuals search engine...
  • Seite 67 (rosso) e COM (nero). 3 Collegare il puntale di misura rosso al terminale positivo del condensatore e il puntale di misura nero al terminale negativo. 4 Leggere il display. Keysight U1251B e U1252B Guida rapida Downloaded from www.Manualslib.com manuals search engine...
  • Seite 68 (rosso) e COM (nero). 3 Toccare la superficie di misurazione con la sonda della termocoppia. 4 Leggere il display. Keysight U1251B e U1252B Guida rapida Downloaded from www.Manualslib.com manuals search engine...
  • Seite 69 (Hz). “—1—” sul display secondario indica che la frequenza del segnale di ingresso viene divisa per 1. Ciò consente di accettare un intervallo di frequenza più alto, fino a 985 kHz. Keysight U1251B e U1252B Guida rapida Downloaded from www.Manualslib.com manuals search engine...
  • Seite 70 Per ingressi superiori a 30 Vpp, è necessario utilizzare la modalità di misurazione della frequenza disponibile con la misurazione della corrente e della tensione, al posto del contatore di frequenze. Keysight U1251B e U1252B Guida rapida Downloaded from www.Manualslib.com manuals search engine...
  • Seite 71 256 passaggi, ognuno dei quali è pari a 0,390625%. Sul display viene indicata soltanto la risoluzione migliore con 0,001%. Premere ha la stessa funzione di NOTA Keysight U1251B e U1252B Guida rapida Downloaded from www.Manualslib.com manuals search engine...
  • Seite 72 QUESTA PAGINA È STATA LASCIATA VOLUTAMENTE BIANCA. Keysight U1251B e U1252B Guida rapida Downloaded from www.Manualslib.com manuals search engine...
  • Seite 73 Keysight U1251B y U1252B Multímetro digital portátil Guía de inicio rápido Downloaded from www.Manualslib.com manuals search engine...
  • Seite 74 600 V CAT IV Para obtener más información sobre seguridad, consulte la Guía del usuario y servicios de los Multímetro digital portátil Keysight U1251B y U1252B. Keysight U1251B y U1252B Guía de inicio rápido Downloaded from www.Manualslib.com manuals search engine...
  • Seite 75 ✔ Pinzas de conexión ✔ Guía de inicio rápido Impresa ✔ Certificado de calibración ✔ Batería alcalina de 9 V (sólo para U1251B) ✔ Batería recargable de 8.4 V (sólo para U1252B) ✔ Cable de alimentación y adaptador de CA (sólo para U1252B)
  • Seite 76 CC para fijar una salida de CC de 24 V y el límite de sobrecarga en 0.5 A. Asegúrese de que la polaridad de la conexión sea correcta. Keysight U1251B y U1252B Guía de inicio rápido Downloaded from www.Manualslib.com manuals search engine...
  • Seite 77 Se trata de un fenómeno normal con baterías recargables. Quite la batería recargable del dispositivo, vuelva a insertarla y repita el procedimiento de carga. Keysight U1251B y U1252B Guía de inicio rápido Downloaded from www.Manualslib.com manuals search engine...
  • Seite 78: Funciones Y Características

    Presione para > 1 s, presione para desplazarse por los datos registrados. Borra los datos registrados Presione por > 1 seg, presione por > 1 seg. Keysight U1251B y U1252B Guía de inicio rápido Downloaded from www.Manualslib.com manuals search engine...
  • Seite 79 Corriente (μA y mA) µA.mA Fusible de acción rápida de 440 mA/1000 V 30 kA Corriente (A) Fusible de acción rápida de 11 A/1000 V 30 kA Keysight U1251B y U1252B Guía de inicio rápido Downloaded from www.Manualslib.com manuals search engine...
  • Seite 80 V. mV (rojo) y COM (negro) respectivamente. 3 Controle los puntos de prueba y lea la pantalla. 4 Presione para mostrar mediciones duales. El parámetro puede cambiarse consecutivamente. Keysight U1251B y U1252B Guía de inicio rápido Downloaded from www.Manualslib.com manuals search engine...
  • Seite 81 4 Presione para guardar los cambios. 5 Mantenga presionado hasta que el multímetro se reinicie y vuelve al modo normal de funcionamiento. Keysight U1251B y U1252B Guía de inicio rápido Downloaded from www.Manualslib.com manuals search engine...
  • Seite 82 Las tensiones de CC que se indiquen pueden estar afectadas por componentes de CA de alta frecuencia y deben filtrarse para que la medición sea correcta. Keysight U1251B y U1252B Guía de inicio rápido Downloaded from www.Manualslib.com manuals search engine...
  • Seite 83 µA.mA (rojo) y COM (negro) ó A (azul) y COM (negro) respectivamente. 3 Controle los puntos de prueba en serie con el circuito y lea en la pantalla. Keysight U1251B y U1252B Guía de inicio rápido Downloaded from www.Manualslib.com manuals search engine...
  • Seite 84 – Si la corriente es > 440 mA, conecte los cables de prueba rojo y negro a las terminales de entrada A (rojo) y COM (negro). Keysight U1251B y U1252B Guía de inicio rápido Downloaded from www.Manualslib.com manuals search engine...
  • Seite 85 3 Controle los puntos de prueba (derivando el resistor) y lea la pantalla. 4 Presione para desplazarse por las pruebas de resistencia, conductancia y continuidad audible, tal como se muestra. Keysight U1251B y U1252B Guía de inicio rápido Downloaded from www.Manualslib.com manuals search engine...
  • Seite 86 3 Coloque el cable de prueba rojo en la terminal positiva del condensador y el cable de prueba negro en la terminal negativa. 4 Lea el indicador. Keysight U1251B y U1252B Guía de inicio rápido Downloaded from www.Manualslib.com manuals search engine...
  • Seite 87 él) en las terminales de entrada (rojo) y COM (negro). 3 Toque la superficie de medición con la sonda de termopar. 4 Lea el indicador. Keysight U1251B y U1252B Guía de inicio rápido Downloaded from www.Manualslib.com manuals search engine...
  • Seite 88 “—1—” en el indicador secundario, la frecuencia de la señal de entrada se divide por 1. Esto permite un rango de frecuencia mayor de hasta 985 kHz. Keysight U1251B y U1252B Guía de inicio rápido Downloaded from www.Manualslib.com manuals search engine...
  • Seite 89 Para entradas superiores a 30 Vpp, se requiere usar el modo de medición de frecuencia disponible en la medición de corriente o tensión en vez de utilizar el contador de frecuencia. Keysight U1251B y U1252B Guía de inicio rápido Downloaded from www.Manualslib.com manuals search engine...
  • Seite 90 Pueden establecerse 256 pasos y cada uno es 0.390625%. El indicador sólo señala la mejor resolución con 0.001%. Presionar es igual que presionar NOTA Keysight U1251B y U1252B Guía de inicio rápido Downloaded from www.Manualslib.com manuals search engine...
  • Seite 91 Keysight U1251B 與 U1252B 手提式數位 電表 快速入門 指南 Downloaded from www.Manualslib.com manuals search engine...
  • Seite 92 遵守操作程序、作法或相關說明, CAT IV 類別 IV 600 V 過壓保護 可能會導致產品毀損或重要資料遺 600 V 失。除非已經完全了解和滿足所指 定的條件,否則請不要在出現 「注 意」通知的狀態下繼續進行。 「警告」通知代表發生危險狀況。 它提醒您注意,如果沒有正確執行 或遵守操作程序、作法或相關說 明,可能會導致人員受傷或死亡。 除非已經完全了解或進行到所指 定的狀況,否則請不要在出現「警 告」通知的狀態下繼續進行。 如需進一步瞭解安全方面的詳細資訊,請參閱 《Keysight U1251B 與 U1252B 手提式數位電表使用者及維修指南》 。 Keysight U1251B 與 U1252B 快速入門指南 Downloaded from www.Manualslib.com manuals search engine...
  • Seite 93 您的萬用電錶包含以下項目: ✔ 矽膠測試引線 ✔ 4 mm 探針 ✔ 鱷魚夾 ✔ 印刷版快速入門指南 ✔ 校正證明 ✔ 9 V 鹼性電池 ( 僅 U1251B) ✔ 可充電 8.4 V 電池 ( 僅 U1252B) ✔ 電源線與 AC 配接器 ( 僅 U1252B) 如果有任何項目缺少或毀損,請聯絡您當地的 Keysight 營業處。 您的萬用電錶具備遠端記錄資料的能力。若要使用此 項功能,您需要有一條 IR-USB 纜線 (U1173A,需另...
  • Seite 94 和 COM 終端中 。 您可使用 DC 電源供應器取代 DC 配接器,以便將 24 V DC 輸出與過電流限制的值設定為 0.5 A 以上。請 確保連接的極性正確。 4 主要顯示畫面會指出次要顯示畫面上閃爍的 「bAt」和 「SbY」 ,並會發出短促嗶聲,提醒 您是否要為電池充電。按下 開始將電池 充電,否則電錶會在施加 24 V 電壓之後,自 動進行自我測試。若剩餘電量超過 90%,建議 您不要為電池充電。 Keysight U1251B 與 U1252B 快速入門指南 Downloaded from www.Manualslib.com manuals search engine...
  • Seite 95 只能使用 7.2 V 或 8.4 V NiMH 可重複充電電池 – (9 V 大小 ) 執行電池充電。 執行電池充電時,請中斷來自所有終端的測試 – 引線。 確定依照正確的極性將電池正確地插入萬用電 – 錶中。 初次使用 ( 或經過長時間存放 ) 的充電電池可能 – 需要三到四次的充/放電週期才會達到最高容量 。 若要進行放電,只需使用充電電池的電力操作萬 用電,直到萬用電表關閉或出現電量不足的警告 為止。 在對新的充電電池充電時,萬用電表可能會在十 – 分鐘後指示充電已完成。這是充電電池的正常現 象。將充電電池從裝置取出,重新裝入充電電池, 再複執行充電程序。 Keysight U1251B 與 U1252B 快速入門指南 Downloaded from www.Manualslib.com manuals search engine...
  • Seite 96 1 秒以上。 補償量測值 按下 。 變更量測範圍 按下 。 開啟自動選取範圍 按住 1 秒以上。 開啟雙顯示幕 按下 。 啟動手動資料記錄 按住 1 秒以上。 檢視記錄資料 按住 1 秒以上,然後按下 ,捲動資料記錄。 清除記錄資料 按住 1 秒以上,然後按住 1 秒以上。 Keysight U1251B 與 U1252B 快速入門指南 Downloaded from www.Manualslib.com manuals search engine...
  • Seite 97 < 0.3 A 短路電流 電阻 電容 溫度 電流 (μA 和 mA) µA.mA 440 mA / 1000 V 30 kA / 快熔保險絲 電流 (A) 11 A / 1000 V 30 kA / 快熔保險絲 Keysight U1251B 與 U1252B 快速入門指南 Downloaded from www.Manualslib.com manuals search engine...
  • Seite 98 執行電壓量測 量測 AC 電壓 1 請將旋扭開關設定為 。針對 和 模式,請按下 以確認 已出 現在顯示幕中。 2 將紅色和黑色測試引線分別連接到輸入終端 V. mV ( 紅色 ) 和 COM ( 黑色 )。 3 探測測試點並讀取顯示值。 4 按下 以顯示雙量測。參數可連續切換。 Keysight U1251B 與 U1252B 快速入門指南 Downloaded from www.Manualslib.com manuals search engine...
  • Seite 99 直到聽到嗶聲。聽到嗶聲後,即可放開 。 2 按下 或 捲動瀏覽功能表項目,直到第二 個顯示器中顯示 FiLtE。 3 按下 或 可啟用濾波器。 4 按下 可儲存所做的變更。 5 按住 直到電錶重新啟動並恢復正常作 業模式。 為了避免可能造成觸電或人身傷害,請啟用濾波器, 來確認是否有危險 DC 電壓存在。顯示的 DC 電壓可 能會受高頻率 AC 分量的影響,所以必須進行過,以 確保讀值準確。 Keysight U1251B 與 U1252B 快速入門指南 Downloaded from www.Manualslib.com manuals search engine...
  • Seite 100 1 請將旋扭開關設定為 或 。按下 以確定 出現在顯示幕。 2 將紅色與黑色測試引線分別連接到輸入終端 µA.mA ( 紅色 ) 與 COM ( 黑色 ) 或 A ( 藍色 ) 與 COM ( 黑色 )。 3 探測與電路串聯的測試點,並讀取顯示值。 Keysight U1251B 與 U1252B 快速入門指南 Downloaded from www.Manualslib.com manuals search engine...
  • Seite 101 如果電流為 ≤ 440 mA,請將紅色和黑色測試引 – 線分別連接到輸入終端 µA.mA ( 紅色 ) 和 COM ( 黑色 )。 如果電流大於 440 mA,請將紅色和黑色測試引 – 線分別連接輸入終端 A ( 紅色 ) 和 COM ( 黑色 )。 Keysight U1251B 與 U1252B 快速入門指南 Downloaded from www.Manualslib.com manuals search engine...
  • Seite 102 執行電阻、電導和導通量測 蜂鳴聲的 導通 1 請將旋扭開關設定為 。 2 將紅色和黑色測試引線分別連接到輸入終端 Ω ( 紅色 ) 和 COM ( 黑色 )。 3 探測測試點 ( 藉由分流電阻器 ) 並讀取顯示值 。 4 按下 捲動蜂鳴聲的導通、電導與電阻測 試,如下所示。 Keysight U1251B 與 U1252B 快速入門指南 Downloaded from www.Manualslib.com manuals search engine...
  • Seite 103 ( 紅色 ) 和 COM ( 黑色 )。 3 將紅色測試引線與電容器正極連接,將黑色測 試引線與電容器負極連接。 4 讀取顯示值。 溫度 1 請將旋扭開關設定為 。按下 以選取 溫度量測。 2 將已連接熱耦合探針之熱耦合配接器插入輸 入終端 ( 紅色 ) 和 COM ( 黑色 )。 3 使用熱耦合探針觸碰量測表面。 4 讀取顯示值。 Keysight U1251B 與 U1252B 快速入門指南 Downloaded from www.Manualslib.com manuals search engine...
  • Seite 104 1 請將旋扭開關設定為 。 2 按下 選取頻率計數器 (Hz) 功能。次要顯 示器上的「—1—」 表示以 1 除的輸入信號頻率 。 這適合較高的頻率範圍,最大值為 985 kHz。 3 將紅色和黑色測試引線分別連接到輸入終端 V ( 紅色 ) 和 COM ( 黑色 )。 4 探測測試點並讀取顯示值。 Keysight U1251B 與 U1252B 快速入門指南 Downloaded from www.Manualslib.com manuals search engine...
  • Seite 105 100 除的輸入信號頻率。這適合較高的頻率範 圍,最大值為 20 MHz。 6 如果在 步驟 5 之後讀值仍不穩定 , 表示訊號不 在範圍內。 將頻率計數器用於低電壓應用產品 。 請勿在 AC 電力 – 系統上使用頻率計數器。 如果輸入超過 30 Vpp,必須使用在電流或電壓量測 – 下 ( 非頻率計數器下 ) 可用的頻率量測模式。 Keysight U1251B 與 U1252B 快速入門指南 Downloaded from www.Manualslib.com manuals search engine...
  • Seite 106 顯示器設定是 600 Hz,主要顯示器則是 50% 週期。 2 按下 或 捲動可用頻率 ( 有 28 個頻率可供 選擇 )。 3 按下 在主顯示器上選取週期 (ms)。 4 按下 或 以調整週期。可將週期設定為 256 個步驟,而每個步驟是 0.390625%。顯示 器只會指示 0.001% 的最佳解析度。 按下 與按下 相同。 Keysight U1251B 與 U1252B 快速入門指南 Downloaded from www.Manualslib.com manuals search engine...
  • Seite 107 Keysight U1251B 和 U1252B 手持式数字 万用表 快速入门 指南 Downloaded from www.Manualslib.com manuals search engine...
  • Seite 108 在 执 行 操 作 步 骤 时 必 须 加 以 注 意,如果不正确地执行操作或不 遵守操作步骤,则可能导致人身 伤亡。在没有完全理解指定的条 件且不满足这些条件的情况下, 请勿继续执行 “ 警告 ” 标志所指示 的任何操作。 有关进一步的安全详细信息,请参阅 Keysight U1251B U1252B 和 手持式数字万用表用户及维修指南 。 Keysight U1251B 和 U1252B 快速入门指南 Downloaded from www.Manualslib.com manuals search engine...
  • Seite 109 您的万用表附随有以下物件: ✔ 硅树脂测试引线 ✔ 4 mm 探头 ✔ 鳄鱼夹 ✔ 印刷版快速入门指南 ✔ 校准证书 ✔ 9 V 碱性电池 (仅适用于 U1251B) ✔ 8.4 V 充电电池 (仅适用于 U1252B) ✔ 电源线和交流电适配器 (仅适用于 U1252B) 如果缺少任何物品或存在已损坏的物品,请联系 离您最近的 Keysight 销售处。 万用表能够进行远程数据记录。要使用此功能,您需 要一根 IR-USB 电缆 (U1173A,单独购买) ,以及 Keysight GUI Data Logger 软件 (可从...
  • Seite 110 和 COM 端子。 为了将 24 V 分别插入 DC 输出和过电流限值设置为大于 0.5 A, 可以 用 DC 电源取代 DC 适配器。请确保正负极连 接正确。 4 主显示屏指示 “bAt” 和 “SbY” 在副显示屏上闪 烁,并发出短音以提醒用户是否要对电池进行 充电。按 可开始对电池充电,否则万用 表将在接通 24 V 电源之后自动开始自检。如 果电池电量超过 90%, 建议不要对电池充电。 Keysight U1251B 和 U1252B 快速入门指南 Downloaded from www.Manualslib.com manuals search engine...
  • Seite 111 只能对 7.2 V 或 8.4 V 镍氢充电电池充电,电池 型号为 9 V。 – 在对电池充电时,断开所有端子的测试引线的 连接。 – 请确保在万用表中正确地插入电池,并确保极性 正确。 – 首次 (或在长时间储存之后)使用时,需要对可 充电电池进行三到四个小时的充电 / 放电循环, 才能使电池获得最大电量。 要进行放电,只要在 由可电电池供电的情况下运行万用表,直到万用 表关闭或出现电池电量低警告。 – 万用表可能会在对新的可充电电池充电十分钟后 指示充电已完成。这对于可充电电池而言是正常 现象。从设备上卸下可充电电池,将其重新插 入,然重复充电过程。 Keysight U1251B 和 U1252B 快速入门指南 Downloaded from www.Manualslib.com manuals search engine...
  • Seite 112 ,持续时间大于 1 秒。 按住 打开双显示屏 按 。 启动手动数据记录 ,持续时间大于 1 秒。 按住 查看记录的数据 (持续时间大于 1 秒) , 按住 按 滚动记录的数据。 清除记录的数据 (持续时间大于 1 秒) , 按住 (持续时间大于 1 秒) 。 按住 Keysight U1251B 和 U1252B 快速入门指南 Downloaded from www.Manualslib.com manuals search engine...
  • Seite 113 1000 V R.M.S 二极管 < 0.3 A 短路电流 电阻 电容 温度 µA.mA 440 mA/1000 V 电流 (μA 和 mA) 30 kA/ 快熔型保险丝 11 A/1000 V 电流 (A) 30 kA/ 快熔型保险丝 Keysight U1251B 和 U1252B 快速入门指南 Downloaded from www.Manualslib.com manuals search engine...
  • Seite 114 执行电压测量 测量交流电压 1 将旋转开关设置为 。对于 和 模式,请按 以确保 已在显示屏中 显示。 2 将红色和黑色测试引线分别与输入端子 V. mV (红色)和 COM (黑色)连接。 3 探测测试点并读取显示值。 4 按 以显示双测量。 可以连续切换参数。 Keysight U1251B 和 U1252B 快速入门指南 Downloaded from www.Manualslib.com manuals search engine...
  • Seite 115 开 。 2 按住 或 在菜单项中滚动,直至第二个显 示屏中显示 FiLtE。 3 按 或 启用滤波器。 4 按 可保存所做的更改。 5 按住 直至仪表重新启动并返回其正常操 作模式。 为了避免发生电击或造成人身伤害,请启用滤波器 以验证是否存在危险 DC 电压。显示的 DC 电压会受 高频率 AC 组件影响,必须进行滤波才能确保获得确 的读数。 Keysight U1251B 和 U1252B 快速入门指南 Downloaded from www.Manualslib.com manuals search engine...
  • Seite 116 。按 以确保 在显示屏中显示。 2 将 红 色 和 黑 色 测 试 引 线 分 别 与 输 入 端 子 µA.mA(红色)和 COM(黑色)或 A(蓝色) 和 COM (黑色)连接。 3 探测与电路串联的测试点,并读取显示值。 Keysight U1251B 和 U1252B 快速入门指南 Downloaded from www.Manualslib.com manuals search engine...
  • Seite 117 2 将 红 色 和 黑 色 测 试 引 线 分 别 与 输 入 端 子 µA.mA(红色)和 COM(黑色)或 A(蓝色) 和 COM (黑色)连接。 3 探测与电路串联的测试点,并读取显示值。 – 如果电流 ≤ 440 mA,请将红色和黑色测试引线 分别与输入端子 µA.mA(红色)和 COM(黑色) 连接。 – 如果电流 > 440 mA,请将红色和黑色测试引线分 别与输入端子 A (红色)和 COM (黑色)连接。 Keysight U1251B 和 U1252B 快速入门指南 Downloaded from www.Manualslib.com manuals search engine...
  • Seite 118 执行电阻、电导和通断测量 通断 1 将旋转开关设置为 。 2 将红色和黑色测试引线分别与输入端子 Ω(红 色)和 COM (黑色)连接。 3 探测测试点 (通过并联电阻器) ,并读取显 示值。 4 按 可在通断测试、电导测试和电阻测试 之间滚动,如图所示。 Keysight U1251B 和 U1252B 快速入门指南 Downloaded from www.Manualslib.com manuals search engine...
  • Seite 119 2 将 红 色 和 黑 色 测 试 引 线 分 别 与 输 入 端 子 (红色)和 COM (黑色)连接。 3 将红色测试引线与电容器正端子连接,将黑色 测试引线与电容器负端子连接。 4 读取显示值。 温度 1 将旋转开关设置为 。按 选择温度 测量。 2 将热电偶适配器(连接有热电偶探头)插入到 输入端子 (红色)和 COM (黑色) 。 3 使用热电偶探头接触测量表面。 4 读取显示值。 Keysight U1251B 和 U1252B 快速入门指南 Downloaded from www.Manualslib.com manuals search engine...
  • Seite 120 在交流 / 直流电压或交流 / 直流电流测量期间, 您 可以在任何时间按 来测量信号频率。 频率计数器测量 1 将旋转开关设置到 。 2 按 可选择频率计数器 (Hz) 功能。副显 示屏上的 “—1—” 表示输入信号频率除以 1。 这 适合于更高的频率范围,最大值为 985 kHz。 3 将红色和黑色测试引线分别与输入端子 V(红 色)和 COM (黑色)连接。 4 探测测试点并读取显示值。 Keysight U1251B 和 U1252B 快速入门指南 Downloaded from www.Manualslib.com manuals search engine...
  • Seite 121 5 如果读数不稳定或为零,按 可选择输入 信号频率除以 100。这适合于更高的频率范 围,最大值为 20 MHz。 如果在步骤 5 后读数仍然不稳定, 则表明信号 超出范围。 – 使用频率计数器处理低电压应用。请永远不要在交 流电力线系统上使用频率计数器。 – 对于超过 30 Vpp 的输入, 需要使用电流或电压测量 下的频率测量模式,而不是频率计数器。 Keysight U1251B 和 U1252B 快速入门指南 Downloaded from www.Manualslib.com manuals search engine...
  • Seite 122 空比。 2 按 滚动到可用的频率 (有 28 种频率 或 可供选择) 。 3 按 可在主显示屏上选择占空比 (ms)。 4 按 调整占空比。 可为 256 个步骤设置 或 占空比,并且每个步骤为 0.390625%。显示屏 仅指示 0.001% 的最佳分辨率。 按 与按 的效果一样。 Keysight U1251B 和 U1252B 快速入门指南 Downloaded from www.Manualslib.com manuals search engine...
  • Seite 123 Keysight U1251B/ U1252B ハンドヘル ド・デジタル・マル チメータ クイック・ スタート・ ガイド Downloaded from www.Manualslib.com manuals search engine...
  • Seite 124 Category IV 600 V 過電圧 600 V 保護 注意の表示は、危険を表します。 ここに示す操作手順や規則などを 正しく実行または遵守しないと、 製品の損傷または重要なデータの 損失を招くおそれがあります。指 定された条件を完全に理解し、そ れが満たされていることを確認す るまで、注意の指示より先に進ま ないでください。 警告の表示は、危険を表しま す。ここに示す操作手順や規則 などを正しく実行または遵守し ないと、怪我または死亡のおそ れがあります。指定された条件 を完全に理解し、それが満たさ れていることを確認するまで、 警告の指示より先に進まないで ください。 詳細な安全情報については、 Keysight U1251B/U1252B ハンドヘルド・デジタル・マルチメータ ・ ユーザーズ・サービス・ガイド を参照してください。 Keysight U1251B/U1252B クイック・スタート・ガイド Downloaded from www.Manualslib.com manuals search engine...
  • Seite 125 マルチメータには、次のアイテムが付属してい ます。 ✔ シリコン・テスト・リード ✔ 4 mm プローブ ✔ ワニ口クリップ ✔ 印刷版クイック・スタート・ガイド ✔ 校正証明書 ✔ 9 V アルカリ電池(U1251B のみ) ✔ 充電式 8.4 V 電池(U1252B のみ) ✔ 電源ケーブルおよび AC アダプタ(U1252B のみ) 欠けている付属品または損傷している付属品が ある場合には、最寄りの Keysight 営業所にお問 い合わせください。 マルチメータにはリモート・データ・ロギング機 能があります。この機能を使用するには、IR-USB ケーブル(U1173A、別売)と Keysight GUI Data Logger ソフトウェア(www.keysight.co.jp/find/...
  • Seite 126 24 V DC アダプタを使用してください。 1 メータからテスト・リードを取り外します。 2 ロータリ・スイッチを 位置まで回し ます。 電源ケーブルを DC アダプタに接続 します。 3 DC アダプタの赤(+)のバナナ端子を 端子に、黒(-)の端子を COM 端子 に接続します。DC アダプタの代わりに DC 電源を使用して、24 Vdc 出力を設定し、過 電流制限値を 0.5 A より大きい値に設定する ことができます。接続の極性が正しいこと を確認してください。 Keysight U1251B/U1252B クイック・スタート・ガイド Downloaded from www.Manualslib.com manuals search engine...
  • Seite 127 充電できる電池は、7.2 V または 8.4 V のニッ ケル水素充電式電池(9 V サイズ)だけです。 – 電池を充電する際は、すべての端子からテス ト・リードを取り外してください。 – 電池をマルチメータに正しく挿入し、+と-の 極性が正しいことを確認してください。 – 初回ご利用時(または長期保管後)には、充電 式電池を最大容量まで充電するのに、3 ~ 4 時 間の充電/放電サイクルを要する場合がありま す。放するには、シャット・ダウンするか、電 池消耗警告が表示されるまで、充電式電池の電 力でマルチメータを動作させます。 – マルチメータによって、新しい充電式電池の充 電が完了するまでに 10 分程度かかる場合があ ります。これは、充電式電池では通常の現象で す。充式電池をデバイスから取り外し再挿入し て、充電手順を繰り返します。 Keysight U1251B/U1252B クイック・スタート・ガイド Downloaded from www.Manualslib.com manuals search engine...
  • Seite 128 を 1 秒以上押します。 測定値のオフセット を押します。 測定レンジの変更 を押します。 オートレンジをオン を 1 秒以上押します。 デュアル・ディスプレイをオン を押します。 手動データ・ロギングの開始 を 1 秒以上押します。 ログ・データの表示 を 1 秒以上押し、 ま たはを押してログ・データをス クロールします。 ログ・データのクリア を 1 秒以上押し、 を 1 秒以上押します。 Keysight U1251B/U1252B クイック・スタート・ガイド Downloaded from www.Manualslib.com manuals search engine...
  • Seite 129 1000 Vrms 電圧 1000 Vrms ダイオード < 0.3 A ショート回路 抵抗 キャパシタンス 温度 電流(µA および mA) µA.mA 440 mA/1000 V 30 kA 高速作動 ヒューズ 11 A/1000 V 電流(A) 30 kA 高速作動 ヒューズ Keysight U1251B/U1252B クイック・スタート・ガイド Downloaded from www.Manualslib.com manuals search engine...
  • Seite 130 電圧測定の実行 AC 電圧の測定 1 ロータリ・スイッチを に設定します。 および モードの場合、 を押 してディスプレイに が表示されること を確認します。 2 赤のテスト・リードと黒のテスト・リード をそれぞれ入力端子 V. mV(赤)と COM (黒)に接続します。 3 テスト・ポイントをプロービングし、表示 を読み取ります。 を押して、デュアル測定を表示しま す。パラメータは、連続的に切り替えられ ます。 Keysight U1251B/U1252B クイック・スタート・ガイド Downloaded from www.Manualslib.com manuals search engine...
  • Seite 131 3 テスト・ポイントをプロービングし、表示 を読み取ります。 を押して、デュアル測定を表示しま す。パラメータは、連続的に切り替えられ ます。 フィルタの使用 1 Setup モードに入るには、メータをオフにし て、回転ノブを回して、ビープ音が聞こえ を押しながら OFF 以外の位置に るまで します。ビープ音が聞こえたら を放し ます。 または を押して、セカンダリ・ディス プレイに FiLtE が表示されるまでメニュー項 目をスクロールします。 または を押して、フィルタをオンにし ます。 を押して、変更を保存します。 5 メータがリスタートしてノーマル動作モー ドになるまで、 を押し続けます。 Keysight U1251B/U1252B クイック・スタート・ガイド Downloaded from www.Manualslib.com manuals search engine...
  • Seite 132 感電事故や怪我を防ぐために、人体に危険な DC 電圧の存在を確認するためのフィルタをオンにし ます。表示される DC 電圧は、高周波 AC 成分の影 響をける可能性があるため、正確な読み値を得る には、フィルタする必要があります。 Keysight U1251B/U1252B クイック・スタート・ガイド Downloaded from www.Manualslib.com manuals search engine...
  • Seite 133 電流測定の実行 現在の測定を実行するには、下の図に示すよう にマルチメータをセットアップします。アナロ グ/デジタル混載信号の DC 電流を DC 測定 モードで測定する場合は、フィルタがオンに なっていることを確認します。 AC 電流の測定 1 ロータリ・スイッチを または に設定します。 を押して、ディスプレ イに が表示されることを確認します。 2 赤のテスト・リードと黒のテスト・リード をそれぞれ入力端子 µA.mA(赤)と COM (黒)または A(青)と COM(黒)に接続し ます。 3 回路と直列にテスト・ポイントをプロービ ングし、表示を読み取ります。 Keysight U1251B/U1252B クイック・スタート・ガイド Downloaded from www.Manualslib.com manuals search engine...
  • Seite 134 ることを確認します。 2 赤のテスト・リードと黒のテスト・リード をそれぞれ入力端子 µA.mA(赤)と COM (黒)または A(青)と COM(黒)に接続し ます。 3 回路と直列にテスト・ポイントをプロービ ングし、表示を読み取ります。 – 電流が 440 mA 以下の場合、赤と黒のテスト・ リードを入力端子 µA.mA(赤)と COM(黒) に接続します。 – 電流が 440 mA を超える場合、赤と黒のテス ト・リードを入力端子 A(赤)と COM(黒) に接続します。 Keysight U1251B/U1252B クイック・スタート・ガイド Downloaded from www.Manualslib.com manuals search engine...
  • Seite 135 抵抗、コンダクタンス、導通測定の実行 可聴導通 1 ロータリ・スイッチを に設定します。 2 赤のテスト・リードと黒のテスト・リードを それぞれ入力端子 Ω(赤)と COM(黒)に 接続します。 3 テスト・ポイントを(抵抗の両端で)プ ロービングし、表示を読み取ります。 を押して、可聴導通、コンダクタン ス、抵抗テストをスクロールします。 Keysight U1251B/U1252B クイック・スタート・ガイド Downloaded from www.Manualslib.com manuals search engine...
  • Seite 136 キャパシタンスおよび温度測定の実行 キャパシタンス 1 ロータリ・スイッチを に設定します。 2 赤のテスト・リードと黒のテスト・リード をそれぞれ入力端子 (赤)と COM(黒) に接続します。 3 赤のテスト・リードをキャパシタの正の端 子、黒のテスト・リードを負の端子に接続 します。 4 表示を読み取ります。 Keysight U1251B/U1252B クイック・スタート・ガイド Downloaded from www.Manualslib.com manuals search engine...
  • Seite 137 温度 1 ロータリ・スイッチを に設定します。 を押して、温度測定を選択します。 2 熱電対アダプタ(熱電対プローブを接続) を入力端子 (赤)と COM(黒)に差し込み ます。 3 熱電対プローブを測定表面に触れます。 4 表示を読み取ります。 Keysight U1251B/U1252B クイック・スタート・ガイド Downloaded from www.Manualslib.com manuals search engine...
  • Seite 138 周波数および周波数カウンタ測定の実行 周波数測定 AC/DC 電圧または AC/DC 電流測定の途中で を押すことにより、いつでも信号の周波 数を測定できます。 周波数カウンタ測定 1 ロータリ・スイッチを に設定します。 を押して、周波数カウンタ(Hz)機能 を選択します。セカンダリ・ディスプレイ に表示される “—1—” は、入力信号周波数が 1 で分周されることを表します。これによ り、最大 985 kHz の高い周波数レンジが得 られます。 Keysight U1251B/U1252B クイック・スタート・ガイド Downloaded from www.Manualslib.com manuals search engine...
  • Seite 139 4 テスト・ポイントをプロービングし、表示 を読み取ります。 5 読み値が安定しないか 0 の場合は、 を 押して、入力信号周波数を 100 で分周しま す。これにより、最大 20 MHz の高い周波数 レンジが得られます。 ステップ 5 の後でも読み値が不安定な場合 は、信号はレンジ外です。 – 周波数カウンタは、低電圧アプリケーションに使 用します。AC 電源ライン・システムに対しては、 絶対に周波数カウンタを使用しないでください。 – 入力が 30 Vpp を超える場合、周波数カウンタの 代わりに、電流または電圧測定の下にある周波数 測定モードを使用する必要があります。 Keysight U1251B/U1252B クイック・スタート・ガイド Downloaded from www.Manualslib.com manuals search engine...
  • Seite 140 方形波出力(U1252B のみ) 1 ロータリ・スイッチを まで回します。 デフォルト表示設定は、セカンダリ・ディ スプレイでは 600 Hz、プライマリ・ディス プレイでは 50%デューティ・サイクルです。 または を押して、使用可能な周波数を スクロールします(28 の周波数から選択で きます) 。 を押して、プライマリ・ディスプレイで デューティ・サイクル(ms)を選択します。 または を押して、デューティ・サイク ルを調整します。デューティ・サイクルは 256 段階で設定でき、各ステップは 0.390625%になります。表示分解能が最高 になるのは、0.001%の場合のみです。 を押すのは、 を押すのと同じです。 Keysight U1251B/U1252B クイック・スタート・ガイド Downloaded from www.Manualslib.com manuals search engine...
  • Seite 141 Keysight U1251B 및 U1252B 휴대용 디지털 멀티미터 빠른 시작 설명서 Downloaded from www.Manualslib.com manuals search engine...
  • Seite 142 기 전에는 경고 고지 이후 내용으 로 넘어가지 마십시오 . 안전 정보에 대한 자세한 내용은 Keysight U1251B U1252B 및 휴대용 디지털 멀티미터 사용자 및 서비 를 참조하십시오 . 스 설명서 Keysight U1251B 및 U1252B 빠른 시작 설명서 Downloaded from www.Manualslib.com manuals search engine...
  • Seite 143 ✔ 악어입 클립 ✔ 빠른 시작 설명서 책자 ✔ 교정 증명서 ✔ 9V 알카라인 배터리 (U1251B 만 해당 ) ✔ 충전용 8.4V 배터리 (U1252B 만 해당 ) ✔ 전원 코드 및 AC 어댑터 (U1252B 만 해당 ) 빠지거나 손상된 품목이 있으면 가까운 Keysight 영업...
  • Seite 144 니다 . 24V DC 출력 및 과전류 제한을 0.5A 이 상으로 설정하기 위해 DC 어댑터를 DC 전원 공급장치로 교체할 수 있습니다 . 극성을 올바 로 연결했는지 확인하십시오 . Keysight U1251B 및 U1252B 빠른 시작 설명서 Downloaded from www.Manualslib.com manuals search engine...
  • Seite 145 정도 후에 충전 완료 표시가 나타나게 됩니다 . 이는 충전용 배터리에서 나타나는 일반적인 현 상입니다 . 장치에서 충전용 배터리를 분리하고 다시 넣은 다음 충전 절차를 반복합니다 . Keysight U1251B 및 U1252B 빠른 시작 설명서 Downloaded from www.Manualslib.com manuals search engine...
  • Seite 146 를 1 초 이상 누르고 를 눌러 기록된 데이터를 살 펴봅니다 . 기록된 데이터를 지웁니다 . 를 1 초 이상 누르고 를 1 초 이상 누릅니다 . Keysight U1251B 및 U1252B 빠른 시작 설명서 Downloaded from www.Manualslib.com manuals search engine...
  • Seite 147 1000V R.M.S 다이오드 < 0.3A 단락 전류 저항 캐패시턴스 온도 µA.mA 440mA/1000V 전류 (µA 및 mA) 30kA/ 고속 액팅 퓨즈 11A/1000V 전류 (A) 30kA/ 고속 액팅 퓨즈 Keysight U1251B 및 U1252B 빠른 시작 설명서 Downloaded from www.Manualslib.com manuals search engine...
  • Seite 148 및 COM ( 검정 ) 입력 단자에 각각 연결합니다 . 3 테스트 포인트를 프로빙하고 디스플레이를 읽습니다 . 를 눌러 이중 측정을 표시합니다 . 파라미 터는 연속적으로 전환될 수 있습니다 . Keysight U1251B 및 U1252B 빠른 시작 설명서 Downloaded from www.Manualslib.com manuals search engine...
  • Seite 149 감전이나 부상을 방지하려면 필터를 활성화하여 위 험 DC 전압이 없는지 확인하십시오 . 표시된 DC 전 압은 고주파 AC 구성 요소에 영향을 받을 수 있으 , 정확한 판독값이 나오도록 필터링되어야 합니다 . Keysight U1251B 및 U1252B 빠른 시작 설명서 Downloaded from www.Manualslib.com manuals search engine...
  • Seite 150 2 빨간색 및 검은색 테스트 리드를 µA.mA( 빨강 ) 및 COM( 검정 ) 또는 A( 파랑 ) 및 COM( 검정 ) 입력 단자에 각각 연결합니다 . 3 테스트 포인트를 회로와 직렬로 프로빙하고 디스플레이를 읽습니다 . Keysight U1251B 및 U1252B 빠른 시작 설명서 Downloaded from www.Manualslib.com manuals search engine...
  • Seite 151 자에 각각 연결합니다 . – 전류가 > 440mA 일 경우 빨간색 및 검은색 테스 트 리드를 A( 빨강 ) 및 COM( 검정 ) 입력 단자에 각각 연결합니다 . Keysight U1251B 및 U1252B 빠른 시작 설명서 Downloaded from www.Manualslib.com manuals search engine...
  • Seite 152 COM ( 검정 ) 입력 단자에 각각 연결합니다 . 3 ( 저항기를 분로시켜 ) 테스트 포인트를 프로 빙하고 디스플레이를 읽습니다 . 를 눌러 가청 연속성 , 컨덕턴스 및 저항 테스트 사이를 이동하십시오 . Keysight U1251B 및 U1252B 빠른 시작 설명서 Downloaded from www.Manualslib.com manuals search engine...
  • Seite 153 COM ( 검정 ) 입력 단자에 각각 연결합니다 . 3 캐패시터의 양 단자에 빨간색 테스트 리드를 , 음 단자에 검은색 테스트 리드를 연결합니다 . 4 디스플레이를 읽습니다 . Keysight U1251B 및 U1252B 빠른 시작 설명서 Downloaded from www.Manualslib.com manuals search engine...
  • Seite 154 2 ( 열전쌍 프로브가 연결된 ) 열전쌍 어댑터를 ( 빨강 ) 및 COM ( 검정 ) 입력 단자에 연결합 니다 . 3 열전쌍 프로브를 측정 표면에 접촉시킵니다 . 4 디스플레이를 읽습니다 . Keysight U1251B 및 U1252B 빠른 시작 설명서 Downloaded from www.Manualslib.com manuals search engine...
  • Seite 155 이것은 최대 985kHz 의 높은 주파수 범위에 적용됩니다 . 3 빨간색 및 검은색 테스트 리드를 V( 빨강 ) 및 COM( 검정 ) 입력 단자에 각각 연결합니다 . Keysight U1251B 및 U1252B 빠른 시작 설명서 Downloaded from www.Manualslib.com manuals search engine...
  • Seite 156 십시오 . AC 전원 라인 시스템에는 주파수 카운터를 사용하지 마십시오 . – 30Vpp 이상 입력에서 , 주파수 카운터 대신 전류 또 는 전압 측정에서 이용할 수 있는 주파수 측정 모드 를 사용해야 합니다 . Keysight U1251B 및 U1252B 빠른 시작 설명서 Downloaded from www.Manualslib.com manuals search engine...
  • Seite 157 듀티 사이클을 256 단계에 대해 설정할 수 있 으며 각 단계는 0.390625% 입니다 . 디스플레 이는 최대 분해능의 0.001% 만을 표시합니다 . 와 같은 기능을 합니다 . 은 Keysight U1251B 및 U1252B 빠른 시작 설명서 Downloaded from www.Manualslib.com manuals search engine...
  • Seite 158 이 페이지는 비어 있습니다 . Keysight U1251B 및 U1252B 빠른 시작 설명서 Downloaded from www.Manualslib.com manuals search engine...
  • Seite 159 Keysight U1251B e U1252B Multímetro digital portátil Guia de início rápido Downloaded from www.Manualslib.com manuals search engine...
  • Seite 160 600 V Categoria IV Para mais detalhes de informações de segurança, consulte Guia de serviço e do usuário do Multímetro digital portátil Keysight U1251B e U1252B. Keysight U1251B e U1252B Guia de início rápido Downloaded from www.Manualslib.com manuals search engine...
  • Seite 161 ✔ Pontas de prova de 4 mm ✔ Clipes jacaré ✔ Guia de início rápido impresso ✔ Certificado de calibração ✔ Bateria alcalina de 9 V (no U1251B apenas) ✔ Bateria recarregável de 8,4 V (apenas no U1252B) ✔ Cabo de alimentação e adaptador de CA...
  • Seite 162: Carregar A Bateria

    CC, para definir a saída CC de 24 V e a limitação de sobrecorrente para um valor maior que 0,5 A. Verifique se a polaridade da conexão está correta. Keysight U1251B e U1252B Guia de início rápido Downloaded from www.Manualslib.com manuals search engine...
  • Seite 163 Essa é uma situação normal de baterias recarregáveis. Retire a bateria recarregável do dispositivo, reinsira-a e repita o procedimento de carga. Keysight U1251B e U1252B Guia de início rápido Downloaded from www.Manualslib.com manuals search engine...
  • Seite 164 Exibe os dados gravados Pressionar por > 1 segundo, pressionar para percorrer os dados registrados. Apaga os dados gravados Pressionar por > 1 s, pressionar por > 1 s. Keysight U1251B e U1252B Guia de início rápido Downloaded from www.Manualslib.com manuals search engine...
  • Seite 165 Corrente (μA e mA) µA.mA Fusível de 440 mA/ 1.000 V 30 kA de ação rápida Corrente (A) Fusível de 11 A/1.000 V 30 kA de ação rápida Keysight U1251B e U1252B Guia de início rápido Downloaded from www.Manualslib.com manuals search engine...
  • Seite 166 3 Aplique as pontas de prova nos pontos de medida e leia o mostrador. 4 Pressione para exibir as medidas duplas. Os parâmetros podem ser alternados consecutivamente. Keysight U1251B e U1252B Guia de início rápido Downloaded from www.Manualslib.com manuals search engine...
  • Seite 167 Filtro. 4 Pressione para salvar suas alterações. 5 Mantenha pressionado até que o medidor reinicialize e retorne ao seu modo de operação normal. Keysight U1251B e U1252B Guia de início rápido Downloaded from www.Manualslib.com manuals search engine...
  • Seite 168 Filtro. As tensões CC exibidas podem ser influenciadas por componentes de CA de alta frequência e devem ser filtradas, garantindo uma leitura precisa. Keysight U1251B e U1252B Guia de início rápido Downloaded from www.Manualslib.com manuals search engine...
  • Seite 169 µA.mA (vermelho) e COM (preto) ou A (azul) e COM (preto), respectivamente. 3 Conecte as pontas de prova em série com o circuito e leia o mostrador. Keysight U1251B e U1252B Guia de início rápido Downloaded from www.Manualslib.com manuals search engine...
  • Seite 170 µA.mA (vermelho) e COM (preto). – Se a corrente for > 440 mA, conecte as pontas de prova vermelha e preta aos terminais de entrada A (vermelho) e COM (preto). Keysight U1251B e U1252B Guia de início rápido Downloaded from www.Manualslib.com manuals search engine...
  • Seite 171 3 Conecte as pontas de prova (aplicando-as no resistor) e leia o mostrador. 4 Pressione para selecionar entre os testes de continuidade audível, condutância e resistência, conforme indicado. Keysight U1251B e U1252B Guia de início rápido Downloaded from www.Manualslib.com manuals search engine...
  • Seite 172 (vermelho) e COM (preto), respectivamente. 3 Conecte a ponta de prova vermelha ao terminal positivo do capacitor e a preta ao terminal negativo. 4 Leia o mostrador. Keysight U1251B e U1252B Guia de início rápido Downloaded from www.Manualslib.com manuals search engine...
  • Seite 173 (vermelho) e COM (preto). 3 Toque a superície de medição com a ponta de prova do termopar. 4 Leia o mostrador. Keysight U1251B e U1252B Guia de início rápido Downloaded from www.Manualslib.com manuals search engine...
  • Seite 174 é dividida por 1. Isso permite medir um intervalo mais alto de frequências até 985 kHz. Keysight U1251B e U1252B Guia de início rápido Downloaded from www.Manualslib.com manuals search engine...
  • Seite 175 Para entrada de mais de 30 Vpp, é preciso usar o modo de medição de frequência disponível na medição de sobrecorrente ou sobretensão em vez de contador de frequência. Keysight U1251B e U1252B Guia de início rápido Downloaded from www.Manualslib.com manuals search engine...
  • Seite 176 O ciclo de serviço pode ser configurado para 256 passos (cada passo é 0,390625%). A exibição indica apenas a melhor resolução com 0,001%. Pressionar é o mesmo que pressionar NOTA Keysight U1251B e U1252B Guia de início rápido Downloaded from www.Manualslib.com manuals search engine...
  • Seite 177 This information is subject to change without notice. Always refer to the Keysight website for the latest revision. © Keysight Technologies 2009-2017 Edition 7, June 1, 2017 Printed in Malaysia *U1251-90070* U1251-90070 www.keysight.com Downloaded from www.Manualslib.com manuals search engine...

Diese Anleitung auch für:

U1252b

Inhaltsverzeichnis