Herunterladen Inhalt Inhalt Diese Seite drucken
Invacare Birdie EVO Gebrauchsanweisung

Invacare Birdie EVO Gebrauchsanweisung

Mobiler patientenlifter
Vorschau ausblenden Andere Handbücher für Birdie EVO:
Inhaltsverzeichnis

Werbung

Verfügbare Sprachen
  • DE

Verfügbare Sprachen

  • DEUTSCH, seite 35
This manual MUST be given to the user of the product.
BEFORE using this product, this manual MUST be read and saved
for future reference.
Invacare® Birdie® EVO
Birdie® EVO, Birdie® EVO COMPACT, Birdie® EVO PLUS,
Birdie® EVO XPLUS
en Mobile Patient Lift
User Manual . . . . . . . . . . . . . . . . . . . . . . . . . . . . . . . . . . . 3
de Mobiler Patientenlifter
Gebrauchsanweisung . . . . . . . . . . . . . . . . . . . . . . . . . . . 35
es
Grúa de elevación
Manual del usuario. . . . . . . . . . . . . . . . . . . . . . . . . . . . . 71
fr
Lève-personne mobile
Manuel d'utilisation . . . . . . . . . . . . . . . . . . . . . . . . . . . .103
it
Sollevatore mobile
Manuale d'uso . . . . . . . . . . . . . . . . . . . . . . . . . . . . . . . . .137
nl
Mobiele patiëntenlift
Gebruiksaanwijzing . . . . . . . . . . . . . . . . . . . . . . . . . . . . .169
pt
Elevador de transferência móvel
Manual de utilização . . . . . . . . . . . . . . . . . . . . . . . . . . .203

Werbung

Inhaltsverzeichnis
loading

Inhaltszusammenfassung für Invacare Birdie EVO

  • Seite 1 Invacare® Birdie® EVO Birdie® EVO, Birdie® EVO COMPACT, Birdie® EVO PLUS, Birdie® EVO XPLUS en Mobile Patient Lift User Manual ........3 de Mobiler Patientenlifter Gebrauchsanweisung .
  • Seite 2 Tutti i diritti riservati. È proibita la riproduzione, la duplicazione o la modifica parziale o completa, salvo previa autorizzazione scritta da parte di Invacare. I marchi sono contrassegnati da ™ e ®. Tutti i marchi sono di proprietà o licenza di Invacare Corporation o di sue affiliate, salvo indicazione contraria.
  • Seite 3: Inhaltsverzeichnis

    Contents 7 Transportation and Storage ......24 7.1 General information ......24 This manual MUST be given to the user of the product.
  • Seite 4: General

    Note that there may be sections in this document, which are not relevant to your product, since this document applies Invacare accepts no liability for damage arising from: to all available models (on the date of printing). If not otherwise stated, each section in this document refers to all •...
  • Seite 5: Safety

    If you are – See 11.4 Environmental conditions, page 31. unable to understand the warnings, cautions or instructions, contact a healthcare professional, Invacare provider or qualified technician before WARNING! attempting to use this product. Risk of injury or damage –...
  • Seite 6: Safety Information On Accessories

    (EMC), page 32. – Due to regional differences, refer to your local Invacare website or catalog for available accessories or contact your Invacare provider. WARNING! – See the manual delivered with the accessory Risk of malfunction for further information and instructions.
  • Seite 7: Identification Label

    Safety 2.4.2 Identification label Do not apply any side forces to the actuator (e.g. by using it as a push bar) as this might result in damage and malfunction. The identification label contains the main product information, including technical data. Symbols Do not remove this label and manipulate the underlying screw as this might impair the safety of the product.
  • Seite 8: Product Overview

    All position changes are possible without assistance of the Due to regional differences, refer to your local patient. Invacare website or catalog for details about available accessories or contact your Invacare provider. There are no known contraindications for this product.
  • Seite 9: Setup

    Risk of Injury and washing instructions. Improper assembly may cause injury or damage. – Use only Invacare parts in the assembly of this patient lift. 4.3 Installing the mast – After each assembly, check that all fittings...
  • Seite 10: Assembling The Mast To The Base

    Invacare® Birdie® EVO 1. Lock both rear castors B. Remove the locking pin A. 2. Raise the mast assembly C to an upright position by stepping with one foot on the leg D and pulling the push bar E upwards until the safety catch F snaps in place.
  • Seite 11: Installing The Actuator To The Boom

    Setup 1. Release the D-clip and remove the pin A from actuator 2. Remove the actuator B from the bracket on the mast and fit it to the boom mounting bracket C. Push and hold the boom C towards the mast D and fold down the spreader bar holder E.
  • Seite 12: Resetting The Service Indicator

    3. You will hear a sound when the service indicator has been reset. (CBJ Care control unit only) IMPORTANT! If the service light is flashing yellow during daily usage or after a reassembly, the lift requires service. – Contact your Invacare provider for service. 1650023-F...
  • Seite 13: Usage

    The hand control is used to open or close the legs of the assistants. base. – Invacare recommends that the rear castors be left unlocked during lifting procedures to 1. To close the legs, press allow the patient lift to stabilize itself when the...
  • Seite 14: Emergency Functions

    Invacare® Birdie® EVO Removing the spreader bar 5.6.3 Activating an emergency lowering (CBJ Care, CBJ1, CBJ2 control unit) If the hand control fails, the boom can be lowered by using 1. Push and hold the release button up. the circular switch for emergency release. Use a sharp 2.
  • Seite 15: Charging The Battery

    Usage Birdie® EVO and Birdie® EVO PLUS / XPLUS patient is still possible. It is recommended to charge the batteries as soon as the sound signal is heard. 1. Locate the red emergency grip A at the bottom of the actuator piston.
  • Seite 16: Optional Hand Control

    Invacare® Birdie® EVO CBJ Care Battery Battery Description Indicator State Battery Battery Description Type Indicator State Type Full The battery is OK — no need Charge for charging (100–50%). The Full The battery is OK — no need right LED is GREEN.
  • Seite 17 Usage 1. Place the battery B When the battery is placed on the charger, the charge on the control unit or LED will illuminate. When charging is complete, charge LED will switch off. charger as shown and make sure there is an A battery needing to be fully recharged will take audible click.
  • Seite 18: Patient Transfer

    – Use the push bars on the mast at all times to possible. push or pull the lift. – Avoid using the lift on an incline. Invacare recommends that the product only be used on 6.2 Preparing to lift a flat surface.
  • Seite 19: Attaching The Sling To The Lift

    3. Repeat the steps for each of the remaining straps of patient to fall or cause injury to assistants. the sling. – Use an Invacare approved sling that is recommended by the individual’s doctor, nurse or medical assistant for the comfort and safety of the individual being lifted.
  • Seite 20: Transferring A Patient To A Bed

    Invacare® Birdie® EVO Lower the patient so that his/her feet rest on the base of the lift, straddling the mast. Lift the patient high enough to clear the stationary The lower center of gravity provides stability object with their weight fully supported by the lift.
  • Seite 21: Transferring A Patient From A Wheelchair

    Raise the boom until there is tension on the straps of the The Invacare patient lift is NOT intended as a sling and make sure that the sling is properly attached transport device. If the bathroom facilities are NOT to the hooks of the spreader bar.
  • Seite 22: Lifting A Patient From The Floor

    Lower the patient onto the commode, leaving the sling attached to the spreader bar hooks. Invacare recommends that the sling remains connected to the spreader bar hooks during the patient’s use of either the commode chair or standard commode.
  • Seite 23 Patient Transfer Position the lift with one leg under the patient’s bent Attach the sling. See 6.2.1 Attaching the sling to the knees and the other leg under the patient’s head. Keep lift, page 19. the sling straps inside of the legs of the lift. 9.
  • Seite 24: Transportation And Storage

    6. Reverse the procedure described in 4.3.1 Unfolding the mast, page 9 and pull and hold the safety catch F upwards before folding down the mast. The folded lift can now be placed in an upright position. 7.4 Mast extension for upright positioning (Birdie EVO only) 1650023-F...
  • Seite 25: Maintenance

    – The product does not tolerate cleaning in – If the service light is flashing yellow the lift requires automatic washing systems, with high-pressure service. Do not use the lift and contact your Invacare cleaning equipment or steam. provider for service.
  • Seite 26: Disinfection Instructions

    Risk of injury or damage online.de/en/for-users. Service must be performed only by a qualified technician. – Contact your Invacare provider for service. In Domestic Care Service must be performed at least every 12 months unless Method: Follow the application notes for the used otherwise stated in local requirements.
  • Seite 27: After Use

    After Use Be environmentally responsible and recycle this product 9 After Use through your recycling facility at its end of life. Disassemble the product and its components, so the different 9.1 Disposal materials can be separated and recycled individually. The disposal and recycling of used products and packaging WARNING! must comply with the laws and regulations for waste Environmental Hazard...
  • Seite 28: Troubleshooting

    The control unit emits a beeping sound Max. load is exceeded Reduce the load (and the lift will during lifting, and the motor stops. function normally). Contact your Invacare provider if the above does not solve your problems. 1650023-F...
  • Seite 29: Technical Data

    Technical Data 11 Technical Data 11.1 Maximum safe working load Birdie® EVO Birdie® EVO Birdie® EVO Birdie® EVO COMPACT PLUS XPLUS Max. Safe Working Load (patient + spreader bar + sling) 180 kg 150 kg 180 kg 210 kg 11.2 Dimensions and Weights * Forward direction Dimensions [mm] Birdie®...
  • Seite 30: Electrical System

    Invacare® Birdie® EVO Dimensions [mm] Birdie® EVO Birdie® EVO Birdie® EVO COMPACT PLUS / XPLUS Total width (legs closed), external measure Min. internal width (i) Internal width at maximum reach (k) Turning diameter without lever 1400 1400 1210 1210 1430...
  • Seite 31: Environmental Conditions

    Technical Data Birdie® EVO Birdie® EVO Birdie® EVO COMPACT PLUS / XPLUS Applied part complying with the specified requirements for Type B Applied Part protection against electrical shock according to IEC60601-1. Sound level 45 – 50 dB(A) Working ability 40 full lifts (with battery between 100% – 50% of full capacity) Intermittent (periodic motor operation) 10%, max.
  • Seite 32: Electromagnetic Compatibility (Emc)

    Invacare® Birdie® EVO 12 Electromagnetic compatibility (EMC) 12.1 General EMC information Medical Electrical Equipment needs to be installed and used according to the EMC information in this manual. This product has been tested and found to comply with EMC limits specified by IEC/EN 60601-1-2 for Class B equipment.
  • Seite 33 Electromagnetic compatibility (EMC) Immunity test Electromagnetic environment – guidance Test / Compliance level < 0% U for 0,5 cycle at Voltage dips, short Mains power quality should be that of a typical commercial or hospital 45° steps interruptions and environment. If the user of this product requires continued operation during voltage variations 0% U for 1 cycles...
  • Seite 34 Notes...
  • Seite 35 Inhaltsverzeichnis 6.6 Transfer eines Patienten in einen Rollstuhl ... . 57 6.7 Transfer eines Patienten auf einen und von einem Toilettenstuhl ....... . 57 Diese Gebrauchsanweisung MUSS dem Benutzer des Produkts 6.8 Anheben eines Patienten vom Fußboden .
  • Seite 36: Allgemein

    Vergewissern Sie sich vor dem Lesen dieses Dokuments, dass Sie die aktuelle Fassung haben. Die jeweils aktuelle 1.3 Beschränkung der Haftung Fassung können Sie als PDF-Datei von der Invacare-Webseite herunterladen. Invacare übernimmt keine Haftung für Schäden aufgrund von: Wenn die gedruckte Ausführung des Dokuments für Sie •...
  • Seite 37: Produktspezifische Normen

    Allgemein 1.5.1 Produktspezifische Normen Weitere Informationen zu lokalen Normen und Vorschriften erhalten Sie bei Ihrem Invacare-Vertreter vor Ort. Die Dieses Produkt wurde getestet und entspricht der Norm entsprechenden Internetadressen finden Sie am Ende dieses ISO 10535 (Lifter zum Transport von behinderten Menschen) Dokuments.
  • Seite 38: Sicherheit

    Dusche. Der Patient muss zum Duschen auf Anweisungen unverständlich sind, wenden Sie einen Duschstuhl oder eine andere Vorrichtung sich an einen Arzt, einen Invacare-Anbieter umgesetzt werden. oder einen qualifizierten Techniker, bevor Sie – Wenn der Patientenlifter in einer Umgebung das Produkt verwenden.
  • Seite 39: Einklemmgefahr

    Sie: – Aufgrund regionaler Unterschiede ziehen – nur Originalkabel, -zubehör und -ersatzteile Sie die Invacare-Website für Ihr Land oder verwenden, um die elektromagnetischen den Invacare-Katalog zurate, um sich über Emissionen nicht zu erhöhen bzw. die erhältliches Zubehör zu informieren, oder...
  • Seite 40: Etiketten Und Symbole Auf Dem Produkt

    Invacare® Birdie® EVO WARNUNG! Seriennummer Gefahr von Fehlfunktionen Elektromagnetische Störungen können den Betrieb beeinträchtigen. – Verwenden Sie dieses Produkt nicht unmittelbar Referenznummer neben oder mit anderen elektrischen Geräten gestapelt. Sofern eine solche Verwendung erforderlich ist, müssen das Produkt und andere Hersteller Geräte sorgfältig beobachtet werden, um den...
  • Seite 41 Sicherheit Luftdruckbereich Manipulationen an der Schraube unter diesem Etikett Transport- und Lagerbedingungen können die Sicherheit des Produkts beeinträchtigen, weshalb derartige Manipulationen ebenso wie die Entfernung des Etiketts untersagt sind. Betriebsbedingungen Wird dieses Etikett entfernt oder beschädigt, erlischt die Garantie für dieses Produkts XXX hPa XXX kg Gesamtgewicht des Produkts bei...
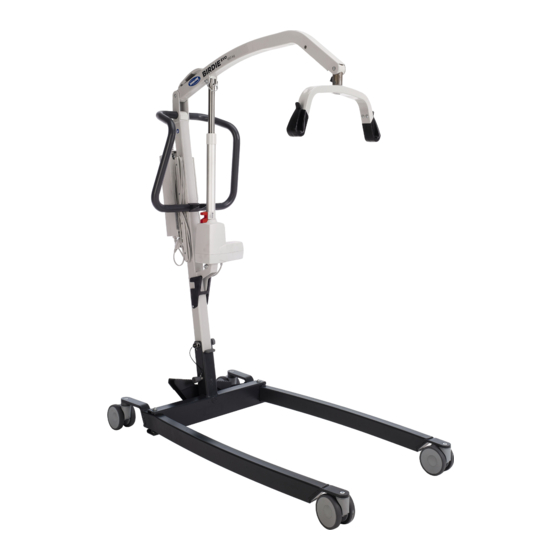
  • Seite 42: Produktübersicht

    Invacare® Birdie® EVO 3.2 Hauptkomponenten des Lifters 3 Produktübersicht 3.1 Verwendungszweck Der mobile Patientenlifter ist eine akkubetriebene Transfervorrichtung und dient dazu, eine Person von einer Sitz- oder Liegefläche auf eine andere zu transferieren und zu positionieren. Beispiel: • Transfer von Patienten zwischen Bett und Rollstuhl •...
  • Seite 43: Zubehörteile

    Wandladegerät für einen abnehmbaren Akku • Zusatzakku Aufgrund regionaler Unterschiede ziehen Sie • Schutzabdeckungen für Fußschienen die Invacare-Website für Ihr Land oder den • Polsterung für Spreizbügel Invacare-Katalog zurate, um Informationen über Patientengurtmodelle mit Schlaufenbefestigung, geeignet für erhältliches Zubehör zu erhalten, oder wenden Sie Spreizbügel (Kleiderbügel-Stil) mit Haken:...
  • Seite 44: Inbetriebnahme

    Wenn der Lifter mit einem Patientengurt geliefert – Für die Montage dieses Patientenlifters dürfen wird, finden Sie in der Gebrauchsanweisung für den Sie nur Originalteile von Invacare verwenden. Patientengurt Hinweise zur Verwendung, zum Einsatz, – Stellen Sie nach jeder Montage sicher, dass alle zur Instandhaltung sowie zur Reinigung.
  • Seite 45: Montage Des Masts Auf Der Basis

    Inbetriebnahme 1. Verriegeln Sie die beiden hinteren Rollen B. Entfernen Sie den Verriegelungsstift A. 2. Bringen Sie die Masteinheit C in eine aufrechte Position, indem Sie mit einem Fuß auf die Fußschiene D treten und die Schiebestange E nach oben ziehen, bis der Sicherungsverschluss F einrastet.
  • Seite 46: Montage Des Verstellmotors Am Ausleger

    Invacare® Birdie® EVO 1. Lösen Sie die D-Klemme und entfernen Sie den Stift A vom Verstellmotor B. 2. Entfernen Sie den Verstellmotor B aus der Halterung am Mast und montieren Sie ihn an der Montagehalterung des Auslegers C. Drücken und halten Sie den Ausleger C in Richtung des Masts D und klappen Sie den Halter E des Spreizbügels...
  • Seite 47: Zurücksetzen Der Serviceanzeige

    3. Schrauben Sie den Hebel D im Uhrzeigersinn auf dem gelb, muss der Lifter gewartet werden. Bolzen fest. – Wenden Sie sich bezüglich der Wartung an Ihren Invacare-Anbieter. WICHTIG Aufgrund der höherer Lasten ist bei der Nach der ersten Montage des Lifters blinkt die Serviceanzeige Ausführung Birdie®...
  • Seite 48: Verwenden

    Verletzungsgefahr oder Gefahr von Sachschäden Der Lifter könnte kippen und die Sicherheit des Patienten und der Helfer gefährden. 5.4.1 Schließen und Öffnen der elektrischen – Invacare empfiehlt, die hinteren Rollen während Fußschienen des Hebevorgangs nicht zu verriegeln, damit der Patientenlifter sich selbst stabilisieren kann, Das Handbedienteil dient zum Öffnen oder Schließen der...
  • Seite 49: Austauschen Des Spreizbügels

    Verwenden 5.5 Austauschen des Spreizbügels 1. Drücken Sie die rote Notaus-Taste A an der Steuerungseinheit, um den Ausleger anzuhalten und das (nur Spreizbügel mit SMARTLOCK™) Heben bzw. Absenken des Patienten zu unterbrechen. 2. Um die Notaus-Taste wieder zurückzusetzen, drehen Sie WARNUNG! die Taste im Uhrzeigersinn.
  • Seite 50: Auslösen Einer Mechanischen Notabsenkung

    Invacare® Birdie® EVO 1. Heben Sie den Ausleger an, indem Sie die Taste B vorn 1. In der unteren Bohrung des roten Notabsenkungshebels an der Steuerungseinheit drücken und halten. A befindet sich eine Schraube. 2. Unterbrechen Sie das Anheben des Auslegers durch 2.
  • Seite 51: Cbj Care-, Cbj1-, Cbj2-Steuerungseinheit

    Verwenden 1. Stecken Sie das Netzkabel C in eine Steckdose ein. Akkuanzeige Ladestand Beschreibung des Akkus Der Akku ist in ungefähr 4 Stunden aufgeladen. Das Ladegerät wird automatisch ausgeschaltet, Niedriger Der Akku muss aufgeladen wenn der Akku vollständig aufgeladen ist. Akkustand werden (unter 25 %).
  • Seite 52: Optionales Akkuladegerät

    Invacare® Birdie® EVO 1. Klappen Sie den Griff A auf der Rückseite des Akkus B Akkuanzeige Ladestand Beschreibung nach oben. des Akkus 2. Nehmen Sie den Akku nach oben aus der Niedriger Der Akku muss aufgeladen Steuerungseinheit oder dem Ladegerät heraus.
  • Seite 53: Patiententransfer

    Vorrichtung. Einklemmgefahr – Verwenden Sie den Lifter nicht auf abschüssigen Es besteht die Gefahr des Einklemmens Oberflächen. Invacare empfiehlt, das Produkt zwischen den Haken des Spreizbügels und dem nur auf ebenen Böden zu verwenden. Patientengurt. – Beim Transfer eines Patienten, der in einem –...
  • Seite 54: Anbringen Des Patientengurts Am Patientenlifter

    Patient herunterfällt oder Begleitpersonen verletzt Verwenden Sie stets auf beiden Seiten des Patientengurts werden. Schlaufen derselben Farbe, damit der Patient gleichmäßig – Verwenden Sie einen von Invacare zugelassenen, angehoben wird. vom Arzt, der Schwester oder der Begleitperson des Patienten empfohlenen Patientengurt, um den Komfort und die Sicherheit des zu hebenden Patienten zu gewährleisten.
  • Seite 55: Transfer Eines Patienten Von Einem Bett

    Patiententransfer 1. Führen Sie die gewünschte Schlaufe des Bands A über die Nase des Hakens B. 2. Ziehen Sie an dem Band A, bis die Schlaufe ganz unten am Haken B sitzt. 3. Wiederholen Sie die Schritte für die restlichen Bänder des Patientengurts.
  • Seite 56: Transfer Eines Patienten Auf Ein Bett

    Invacare® Birdie® EVO 4. Vergewissern Sie sich, dass der Patient von der Oberfläche, auf die Sie ihn umlagern, vollständig getragen wird. 5. Sperren Sie die hinteren Rollen. 6. Heben Sie das Bett auf eine günstige Arbeitshöhe an (normalerweise auf Hüfthöhe der Pflegepersonen).
  • Seite 57: Transfer Eines Patienten In Einen Rollstuhl

    Patiententransfer 6.7 Transfer eines Patienten auf einen und von einem Toilettenstuhl Der Patientenlifter von Invacare ist KEIN Transportfahrzeug. Wenn sich das Badezimmer NICHT in unmittelbarer Nähe des Betts befindet oder der Patientenlifter nicht leicht in Richtung Toilettenstuhl bewegt werden kann, MUSS der Patient in einem...
  • Seite 58: Anheben Eines Patienten Vom Fußboden

    Senken Sie den Patienten auf den Toilettenstuhl ab und belassen Sie dabei den Patientengurt an den Haken des Spreizbügels. Invacare empfiehlt, dass der Patientengurt an den Haken des Spreizbügels verbleibt, während der Positionieren Sie den Patientengurt A unter dem Patient auf dem Toilettensitz oder -stuhl sitzt.
  • Seite 59 Patiententransfer 9. Heben Sie den Ausleger an, um den Patienten vom Fußboden anzuheben. 10. Fahren Sie mit dem Transfer auf eine andere Sitzfläche oder ein stehendes Objekt fort. Befestigen Sie den Patientengurt. Siehe 6.2.1 Anbringen des Patientengurts am Patientenlifter, Seite 54. 1650023-F...
  • Seite 60: Transport Und Lagerung

    Invacare® Birdie® EVO 7.4 Mastverlängerung für aufrechte 7 Transport und Lagerung Positionierung (nur Birdie EVO) 7.1 Allgemeine Informationen Eine mitgelieferte magnetische Mastverlängerung ermöglicht Während des Transports oder bei längerer Nichtbenutzung eine aufrechte Positionierung, wenn der Patientenlifter mit des Patientenlifters sollte die Notaus-Taste gedrückt sein.
  • Seite 61: Instandhaltung

    Techniker durchgeführt werden müssen, – Sicherstellen, dass kein Wasser auf den sind im Servicehandbuch zu diesem Produkt beschrieben. Netzstecker oder die Steckdose gelangt. Servicehandbücher sind bei Invacare erhältlich. – Die Steckdose nicht mit nassen Händen berühren. 8.2 Tägliche Überprüfungen...
  • Seite 62: Reinigungsanleitung

    Invacare® Birdie® EVO 8.3.3 Reinigungsanleitung Im häuslichen Bereich Methode: Befolgen Sie die Anwendungshinweise des WICHTIG! verwendeten Desinfektionsmittels und desinfizieren Sie alle – Das Produkt darf nicht in automatischen zugänglichen Oberflächen durch Abwischen. Waschanlagen, mit einem Hochdruckreiniger oder mit Dampf gereinigt werden.
  • Seite 63: Nach Dem Gebrauch

    Nach dem Gebrauch Handeln Sie umweltbewusst, und lassen Sie dieses Produkt 9 Nach dem Gebrauch nach dem Ende seiner Lebensdauer über eine lokale Müllverwertungsanlage recyceln. 9.1 Entsorgung Demontieren Sie das Produkt und seine Bauteile, damit die verschiedenen Materialen einzeln getrennt und recycelt WARNUNG! werden können.
  • Seite 64: Problembehandlung

    Max. Last ist überschritten Last reduzieren (der Lifter funktioniert kurzes akustisches Signal während normal). des Anhebens aus und der Motor unterbricht den Betrieb. Wenden Sie sich an Ihren Invacare-Anbieter, falls das Problem nicht durch die oben aufgeführten Schritte behoben werden kann. 1650023-F...
  • Seite 65: Technische Daten

    Technische Daten 11 Technische Daten 11.1 Maximale Tragfähigkeit Birdie® EVO Birdie® EVO Birdie® EVO Birdie® EVO COMPACT PLUS XPLUS Max. Tragfähigkeit (Patient + Spreizbügel + Patientengurt) 180 kg 150 kg 180 kg 210 kg 11.2 Abmessungen und Gewichte * Vorwärtsrichtung Abmessungen [mm] Birdie®...
  • Seite 66: Elektrisches System

    Invacare® Birdie® EVO Abmessungen [mm] Birdie® EVO Birdie® EVO Birdie® EVO COMPACT PLUS / XPLUS Gesamtbreite (Fußschienen geöffnet) zwischen den 1100 1100 1100 Schwenkrollen 1040 1020 1020 Gesamtbreite (Fußschienen geöffnet), Innenmaß (j) Gesamtbreite (Fußschienen geschlossen), Außenmaß Min. Innenbreite (i) Innenbreite bei maximaler Reichweite (k)
  • Seite 67: Umgebungsbedingungen

    Technische Daten Birdie® EVO Birdie® EVO Birdie® EVO COMPACT PLUS/XPLUS 400 mA (CBJ1, CBJ2 400 mA (CBJ1 400 mA (CBJ2)/ Maximaler Eingangsstrom und CBJ Care) / und CBJ Care) / 280 mA (CBJ Home) 280 mA (CBJ Home) 280 mA (CBJ Home) Schutzart (gesamte Vorrichtung) IPX4* Schutzklasse...
  • Seite 68: Elektromagnetische Verträglichkeit (Emv)

    Invacare® Birdie® EVO 12 Elektromagnetische Verträglichkeit (EMV) 12.1 Allgemeine Informationen zu Elektromagnetischer Verträglichkeit (EMV) Medizinische elektrische Geräte müssen gemäß den EMV-Informationen in diesem Handbuch installiert und verwendet werden. Dieses Produkt wurde getestet und erfüllt die in IEC/EN 60601-1-2 für Ausrüstung der Klasse B angegebenen EMV-Grenzwerte.
  • Seite 69 Elektromagnetische Verträglichkeit (EMV) Störfestigkeitstest Elektromagnetische Umgebung – Anleitung Test-/ Konformitätswert ± 1 kV zwischen Stoßspannung Leitungen Die Netzstromqualität muss der einer typischen gewerblichen oder Krankenhausumgebung entsprechen. IEC 61000-4-5 ± 2 kV zwischen Leitung und Erdung Spannungsabfälle, < 0 % U für halben kurze Die Netzstromqualität muss der einer typischen gewerblichen oder...
  • Seite 70 Notes...
  • Seite 71 Contenido 6.8 Elevación de un paciente que está en el suelo ..92 7 Transporte y almacenamiento ......93 Este manual DEBE ser entregado al usuario final.
  • Seite 72: Generalidades

    1.3 Limitación de responsabilidad los modelos del producto. Invacare no se hace responsable de los daños surgidos por: Los modelos y las configuraciones disponibles en su país pueden encontrarse en los documentos de venta específicos •...
  • Seite 73: Seguridad

    – Si la grúa se utiliza en un entorno húmedo, profesional sanitario, el proveedor de Invacare o asegúrese de eliminar cualquier resto de un técnico cualificado antes de intentar utilizar humedad tras utilizarla.
  • Seite 74: Puntos De Pinzamiento

    Si no es posible fijación separarlos, debe observarlos detenidamente Invacare utiliza un sistema de fijación de uso para asegurarse de que funcionan normalmente. frecuente que emplea ganchos y cinchas de posición. Las cinchas de posición de las eslingas se conectan a los ganchos de las perchas (tipo perchero).
  • Seite 75: Etiquetas Y Símbolos En El Producto

    Seguridad 2.4 Etiquetas y símbolos en el producto Carga máx. de utilización segura 2.4.1 Ubicación de etiquetas Equipo de clase II Pieza aplicada de tipo B Conforme con RAEE Conformidad europea Producto sanitario Abreviaturas de los datos técnicos: • Iin: corriente de entrada •...
  • Seite 76 Invacare® Birdie® EVO Límite de temperatura Límite de humedad Límite de presión atmosférica Asegúrese siempre de que la eslinga esté correctamente fijada a los ganchos. Condiciones de transporte y Consulte 6.2.1 Acoplamiento de la eslinga a la grúa, almacenamiento página 88.
  • Seite 77: Descripción Del Producto

    Dadas las diferencias regionales existentes, consulte Todos los cambios de posición son posibles sin la ayuda del su catálogo o sitio web de Invacare local para paciente. informarse sobre los accesorios disponibles o póngase No existen contraindicaciones conocidas para este producto.
  • Seite 78: Instalación

    4.3.1 Desplegado del mástil de elevación. (solo mástiles plegables) Si tiene algún problema o duda durante el montaje, póngase en contacto con el proveedor de Invacare. ¡ADVERTENCIA! – El mástil puede plegarse para guardarlo o transportarlo. Siempre que se vaya a plegar el 4.2 Contenido de la entrega...
  • Seite 79: Montaje Del Mástil En La Base

    Instalación 1. Bloquee las dos ruedas traseras B. Quite el pasador de bloqueo A. 2. Levante el conjunto del mástil C hasta dejarlo en posición vertical pisando con un pie la pata D y tirando de la barra de empuje E hacia arriba hasta que el tope de seguridad F encaje en su sitio.
  • Seite 80: Instalación Del Pistón En El Brazo

    Invacare® Birdie® EVO 1. Suelte la horquilla en forma de D y quite el pasador A del pistón B. 2. Retire el pistón B del soporte del mástil y fíjelo al soporte de montaje del brazo C. Mantenga presionado el brazo C en dirección al mástil D y baje el soporte de la percha E.
  • Seite 81: Restablecimiento Del Indicador De Servicio

    (solo en la unidad de control CBJ Care) IMPORTANTE Si la luz de servicio parpadea en color amarillo durante el uso diario o después de una operación de montaje, es necesario reparar la grúa. – Póngase en contacto con el proveedor de Invacare para obtener asistencia. 1650023-F...
  • Seite 82: Utilización

    La grúa podría volcar y poner en peligro al mantenga pulsado el botón paciente y a los cuidadores. de patas cerradas A. – Invacare recomienda que las ruedas traseras 2. Para abrir las patas, permanezcan desbloqueadas durante los mantenga pulsado el botón procedimientos de elevación para que la grúa...
  • Seite 83: Funciones De Emergencia

    Utilización ¡ADVERTENCIA! Riesgo de lesiones – Utilice únicamente las perchas diseñadas para esta grúa. – Asegúrese de que la percha es adecuada para el paciente y la grúa o el traslado que se va a realizar. – Compruebe que la percha está bien fijada al conector del brazo y que no puede extraerse 1.
  • Seite 84: Carga De La Batería

    Invacare® Birdie® EVO 5.7 Carga de la batería ¡ADVERTENCIA! Riesgo de daños o lesiones IMPORTANTE Si se utiliza repetidamente la bajada de – Asegúrese de que la parada de emergencia no emergencia mecánica, se produce un aumento de esté activada durante la carga de la batería.
  • Seite 85: Indicador De La Batería

    Utilización posible bajar al paciente. Se recomienda cargar las baterías Tipo de Estado Descripción en cuanto se escuche la señal acústica. indicador de de la la batería batería 1. Enchufe el cable de alimentación A en una toma eléctrica. Carga La batería debe cargarse (25 %).
  • Seite 86 Invacare® Birdie® EVO 1. Levante el asidero A situado en la parte posterior de 1. Coloque la batería B la batería B. en la unidad de control 2. Levante la batería para sacarla de la unidad de control o el cargador como se o del cargador.
  • Seite 87: Traslado De Pacientes

    – Evite utilizar la grúa en superficies inclinadas. describen a continuación pueden realizarse con Invacare recomienda utilizar el producto un (1) único asistente. Sin embargo, Invacare únicamente en superficies planas. recomienda que, siempre que sea posible, estos – Durante el traslado, mientras el paciente esté...
  • Seite 88: Acoplamiento De La Eslinga A La Grúa

    1. Coloque la anilla deseada de la correa A sobre el – Utilice una eslinga Invacare aprobada que saliente del gancho B. cuente con la recomendación del médico, 2.
  • Seite 89: Traslado De Un Paciente A La Cama

    Traslado de pacientes Baje la cama lo máximo posible. Con ayuda de las asas de la eslinga, gire al paciente hasta que quede de frente al auxiliar que maneja la grúa de elevación. Levante al paciente lo suficiente como para que quede Baje al paciente de forma que sus pies descansen sobre separado de la superficie de descanso y que la grúa la base de la grúa, con una pierna a cada lado del mástil.
  • Seite 90: Traslado De Un Paciente Desde Una Silla De Ruedas

    Invacare® Birdie® EVO Baje al paciente hasta que quede sobre la superficie fija. 4. Asegúrese de que la superficie a la que va a trasladar el Levante el brazo hasta que haya tensión en las correas paciente soporta totalmente su peso.
  • Seite 91: Traslado De Un Paciente Al Inodoro

    6.7 Traslado de un paciente al inodoro La grúa de elevación de Invacare NO ha sido diseñada como dispositivo de transporte. Si el cuarto de baño Baje al paciente hasta el inodoro y deje la eslinga fijada NO se encuentra próximo a la cama o si la grúa no...
  • Seite 92: Elevación De Un Paciente Que Está En El Suelo

    Invacare® Birdie® EVO 6.8 Elevación de un paciente que está en el suelo ¡ADVERTENCIA! Riesgo de lesiones La grúa puede lesionar a un paciente que esté en el suelo o a un auxiliar que esté haciendo algo en el suelo.
  • Seite 93: Transporte Y Almacenamiento

    4.3.1 Desplegado del mástil, página 78 y, antes de plegar el mástil, tire del pestillo de seguridad F y manténgalo La grúa plegada podrá colocarse ahora en posición en esa posición. vertical. 7.4 Extensión del mástil para colocar la grúa en posición vertical (solo Birdie EVO) 1650023-F...
  • Seite 94: Mantenimiento

    – Asegúrese de que no salpique agua en el ser realizados por un técnico cualificado. Invacare puede enchufe o la toma de pared. facilitarle los manuales de servicio. – No toque la toma de corriente con las manos mojadas.
  • Seite 95: Instrucciones De Limpieza

    Consulte las instrucciones de lavado en la eslinga y en su – Póngase en contacto con el proveedor de manual para obtener información sobre cómo limpiarla. Invacare para obtener asistencia. 8.3.4 Instrucciones de desinfección A menos que las normativas locales establezcan lo contrario, las tareas de mantenimiento deben realizarse como mínimo...
  • Seite 96: Después Del Uso

    Invacare® Birdie® EVO Proteja el medio ambiente y recicle este producto a través 9 Después del uso de la planta de reciclaje más próxima cuando llegue al final de su vida útil. 9.1 Eliminación Desmonte el producto y sus componentes para separar y reciclar individualmente los diferentes materiales.
  • Seite 97: Solución De Problemas

    La unidad de control emite un pitido La carga máxima es excesiva. Reduzca la carga (y la grúa funcionará durante la elevación y el motor se para. con normalidad). Póngase en contacto con el proveedor de Invacare si las instrucciones descritas no solucionan el problema. 1650023-F...
  • Seite 98: Datos Técnicos

    Invacare® Birdie® EVO 11 Datos Técnicos 11.1 Carga máxima de utilización segura Birdie® EVO Birdie® EVO Birdie® EVO Birdie® EVO COMPACT PLUS XPLUS Carga máxima de utilización segura (paciente + percha + eslinga) 180 kg 150 kg 180 kg 210 kg 11.2 Dimensiones y pesos...
  • Seite 99: Sistema Eléctrico

    Datos Técnicos Dimensiones [mm] Birdie® EVO Birdie® EVO Birdie® EVO COMPACT PLUS / XPLUS Anchura total (con las patas abiertas) entre el centro de las 1100 1100 1100 ruedas Anchura total (con las patas abiertas) medida desde el interior 1040 1020 1020 Anchura total (con las patas cerradas) medida desde el exterior...
  • Seite 100: Condiciones Ambientales

    Invacare® Birdie® EVO Birdie® EVO Birdie® EVO Birdie® EVO COMPACT PLUS / XPLUS 400 mA (en CBJ1, 400 mA (CBJ1 400 mA (en CBJ2) / CBJ2 y CBJ Care)/ y CBJ Care) / Corriente de entrada máxima 280 mA (en CBJ...
  • Seite 101: Compatibilidad Electromagnética (Emc)

    Compatibilidad electromagnética (EMC) 12 Compatibilidad electromagnética (EMC) 12.1 Información general sobre EMC Los equipos eléctricos médicos deben instalarse y utilizarse de acuerdo con la información sobre EMC de este manual. Este equipo se ha probado y cumple con los límites de EMC establecidos por IEC/EN 60601-1-2 para equipos de Clase B. Los equipos de comunicaciones por radiofrecuencia portátiles y móviles pueden afectar al funcionamiento de este producto.
  • Seite 102 Invacare® Birdie® EVO Prueba de Nivel de Entorno electromagnético: guía inmunidad prueba/cumplimiento < 0 % U durante 0,5 Caídas de tensión, La calidad de la red de suministro eléctrico debería ser la habitual de un ciclo en pasos de 45°...
  • Seite 103 Sommaire 6.8 Soulèvement d'un patient à partir du sol ... . . 124 7 Transport et stockage....... 126 Ce manuel DOIT être remis à...
  • Seite 104: Généralités

    • un non respect du manuel d'utilisation, • une utilisation incorrecte, Invacare se réserve le droit de modifier les caractéristiques • l'usure normale, des produits sans préavis. • un assemblage ou montage incorrect par l'acheteur ou...
  • Seite 105: Sécurité

    Le patient doit être transféré sur contactez un professionnel de santé, un une chaise de douche ou doit utiliser d'autres fournisseur Invacare ou un technicien qualifié moyens pour se doucher. avant d'utiliser ce produit. – Si le lève-personne est utilisé dans un –...
  • Seite 106: Points De Pincement

    Les composants du produit peuvent devenir fixation brûlants en cas d'exposition au soleil ou à d'autres Invacare utilise un système de fixation courant sources de chaleur. basé sur des boucles et des crochets. Les boucles – N'exposez pas le produit à la lumière directe du situées sur les sangles se fixent sur les crochets...
  • Seite 107: Étiquettes Et Symboles Figurant Sur Le Produit

    Sécurité Symboles AVERTISSEMENT ! Risque de dysfonctionnement Des interférences électromagnétiques peuvent Numéro de série affecter le fonctionnement. – Lorsque vous l'utilisez, ce produit ne doit pas être placé à côté ou sur un autre équipement électrique. Si cela est nécessaire, il est Numéro de référence indispensable d'inspecter rigoureusement ce produit et l'autre équipement afin de vérifier...
  • Seite 108 Invacare® Birdie® EVO Limite de pression atmosphérique Ne retirez pas cette étiquette et ne manipulez pas la Conditions de transport et de stockage vis sous-jacente, car cela pourrait affecter la sécurité du produit. Conditions d'utilisation La garantie du produit est annulée si cette étiquette est retirée ou rompue.
  • Seite 109: Présentation Du Produit

    Toutes les modifications de position peuvent être effectuées sans l'aide du patient. En raison de différences régionales, vous devez vous reporter au site Internet ou au catalogue Invacare de Ce produit ne présente aucune contre-indication connue. votre pays pour connaître les accessoires qui sont disponibles ;...
  • Seite 110: Réglages (Mise En Service)

    Un montage inadéquat est susceptible d'entraîner Sangle (1 pièce)* des blessures ou des dégâts matériels. – Seules des pièces Invacare doivent être utilisées * Selon le modèle et/ou la configuration pour le montage de ce lève-personne. Si le lève-personne est livré avec une sangle, –...
  • Seite 111: Fixation Du Mât À La Base

    Réglages (Mise en service) 1. Verrouillez les deux roulettes arrière B. Retirez la goupille de verrouillage A. 2. Hissez le mât C à la verticale en posant un pieds sur le pied D et en tirant la barre de poussée E vers le haut jusqu'à...
  • Seite 112: Installation Du Vérin Sur La Flèche

    Invacare® Birdie® EVO 1. Libérez la fixation D et-clip retirez la broche A du vérin B. 2. Retirez le vérin B du support du mât et fixez-le au support de montage de la flèche C. Poussez la flèche C vers le mât D et tout en la maintenant, rabattez le support du fléau E.
  • Seite 113: Réinitialisation Du Témoin Lumineux De Révision

    (boîtier de contrôle CBJ Care uniquement) IMPORTANT ! Si le témoin lumineux de révision s'allume en jaune et clignote pendant l'utilisation quotidienne ou après un remontage, cela signifie que le lève-personne a besoin d'une révision. – Contactez votre fournisseur Invacare pour effectuer un entretien. 1650023-F...
  • Seite 114: Utilisation

    La télécommande permet d'ouvrir ou de fermer les pieds le patient et les assistants en danger. de la base. – Invacare recommande que les roulettes arrière 1. Pour fermer les pieds, soient déverrouillées lors du soulèvement appuyez sur le bouton du patient pour permettre la stabilité...
  • Seite 115: Fonctions D'urgence

    Utilisation 5.6.2 Activation d'un abaissement d'urgence AVERTISSEMENT ! (boîtier de contrôle CBJ Home) Risque de blessure – Utilisez exclusivement des fléaux spécialement En cas de panne de la télécommande, il est possible conçus pour ce lève-personne. d'abaisser la flèche au moyen du bouton de déverrouillage –...
  • Seite 116: Recharge De La Batterie

    Invacare® Birdie® EVO 5.7 Recharge de la batterie de panne électrique partielle ou totale, ou de décharge de la batterie en cours d'utilisation. IMPORTANT ! AVERTISSEMENT ! – Assurez-vous que l'arrêt d'urgence n'est pas Risque de blessure ou de dommage matériel actionné...
  • Seite 117: Témoin De Batterie

    Utilisation Le boîtier de contrôle est équipé d'un signal sonore. CBJ1 et CBJ2 avec LCD Un bip indique que la batterie est déchargée, mais que Type de Description État de la l'abaissement du patient reste possible. Il est recommandé témoin de batterie de recharger les batteries dès que le signal sonore est émis.
  • Seite 118: Chargeur De Batterie En Option

    Invacare® Birdie® EVO 5.7.4 Chargeur de batterie en option ATTENTION ! Une mise en place incorrecte de la batterie (pour les boîtiers de contrôle avec batterie amovible est susceptible d'entraîner des blessures ou des uniquement) dégâts matériels. La procédure de démontage ou d'installation de la –...
  • Seite 119: Transfert Du Patient

    Il existe un risque de coincement entre les – Évitez d'utiliser le lève-personne sur une pente. crochets du fléau et la sangle. Invacare recommande d'utiliser le produit sur – Prenez toutes les précautions nécessaires lors des surfaces planes exclusivement. des opérations de levage.
  • Seite 120: Installation De La Sangle Sur Le Lève-Personne

    – Utilisez une sangle approuvée par Invacare et recommandée par le médecin, l'infirmier ou l'assistant médical afin d'assurer la sécurité et le confort du patient durant la levée.
  • Seite 121: Transfert Du Patient À Partir D'un Lit

    Transfert du patient 1. Placez la boucle de bande souhaitée A sur l'extrémité du crochet B. 2. Tirez la bande A vers le bas jusqu'à ce que la boucle soit bien au fond du crochet B. 3. Répétez les étapes pour chacune des bandes restantes de la sangle.
  • Seite 122: Transfert Du Patient Dans Un Lit

    Invacare® Birdie® EVO 5. Verrouillez les roulettes arrière. 6. Élevez le lit jusqu'à atteindre une hauteur de travail adéquate (généralement la hauteur de hanche des soignants). Abaissez le patient jusqu'à ce que ses pieds reposent sur la base du lève-personne, de part et d'autre du mât.
  • Seite 123: Transfert D'un Patient Sur Un Fauteuil Roulant

    Transfert du patient 6.7 Transfert d'un patient vers et depuis une chaise toilettes Le lève-personne Invacare n'est PAS un dispositif de transport. Si la salle de bains est loin du lit ou si le lève-personne ne peut être facilement manœuvré...
  • Seite 124: Soulèvement D'un Patient À Partir Du Sol

    Si aucun soin médical n'est requis, procédez au transfert. Abaissez le patient vers la chaise toilettes en laissant la sangle accrochée aux crochets du fléau. Invacare recommande que la sangle reste fixée aux crochets du Positionnez la sangle A au-dessous du patient.
  • Seite 125 Transfert du patient 9. Levez la flèche pour soulever le patient du sol. 10. Procédez au transfert sur une autre surface de repos ou emplacement fixe. Fixez la sangle. Reportez-vous à la section 6.2.1 Installation de la sangle sur le lève-personne, page120 . 1650023-F...
  • Seite 126: Transport Et Stockage

    6. Appliquez la procédure décrite à la section 4.3.1 Dépliage position verticale. du mât, page 110 en commençant par la fin et tirez le cran d'arrêt F vers le haut avant de replier le mât. 7.4 Extension de mât pour positionnement vertical (Birdie EVO uniquement) 1650023-F...
  • Seite 127: Maintenance

    – Vous ne devez effectuer aucune procédure de besoin d'une révision. N'utilisez pas le lève-personne maintenance ou d'entretien tant que le produit et contactez votre fournisseur Invacare pour une est en cours d'utilisation. révision. – Si le témoin lumineux de révision ne clignote pas, le Suivez les procédures de maintenance décrites dans le...
  • Seite 128: Fréquence De Nettoyage

    Les révisions doivent être effectuées uniquement par un technicien qualifié. Température maximale : 40 °C – Contactez votre fournisseur Invacare pour effectuer un entretien. Solvant/produit chimique : agent de nettoyage ordinaire à usage ménager et eau. L'entretien doit être effectué au moins tous les 12 mois, sauf Séchage : essuyez avec un chiffon doux.
  • Seite 129: Après L'utilisation

    Après l’utilisation Préservez l'environnement en faisant recycler ce produit en 9 Après l’utilisation fin de vie dans un centre de recyclage. Désassemblez le produit et ses composants afin que les 9.1 Mise au rebut différents matériaux puissent être séparés et recyclés individuellement.
  • Seite 130: Dépannage

    Le boîtier de contrôle émet un bip La charge maximale a été dépassée. Réduisez la charge (le lève-personne sonore en cours de levage et le moteur devrait refonctionner normalement). s'arrête. Si les problèmes persistent après application des solutions suggérées, veuillez contacter votre fournisseur Invacare. 1650023-F...
  • Seite 131: Caractéristiques Techniques

    Caractéristiques Techniques 11 Caractéristiques Techniques 11.1 Charge maximale d'utilisation Birdie® EVO Birdie® EVO Birdie® EVO Birdie® EVO COMPACT PLUS XPLUS Charge max. d'utilisation (patient + fléau + sangle) 180 kg 150 kg 180 kg 210 kg 11.2 Dimensions et poids * Vers l'avant Dimensions [mm] Birdie®...
  • Seite 132: Système Électrique

    Invacare® Birdie® EVO Dimensions [mm] Birdie® EVO Birdie® EVO Birdie® EVO COMPACT PLUS/XPLUS Largeur totale (pieds fermés), mesure externe Largeur interne min. (i) Largeur interne à la portée maximale (k) Rayon de giration sans levier 1400 1400 1210 1210 1430...
  • Seite 133: Conditions Ambiantes

    Caractéristiques Techniques Birdie® EVO Birdie® EVO Birdie® EVO COMPACT PLUS/XPLUS Pièce appliquée conforme aux exigences spécifiées Pièce appliquée de type B pour la protection contre les décharges électriques selon la norme IEC 60601-1. Niveau sonore de 45 à 50 dB (A). 40 élévations complètes (avec une batterie chargée Capacité...
  • Seite 134: Compatibilité Électromagnétique (Cem)

    Invacare® Birdie® EVO 12 Compatibilité électromagnétique (CEM) 12.1 Informations relatives aux interférences électromagnétiques L'équipement médical électrique doit être installé et utilisé conformément aux informations relatives aux interférences magnétiques présentes dans ce manuel. Ce produit a été testé et est certifié conforme aux limites CEM spécifiées dans la norme CEI/EN 60601-1-2 pour les équipements de classe B.
  • Seite 135 Compatibilité électromagnétique (CEM) Test d’immunité Directives relatives à l'environnement électromagnétique Test/Niveau de conformité ± 1 kV de ligne à ligne Ondes de choc La qualité du réseau électrique doit être la même que celle du réseau ± 2 kV de la ligne à la électrique d’un hôpital ou d’un établissement commercial.
  • Seite 136 Notes...
  • Seite 137 Sommario 6.5 Trasferimento di un paziente da e verso una carrozzina ........156 6.6 Trasferimento del paziente su una carrozzina .
  • Seite 138: Generale

    Invacare non si assume alcuna responsabilità per danni sono riportati nei documenti di vendita specifici per paese. derivanti da: Invacare si riserva il diritto di modificare le specifiche del • Non conformità con il manuale d'uso prodotto senza ulteriore preavviso.
  • Seite 139: Sicurezza

    Invacare altro mezzo per fare la doccia. o un tecnico qualificato prima di iniziare a –...
  • Seite 140: Punti Di Pizzicamento

    – Non utilizzare apparecchiature di comunicazione fare riferimento al sito web o al catalogo in radiofrequenza (RF) portatili a una distanza locale di Invacare per gli accessori disponibili o inferiore a 30 cm da qualsiasi parte di questo contattare il proprio fornitore Invacare.
  • Seite 141: Etichette E Simboli Sul Prodotto

    Sicurezza Simboli ATTENZIONE! Rischio di malfunzionamento Le interferenze elettromagnetiche possono Numero di serie causare malfunzionamenti. – Non utilizzare il presente prodotto nelle vicinanze di o sovrapposto ad altre apparecchiature elettriche. Se un tale utilizzo Codice di riferimento fosse necessario, controllare attentamente che il prodotto e le altre apparecchiature funzionino normalmente.
  • Seite 142 Invacare® Birdie® EVO Limite di pressione atmosferica Non rimuovere questa etichetta e non manipolare la vite Condizioni di trasporto e stoccaggio sottostante, in quanto ciò potrebbe compromettere la sicurezza del prodotto. Condizioni di funzionamento La garanzia del prodotto viene annullata se si rimuove o si rompe questa etichetta.
  • Seite 143: Panoramica Del Prodotto

    Tutti i cambiamenti di posizione sono possibili senza In considerazione delle differenze regionali, fare collaborazione da parte del paziente. riferimento al sito web o al catalogo locale di Invacare Non si conoscono controindicazioni per questo prodotto. per dettagli sugli accessori disponibili o contattare il proprio fornitore Invacare.
  • Seite 144: Messa In Servizio

    Un montaggio non corretto può causare lesioni applicazione, manutenzione e lavaggio. o danni. – Utilizzare solo pezzi di Invacare per il montaggio di questo sollevatore. 4.3 Montaggio dell'albero – Dopo ogni montaggio, controllare che tutti i raccordi siano ben serrati e che tutte le parti funzionino correttamente.
  • Seite 145: Montaggio Dell'albero Sulla Base

    Messa in servizio 1. Bloccare entrambe le ruote posteriori orientabili B. Rimuovere il perno di bloccaggio A. 2. Sollevare il gruppo dell'albero C in posizione verticale poggiando un piede sulla gamba D e tirando verso l'alto la barra di spinta E fino a far scattare il fermo di sicurezza F.
  • Seite 146: Montaggio Dell'attuatore Sul Braccio

    Invacare® Birdie® EVO 1. Sganciare il fermo D e rimuovere il perno A dall'attuatore B. 2. Rimuovere l'attuatore B dalla staffa sull'albero e montarlo sulla staffa di montaggio del braccio C. Premere e tenere premuto il braccio C verso l'albero D e abbassare il fermo del bilancino E.
  • Seite 147: Ripristino Dell'indicatore Di Manutenzione

    (solo centralina CBJ Care) IMPORTANTE! Se la spia di manutenzione è gialla lampeggiante durante l'utilizzo quotidiano o dopo un rimontaggio, il sollevatore necessita di manutenzione. – Per la manutenzione, rivolgersi al proprio fornitore Invacare. 1650023-F...
  • Seite 148: Uso

    La pulsantiera viene utilizzata per aprire o chiudere le gambe il paziente e gli assistenti. della base. – Invacare raccomanda che le ruote posteriori orientabili siano sbloccate durante le procedure 1. Per chiudere le gambe, di sollevamento per consentire al sollevatore...
  • Seite 149: Funzioni Di Emergenza

    5.6.2 Attivazione di abbassamento di emergenza ATTENZIONE! (centralina CBJ Home) Pericolo di lesioni – Utilizzare esclusivamente bilancini realizzati per Se la pulsantiera non funziona, il braccio può essere questo sollevatore. abbassato azionando l'interruttore rotondo per il rilascio di – Assicurarsi che il bilancino sia adatto per emergenza.
  • Seite 150: Attivazione Di Un Abbassamento Di Emergenza

    Invacare® Birdie® EVO 5.6.5 Attivazione di un abbassamento di Birdie® EVO COMPACT emergenza meccanico (opzionale) Se l'abbassamento di emergenza sulla centralina non 1. Individuare la manopola funziona, è disponibile un abbassamento di emergenza di rilascio di emergenza meccanico tampone. Questo può accadere in caso di...
  • Seite 151: Centralina Cbj Care, Cbj1, Cbj2

    1. Collegare il cavo di alimentazione C a una presa di CBJ Care corrente. Tipo di Stato di Descrizione La carica della batteria sarà completata indicatore carica in circa 4 ore. Quando le batterie sono della batteria della completamente cariche, il caricabatteria si arresta batteria automaticamente.
  • Seite 152: Telecomando Opzionale

    Invacare® Birdie® EVO 5.7.3 Telecomando opzionale Per CBJ Care è disponibile un telecomando opzionale con indicatore della batteria. Tipo di Stato di Descrizione indicatore carica della batteria della batteria Completa- La batteria è OK, non deve mente essere ricaricata (100–50%). Il carica LED sulla destra è...
  • Seite 153: Trasferimento Del Paziente

    ATTENZIONE! di seguito possono essere eseguite da un (1) Pericolo di lesioni o danni assistente: Invacare consiglia tuttavia, se possibile, Danni a parti del sollevatore (pulsantiera, ruote l'utilizzo di due (2) assistenti per l'esecuzione orientabili, ecc.) provocate da un urto contro il delle procedure.
  • Seite 154: Attacco Dell'imbracatura Al Sollevatore

    – Per il comfort e la sicurezza del paziente che deve essere sollevato, utilizzare esclusivamente un'imbracatura approvata da Invacare e consigliata dal medico, dall'infermiere o dall'assistente sanitario che seguono il paziente. – Le imbracature e gli accessori per sollevatore sono appositamente progettati per l'uso in combinazione con i sollevatori Invacare.
  • Seite 155: Trasferimento Del Paziente Da Un Letto

    Trasferimento del paziente Prima di spostare il paziente, controllare nuovamente che l'imbracatura sia fissata correttamente ai ganci del bilancino. Consultare la sezione 6.2.1 Attacco Su un bilancino a 4 punti, fissare ciascuna cinghia dell'imbracatura al sollevatore, pagina 154 . Se gli a un singolo gancio.
  • Seite 156: Trasferimento Del Paziente Su Un Letto

    Invacare® Birdie® EVO 8. Sbloccare le ruote posteriori orientabili. Spostare il sollevatore tenendo saldamente entrambe le Allontanare il sollevatore dalla zona del paziente. mani sulle barre di spinta. 11. Procedere al trasferimento su un'altra superficie di riposo o oggetto fisso.
  • Seite 157: Carrozzina

    6.7 Trasferimento di un paziente da e verso una sedia WC Il sollevatore Invacare NON è inteso come un dispositivo di trasporto. Se le strutture del bagno Abbassare il paziente sulla sedia WC lasciando NON sono vicine al letto o se il sollevatore non può...
  • Seite 158: Sollevamento Del Paziente Dal Pavimento

    Invacare® Birdie® EVO 4. Sbloccare le ruote posteriori orientabili. Consultare la sezione 5 Uso, pagina 148 5. Aprire le gambe del sollevatore. Consultare la sezione 5 Uso, pagina 148 Quando il paziente è distante dalla superficie della sedia WC, utilizzare le barre di spinta per spostare il sollevatore dalla sedia WC.
  • Seite 159: Trasporto E Immagazzinamento

    Trasporto e immagazzinamento 7.4 Prolunga dell'albero per il 7 Trasporto e immagazzinamento posizionamento in verticale (Solo Birdie EVO) 7.1 Informazioni generali Se il sollevatore è dotato di un meccanismo di apertura Durante il trasporto, o quando il sollevatore non deve...
  • Seite 160: Manutenzione

    Non utilizzare – in caso di contatto con liquidi biologici, il prodotto e contattare il proprio fornitore Invacare – prima dell'uso per un nuovo utilizzatore. per assistenza. – Se la spia di manutenzione non lampeggia, il sollevatore è...
  • Seite 161: Istruzioni Per La Pulizia

    Fare riferimento alle istruzioni di lavaggio dell'imbracatura e – Per la manutenzione, rivolgersi al proprio al manuale dell'imbracatura per le informazioni sulla pulizia. fornitore Invacare. 8.3.4 Istruzioni per la disinfezione La manutenzione deve essere eseguita almeno ogni 12 mesi salvo quanto previsto dalle norme locali.
  • Seite 162: Dopo L'utilizzo

    Invacare® Birdie® EVO Rispettare l'ambiente e riciclare il prodotto attraverso un 9 Dopo l'utilizzo centro di riciclaggio locale al termine del suo utilizzo. Smontare il prodotto e i relativi componenti, in modo 9.1 Smaltimento che i differenti materiali possano essere staccati e riciclati singolarmente.
  • Seite 163: Guida Alla Soluzione Dei Problemi

    La centralina emette un segnale acustico Ridurre il carico (il sollevatore tornerà a È stato superato il carico massimo durante il sollevamento e il motore si funzionare normalmente). ammissibile arresta. Se quanto indicato in precedenza non risolve i problemi, contattare il proprio fornitore Invacare. 1650023-F...
  • Seite 164: Dati Tecnici

    Invacare® Birdie® EVO 11 Dati Tecnici 11.1 Carico massimo per un utilizzo in sicurezza Birdie® EVO Birdie® EVO Birdie® EVO Birdie® EVO COMPACT PLUS XPLUS 180 kg 150 kg 180 kg 210 kg Carico massimo per un utilizzo in sicurezza (paziente + bilancino + imbracatura) 11.2 Dimensioni e pesi...
  • Seite 165: Impianto Elettrico

    Dati Tecnici Dimensioni [mm] Birdie® EVO Birdie® EVO Birdie® EVO COMPACT PLUS / XPLUS Larghezza totale (con gambe aperte), tra le mezzerie delle 1100 1100 1100 ruote orientabili 1040 1020 1020 Larghezza totale (con gambe aperte), misura interna (j) Larghezza totale (con gambe chiuse), misura esterna Larghezza interna minima (i) Larghezza interna in corrispondenza dell'estensione massima (k) Diametro di sterzata senza leva...
  • Seite 166: Condizioni Ambientali

    Invacare® Birdie® EVO Birdie® EVO Birdie® EVO Birdie® EVO COMPACT PLUS / XPLUS 400 mA (CBJ1 400 mA (CBJ1, e CBJ Care) / 400 mA (CBJ2) / Corrente di ingresso massima CBJ2 e CBJ Care) / 280 mA (CBJ Home)
  • Seite 167: Compatibilità Elettromagnetica (Emc)

    Compatibilità elettromagnetica (EMC) 12 Compatibilità elettromagnetica (EMC) 12.1 Informazioni generali sulla compatibilità elettromagnetica (EMC) Le apparecchiature elettromedicali devono essere installate e utilizzate conformemente alle informazioni sulla compatibilità elettromagnetica contenute nel presente manuale. Questo prodotto è stato collaudato ed è risultato conforme ai limiti di compatibilità elettromagnetica specificati dalla norma IEC/EN 60601-1-2 per le apparecchiature di classe B.
  • Seite 168 Invacare® Birdie® EVO Test di immunità Ambiente elettromagnetico - guida Test / Livello di conformità Sbalzi di tensione ± 1 kV da linea a linea La qualità della connessione elettrica deve essere quella di un tipico ambiente commerciale od ospedaliero.
  • Seite 169 Inhoudsopgave 6.8 Een patiënt van de vloer omhoog tillen ....190 7 Transport en opslag ....... . 192 Deze handleiding dient te worden overhandigd aan de gebruiker van 7.1 Algemene informatie .
  • Seite 170: Algemeen

    • Normale slijtage desbetreffende land. • Verkeerde montage of afstelling door de koper of een Invacare behoudt zich het recht voor om productspecificaties derde zonder voorafgaande kennisgeving te wijzigen. • Technische aanpassingen •...
  • Seite 171: Veiligheid

    – De patiëntenlift kan in een badkamer worden met een zorgverlener, een Invacare-leverancier gebruikt, maar mag NIET onder de douche of een technisch medewerker voordat u dit worden gebruikt. De patiënt moet worden product gaat gebruiken.
  • Seite 172: Klempunten

    – Omdat er verschillen zijn per regio, kunt u – Gebruik alleen originele accessoires het beste de Invacare-website of -catalogus en reserve-onderdelen. Zo neemt de voor uw regio raadplegen voor de beschikbare elektromagnetische emissie niet toe en neemt accessoires.
  • Seite 173: Typeplaatjes En Symbolen Op Het Product

    Veiligheid WAARSCHUWING! Serienummer Risico op storing Elektromagnetische interferentie kan een onjuiste werking tot gevolg hebben. – Gebruik dit product niet naast of gestapeld Referentienummer met andere elektrische apparatuur. Als het toch nodig is dit product op dergelijke wijze te gebruiken, moet u de werking van het product Fabrikant en de andere apparatuur goed in de gaten houden.
  • Seite 174 Invacare® Birdie® EVO Minimale/maximale atmosferische druk Verwijder dit label niet en kom niet aan de schroef onder Voorwaarden voor transport en opslag het label; dit kan negatieve gevolgen hebben voor de veiligheid van het product. Voorwaarden voor gebruik De garantie voor het product komt te vervallen als dit label wordt verwijderd of kapot wordt gemaakt.
  • Seite 175: Productoverzicht

    Alle positiewijzigingen kunnen worden uitgevoerd zonder hulp van de patiënt. Omdat er verschillen zijn per regio, kunt u het beste de Invacare-website of -catalogus voor uw regio Voor dit product zijn geen contra-indicaties bekend. raadplegen voor informatie over de beschikbare accessoires.
  • Seite 176: Montage

    Gevaar voor lichamelijk letsel Een onjuiste montage kan tot letsel of schade Draagband (1 stuk)* leiden. – Gebruik alleen onderdelen van Invacare voor de * Afhankelijk van model en/of uitvoering montage van deze patiëntenlift. – Controleer na elke montage of alle bevestigingen...
  • Seite 177: De Mast Op Het Onderstel Monteren

    Montage 1. Vergrendel beide achterste zwenkwielen B. Verwijder de vergrendelingspin A. 2. Zet de mastconstructie C rechtop door met één voet op de poot D te gaan staan en de duwstang E omhoog te trekken totdat de veiligheidsvergrendeling F op zijn plaats vastklikt.
  • Seite 178: De Actuator Op De Hefboom Installeren

    Invacare® Birdie® EVO 1. Maak de D-clip los en verwijder pin A uit actuator B. 2. Verwijder actuator B uit de beugel op de mast en maak deze vast aan montagebeugel C van de hefboom. Houd hefboom C tegen mast D gedrukt en trek tiljukhouder E naar beneden.
  • Seite 179: Het Servicelampje Resetten

    (alleen voor de CBJ Care-bedieningseenheid) BELANGRIJK! Als het servicelampje geel knippert tijdens het dagelijkse gebruik of nadat de lift opnieuw in elkaar is gezet, is er onderhoud aan de lift vereist. – Neem voor onderhoud contact op met uw Invacare-leverancier. 1650023-F...
  • Seite 180: Gebruik

    1. Klap de poten in door de – Invacare raadt aan de vergrendeling van de knop voor het inklappen achterste zwenkwielen niet in te schakelen van de poten A ingedrukt tijdens het tillen en verplaatsen, zodat de te houden.
  • Seite 181: Functies Voor Noodgevallen

    Gebruik WAARSCHUWING! Kans op lichamelijk letsel – Gebruik alleen tiljukken die zijn gemaakt voor deze lift. – Controleer of het tiljuk geschikt is voor de patiënt en voor de vereiste wijze van tillen of verplaatsen. – Controleer of het tiljuk stevig is bevestigd aan de hefboomconnector en niet kan worden 1.
  • Seite 182: De Accu Opladen

    Invacare® Birdie® EVO 5.7 De accu opladen WAARSCHUWING! Risico op letsel of beschadiging BELANGRIJK! Als de mechanische noodverlaging herhaaldelijk – De noodstop mag niet zijn geactiveerd wanneer wordt gebruikt, neemt de verlagingssnelheid snel de accu wordt opgeladen. toe. – De accu moet worden opgeladen in een goed –...
  • Seite 183: Optionele Handbediening

    Gebruik nog wel mogelijk om de patiënt te laten zakken. Het wordt Type Accustatus Omschrijving aangeraden de accu op te laden zodra het geluidssignaal acculampje klinkt. Nog niet De accu moet worden 1. Steek de stekker van het netsnoer A in het stopcontact. opgeladen opgeladen (25%).
  • Seite 184 Invacare® Birdie® EVO 1. Houd de accu vast aan het handvat A achter op de 1. Plaats de accu B op de accu B. bedieningseenheid 2. Til de accu omhoog uit de bedieningseenheid of de lader. of de lader zoals...
  • Seite 185: Verplaatsen Van Een Patiënt

    Beknellingsgevaar de lift te duwen of te trekken. Het risico bestaat dat u bekneld raakt tussen het – Gebruik de lift niet op een helling. Invacare tiljuk en de draagband. adviseert het product alleen op een vlakke – Wees voorzichtig bij het tillen.
  • Seite 186: De Draagband Aan De Patiëntenlift Bevestigen

    De bevestigingsbandjes aan de draagband kunnen lussen of de assistenten gewond raken. bevatten in verschillende kleuren die verschillende lengtes – Gebruik een door Invacare goedgekeurde aangeven. Hiervan kan gebruik worden gemaakt om de draagband die wordt aanbevolen door de patiënt in verschillende posities te plaatsen. De kortere...
  • Seite 187: De Patiënt Vanaf Een Bed Verplaatsen

    Verplaatsen van een patiënt Til de patiënt voldoende hoog op om het stilstaande object vrij te maken terwijl zijn/haar gewicht volledig wordt ondersteund door de lift. Bevestig de schouderband C op een 2-punts tiljuk voor de beenband D aan elk van de haken. De hefboom blijft in deze positie totdat de knop OMLAAG wordt ingedrukt.
  • Seite 188: Een Patiënt Naar Een Bed Verplaatsen

    Invacare® Birdie® EVO 5. Vergrendel de achterste zwenkwielen. 6. Verhoog het bed naar een goede werkhoogte (doorgaans de heuphoogte van de zorgverleners). Laat de patiënt zakken zodat zijn/haar voeten op het onderstel van de lift rusten, schrijlings langs de mast.
  • Seite 189: Een Patiënt In Een Rolstoel Zetten

    Verplaatsen van een patiënt 6.7 Een patiënt van en naar een toiletstoel verplaatsen De Invacare-patiëntenlift is GEEN vervoermiddel. Wanneer de badkamer zich NIET in de buurt van het bed bevindt of wanneer de patiënt niet gemakkelijk naar de toiletstoel kan worden verplaatst, MOET de patiënt in een rolstoel worden verplaatst en naar...
  • Seite 190: Een Patiënt Van De Vloer Omhoog Tillen

    Laat de patiënt zakken op de toiletstoel waarbij de draagband aan de haken van het tiljuk bevestigd dienen te blijven. Invacare raadt aan de draagband aan de Plaats de draagband A onder de patiënt. Raadpleeg haken van het tiljuk te laten terwijl de patiënt een de gebruiksaanwijzing van de draagband voor meer toiletrolstoel of een standaard toiletstoel gebruikt.
  • Seite 191 Verplaatsen van een patiënt 9. Breng de hefboom omhoog om de patiënt van de vloer te tillen. 10. Ga verder met het verplaatsen naar een ander rustoppervlak of stilstaand object. Bevestig de draagband. Raadpleeg 6.2.1 De draagband aan de patiëntenlift bevestigen, pagina186 . 1650023-F...
  • Seite 192: Transport En Opslag

    Invacare® Birdie® EVO 7.4 Mastverlengstuk voor rechtop zetten 7 Transport en opslag van de lift (Alleen Birdie EVO) 7.1 Algemene informatie Er is een magnetisch mastverlengstuk meegeleverd waarmee De noodstopknop moet worden ingedrukt tijdens transport de lift rechtop kan worden gezet. Hiervoor moet er een en wanneer de patiëntenlift enige tijd niet wordt gebruikt.
  • Seite 193: Onderhoud

    Neem onmiddellijk contact de te reinigen materialen beschermen. op met uw Invacare-leverancier en zorg ervoor – Gebruik nooit bijtende vloeistoffen (zuren, basen dat de lift niet wordt gebruikt totdat deze is enzovoort) of schurende reinigingsmiddelen.
  • Seite 194: Reinigingsinstructies

    Onderhoud mag alleen worden uitgevoerd door reinigen. een bevoegd technicus. – Neem voor onderhoud contact op met Invacare. 8.3.4 Instructies voor desinfecteren Er moet minimaal eens per 12 maanden onderhoud worden Informatie over aanbevolen desinfectiemiddelen uitgevoerd, tenzij anders vermeld in lokale vereisten.
  • Seite 195: Na Gebruik

    Na gebruik Wij hopen dat u voldoende milieubewust bent om dit 9 Na gebruik product na de levensduur naar een afvalverwerkingsstation te brengen. 9.1 Afvoeren Haal het product en de onderdelen ervan uit elkaar, zodat de verschillende materialen afzonderlijk kunnen worden WAARSCHUWING! gerecycled.
  • Seite 196: Problemen Oplossen

    Tijdens het tillen klinkt er een pieptoon Max. belasting is overschreden. Verminder de belasting (zodat de lift vanuit de bedieningseenheid en de weer normaal functioneert). motor stopt. Neem contact op met uw Invacare-leverancier als de problemen hiermee niet kunnen worden opgelost. 1650023-F...
  • Seite 197: Technische Specificaties

    Technische Specificaties 11 Technische Specificaties 11.1 Maximale veilige belasting Birdie® EVO Birdie® EVO Birdie® EVO Birdie® EVO COMPACT PLUS XPLUS 180 kg 150 kg 180 kg 210 kg Maximale veilige belasting (patiënt + tiljuk + draagband) 11.2 Afmetingen en gewichten * Voorwaartse richting Afmetingen (mm) Birdie®...
  • Seite 198: Elektrisch Systeem

    Invacare® Birdie® EVO Afmetingen (mm) Birdie® EVO Birdie® EVO Birdie® EVO COMPACT PLUS / XPLUS Totale breedte (poten uitgeklapt), binnenmaat (j) 1040 1020 1020 Totale breedte (poten ingeklapt), buitenmaat Min. binnenbreedte (i) Binnenbreedte bij maximale reikwijdte (k) Draaidiameter zonder hendel...
  • Seite 199: Voorwaarden Voor De Gebruiksomgeving

    Technische Specificaties Birdie® EVO Birdie® EVO Birdie® EVO COMPACT PLUS / XPLUS Isolatieklasse Klasse II-apparaat Toegepast onderdeel voldoet aan de opgegeven Type B-apparaat vereisten voor bescherming tegen elektrische schokken in overeenstemming met IEC60601-1. Geluidsniveau 45 – 50 dB (A) 40 keer volledig tillen (met de accu tussen 100% - Werkvermogen 50% van het volledige vermogen) Met onderbrekingen (periodieke motorfunctie)
  • Seite 200: Elektromagnetische Compatibiliteit (Emc)

    Invacare® Birdie® EVO 12 Elektromagnetische compatibiliteit (EMC) 12.1 Algemene informatie over EMC Elektrische medische apparatuur moet worden geïnstalleerd en gebruikt in overeenstemming met de EMC-informatie in deze handleiding. Tests hebben uitgewezen dat dit product voldoet aan de EMC-richtlijnen volgens IEC/EN 60601-1-2 voor apparatuur van klasse B.
  • Seite 201 Elektromagnetische compatibiliteit (EMC) Immuniteitstest Elektromagnetische omgeving– richtlijn Testniveau/ mate van overeenkomst < 0% U gedurende 0,5 De kwaliteit van de netstroom moet overeenkomen met die cyclus in stappen van 45° Spanningsdips, van een commerciële omgeving of ziekenhuisomgeving. Als de korte 0% U gedurende 1 gebruiker van dit product continue beschikbaarheid vereist gedurende...
  • Seite 202 Notes...
  • Seite 203 6.7 Transferir um paciente para e de uma sanita ..224 Índice 6.8 Levantar um paciente a partir do chão ....225 7 Transporte e armazenamento.
  • Seite 204: Geral

    • Utilização incorreta do país. • Desgaste natural devido ao uso A Invacare reserva-se o direito de alterar as especificações • Montagem ou preparação incorreta pelo comprador ou do produto sem aviso prévio. por terceiros •...
  • Seite 205: Segurança

    Invacare antes de tentar utilizar este produto. – Se o elevador de transferência for utilizado num – Não faça quaisquer modificações nem alterações ambiente húmido, certifique-se de que limpa não autorizadas ao produto.
  • Seite 206: Pontos De Pressão

    O produto pode ficar quente quando está exposto fixação à luz do sol ou a outras fontes de calor. A Invacare utiliza um sistema de fixação comum – Não exponha o produto à luz solar direta baseado em ganchos e presilhas. As presilhas durante períodos prolongados.
  • Seite 207: Rótulos E Símbolos No Produto

    Segurança Símbolos ADVERTÊNCIA! Risco de avaria A interferência eletromagnética pode causar Número de série problemas de funcionamento. – Não utilize este produto ao lado de ou empilhado com equipamento elétrico adicional. Número de referência Se tiver de o fazer, este produto e o equipamento adicional terão de ser observados de perto para confirmar se estão a funcionar normalmente.
  • Seite 208 Invacare® Birdie® EVO Limite de pressão atmosférica Não retire esta etiqueta nem manipule o parafuso que Condições de transporte e armazenamento está por baixo, uma vez que isso pode prejudicar a segurança do produto. Condições de funcionamento A garantia do produto será anulada se esta etiqueta for retirada ou danificada.
  • Seite 209: Descrição Geral Do Produto

    Unidade de controlo CBJ Care, CBJ1 ou CBJ2 com bateria removível 3.3 Acessórios Devido a diferenças regionais, consulte o catálogo ou o site local da Invacare para obter detalhes sobre os acessórios disponíveis ou contacte o seu fornecedor Invacare. 1650023-F...
  • Seite 210 Invacare® Birdie® EVO • Barra de suporte de 4 pontos (estilo cabide), com 450, Os modelos de cesta com fixações de presilha, adequados 500 ou 550 mm de largura para barras de suporte (estilo cabide) com ganchos: • Barra de suporte de 2 pontos (estilo cabide), com 350, •...
  • Seite 211: Configuração

    A montagem incorreta deste produto pode causar Cesta (1 unidade)* lesões ou danos. – Utilize apenas peças da Invacare na montagem deste elevador de transferência. * Depende do modelo e/ou da configuração – Após cada montagem, verifique se os encaixes Se o elevador for entregue com uma cesta, consulte estão devidamente apertados e se todas as...
  • Seite 212: Montar O Mastro Na Base

    Invacare® Birdie® EVO 1. Bloqueie ambos os rodízios traseiros B. Retire o pino de bloqueio A. 2. Levante a unidade do mastro C para uma posição vertical pousando um pé na perna D e puxando a barra de empurrar E para cima até o gancho de segurança F encaixar no lugar.
  • Seite 213: Instalar O Atuador No Braço

    Configuração 1. Solte o clipe em forma de D e retire o pino A do atuador B. 2. Retire o atuador B do suporte do mastro e fixe-o ao suporte de montagem do braço C. Pressione o braço C contra o mastro D e rebata o suporte da barra de suporte E.
  • Seite 214: Reposição Do Indicador De Assistência

    (apenas a unidade de controlo CBJ Care) um som. IMPORTANTE! Se a luz de assistência estiver a piscar a amarelo durante a utilização diária ou após uma nova montagem, o elevador de transferência necessita de assistência. – Contacte o fornecedor Invacare para solicitar manutenção. 1650023-F...
  • Seite 215: Utilização

    O elevador pode tombar e colocar o paciente e os assistentes em perigo. O comando é utilizado para abrir ou fechar as pernas da – A Invacare recomenda que os rodízios traseiros base. permaneçam desbloqueadas durante os procedimentos de elevação, para permitir que 1.
  • Seite 216: Substituir A Barra De Suporte

    Invacare® Birdie® EVO 5.5 Substituir a barra de suporte 5.6.2 Ativação de um abaixamento de emergência (unidade de controlo CBJ-Home) (barra de suporte apenas com SMARTLOCK™) Se o comando falhar, o braço pode ser baixado utilizando o ADVERTÊNCIA! switch circular para a função de emergência.
  • Seite 217: Carregar A Bateria

    Utilização 5.7 Carregar a bateria emergência mecânico como recurso de reserva. Isto pode acontecer em caso de falha de energia parcial ou total, ou IMPORTANTE! se a bateria acabar durante a utilização. – Certifique-se de que a paragem de emergência não está...
  • Seite 218: Indicador Da Bateria

    Invacare® Birdie® EVO A unidade de controlo está equipada com um sinal sonoro. CBJ1 e CBJ2 com LCD Um bip indica que a bateria tem baixa capacidade, mas ainda Tipo de Estado Descrição é possível baixar o paciente. Recomenda-se que as baterias indicador da sejam carregadas assim que o sinal sonoro seja ouvido.
  • Seite 219 Utilização 1. Coloque a bateria B na unidade de controlo ou no carregador, conforme é mostrado, e certifique-se de que ouve um clique. Quando a bateria é colocada no carregador, o LED de carga acende-se. Quando o carregamento estiver 1. Levante o manípulo A na parte detrás da bateria B. concluído, o LED de carga apaga-se.
  • Seite 220: Transferência Do Paciente

    (1) assistência. No entanto, a Invacare – Evite utilizar o elevador num declive. A Invacare recomenda que, sempre que possível, os recomenda que o produto seja apenas utilizado procedimentos sejam realizados por dois (2) numa superfície plana.
  • Seite 221: Fixar A Cesta Ao Elevador De Transferência

    1. Passe o ilhó pretendido da correia A pela ponta do – Utilize uma cesta aprovada pela Invacare que gancho B. seja recomendada pelo médico responsável, 2. Puxe a correia A para baixo até o ilhó assentar enfermeiro ou médico assistente da pessoa a...
  • Seite 222: Transferir Um Paciente A Partir De Uma Cama

    Invacare® Birdie® EVO Num barra de suporte de 4 pontos, prenda cada uma das correias a um gancho individual. 6.3 Transferir um paciente a partir de uma cama 1. Prepare a elevação. Consulte a secção 6.2 Preparar o levantamento, página 220 .
  • Seite 223: Transferir Um Paciente Para Uma Cama

    Transferência do paciente 6.4 Transferir um paciente para uma 3. Certifique-se de que a cadeira de rodas é colocada entre as pernas abertas do elevador de transferência com o cama paciente voltado para o mastro. 4. Prenda a cesta ao elevador de transferência. Consulte a 1.
  • Seite 224: Transferir Um Paciente Para E De Uma Sanita

    Baixe o paciente até o colocar na sanita, deixando a O elevador de transferência da Invacare NÃO se cesta presa aos ganchos da barra de suporte. A Invacare destina ser utilizado como dispositivo de transporte. recomenda que a cesta permaneça ligada aos ganchos Se as instalações sanitárias NÃO estiverem junto à...
  • Seite 225: Levantar Um Paciente A Partir Do Chão

    Transferência do paciente 6.8 Levantar um paciente a partir do chão ADVERTÊNCIA! Risco de lesões O elevador pode provocar lesões num paciente no chão ou num assistente a trabalhar no chão. – Tenha sempre cuidado ao mover as peças do elevador perto de uma pessoa no chão.
  • Seite 226: Transporte E Armazenamento

    Agora, o elevador de transferência já pode ser colocado numa posição vertical. puxe e segure o gancho de segurança F para cima antes de dobrar o mastro. 7.4 Extensão do mastro para posicionamento vertical (apenas o modelo Birdie EVO) 1650023-F...
  • Seite 227: Manutenção

    – Certifique-se de que evita quaisquer salpicos de são descritos no manual de assistência deste produto. Os água na ficha ou tomada de parede. manuais de assistência podem ser solicitados à Invacare. – Não toque na tomada com as mãos molhadas. 8.2 Inspeções diárias IMPORTANTE! Métodos ou fluidos errados podem prejudicar ou...
  • Seite 228: Instruções De Limpeza

    Risco de lesão ou danos As operações de manutenção só podem ser Limpeza da cesta realizadas por técnicos qualificados. – Contacte o fornecedor Invacare para solicitar Consulte as instruções de lavagem da cesta e o respetivo manutenção. manual para obter detalhes sobre a limpeza.
  • Seite 229: Após A Utilização

    Após a utilização Seja amigo do ambiente e recicle este produto no fim da 9 Após a utilização respetiva vida útil através das instalações de reciclagem existentes. 9.1 Eliminação Desmonte o produto e os seus componentes, para que os diferentes materiais possam ser separados e reciclados ADVERTÊNCIA! individualmente.
  • Seite 230: Resolução De Problemas

    A unidade de controlo emite um bip A carga máx. foi ultrapassada. Reduza a carga (e o elevador irá durante a elevação e o motor para. funcionar normalmente). Contacte o seu fornecedor Invacare, se as instruções acima não resolverem os seus problemas. 1650023-F...
  • Seite 231: Características Técnicas

    Características Técnicas 11 Características Técnicas 11.1 Carga útil máxima Birdie® EVO Birdie® EVO Birdie® EVO Birdie® EVO COMPACT PLUS XPLUS Carga útil máxima (paciente + barra de suporte + cesta) 180 kg 150 kg 180 kg 210 kg 11.2 Dimensões e pesos * Direção em frente Dimensões [mm] Birdie®...
  • Seite 232: Sistema Elétrico

    Invacare® Birdie® EVO Dimensões [mm] Birdie® EVO Birdie® EVO Birdie® EVO COMPACT PLUS / XPLUS Largura total (pernas fechadas), medida externa Largura interna mínima (i) Largura interna com o alcance máximo (k) Diâmetro de viragem sem alavanca 1400 1400 1210...
  • Seite 233: Condições Ambientais

    Características Técnicas Birdie® EVO Birdie® EVO Birdie® EVO COMPACT PLUS/XPLUS Peça aplicada, em conformidade com os requisitos Peça aplicada de tipo B especificados para proteção contra choque elétrico de acordo com a norma IEC60601-1. Nível sonoro 45 – 50 dB(A) 40 levantamentos completos (com a bateria entre 100% Capacidade de funcionamento –...
  • Seite 234: Compatibilidade Eletromagnética (Emc)

    Invacare® Birdie® EVO 12 Compatibilidade eletromagnética (EMC) 12.1 Informações gerais sobre compatibilidade eletromagnética (EMC) O equipamento elétrico médico deve ser instalado e utilizado de acordo com as informações de EMC incluídas neste manual. Este produto foi testado e considerado em conformidade com os limites de EMC especificados pela norma IEC/EN 60601-1-2 para o equipamento de Classe B.
  • Seite 235 Compatibilidade eletromagnética (EMC) Teste de imunidade Nível de Ambiente eletromagnético – diretrizes teste/conformidade < 0% U para 0,5 ciclo a Quedas de tensão, A qualidade da alimentação deverá corresponder a um ambiente incrementos de 45° interrupções curtas comercial ou hospitalar típico. Se o utilizador deste produto necessitar e variações de de um funcionamento contínuo durante as interrupções da alimentação, 0% U...
  • Seite 236 Italia: Nederland: Belgium & Luxemburg: Norge: Invacare AS Invacare Mecc San s.r.l., Invacare BV Invacare nv Grensesvingen 9, Postboks 6230, Via dei Pini 62, Galvanistraat 14-3 Autobaan 22 Etterstad I-36016 Thiene (VI) NL-6716 AE Ede...

Inhaltsverzeichnis