Herunterladen Inhalt Inhalt Diese Seite drucken
Inhaltsverzeichnis

Werbung

Verfügbare Sprachen

Verfügbare Sprachen

X2DW
D
Bedienungsanleitung
GB Instruction Manual
F
Manuel d' Installation et d' Utilisation
I
Manuale d' Installazione e Funzionamento
I
F
GB
D

Werbung

Inhaltsverzeichnis
loading

Inhaltszusammenfassung für VDO X2DW

  • Seite 1 X2DW Bedienungsanleitung GB Instruction Manual Manuel d‘ Installation et d‘ Utilisation Manuale d‘ Installazione e Funzionamento...
  • Seite 2: Inhaltsverzeichnis

    5. Grundeinstellungen Herzlichen Glückwunsch. Sprache einstellen Mit Ihrer Wahl für einen VDO Computer haben Sie sich für ein technisch sehr hochwertiges Gerät entschieden. 2. Bedienung Einstellen und Messen Um das Potenzial des Computers optimal ausnutzen zu können, empfehlen wir Ihnen, diese Anleitung der Radgröße...
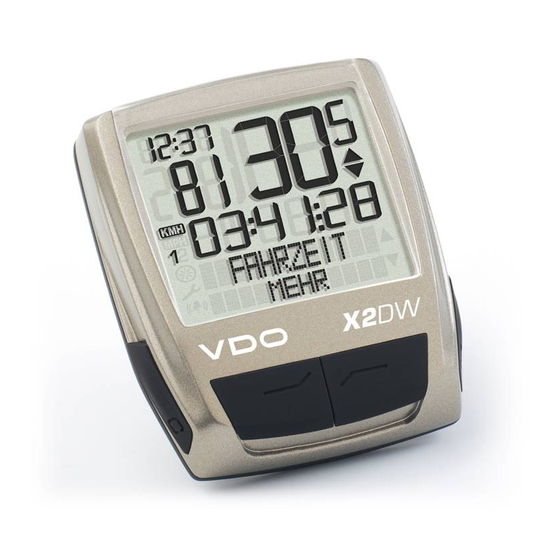
  • Seite 3: Display

    Zeile) wird angezeigt, anzeigen. Strecken werden entsprechend in Kilo- rechten Seite. ob es weitere Informati- meter oder Meilen angezeigt. Der Indikator zeigt onen gibt „MEHR“ die gewählte Messeinheit an. ob es eine weitere Auswahlmöglichkeit gibt „AUSWAHL“ X2DW VDO CYCLECOMPUTING www.vdocyclecomputing.com X2DW...
  • Seite 4: Bedienung

    Gesamtfahrzeit Rad 1 bis max. 999:59 HHH:MM AUSWAHL zeigt, dass es zum Hauptmenu NAVIGATOR Eine Ziffer verringern. Eine Ziffer erhöhen. Gesamtfahrzeit Rad 2 bis max. 999:59 HHH:MM ein Untermenu gibt. Das Untermenu öffnen Sie mit X2DW VDO CYCLECOMPUTING www.vdocyclecomputing.com X2DW...
  • Seite 5: Trittfrequenz-Option

    ACHTUNG: Der Abstand des Senders vom Computer montieren wollen (rechts oder links) mit beilie- Ihr VDO Computer wird mit einer 3V Batterie step 1 Legen Sie die Batterie mit dem +Pol nach am Lenker sollte nicht über 60 cm liegen (Funk- gendem Kabelbinder (zunächst lose, noch nicht...
  • Seite 6: Spracheinstellung Nach Batteriewechsel

    4.6 Sender Pairing step 3 Beachten Sie, dass die Gummidichtung TIPP zum Batteriewechsel: VDO empfiehlt einen glatt auf dem Batteriefachdeckel aufliegt. jährlichen Batteriewechsel. Kaufen Sie rechtzeitig eine neue Batterie, um eine einwandfreie Funk- Die Geschwindigkeits- und Trittfrequenzsignale step 2 Drehen Sie jetzt das Vorderrad, oder fahren step 4 Setzen Sie den Batteriefachdeckel in die tion der Funkübertragung sicherzustellen.
  • Seite 7: Einstellen Und Messen Der Radgröße

    5.2 Einstellen und Messen der Radgröße So stellen Sie die Reifengröße über Auswahl des Reifens ein: Damit Ihr VDO Computer korrekt messen kann, müssen Sie die Radgröße (Radabrollumfang) Ihres zu EINSTELLMENU/ RADGRÖSSE/RAD 1 (mit Rades einstellen. Hier gibt es 2 Möglichkeiten: AUSWAHL.
  • Seite 8: Einstellen Uhr

    Stundeneinstellung mit MANUELL SET. Bestätigen mit Funktions-Modus). step 6 Geben Sie den so gemessenen Radumfang UHR…SET MINUTEN/WEITER in Ihren VDO-Computer ein. stellen Sie die Minu- RAD 1 …SET UMFANG/WEITER zu UHR/EINSTELLEN ten ein. Bestätigen Sie die Mi- ACHTUNG: Wenn Sie KMH–Anzeige gewählt stellen Sie jetzt den Bestätigen mit...
  • Seite 9: Umschalten Von Rad 1 Auf Rad

    5.5 Umschalten von Rad 1 auf Rad 2 >>> P03 einstellen. Zum Aufruf der nächsten Ziffer bestätigen Ihr VDO Computer kann an 2 Fahrrädern verwendet zu RADSERVICE/ Sie mit werden. Wenn Sie von Rad 1 auf Rad 2 wechseln, EINSTELLEN. Bestätigen mit erkennt der Computer den Sender von Rad 2.
  • Seite 10: Sleep-Modus

    5.8 Sleep-Modus Navigator auf Null zurückstellen: NAVIGATOR/EINSTELLEN. Bestä- tigen mit . Sie befinden sich Ihr VDO-Computer ist mit einer zweifachen Sleep- Im Sleep-Modus 2 wird auch der Funkempfänger jetzt im Einstell-Modus Modus Funktion ausgestattet. Im Sleep-Modus ausgeschaltet (nach 15 min.).
  • Seite 11: Reset-Funktionen

    5.9 Reset-Funktionen 6. Garantiebedingungen Mit der RESET Funktion stellen Sie wahlweise zurück VDO Cycle Parts gewährt für Ihren VDO-Computer Bitte wenden Sie sich mit allen Reklamationen TOUR DATEN eine Garantie von 5 Jahren ab Kaufdatum. Die und Garantieansprüchen an Ihren Fachhändler,...
  • Seite 12: Fehlerbehebung

    100 mm bis 3999 mm (3,9 bis 157,4 inch) Anzeige wird schwach Batterie leer Batterie prüfen, evtl. ersetzen Anzeige wird schwach Temperaturen unter 5° machen Bei normalen Temperaturen die Anzeige träge arbeitet die Anzeige wieder normal X2DW VDO CYCLECOMPUTING www.vdocyclecomputing.com X2DW...
  • Seite 13 5. Basic settings Congratulations Setting the language With your selection of a VDO computer you have opted for a technically very high quality appliance. 2. Operation Setting and measuring the wheel size In order to fully benefit from the potential of the computer, we recommend that you carefully read this 5.2.1 Select from tyre table...
  • Seite 14: Display

    You can find the description shows, accordingly.The indicator shows the selected of the individual indicators whether there is more measurement unit on the right hand side. information „MORE“ whether there is another selection option „SELECT“ X2DW VDO CYCLECOMPUTING www.vdocyclecomputing.com X2DW...
  • Seite 15: Operation

    Roadbook. the setting modes. Scroll upwards within menu RIDE TIME. You open the submenu with Decrease a digit. the setting modes. In the submenu you will find. Increase a digit. X2DW VDO CYCLECOMPUTING www.vdocyclecomputing.com X2DW...
  • Seite 16: Cadence Option

    1 Place the rubber pad under the transmitter. Fit the transmitter on the same side of the fork Your VDO computer is supplied with a 3V battery step 1 Place the battery in the computer casing ATTENTION: The transmitting distance between where you later want to fit the computer to the (type 2032).
  • Seite 17: Language Setting After Battery Change

    4.6 Transmitter pairing step 3 Take care that the rubber seal lies flat on TIP for changing battery: VDO recommends chang- the battery compartment lid. ing the battery once a year. Buy a new battery in good time to ensure the wireless transmission The speed and cadence signals (Option: Item no.
  • Seite 18: Setting And Measuring The Wheel Size

    5.2 Setting and measuring the wheel size How to set the tyre size by selecting the tyre: You must set the wheel size (wheel roll circum- ference) of your bike so that your VDO computer Using go to SETTINGS/ WHEELSIZE/BIKE 1 (use can measure correctly.
  • Seite 19: Setting The Clock

    WHEEL-SIZE/MANUAL SET. Step 6 Enter the wheel circumference measured Confirm with CLOCK...SET MINUTES/ in this way into your VDO computer. CONTINUE. Set the minutes Using go to CLOCK/SET. using . Confirm the ATTENTION: If you have selected KMH display, BIKE 1 ...SET SIZE/CONTINUE...
  • Seite 20: Switch From Bike 1 To Bike

    5.5 Switch from Bike1 to Bike2 >>> P03 is flashing. Confirm with Your VDO computer can be used on 2 bikes. BIKE SERVICE/ON (switch to OFF BIKE 1/SET OK? Confirm with If you switch from bike 1 to bike 2, the computer using ).
  • Seite 21: Sleep Mode

    5.8 Sleep mode Set navigator back to zero: Select NAVIGATOR/FORWARD or Your VDO computer is equipped with a two-fold In Sleep-Modus 2 the wireless receiver is also NAVIGATOR/BACKWARD using sleep mode function. switched off. (after 15 min). . Confirm with...
  • Seite 22: Reset Functions

    5.9 Reset functions 6. Terms of guarantee You use the RESET function to set any of these back VDO Cycle Parts grants a guarantee of 5 years Please contact the dealer from whom you TOUR DATA from the date of purchase for your VDO computer.
  • Seite 23: Troubleshooting

    100 mm to 3999 mm (3.9 to 157.4 inches) Display becomes weak Battery dead Check battery, replace if nec. Display becomes weak Temperatures under 5° make At normal temperatures the the display sluggish display will work normally again X2DW VDO CYCLECOMPUTING www.vdocyclecomputing.com X2DW...
  • Seite 24: Contenu De L'emballage

    Fonctions d’information en mode 5.2.2 Réglage au moyen de Nous vous souhaitons beaucoup de plaisir lors de toutes vos sorties avec votre compteur Cycle VDO. de fonctionnement la circonférence de la roue Cycle Parts GmbH Option «...
  • Seite 25 L’indicateur indique l’unité de mesu- la page de droite. (ligne de menu) indique re sélectionnée. « PLUS » si d’autres informations sont disponibles. « CHOIX » si une autre possibilité de sélection existe. X2DW VDO CYCLECOMPUTING www.vdocyclecomputing.com X2DW...
  • Seite 26: Fonctions D'information En Mode De Fonctionnement

    Augmenter un chiffre. PLUS indique qu’un sous-menu existe pour le menu Ces possibilités particulières facilitent le suivi des principal CHRONO JOUR. Le sous-menu peut être tours au moyen d’un journal des tours ou d’un X2DW VDO CYCLECOMPUTING www.vdocyclecomputing.com X2DW...
  • Seite 27: Option « Fréquence De Pédalage

    Monter l’émetteur sur la fourche, du côté où vous souhaitez monter le compteur Votre compteur VDO est fourni avec une pile 3V Etape 1 Mettre la pile en place dans le boîtier du ATTENTION : L’écart entre l’émetteur et le compteur (à...
  • Seite 28: Réglage De La Langue Après Un Changement De Pile

    4.6 Couplage de l’émetteur Etape 3 Veiller à ce que le joint en caoutchouc soit ASTUCE pour le remplacement de la pile : VDO bien à plat dans le couvercle du compartiment recommande de remplacer la pile chaque année. à batterie.
  • Seite 29: Régler Et Mesurer La Taille De La Roue

    5.2 Régler et mesurer la taille de la roue Comment régler la taille de la roue en sélecti- onnant un type de pneu ? Pour que les mesures de votre compteur VDO TAILLE ROUE / VELO 1 soient correctes, vous devez tout d‘abord régler Touches pour accéder...
  • Seite 30: Régler L'heure

    HORLOGE … REGL. MINUTES / Etape 6 Saisir la circonférence ainsi mesurée dans Confirmer avec mode de fonctionnement). CONTINUER. Les touches votre compteur VDO. permettent de déterminer les VELO 1 … REGLAGE ROUE / Touches pour accéder à minutes. Confirmer les minutes ATTENTION : Si vous avez sélectionné...
  • Seite 31: Affichage Des Intervalles De Service

    à chiffre de droite clignote. Confirmer avec REVISER VELO / REGLAGE. Votre compteur VDO peut être utilisé sur 2 vélos. Confirmer avec VELO 1 / REGLAGE OK? Confirmer avec Lorsque vous passez du vélo 1 au vélo 2, le compteur détecte l’émetteur du vélo 2.
  • Seite 32: Mode « Veille

    5.8 Mode « Veille » Réglage du Navigator : NAVIGATOR / REGLAGE OK apparaît pour confir- mer et votre compteur VDO revient automatique- ment au menu NAVIGATEUR / CHOIX. Votre compteur VDO est équipé d’une fonction En mode « Veille » 2, le récepteur radio est...
  • Seite 33: Fonction De Mise À Zéro

    5.9 Fonction de mise à zéro 6. Conditions de garantie La fonction MISE A ZERO permet, au choix, VDO Cycle Parts offre une garantie de 5 ans à Veuillez vous adresser à votre revendeur pour tou- de remettre les données suivantes à zéro : compter de la date d‘achat pour votre compteur...
  • Seite 34: Spécifications Techniques

    2,5 km/h, max. 199,5 km/h Affichage faible La pile est déchargée. Contrôler la pile et, éventuelle- ment, la remplacer. Affichage faible Les températures inférieures L’affichage est à nouveau à 5°C rendent l’affichage lent. normal lorsque les températu- res remontent. X2DW VDO CYCLECOMPUTING www.vdocyclecomputing.com X2DW...
  • Seite 35: Contenuto Della Confezione

    5. Impostazioni di base Complimenti! Impostazione lingua Con l’acquisto di un computer VDO avete scelto un apparecchio di alto livello tecnologico. Per sfruttare 2. Comando Impostazione e misurazione al massimo il potenziale del computer vi raccomandiamo di leggere attentamente le presenti istruzioni, della misura della ruota nelle quali troverete tutte le istruzioni per l’uso e molti consigli utili.
  • Seite 36 è riportata sul mostra le seguenti voci: metri o in miglia. lato destro. “DI PIU’” se vi sono L’indicatore mostra l’unità di misura selezionata. ulteriori informazioni. “SELEZIONA” se vi è un’altra possibilità di scelta. X2DW VDO CYCLECOMPUTING www.vdocyclecomputing.com X2DW...
  • Seite 37 SELEZIONA indica che nel menu principale NAVIGA- Acorrere verso l’alto in modalità Tempo corsa totale bici 2 fino massimo TOR vi è un sottomenu. Per aprire il sottomenu impostazione . 999:59 HHH:MM. premere il tasto Aumentare una cifra.. X2DW VDO CYCLECOMPUTING www.vdocyclecomputing.com X2DW...
  • Seite 38 1 Inserire la batteria nell’alloggiamento del ATTENZIONE: la distanza tra il sensore e il computer avete previsto di montare il computer sul manu- VDO è completo di batteria 3V (mod. 2032). computer con il polo+ verso l’alto. sul manubrio non deve superare i 60 cm brio (destra o sinistra), utilizzando la fascetta per L’apparecchi viene fornito con la batteria è...
  • Seite 39: Impostazioni Di Base

    >>> P06 Con i tasti andate su IMPOSTAZIONI/SELEZIONA. Il sistema twist click VDO garantisce un colle- step 2 Ruotare ”twist” il computer verso destra Confermare con gamento sicuro del computer al supporto per tenendolo nella posizione delle ore 12.00 e bloc- Ora siete in modalità...
  • Seite 40 5.2 Impostazione e misurazione della misura della ruota Come impostare la misura delle gomme selezi- onando la gomma: Per consentire al vostro computer VDO di esegui- DIMENS RUOTA/BICI 1 (con re una corretta misurazione dovete impostare la in IMPOSTAZIONI/ per l’impostazione della bici 2) misura della vostra ruota (circonferenza di rotola- SELEZIONA.
  • Seite 41: Impostazione Orario

    (circonferenza di rotolamento). DIMENS RUOTA/BICI 1 (con per l’impostazione ORA...IMPOST MIN/CONTINUA step 6 Inserite nel vostro computer VDO la circon- della bici 2). Confermare con impostate i minuti. ferenza della ruota così misurata. in ORA/IMPOSTAZ Confermare l’impostazione dei...
  • Seite 42 5.5 Passaggio da Bici 1 a Bici 2 >>> P03 mare con in MANUT. BICI/ Il computer VDO può essere utilizzato per 2 bici. IMPOSTAZ. Confermare con Ripetere queste operazioni fino a quando l’ultima Quando si passa da bici 1 a bici 2 il computer riconosce cifra a destra lampeggia.
  • Seite 43: Modalità Sleep

    5.8 Modalità sleep Riazzerare il navigatore: Il vostro computer VDO è dotato di una doppia Nella modalità sleep 2 viene anche disinserito il NAVIGATOR/AVANTI o NAVIGA- funzione modalità sleep. In modalità sleep il dis- radioricevitore (dopo 15 min.). TOR/INDIETRO. Selezionare play si disattiva quasi totalmente per risparmiare .
  • Seite 44 La VDO Cycle Parts rilascia per il vostro computer Per tutti i reclami e i casi di garanzia vi preghia- DATI VIAGGIO VDO una garanzia di 5 anni dalla data di acquisto. mo di rivolgervi al vostro rivenditore di fiducia TOT DIST 1+2 La garanzia copre i difetti del materiale e di lavo- dal quale avete acquistato l’apparecchio.
  • Seite 45: Eliminazione Dei Guasti

    (2) this device must accept any interference received, including interference that may cause undesired operation. NOTICE: Warning: Changes or modifications made to this equipment not expressly approved by VDO Cycle Parts GmbH may void the FCC authorization to operate this equipment.
  • Seite 46 (rifiuti elettrici ed elettronici) on und anderen europäischen Ländern mit einem they purchased this product, or their local govern- X2DW, X3DW und alle Sender SPD-TX und CAD-TX separaten Sammelsystem). Die Kennzeichnung auf ment office, for details of where and how they can bei bestimmungsgemäßer Verwendung den grund-...
  • Seite 47 www.cyclecomputing.com...

Inhaltsverzeichnis