Improvements may be made to the design of this product to enhance its user features. Description PULSAR DIGEX attachable infrared Illuminators are designed for use with DIGEX digital riflescopes. Infrared illuminators are completed with additional illumination of the surveillance objects by infrared rays when using digital night vision devices in low light conditions (no moon at night, heavy cloud cover, etc.) or in complete darkness.
Seite 5
Installing the battery pack in the IR illuminator Fig. Power button LED indicator Lever of Battery eccentric compartment Eccentric pin Battery compartment cover Ring mount The IR illuminator for the Digex riflescope is powered by APS2 battery pack. • To install the battery in the IR illuminator, turn the battery cover (1) counterclockwise and remove it.
• Lock the eccentric lever (5) position by lowering it down. • The mount with the IR illuminator should be located as close as possible to the body of the riflescope lens. • In case of loosening or insufficient fixing of the IR-illuminator on the riflescope, raise the eccentric lever (5) and tighten the adjustment screw by 1-2 turns.
Precautions • Do not allow water to enter the illuminator body. This can disable it. • Independent alterations or repairs of the illuminator are prohibited. Contact the manufacturer for qualified support if any issues arise. • When using the battery at sub-zero temperature, the battery capacity decreases, this is normal and not a defect.
Seite 8
• Housse La configuration peut être modifiée afin d’améliorer l’utilisation d’un appareil. Description Les illuminateurs IR enfichables PULSAR DIGEX sont conçus pour être utilisés avec les viseurs numériques DIGEX. Les illuminateurs IR effectuent un éclairement supplémentaire par les rayons infrarouges des objets d'observation lors de l'utilisation d'appareils de vision de la nuit numériques dans les conditions d'éclairage faible (pas de lune pendant...
Seite 9
• augmenter la distance de l'observation; • ajuster la position de la tache dans la vue du viseur Installation de la batterie dans l’illuminateur IR Fig. Bouton de marche Indicateur LED Levier Comparti- d’excentrique ment de batterie Goupille excentrique Couvercle du compartiment de batterie Fixation...
Seite 10
Montage de l’illuminateur ir sur le viseur • Ouvrez la fixation annulaire (4) de l’illuminateur IR. • Placez le support sur le boîtier de viseur de manière à ce que les demi- anneaux de montage entourent le boîtier de viseur. •...
Seite 11
Maintenance Nettoyez l'extérieur avec un chiffon légèrement imbibé de détergent synthétique. La poussière sur les lentilles peut être enlevée avec un pinceau douce. Si nécessaire nettoyez les optiques avec un chiffon doux en coton imbibé d'alcool éthylique ou d'un liquide spécial pour lentilles multicouches.
Diagnostic d’erreurs Problème Cause possible Solution Lueur inégale La lentille est sale. Nettoyez l’objectif selon la section «Maintenance». de la tache infrarouge. L'illuminateur IR La batterie est épuisée. Insérez une batterie chargée. ne s'allume pas Les contacts de batterie Vérifiez les débris et la saleté par la touche sont sales.
Änderungen im Design zwecks höherer Gebrauchseigenschaften des Produkts vorbehalten. Beschreibung Die aufsetzbaren Infrarotstrahler PULSAR DIGEX sind für die Verwendung mit den digitalen Zielfernrohren DIGEX konzipiert. Die Infrarotstrahler bieten eine zusätzliche Infrarot-Beleuchtung während der Beobachtung der Objekte mit digitalen Nachtsichtgeräten bei schlechten Lichtverhältnissen (kein Mond bei Nacht, starke Wolkendecke usw.) oder in absoluter Dunkelheit.
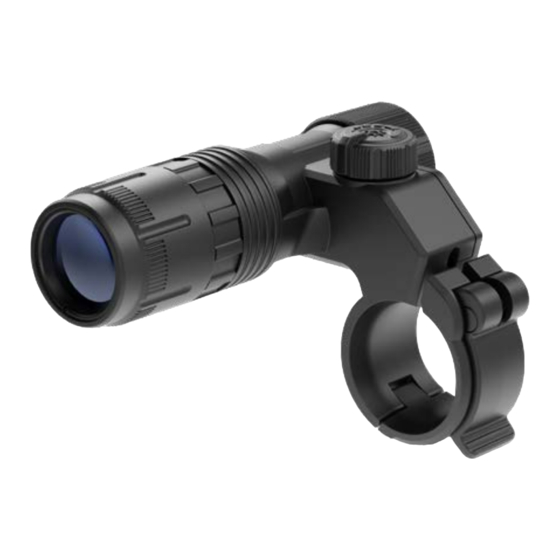
Einsetzen des Akkus in den IR-Strahler Abb. Einschalttaste LED-Anzeige Exzenterhebel Akkufach Exzenterstift Akkufachabdeckung Ringhalterung Der IR-Strahler des Zielfernrohrs Digex wird mit einem APS2-Akku betrieben. • Um den Akku in den IR-Strahler einzusetzen, drehen Sie die Akkufachabdeckung (1) gegen den Uhrzeigersinn und entfernen Sie sie. •...
• Fixieren Sie die Position des Exzenterhebels (5), indem Sie ihn nach unten senken. • Die Halterung mit dem IR-Strahler soll so nah wie möglich am Gehäuse des Objektivs des Zielfernrohrs angebracht werden. • Falls der IR-Strahler am Zielfernrohr nicht genug fixiert wurde, heben Sie den Exzenterhebel (5) an und ziehen Sie die Einstellschraube für 1-2 Gänge an.
Sicherheitshinweise • Lassen Sie kein Wasser in das Gehäuse des IR-Strahlers eindringen. Dies kann das Gerät außer Betrieb setzen. • Eigenmächtige Eingriffe in die Konstruktion des IR-Strahlers oder seine Reparatur sind nicht zulässig. Bei Problemen wenden Sie sich bitte an den Hersteller, um eine qualifizierte Unterstützung zu erhalten.
El diseño de este producto está sujeto a modificaciones con fines de mejorar sus propiedades del consumo. Descripción Los iluminadores infrarrojos acoplables PULSAR DIGEX están diseñados para usarse con los visores digitales DIGEX. Los iluminadores infrarrojos proporcionan una iluminación adicional por rayos infrarrojos a los objetos de observación cuando se utilizan dispositivos digitales de visión nocturna...
Seite 19
Instalación de la pila recargable en el iluminador IR Fig. Botón de encendido Indicador LED Brazo del Comparti- excéntrico miento de batería Pasador del excéntrico Tapa del compartimiento de batería Anillo de montaje El iluminador IR del visor telescópico Digex funciona con una batería APS2. •...
Seite 20
• Levantando el brazo del excéntrico (5), muévala hacia la izquierda. Alinee el eje del excéntrico con la ranura del medioanillo móvil. El brazo del excéntrico (5) debe ocupar su asiento de montaje. • Bloquee la posición del brazo del excéntrico (5) bajándolo. •...
Medidas de seguridad • No deje penetrar el agua en el cuerpo del iluminador. Esto puede estropearlo. • Está prohibido modificar el diseño del iluminador o repararlo por sus propias fuerzas. En caso de problemas, póngase en contacto con el fabricante para obtener una asistencia cualificada.
Per migliorare le proprietà del prodotto nella sua costruzione possono essere apportate delle modifiche. Descrizione Gli illuminatori a infrarossi innestabili PULSAR DIGEX sono progettati per l'uso con i mirini digitali DIGEX. Gli illuminatori a infrarossi forniscono ulteriore illuminazione degli oggetti osservati tramite i raggi infrarossi quando si utilizzano dispositivi di visione notturna digitali in condizioni di scarsa luminosità...
Seite 23
Installazione della batteria in un illuminatore IR Fig. Pulsante di accensione Indicatore LED Leva Vano eccentrica batteria Perno della camma Coperchio del vano batteria Anello di montaggio L'illuminatore IR Digex è alimentato dalla batteria APS2. • Per installare la batteria nell'illuminatore IR, ruotare in senso antiorario e rimuovere il coperchio della batteria (1).
• Il supporto con illuminatore IR deve essere posizionato il più vicino possibile al corpo dell'obiettivo. • In caso di allentamento o fissaggio insufficiente dell’illuminatore IR sul cannocchiale da puntamento, sollevare la leva eccentrica (5) e serrare la vite di regolazione di 1-2 giri. Quindi abbassare la leva e verificare il fissaggio dell’illuminatore IR sul cannocchiale da puntamento.
Precauzioni d’uso • Non consentire all'acqua di penetrare nel corpo illuminatore. Questo può danneggiarlo. • Non è consentito intervenire nel corpo dell'illuminatore o ripararlo da sè. In caso di problemi, contattare il produttore per un supporto qualificato. • Nell’usare la batteria sottozero, la capacità della batteria diminuisce, questo è...
сильная облачность и т.д.) или в полной темноте. Особая конструкция осветителя гарантирует четкое и чистое изображение по всему полю зрения. ИК-осветитель DIGEX X940 работает в невидимом диапазоне, что обеспечивает скрытое наблюдение. С помощью ИК-осветителей Pulsar Digex возможно: • произвести более точную идентификацию объекта наблюдения; РУССКИЙ...
Seite 27
• детально рассмотреть выбранный объект; • увеличить дальность наблюдения; • регулировать положения пятна в поле зрения прицела Установка аккумуляторной батареи в ИК-осветитель Рис. Кнопка включения Светодиодный индикатор Рычаг Батарейный эксцентрика отсек Штифт эксцентрика Крышка батарейного отсека Кольцевое крепление ИК-осветитель прицела Digex работает от аккумуляторной батареи APS2. •...
Seite 28
Установка ИК-осветителя на прицел • Раскройте кольцевое крепление (4) ИК-осветителя. • Наденьте на корпус прицела крепление так, чтобы полукольца крепления обхватили корпус прицела. • Приподняв рычаг эксцентрика (5), отведите его влево. Совместите ось эксцентрика с пазом подвижного полукольца. Рычаг эксцентрика (5) должен...
Особенности эксплуатации Чистку наружной поверхности производите тканью, слегка пропитанной синтетическим чистящим средством. Пыль с линз можно смахнуть мягкой кисточкой. При необходимости очищайте оптику мягкой хлопчатобумажной салфеткой, смоченной этиловым спиртом или специальной жидкостью для линз с многослойным покрытием. При перемещении осветителя из холода в тепло на оптических поверхностях...
Выявление неисправностей Проблема Возможная причина Решение Неравномерное Загрязнена линза. Очистите линзу в свечение ИК- соответствии с указаниями раздела «Особенности пятна. эксплуатации». Осветитель не Разрядилась батарея. Вставьте заряженную включается батарею. кнопкой Загрязнены контакты. Проверить наличие мусора включения. и загрязнений на контактах в...