
Verwandte Anleitungen für Kaiser La Perle EH Serie


Inhaltszusammenfassung für Kaiser La Perle EH Serie
- Seite 1 EH ... BUILT IN ELECTRIC OVEN EINBAU-ELEKTRO-BACKOFEN ВСТРАИВАЕМЫЙ ЭЛЕКТРИЧЕСКИЙ ДУХОВОЙ ШКАФ USER MANUAL GEBRAUCHSANWEISUNG ИНСТРУКЦИЯ ПО ОБСЛУЖИВАНИЮ И ЭКСПЛУАТАЦИИ...
- Seite 2 DEAR CUSTOMERS, we thank to you for the acquisition of our technology. We are convinced that you have made a right choice. This product which satisfies the high quality demands and corresponds to world comprehensive standards realizes your cookeries, and his modern appearance which has been developed by the best European designers will decorate your kitchen splendidly.
- Seite 3 УВАЖАЕМЫЙ ПОКУПАТЕЛЬ, LIEBE KUNDIN, LIEBER KUNDE, благодарим Вас за приобретение нашей техники. wir danken Ihnen für den Erwerb unserer Technik. Мы уверены, что Вы сделали правильный выбор. Wir sind überzeug, dass Sie eine richtige Wahl getroffen Данный продукт, удовлетворяющий самым высоким haben.
- Seite 4 CONTENTS SAFETY INSTRUCTIONS INSTALLATION INSTRUCTIONS Electrical connection Installation of the oven Preparation BRIEF DESCRIPTION Location drawing Control panel EQUIPMENT Multifunction oven control Operation functions of the oven USAGE Digital clock timer with sensor Intelligent System of the ovens La Perle PRACTICAL ADVICES CARE AND ATTENDANCE RESPECT FOR THE ENVIROMENT...
-
Seite 5: Inhaltsverzeichnis
ОГЛАВЛЕНИЕ INHALTSVERZEICHNIS SICHERHEITSHINWEISE ТЕХНИКА БЕЗОПАСНОСТИ FÜR DEN INSTALLATEUR ИНСТРУКЦИЯ ПО МОНТАЖУ Подключение к электросети Stromanschluss Установка Einbau des Backofen Подготовка Vorbereitung KURZBESCHREIBUNG КРАТКОЕ ОПИСАНИЕ Внешний вид Gesamtansicht Панель управления Bedienblende AUSSTATUNG ОБОРУДОВАНИЕ Управление работой Steuerung von Multifunktionsbackofen многофункционального духового шкафа Рабочие... -
Seite 6: Safety Instructions
SAFETY INSTRUCTIONS This appliance complies with statutory safety requirements. Inappropriate use can, however, lead to personal injury and damage to property. Please read this instruction carefully before using the appliance for the first time, to avoid the risk of accidents and damage of the appliance. The instruction contains important... -
Seite 7: Sicherheitshinweise
ТЕХНИКА БЕЗОПАСНОСТИ SICHERHEITSHINWEISE Данный прибор соответствунт всем Dieses Gerät entspricht den vorgeschriebenen действующим нормам безопасности. Sicherheitsbestimmungen. Неправильное использование прибора и Ein unsachgemäßer Gebrauch kann jedoch zu несоблюдение даной инструкции могут Schäden an Personen und Sachen führen. привести к ущербуб как человеческому тав и к материальному. -
Seite 8: Technical Safety
TECHNICAL SAFETY • Installation of this appliance must be performed only by a licensed specialist The installer is responsible for connecting the appliance to the mains power supply in observance relevant safety recommendations. • Check the appliance for visible signs of damage before using it. -
Seite 9: Technische Sicherheit
TECHNISCHE SICHERHEIT ТЕХНИЧЕСКАЯ БЕЗОПАСНОСТЬ • • Подключение и установка устройства Das Gerät darf nur von einer qualifizierten должно быть выполнено Fachperson eingebaut und angeschlossen квалифицированным специалистом. werden. Проверьте устройство на предмет • • Kontrollieren Sie das Gerät auf sichtbare видимых повреждений. -
Seite 10: Terms Of Use
TERMS OF USE • This appliance is intended for use in domestic households and it is not intended for outdoor use. • Danger of burning. During use, the appliance interior surface becomes hot enough to cause burns. There is danger to burn yourself on the heating elements, appliance interior, cooked food, appliance accessories or hot steam. -
Seite 11: Правила Эксплуатации
NUTZUNGSBEDINGUNGEN ПРАВИЛА ЭКСПЛУАТАЦИИ • Данное устройство предназначено • Dieses Gerät ist nur für den privaten исключительно для домашнего Haushalt häusliche Umfeld использования. bestimmt. Опасность пожара! При эксплуатации • • Verbrennungsgefahr. Das Gerät wird im устройство нагревается. Вы можете Betrieb heiß. Sie können sich an den обжечься... -
Seite 12: Child Safety
CHILD SAFETY • This appliance is not intended for use by persons (including children) with reduced physical, sensory or mental capabilities, or lack of experience and knowledge, unless they have been given supervision or instruction concerning use of the appliance by a person slide for their safety. -
Seite 13: Kindersicherheit
KINDERSICHERHEIT БЕЗОПАСНОСТЬ ДЕТЕЙ Данный прибор не предназначен для • • Die Kinder oder Personen, die wegen использования детьми или лицами чьи geistigen, physischen und motorischen физические, сенсорные или ментальные Fähigkeiten oder wegen des Fehlens der способности, либо отсутствие notwendigen Erfahrungen oder Kenntnisse необходимого... -
Seite 14: Installation Instructions
INSTALLATION INSTRUCTIONS ELECTRICAL CONNECTION Before connecting the oven to the mains power supply, make sure that: • The supply voltage corresponds to the specifications on the data plate on the front of the oven. • The mains supply has an efficient ground connection complying with all applicable laws and regulations. -
Seite 15: Für Den Installateur
ИНСТРУКЦИЯ ПО МОНТАЖУ FÜR DEN INSTALLATEUR STROMANSCHLUSS ПОДКЛЮЧЕНИЕ К ЭЛЕКТРОСЕТИ Перед подключением духового шкафа к эл. Vor der Durchführung des Stromanschlusses muss сети, необходимо убедиться, что: sichergestellt werden, dass: • • параметры сети соответствуют данным в die Eigenschaften des Stromnetzes mit den табличке... -
Seite 16: Installation Of The Oven
INSTALLATION OF THE OVEN The oven can be installed under a work top or in a cooking column. Figure shows the installation dimensions. Make sure that surrounding materials are heat resistant. Align the oven centrally with respect to the side walls of the units surrounding it and fix it in place with the screws and Allen screws provided. -
Seite 17: Einbau Des Backofen
EINBAU DES BACKOFENS УСТАНОВКА Духовой шкаф предназначен для встройки либо Der Backofen kann unter eine Arbeitsplatte oder in под рабочую поверхность стола, либо в шкаф. einen Schrank eingebaut werden. Die Einbaumaße Размеры, которыми необходимо müssen den auf der Abbildung dargestellten Maßen руководствоваться... -
Seite 18: Brief Description
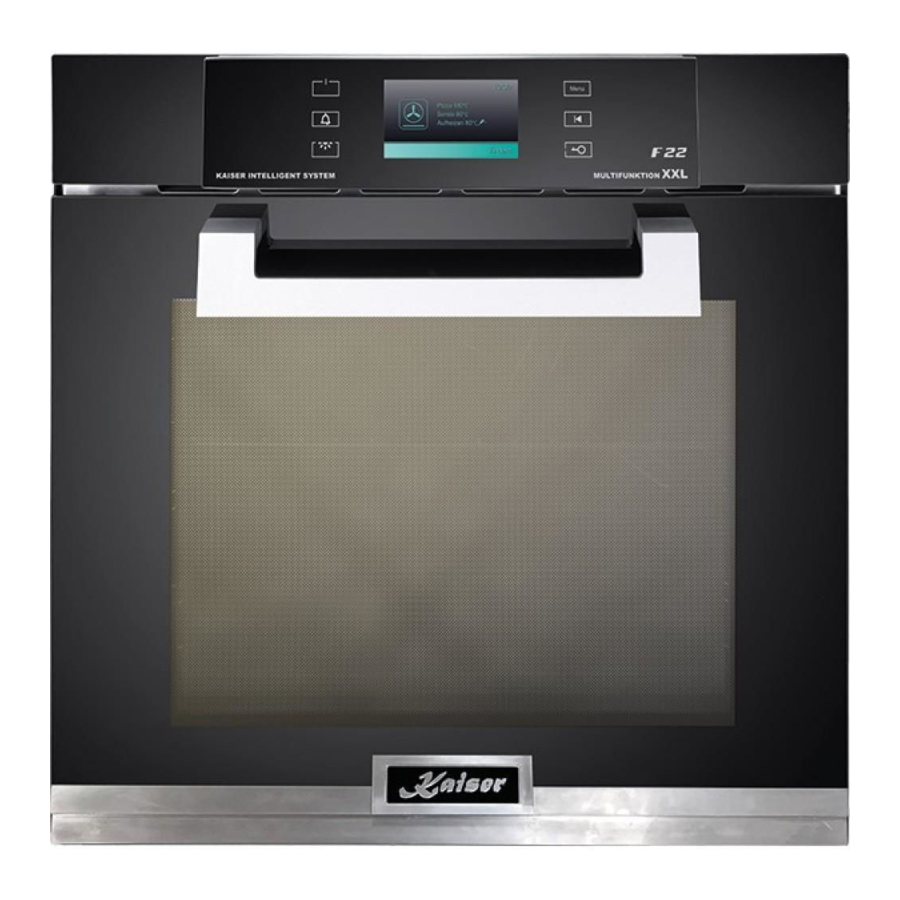
BRIEF DESCRIPTION LOCATION DRAWING BUILT-IN OVENS Functional assemblies 1. Control panel 2. Touch screen TFT display 3. Appliance door Touch the lighted part of the display to switch on the appliance. Only lighted buttons react on your touch. CONTROL PANEL BUILT-IN OVENS Model range La Perle with multilingual and multifunctional sensor TFT display and Full... -
Seite 19: Внешний Вид
KURZBESCHREIBUNG КРАТКОЕ ОПИСАНИЕ GESAMTANSICHT ВНЕШНИЙ ВИД ВСТРАИВАЕМЫЕ ДУХОВЫЕ ШКАФЫ eINBAU-BACKÖFEN (НЕЗАВИСИМЫЕ) Anordnung von Funktionsbaugruppen Размещение функциональных узлов 1. Пaнeль управления 1. Bedienblende 2. Touch screen TFT-Display 2. Touch screen TFT-дисплей 3. Дверь устройства Tür des Gerätes Нажмите на зажженную часть дисплея, чтобы Tippen Sie auf das beleuchtete Teil des Displays включить... -
Seite 20: Multifunction Oven Control
EQUIPMENT MULTIFUNCTION OVEN CONTROL The switching on of the appliance is performed by the simple touching of the sensor display 1. The oven operations are steered through selecting of the necessary function 2 on the display 1. The basic programs of the appliance are pre- programmed for the temperature of 180 °C and for the duration time of 2:00 hours. -
Seite 21: Ausstatung
ОБОРУДОВАНИЕ AUSSTATUNG STEUERUNG VON MULTIFUNKTIONS- УПРАВЛЕНИЕ РАБОТОЙ BACKOFEN МНОГОФУНКЦИОНАЛЬНОГО ДУХОВОГО ШКАФА Включение устройства осуществляется Das Einschalten des Gerätes wird durch ein посредством простого касания сенсорного einfaches Tippen aufs Sensor-Displays дисплея 1, а управление режимами работы ausgeführt. Steuerung духового шкафа осуществляется посредством Backofenbetriebsfunktionen erfolgt durch... -
Seite 22: Operation Functions Of The Oven
OPERATION FUNCTIONS OF THE OVEN CONVENTIONAL COOKING A classical system in which top and bottom heat are used to cook a single dish. Place the food in the oven only once cooking temperature has been reached, i.e. when the heating indicator goes out. If you want to increase top or bottom temperature towards the end of the cooking cycle, set the temperature control to the right position. -
Seite 23: Betriebsfunktion Des Backofens
BETRIEBSFUNKTIONEN DES BACKOFENS РАБОЧИЕ ФУНКЦИИ ДУХОВОГО ШКАФА ОБЫЧНОЕ ПРИГОТОВЛЕНИЕ KONVENTIONELLES BACKEN Классическая система, при которой Ein klassisches System, das in der Verwendung der применяется верхний или нижний нагрев, Unter- oder Oberhitze besteht. Das System ist nur пригодна для приготовления только одного für die Zubereitung eines Gerichts geeignet. -
Seite 24: Cooling Fan
ROTISSERIE (if available) Some ovens are completely equipped with stick engine and rotary spit for spit roast. The rotisserie* allows to roast food in the oven rotary. It serves primarily for the roasting of shashliks, fowl, small sausages and similar dishes. The switch on and rotisserie actuation occurs... -
Seite 25: Grillen Am Drehspieß
ВЕРТЕЛ (если имеется) DREHSPIEß (wenn verfügbar) Некоторые духовки оборудованы вертелом, Einige Backöfen sind komplett mit Stabmotor und приводимым во вращение эл. мотором, Drehspieß für das Spießbraten ausgestattet. Благодаря вертелу* возможна вращательная Der Spieß* erlaubt es, die Speisen im Backofen обжарка блюд в духовке. Служит главным rotierend zu rösten. - Seite 26 Food probe The food probe is a thermometer which is being putted in the cooking food. With that thermometer you can control the internal temperature (core temperature) and then use to determine the end of the cooking time. It can happen, for example that the meat looks from the outside already cooked, however, is still bloody inside! The temperature which achieve the meals during...
- Seite 27 Temperatursonde Термозонд Термозонд это термометр, который Die Temperatursonde (Bratenthermometer) ist ein — помещается в приготовляемое блюдо и с Thermometer, das in das Gericht gesteckt wird und помощью которого Вы можете контролировать interne Temperatur внутреннюю температуру, а также использовать (Kerntemperatur) kontrollieren und so nutzen его...
- Seite 28 When the food probe riches the preprogrammed temperature, the oven will be turned off. This is indicated by a sound signal. You can vary the value of the lowest core temperature in an area from +30 °C to +99 °C. We recommend you to keep to the following table which was taken from "THE NATIONAL FOOD SAFETY DATABASE (USA)"...
- Seite 29 Когда температура термозонда достигнет Wenn Temperatursonde vorgestellte заданной, духовка отключается. Раздается Temperatur erreicht, dann wird Ofen звуковой сигнал. ausgeschaltet. Dies wird durch einen Signalton angezeigt. Вы можете варьировать минимальную Sie können den Wert der Mindest-Kerntemperatur внутреннюю температуру в области +30 °C до in einem Bereich von +30 °C bis + 99°C variieren.
- Seite 30 RYROLYTIC SELF CLEAN Some appliances are equipped with the pyrolytic cleaning. The interior of the oven with the function of pyrolytic cleaning will be heated to the temperature of 400 °C. All organics will be decomposed by the heat and their molecules will be destroyed.
- Seite 31 PYROLYSE-SELBSTREINIGUNG ПИРОЛИТИЧЕСКАЯ САМООЧИСТКА Некоторые устройства оборудованы функцией Einige Geräte sind mit der Funktion der Pyrolyse- пиролитической очистки. Внутреннее Reinigung ausgestattet. In den Backöfen mit der пространство духовок с функцией пиролиза Pyrolyse-Funktion wird der Innenraum auf die нагревается до температуры 400 °C. Все Temperatur von 400 °C erhitzt.
-
Seite 32: Oven Light
OVEN LIGHT The oven is equipped with the oven light. The oven light stays switched on during oven operations. The Lighting key 1 will be lighted more intense, while the interior of the appliance is illuminated. Touch this key to switch off the lighting. If you want to control your food after preparing it, touch this key again 1. -
Seite 33: Innenbeleuchtung
INNENBELEUCHTUNG ОСВЕЩЕНИЕ ДУХОВКИ Духовой шкаф оснащен системой освещения. Der Backofen ist mit der Innenbeleuchtung Свет остается включенным во время работы ausgestattet. Die Innenbeleuchtung bleibt während духовки. Во время освещения внутреннего des Betriebes von dem Backofen eingeschaltet. Die Beleuchtung-Taste 1 wird intensiver leuchten, пространства... - Seite 34 • The programmed temperature and duration will be shown on the display 1, 2. • If necessary, you can change these options by their activating (See Digital clock timer with sensor) . If you want to use the Probe , the Duration will be changed automatically to Probe after inserting the probe into the corresponding slot in the oven interior.
-
Seite 35: Elektronische Zeitschaltuhr Mit Sensor
На дисплее появятся • • Display erscheinen запрограммированные температура и vorprogrammierten Temperatur und die Dauer der Zubereitung 1, 2. время приготовления 1, 2. • • При необходимости Вы можете Sie können diese Daten auf Ihrer Wahl изменить данные параметры путём их ändern, wenn es notwendig ist. -
Seite 36: Digital Clock Timer With Sensor
DIGITAL CLOCK TIMER WITH SENSOR Intelligent System OF THE OVENS La Perle LANGUAGE SETTING Touch the field Setting, 1 in the main • menu. Touch the field Language, 2 in the Setting • menu level. • Choose the necessary language. The default language is English. -
Seite 37: Сенсорное Электронное Программирующее
СЕНСОРНОЕ ЭЛЕКТРОННОЕ ELEKTRONISCHE ZEITSCHALUHR MIT SENSOR-BEDIENUNG Intelligent System ПРОГРАММИРУЮЩЕЕ УСТРОЙСТВО VON BACKÖFEN La Perle Intelligent System ДУХОВЫХ ШКАФОВ La Perle ВЫБОР ЯЗЫКА SPRACHE EINSTELLUNG Нажмите пункт Настройки, 1 в главном Tippen Sie auf das Feld Einstellungen, 1 • • меню. im Hauptmenü. -
Seite 38: Date Setting
DATE SETTING Touch the field Date, 1 in the Setting menu. • Through the keyboard 2 set the actual date. • The input sequence is: (year), (month), (day). Touch OK, 3 to save the date and to return to • the interface of setting. -
Seite 39: Установка Даты
DATUM EINTELLUNG УСТАНОВКА ДАТЫ Tippen Sie auf das Feld Datum, 1 in der Нажмите пункт в меню • • Дата, Menü Einstellungen. Настройки. Durch die Tastatur 2 stellen Sie das С помощью клавиатуры 2 установите • • текущую дату. Последовательность aktuelle Datum ein. -
Seite 40: Time Setting
TIME SETTING Touch the field Time, 1 in the Setting • menu level. Through the keyboard 2 set the actual hour • and minutes. Touch OK, 3 to save the time and to return • to the interface of setting. •... -
Seite 41: Zeit Eintellung
ZEIT EINTELLUNG УСТАНОВКА ВРЕМЕНИ Tippen Sie auf das Feld Zeit, 1 in der Нажмите на пункт Время, 1 в меню • • Menü Einstellungen. Настройки. Durch die Tastatur 2 stellen Sie die aktuelle • С помощью клавиатуры 2 установите • текущее... -
Seite 42: Brightness Setting
CLOCK FORMAT SELECTION • Touch the field Clock format in the Setting menu. • Choose the necessary clock format: 12 or 24 hours, 1. The selected setting will be marked with symbol , Touch OK, 3 to save the clock format and •... -
Seite 43: Helligkeit-Eintellung
AUSWAHL DES UHRZEITFORMATES ВЫБОР ЧАСОВОГО ФОРМАТА Выберите пункт Часовой формат в • • Tippen Sie auf das Feld Uhrzeitformat in меню Настройки. dem Menü Einstellungen. Выберите желаемый формат: 12 или 24 • • Wählen Sie das gewünschte Uhrzeitformat aus: 12 oder 24 Stunden, 1. часа, 1. - Seite 44 BUZZER TONE SETTING • Touch Buzzer tone in the Setting menu. Through the slider 1 set the necessary • buzzer tone. Touch OK, 2 to save the buzzer tone and to • return to the Setting menu. TEMPERATURE UNITS SETTING •...
-
Seite 45: Lautstärke-Eintellung
LAUTSTÄRKE-EINTELLUNG НАСТРОЙКА ГРОМКОСТИ ЗВОНКА • • Выберите Громкость звонка в меню Tippen Sie auf Summerton im Menü Настройки. Einstellungen. Anhand von Slider 1 stellen Sie den • • Передвигая слайдер выберите необходимую громкость. gewünschten Summerton (Lautstärke) ein. • Tippen Sie auf OK, 2, um den Summerton Нажмите... -
Seite 46: Factory Default Setting
FACTORY DEFAULT SETTING • Touch Factory default setting in the Setting menu. Choose the necessary setting 2: No if you • do not want to activate the factory default settings and Yes if you want do it. The selected setting will be marked with symbol , Touch OK, 3 to save changes and to return •... -
Seite 47: Werkeinstellungen
ФАБРИЧНЫЕ УСТАНОВКИ WERKEINSTELLUNGEN • • Выберите Фабричные установки в Tippen Sie auf Werkeinstellungen im меню Настройки. Menü Einstellungen. Wählen Sie gie gewünschte Einstellung 2 Выберите необходимую настройку 2: • • aus: Nein wenn sie die Einstellungen nicht нажмите Нет, если Вы не хотите изменять... - Seite 48 Electronical countdown timer The countdown timer works independently of all other timer functions, and can be used even when the appliance is switched off. If the timer key 1 is lighted you can enter a minute minder duration at any time, for example when you are boiling eggs on the hob.
- Seite 49 Электронный минутник Elektronischer Kurzzeitwecker Электронный минутник работает независимо от Der Gebrauch vom elektronischen Kurzzeitwecker других функций. Им можно пользоваться даже ist von anderen Funktionen unabhängig und kann если устройство выключено. auch bei dem ausgeschalteten Gerät verwendet Когда кнопка 1 горит, вы всегда можете werden.
- Seite 50 Setting the cooking temperature and the duration The process in the oven should switch off after a wanted duration automatically. Before setting the duration you have to set the oven operating function temperature (see chapter Usage) Set the Temperature: • Touch the Temperature in the menu of the chosen function to adjust the temperature.
- Seite 51 Einstellenung Temperatur Установка температуры и продолжительности приготовления Betriebsdauer Духовой шкаф должен автоматически Der Vorgang im Backofen soll nach einer отключиться по истечении желаемого gewünschten Dauer automatisch abgeschaltet промежутка времени. werden. Прежде чем задать продолжительность Bevor Dauer Gerichtszubereitung приготовления, Вы должны установить режим eingegeben wird, müssen...
- Seite 52 Setting the Start of cooking time The oven must be switched on after the set start time. Before setting the end of cooking time you have to set the oven operating function and the temperature (see chapter Multifunction oven control). Set the Start time of cooking: Touch the Duration 1 in the menu of the •...
- Seite 53 Установка времени начала приготовления Einstellen der Startzeit Духовой шкаф должен автоматически включиться в Der Backofen muss in eingegebener Startzeit заранее заданное время. eingeschaltet werden. Прежде чем задать время окончания работы, Вы Bevor die Ausschaltzeit eingegeben wird, müssen Sie die Backofenfunktion und die должны...
- Seite 54 Setting cooking duration and end times You can combine the cooking duration and end of cooking time functions to set the start and end times for cooking. In this way you can program your electronic oven to cook while you are out or to defrost foods ready for you to cook when you get back.
- Seite 55 Einstellen der Betriebsdauer und Ausschaltzeit Установка продолжительности и времени окончания приготовления Вы можете комбинировать функции времени Sie können die beiden Funktionen "Betriebsdauer" приготовления и времени окончания und „Ausschaltzeit“ kombinieren, wobei Sie eine приготовления, задавая желаемое время gewünschte Zeit eingeben, um den Backofen ein- включения...
- Seite 56 Now set the wanted Finish time. • Touch the Finish time in the menu of the chosen function. • Set the necessary finish time of the preparation. • A few seconds later this time will be registrated 2 (in our example – 10:40). •...
- Seite 57 Теперь запрограммируйте желаемое время Programmieren jetzt gewünschte окончания процесса приготовления. Ausschaltzeit. Нажмите Окончание в меню выбранной • • Tippen Sie auf Ausschaltzeit im Menü der функции готовки gewählten Funktion. • • Установите желаемое время окончания Stellen Sie die gewünschte Ausschaltzeit готовки...
- Seite 58 Pre-programmed recipes For your comfort is the oven La Perle equipped with the pre-programmed recipes for different dishes. So can you select the necessary recipe: Touch Recipe, 1 in the main menu. • • Choose from the pre-programmed recipes a dishe you would like to prepare, 2 (Cakes for example).
- Seite 59 Vorpogrammierte Rezepte Запрограмированные рецепты Für Ihren Komfort ist der Backofen La Perle mit Для вашего удобства духовой шкаф La Perle имеет запрограмированные рецепты на den vorprogrammierten Rezepten für verschiedene различные блюда. Gerichte ausgestattet. Для выбора рецепта: So wählen Sie das Rezept aus: Tippen Sie auf Rezept, 1 inm Hauptmenü.
- Seite 60 Set the necessary duration, 1 of the • preparation. Touch OK, 2 to start cooking. • User programmes You can program up to 4 recipes, if you wish To program the recipes: Touch the User programmes, 3 in the main •...
- Seite 61 Stellen Sie die gewünschte Dauer, 1 der • • Установите желаемое время продолжительности приготовления, 1. Zubereitung ein. Tippen Sie auf OK, 2 um die Zubereitung • • Нажмите чтобы запустить приготовление. zu starten. Benutzerprogramme Пользовательские программы Вы можете самостоятельно запрограммировать Nach Ihrem Wunsch können Sie selbst bis zu 4 до...
- Seite 62 • Select the type of preparation, temperature and duration, as described in the section Setting the cooking temperature and the duration. Touch Complete, 1 to confirm the creation • of the recipe. Touch OK, 2 on the information display. • •...
- Seite 63 • • Выберите способ приготовления, Wählen Zubereitungsart, температуру и продолжительность, как Temperatur und Dauer, wie es im Kapitel описано в разделе Установка Einstellenung der Temperatur und der температуры и продолжительности Betriebsdauer beschrieben ist. приготовления Tippen Sie auf Beenden, 1 um die Чтобы...
- Seite 64 Child lock An important planning aspect is to prevent inadvertent shift or unintentional turning on. You can activate the child lock any time. Activating the child lock • Touch the lighted part of the display to switch on the appliance 1 (if it is off). Touch the ON/OFF key, 2.
- Seite 65 Kindersicherung Блокировка от детей Данное устройство имеет функцию блокировки Ein wichtiger Planungsaspekt Ihres neuen Gerätes от детей, которая предотвращает их besteht darin, versehentliche Verstellungen oder вмешательство и случайное включение духовки. ungewolltes Einschalten zu verhindern. Sie können Вы можете активировать эту функцию в любое die Kindersicherung jederzeit aktivieren.
- Seite 66 Self-clean function* The self clean function of the oven is the function of the pyrolytic cleaning, which takes place by high temperatures. Touch the Self clean 1 in the main menu. • • Select the necessary duration of the pyrolytic cleaning 2. •...
- Seite 67 Selbstreinigungsfunktion* Функция самоочистки* Функция самоочистки духовки представляет Unter der Selbstreinigung-Funktion des Backofens собой пиролитическую очистку под ist die Funktion der Pyrolyse-Reinigung gemeint, воздействием высоких температур. die bei hohen Temperaturen stattfindet. Выберите Самоочистка 1 в главном • Tippen Sie auf Selbstreinigung 1 in dem •...
- Seite 68 Catalytic cleaning* The self clean function of the oven is the function of the pyrolytic cleaning, which takes place by high temperatures. Touch the Self clean 1 in the main menu. • Select the necessary temperature 2 • 200-250 °C and duration 3 of the self cleaning (the recommended duration is 1 hour) •...
- Seite 69 talytische S elbstreinigung* Каталитическая очистка* Каталитическая очистка духовки представляет Unter der Katalytischen Selbstreinigung des собой очистку под воздействием высоких Backofens ist die Funktion der Reinigung gemeint, температур. die bei hohen Temperaturen stattfindet. Выберите Мультинагрев 1 в главном • Tippen Sie auf Selbstreinigung 1 in dem •...
-
Seite 70: Steam Function
– MOISTURE PLUS STEAM FUNCTION Moisture Plus function uses a steam injection system in the cooking process. The steam ejection hole is located on the top center of the rear wall of the oven. Water pump in going through the tube (located on the left side under control panel). - Seite 71 – KLIMAGAREN DAMPFFUNKTION* ФУНКЦИЯ УВЛАЖНЕНИЯ ПАРОМ Функция увлажнения паром использует систему Beim Klimagaren werden die Dampfstoße während впрыска пара в процессе приготовления. des Prozesses der Zubereitung verwendet. Отверстие выброса пара расположено в центре Das Loch der Dampfstöße befindet sich in der Mitte верхней...
- Seite 72 The are the following options of Moisture Plus function: Automatically: The optimum temperature, the degree of moisture and the duration are set automatically. Turn the pipe, 1 under the control panel, 2 • to the vertical position. Fill a container, 3 with approx. 100 ml water •...
- Seite 73 Предусмотрены следующие опции выбора Es gibt folgende Optionen der Klimagaren- функции приготовления с паром: Funktion: Автоматическая: Automatische: Автоматически установлены оптимальная Die optimale Temperatur, der Feuchtigkeitsgrad температура, степерь влажности и und die Dauer werden automatisch eingestellt. длительность приготовления Повернуть трубку, под панелью...
- Seite 74 • Remove the water container after the pump in process is finished. Put the pipe, 1 back till you hear the click • sound. • Close the door. Touch OK, 2. • At the end of the program, pump out the residual water.
- Seite 75 • • После завершения процесса закачки Entfernen Sie den Behälter, wenn das уберите контейнер. Einsaugen beendet ist. Setzen Sie das Rohr, 1 zurück, bis Sie das Установите трубку, 1 обратно, до щелчка. • • Klick-Geräusch hören. • • Закройте дверцу духовки. Schließen Sie die Tür Tippen Sie auf OK, 2.
- Seite 76 DESCALE FUNCTION To ensure the oven functions correctly you should run the descaling program after a certain number of oven uses. Touch Descale 1 in the main menu. • Pull an empty container 2 under the pipe 3 • (located below the control panel on the left side).
-
Seite 77: Удаление Накипи
ENTKALKEN УДАЛЕНИЕ НАКИПИ Для обеспечения правильной работы функций Um den einwandfreien Betrieb der Ofenfunktionen духового шкафа, Вы должны переодически zu gewährleisten, muss nach einer bestimmten запускать программу удаления накипи Anzahl der Anwendungen die Entkalken-Funktion durchgeführt werden. Выберите Удаление накипи 1 в главном •... - Seite 78 Pump out the descaling liquid after 30 minutes. Pull an empty container 1 under the pipe 2. • Touch ОК, 3, pump out program starts. It • will be stopped after about 1 minute work. The oven injection system will need to be cleaned at the end of the descaling process to remove all traces of the descaling liquid.
- Seite 79 По окончании программы удаления накипи Pumpen Sie die Entkalkungsflüssigkeit nach 30 откачайте жидкость Minuten aus. Stellen Sie einen leeren Behälter 1 unter das Поставьте пустой контейнер 1 под • • Rohr 2. трубку 2. Tippen Sie auf ОК, 3. Programm des Нажмите...
-
Seite 80: Practical Advices
PRACTICAL ADVICES Baking • It is recommended to bake pastry and cakes on the baking trais, which are provided as oven equipment. Choose a matching tray height. Depending on model the ovens have 4 or 5 heights. • You also can bake on customary baking trais, which are to be placed on the grate. -
Seite 81: Praktische Empfehlungen
PRAKTISCHE EMPFEHLUNGEN ПРАКТИЧЕСКИЕ СОВЕТЫ Backen Выпечка кондитерских изделий • • Рекомендуется выпечка теста на Es wird empfohlen, die Gebäcke und противнях, поставляющихся вместе с Kuchen auf den Backblechen zu backen, духовым шкафом. Выберите die als Herdausrüstung mitgeliefert sind. подходящий уровень для... - Seite 82 Pastry parameter Gebäckparameter bei Nutzung Параметры выпечки с конвенционным нагревом. For conventional heating Konventioneller Beheizung Table 1 Tabelle 1 Таблица 1 Kind of pastry Height Temperature Baking time, min. Gebäckart Höhe Temperatur °C Backzeit, min. Тип теста Раб. уровень Температура °С Время, мин.
- Seite 83 Параметры выпечки с Pastry parameter Gebäckparameter bei Nutzung термоциркуляцией. For thermocirculation. der Heißluft. Таблица 2 Table 2 Tabelle 2 Temperature °C Baking time, min. King of pastry / Gebäckart / Тип теста Temperatur °C Backzeit, min. Температура °С Время, мин. Pastry in forms / Formgebäck/ Выпечка...
- Seite 84 Параметры жарения с Roast parameters for usage of Bratparameter bei Nutzung conventional heating Konventioneller Beheizung конвенционным нагревом. Table 3 Tabelle 3 Таблица 3 Kind of meat Advices Height Temperature °C Roasttime min. Fleischgattung Empfehlungen Höhe Temperatur °C Bratzeit min. Вид мяса Рекомендации...
- Seite 85 Roast parameters for usage of Bratparameter bei Nutzung Параметры жарения с thermocirculation der Heißluft термоциркуляцией. Table 4 Tabelle 4 Таблица 4 Fleischgattung Portion Temperatur °C Bratzeit min. Вид мяса Порция Температура °С Время, мин. Fowl / Hähnchen / Цыплята 50-60 Game / Wildfleisch / Дичь...
- Seite 86 Note! The shown parameters concern roasting on the grid. If you use closed jars the temperature is to be set to 200 °C. After the run off of the predetermined halftime the meat should be reversed. It is more advantageousto roast bigger meat shares. Baste the meat with gravy while roasting.
- Seite 87 Приведенные параметры Bemerkung! dargestellten Parameter Примечание! касаются жарения на решетке. В случае betreffen das Braten auf dem Rost. Bei der применения закрытых емкостей (кастрюль), Verwendung von den geschlossenen Gefäßen ist температуру следует установить на уровне 200 die Temperatur auf 200 °C einzustellen. °С.
-
Seite 88: Care And Attendance
CARE AND ATTENDANCE IMPORTANT!!! As a safety precaution, before care and attendance of the oven, always disconnect the plug from the power socket or the power cable from the oven. Make sure that the appliance is cool before cleaning. Do not clean the appliance while it is still hot. -
Seite 89: Pflege Und Wartung
ОБСЛУЖИВАНИЕ И УХОД PFLEGE UND WARTUNG ВАЖНО!!! В качестве меры предосторожности WICHTIG!!! Als Sicherheitsvorkehrung soll vor необходимо перед обслуживанием и уходом за jeder Pflege- und Wartungarbeit des Backofens духовкой отключать ее от сети. immer das Stromnetz abgeschaltet werden. Перед чисткой убедитесь, что устройство не Vergewissern Sie sich, dass das Gerät vor dem является... - Seite 90 Oven The inner walls of the oven are covered with easy to be cleaned high quality enamel. The very smooth surface counteracts against the appearance of the remaining soiling on the walls of the oven very fast and can be also simply cleaned. The anti-acid- containing quality of this enamel permits a long-term qualitatively high exploitation of Your oven The oven is to be cleaned after every use.
- Seite 91 Backofen Духовой шкаф Внутренние стенки духовки покрыты Die inneren Wände des Backofens sind mit der высококачественной легкоочищающейся hochwertigen und reiniogungsfreundlichen Emaille эмалью. Очень гладкая поверхность bedeckt. Die sehr glatte Oberfläche wirkt dem противодействует появлению на стенках Erscheinen der restlichen Verschmutzungen auf духовки...
- Seite 92 Kaiser The given construction differs from similar ones through the comfortable and practical access to...
- Seite 93 выдвигать все противни как совместно, так и по und sogar während der Zubereitung eines Gerichtes отдельности даже во время приготовления herauszuschieben. блюд. Kaiser Kaiser Данная конструкция отличается от Diese Konstruktion unterscheidet sich von аналогичных удобным и практичным доступом к...
- Seite 94 Alternate inspection Besides the current maintenance the user is dutybound to the following actions: • alternate check and maintenance of oven elements and assemblies, • let the oven be checked by the customer service after expiration of the warranty once in two years.
- Seite 95 Периодический осмотр Periodische Besichtigung Кроме операций связанных с текущим уходом Außer den laufenden Wartungsarbeiten ist der за плитой, следует: Benutzer zu folgenden Tätigkeiten verpflichtet: производить периодические • • Periodische Überprüfung und Wartung von проверки исправности органов Backofenelementen und Baugruppen, управления и...
- Seite 96 Error Possible reason Advices Oven doesn’t Disturbance in power Check the work supply protection device of your home conduction. If defective - replace Interruption of the Set the current time stream supply on the display again and switch on the oven Zeros flash on Interruption of the...
- Seite 97 Störung Mögliche Hinweise Проблемы Возможные Решения Ursache причины Нарушение Проверить Der Ofen Sörung der Prüfen der Духовка не электроснабжения предохранители funktioniert работает Elektroversorgung Schutzvorrichtug домашней nicht n der häuslichen проводки. Leitung. Wenn Неисправные - fehlerhaft - заменить ersetzen новыми Перерыв в подаче Заново...
-
Seite 98: Respect For The Environment
RESPECT FOR THE ENVIRONMENT The documentation provided with this oven has been printed on chlorine free bleached paper or recycled paper to show respect for the environment. The packaging has also been designed to avoid environmental impact. Packaging material ecological and can be re-used or recycled. By recycling the packaging, you will help save raw materials as well as reducing the bulk of domestic and industrial waste. -
Seite 99: Umweltverträglichkeit
ОХРАНА ОКРУЖАЮЩЕЙ СРЕДЫ UMWELTVERTRÄGLICHKEIT В качестве вклада в охрану окружающей среды, Beitrag Umweltschutz wurde вся документация к этому устройству была Dokumentation zum diesen Geräts auf einem напечатана на отбеленной, не содержащей chlorfrein und gebleichten oder Recycling-Papier хлора или на пригодной ко... -
Seite 100: Garantiebedingungen Für Haushaltsgeräte
Zentrale Kundendienst EU SPI-Kundendienst: SPI Service-Center ServicePoint International GmbH Tel.: 01805-76 33 76 (0,14 Euro pro Minute aus dem Thunbuschstr.8 D-42781 Haan Festnetz, Mobilfunk max. 0,42 Euro pro Minute) Tel.: +49 (0)2104-9640-0 E-Mail: service@spi-kundendienst.de Fax.: +49 (0)2104-9640-20 Internet: www.spi-kundendienst.de GARANTIEBEDINGUNGEN FÜR HAUSHALTSGERÄTE: 1. - Seite 101 1. In the event of our products being damaged or experiencing some kind of fault from transport damage, due to incorrect installation by other than trained Kaiser technician or taking improper care of the products, connecting to the wrong power supply, the use of non-recommended cleaning agents and detergents.
-
Seite 102: Условия Гарантии
Телефоны: 8 (495) 482-55-74 8 (499) 488-75-10 8 (499) 488-76-10 E-Mail: service@kaiser.ru Internet: www.kaiser.ru УСЛОВИЯ ГАРАНТИИ 1. Гарантия на исправное действие прибора на территории России действительна на период 12 месяцев со дня покупки прибора (подтверждена оттиском печати пункта розничной продажи и подписью продавца). -
Seite 103: Гарантійні Умови
в Україні по сервісному обслуговуванню та роботі зі споживачами: Тел.: (044) 331-50-77, 331-50-78, 496-55-44 Факс: (044) 391-03-00 E-Mail: service@kaiser.ua Internet: www.kaiser.ua ГАРАНТІЙНІ УМОВИ Гарантія на справну роботу пристрою є дійсною на період 12 місяців з дня придбання приладу (підтверджена відбитком печатки пункту роздрібної торгівлі ті підписом продавця). -
Seite 104: Garantiekarte
GARANTIEKARTE (Nr. entspricht der Nummer des Geräts, siehe auf der Rückseite dieser Bedienungsanleitung) Die oben angegebenen Garantieverpflichtungen beeinträchtigen nicht die gesetzlichen Verbraucherrechte Wir gratulieren Ihnen zur Anschaffung der Haushaltsgeräte von ausgezeichneter Qualität! Bitte machen Sie sich mit der vorliegenden Garantiekarte vertraut und überprüfen, ob sie richtig ausgefüllt und mit dem Stempel des Verkäufers versehen ist. - Seite 105 VERKAUFSVERMERK :: PURCHASE MARK :: ОТМЕТКА О ПРОДАЖЕ :: ВІДМІТКА ЩОДО ПРОДАЖУ PRODUKT :: PRODUCT :: ИЗДЕЛИЕ :: ВИРІБ Elektroherd • Electric cooker Kühl- Gefriergerät • Fridge/ Freezer Электрическая плита • Електрична плита Холодильник • Холодильник Gasherd • Gas cooker Waschmaschine •...
- Seite 106 The manufacturer declines all responsibility for possible mistakes and typing errors and reserves the right to make in design and construction of our own products those changes which do not touch negative influence upon the qualities and properties without a preliminary notification.
- Seite 108 OLAN-Haushaltsgeräte • Berlin • Germany www.kaiser-olan.de...