Werbung
Verfügbare Sprachen
Verfügbare Sprachen
Quicklinks
SIT 1208-1
FLM 40
431258
SERVICEINSTRUKTION Fläktbyte FLM 40
SE
SERVICE INSTRUCTION Fan replacement FLM 40
GB
SERVICE-INSTRUKTION Ventilatorwechsel FLM 40
DE
SERVICEINSTRUKTION / SERVICE INSTRUCTIONS /
WARTUNGSINSTRUKTIONEN
Fläktbyte / Fan replacement / Ventilatorwechsel
A
Werbung

Verwandte Anleitungen für Nibe FLM 40


Inhaltszusammenfassung für Nibe FLM 40
- Seite 1 SERVICEINSTRUKTION / SERVICE INSTRUCTIONS / SIT 1208-1 FLM 40 WARTUNGSINSTRUKTIONEN 431258 Fläktbyte / Fan replacement / Ventilatorwechsel SERVICEINSTRUKTION Fläktbyte FLM 40 SERVICE INSTRUCTION Fan replacement FLM 40 SERVICE-INSTRUKTION Ventilatorwechsel FLM 40...
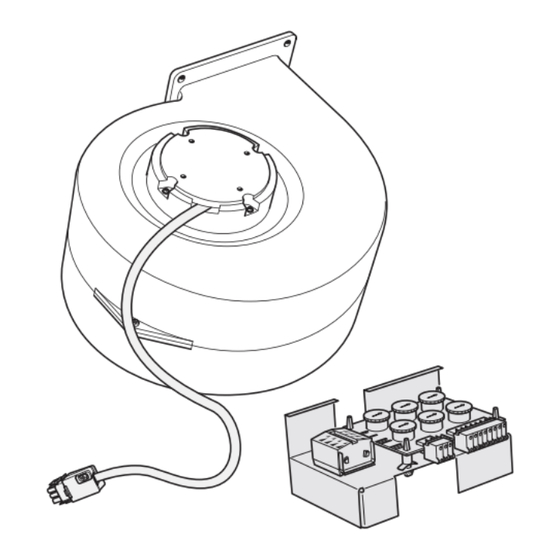
- Seite 3 SERVICEINSTRUKTION Fläktbyte FLM 40 Allmänt 3. Lossa skruvarna och demontera plastlocket. Denna instruktion gäller utbyte av fläkt i NIBE FLM 40. Utbyte av fläkt och montering av fläktkort 1. Gör frånluftsmodulen spänningslös och demontera frontluckan. 4. Demontera den gamla fläkten enligt bild.
- Seite 4 11. Återmontera övriga detaljer i omvänd ordning. Fläktinställning Kontroll av gammal fläkt Kontrollera den gamla fläktens DIP-kontakter och läs av med hjälp av följande tabeller och diagram vilken fläkt- kurva ”Fläktläge B” (normalläge) är inställd till. DIP-kontakter, under lock Fläktbyte FLM 40...
- Seite 5 Tillgängligt tryck, Pa Tillgängligt tryck, Pa Flöde I, J G, H E, F C, D Flöde A, B Flöde m³/h Effekt, W Effekt, W I, J G, H E, F C, D A, B Flöde Flöde m³/h Fläktbyte FLM 40...
- Seite 6 Elschema Fläktbyte FLM 40...
- Seite 7 SERVICE INSTRUCTIONS Fan replacement FLM 40 General 3. Slacken off the screws and remove the plastic cover. This instruction applies to the fan replacement in NIBE FLM 40. Replacing the fan and installing the fan card 1. Cut the power to the exhaust air module and re- move the front door.
- Seite 8 Fan adjustment Checking the old fan Check the old fan’s DIP switches and read off which fan curve ”Fan position B” (normal position) is set to using the following tables and diagrams. DIP switches, under cover Fan replacement FLM 40...
- Seite 9 Available pressure, Pa Tillgängligt tryck, Pa I, J Flow G, H E, F C, D Flow A, B Flöde m³/h Output, W Effekt, W I, J G, H E, F C, D A, B Flow Flöde m³/h Fan replacement FLM 40...
-
Seite 10: Electrical Circuit Diagram
Electrical circuit diagram Fan replacement FLM 40... - Seite 11 SERVICEANLEITUNG Ventilatorwechsel FLM 40 Allgemeines 3. Lösen Sie die Schrauben und entfernen Sie die Kunststoffabdeckung. Diese Anleitung beschreibt den Ventilatorwechsel in NIBE FLM 40. Ventilatorwechsel und Montage der Ventilatorplatine 1. Unterbrechen Sie die Stromzufuhr zum Abluftmodul und nehmen Sie die Frontabdeckung ab.
- Seite 12 11. Montieren Sie die restlichen Komponenten erneut in umgekehrter Reihenfolge. Ventilatoreinstellung Kontrolle des alten Ventilators Kontrollieren Sie die DIP-Schalter des alten Ventilators. Lesen Sie mithilfe der folgenden Tabellen und Diagramme ab, auf welche Ventilatorkurve ”Ventilatorstellung B” (Normalstellung) justiert ist. DIP-Schalter, unter der Abdeckung Ventilatorwechsel FLM 40...
- Seite 13 Tillgängligt tryck, Pa Durch- fluss I, J Durch- G, H E, F C, D fluss A, B Flöde m³/h Leistung, W Effekt, W I, J G, H E, F Durch- C, D A, B fluss Flöde m³/h Ventilatorwechsel FLM 40...
- Seite 14 Schaltplan Ventilatorwechsel FLM 40...
- Seite 16 Tel: +43 (0)7662 8963-0 Fax: +43 (0)7662 8963-44 E-mail: mail@knv.at www.knv.at NIBE Wärmetechnik AG, Winterthurerstrasse 710, CH-8247 Flurlingen Tel: (52) 647 00 30 Fax: (52) 647 00 31 E-mail: info@nibe.ch www.nibe.ch Druzstevni zavody Drazice s.r.o, Drazice 69, CZ - 294 71 Benatky nad Jizerou Tel: +420 326 373 801 Fax: +420 326 373 803 E-mail: nibe@nibe.cz www.nibe.cz...