Inhaltsverzeichnis
Werbung
Verfügbare Sprachen
Verfügbare Sprachen
DELTA-SPORT HANDELSKONTOR GMBH
Wragekamp 6 • DE-22397 Hamburg
GERMANY
05/2018
Delta-Sport-Nr.: QC-5150
IAN 300162
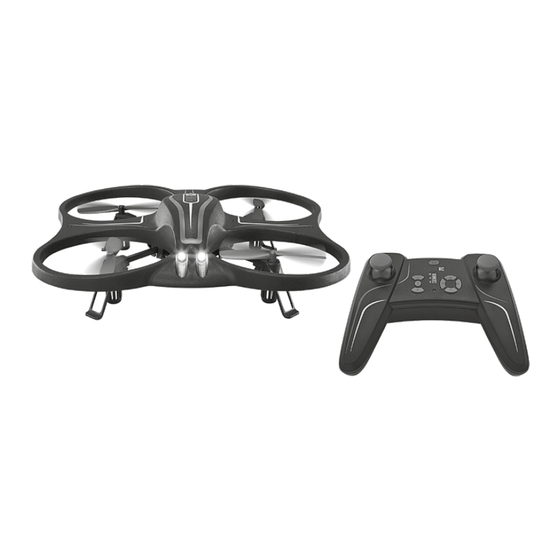
QUADROCOPTER
QUADCOPTER
QUADRICOPTÈRE
QUADROCOPTER
QUADCOPTER
Gebrauchsanweisung
Instructions for use
QUADRICOPTÈRE
QUADROCOPTER
Mode d'emploi
Gebruiksaanwijzing
KVADROKOPTÉRA
CUADRICÓPTERO
Návod k použití
Instrucciones de uso
QUADRICOPTERO
Manual de instruções
IAN 300162
Klappen Sie vor dem Lesen die Seite mit den Abbildungen aus und machen Sie sich anschließend mit
allen Funktionen des Artikels vertraut.
Before reading, fold out the illustration page and get to know all of the functions of your unit.
Dépliez la page avec les illustrations avant la lecture et informez-vous ensuite au sujet des fonctions de
l'appareil.
Klap voor het lezen de pagina met de afbeeldingen open en maak u vervolgens vertrouwd met alle
functies van het apparaat.
Před čtením si nejdříve vyklopte stránku s obrázky a seznamte se se všemi funkcemi přístroje.
Antes de leer, abra la página con las ilustraciones y familiarícese seguidamente con todas las funciones
del aparato.
Antes de ler, vire o lado com as imagens para fora e familiarize-se com todas as funções do aparelho.
DE/AT/CH
Gebrauchs- und Sicherheitshinweise
GB/IE
Instructions and Safety Notice
FR/BE
Instructions d'utilisation et de sécurité
NL/BE
Gebruiksaanwijzingen en veiligheidsinstructies
CZ
Pokyny k používání a bezpečnostní upozornění
ES
Instrucciones de manejo y seguridad
PT
Manual de instruções e indicações de segurança
Seite
12
Page
21
Page
29
Pagina
39
Stránky 48
Página
56
Página
65
Werbung
Inhaltsverzeichnis

Verwandte Anleitungen für DELTA-SPORT IAN 300162


Inhaltszusammenfassung für DELTA-SPORT IAN 300162
- Seite 1 QUADRICOPTÈRE QUADROCOPTER GB/IE Instructions and Safety Notice Page Mode d‘emploi Gebruiksaanwijzing FR/BE Instructions d‘utilisation et de sécurité Page DELTA-SPORT HANDELSKONTOR GMBH KVADROKOPTÉRA CUADRICÓPTERO NL/BE Gebruiksaanwijzingen en veiligheidsinstructies Pagina Wragekamp 6 • DE-22397 Hamburg Návod k použití Instrucciones de uso GERMANY Pokyny k používání...
- Seite 2 ca. 60 Min...
-
Seite 6: Inhaltsverzeichnis
Inhaltsverzeichnis /Contents Lieferumfang ............12 Package contents ..........21 Quadrocopter .......... 12 Quadrocopter ........... 21 Fernsteuerung ........... 12 Remote control .......... 21 Technische Daten ..........12 Technical data ........... 21 Bestimmungsgemäße Verwendung ....12 Intended use ............21 Sicherheitshinweise ........12 - 15 Safety information ........ - Seite 7 Table des matieres/Inhoudsopgave Étendue de la livraison ........29 Leveringsomvang ..........39 Quadrirotor ..........29 Quadrocopter ........... 39 Télécommande ......... 29 Afstandsbediening ........39 Caractéristiques techniques ......29 Technische gegevens ........39 Utilisation conforme à sa destination ....29 Beoogd gebruik ..........39 Consignes de sécurité...
- Seite 8 Obsah/Índice Obsah balení ............ 48 Alcance de suministro ........56 Quadrocopter ........... 48 Cuadricóptero .......... 56 Dálkové ovládání ........48 Control remoto .......... 56 Technické údaje ..........48 Datos técnicos ........... 56 Účel použití ............48 Uso previsto ............56 Bezpečnostní...
- Seite 9 Índice Volume de fornecimento ........65 Quadricóptero ......... 65 Telecomando ..........65 Dados técnicos ..........65 Utilização prevista ..........65 Instruções de segurança ......65 - 68 Aviso relativo às pilhas/bateria! ..67 - 68 Inserir as pilhas no telecomando ....68 Carregar a bateria ...........
-
Seite 10: Lieferumfang
Technische Daten Herzlichen Glückwunsch! Energieversorgung Batterie: Mit Ihrem Kauf haben Sie sich für einen 1,5 V Batterietyp AAA, LR3 hochwertigen Artikel entschieden. Machen Sie sich vor der ersten Inbetriebnahme Energieversorgung Akku: mit dem Artikel vertraut. 3,7 V Li-Polymer 300 mAh Lesen Sie hierzu aufmerksam die Reichweite: ca. - Seite 11 • Prüfen Sie, ob der Quadrocopter gemäß der • Gehen Sie bei Betrieb des Quadrocopters kein Gebrauchsanweisung zusammengebaut ist. Risiko ein! Ihre eigene Sicherheit und die Ihres • Sollten Sie noch nicht über ausreichende Kennt- Umfeldes hängen von Ihrem verantwortungsbe- nisse über den Umgang mit ferngesteuerten wussten Umgang mit dem Quadrocopter ab.
-
Seite 12: Warnhinweise Batterien/Akku
Erst danach darf die Fernsteuerung ausgeschal- • Bewahren Sie Batterien immer außerhalb der tet werden. Reichweite von Kindern auf. • Bei einem Defekt oder einer Fehlfunktion ist • Nicht wiederaufladbare Batterien dürfen nicht zuerst die Ursache der Störung zu beseitigen, geladen werden. -
Seite 13: Batterien In Die Fernsteuerung Einsetzen
Die Rotoren könnten ungewollt anlaufen und • Transportieren Sie Akkus nie in Hosentaschen Schäden oder Verletzungen verursachen. oder Tragetaschen. Achten Sie auf scharfe oder • Laden Sie nur intakte und unbeschädigte Akkus. kantige Objekte, die Ihrem Akku schaden könnten. Sollte die äußere Isolierung des Akkus beschä- •... -
Seite 14: Unterspannungs-Warnung
2. Stecken Sie das andere Kabelende (5b) • Suchen Sie sich eine große, offene und weite des USB-Ladekabels in einen USB-Port Fläche ohne Hindernisse, achten Sie besonders eines eingeschalteten Computers oder einer auf Gebäude, Menschenansammlungen, Hoch- spannungsleitungen und Bäume. Ladestation mit USB-Port. 3. -
Seite 15: Quadrocopter Steuern
Vor-/rückwärts bewegen (Nick) Hinweis: Schalten Sie immer zuerst die Fernsteu- erung ein. Achten Sie darauf, dass beim Einschal- (Abb. L) ten der Fernsteuerung der Gashebel auf niedrigs- Indem Sie den rechten Steuerhebel (2e) nach ter Stellung (Motoren aus) eingestellt ist! vorne oder hinten bewegen, neigt sich der Erst danach darf der Akku des Modells ange- Quadrocopter in die entsprechende Richtung. -
Seite 16: Led-Positions-Leuchten
Geschwindigkeitsstufe 1 (2h) Die LED-Positions-Leuchten (1b) des Quadro- (Piepton ertönt einmal) copters blinken auf. Sobald sie aufhören zu blinken, ist die Kalibrierung abgeschlossen und Geschwindigkeitsanzeige (2i) leuchtet im unteren der Quadrocopter flugbereit. Bereich. Hinweis: Wiederholen Sie die Kalibrierung, Für die ersten Versuche und wenig Flugerfahrung. wenn der Quadrocopter noch immer unkontrolliert Geschwindigkeitsstufe 2 (2g) (Piepton ertönt zweimal) -
Seite 17: Hinweise Zur Entsorgung
2. Setzen Sie das Ersatzrotorblatt (6) auf die Die Garantiezeit wird durch etwaige Reparaturen Position, wo vorher das beschädigte Rotorblatt aufgrund der Garantie, gesetzlicher Gewähr- saß. leistung oder Kulanz nicht verlängert.Dies gilt auch für ersetzte und reparierte Teile. Hinweise zur Entsorgung Nach Ablauf der Garantie anfallende Repara- turen sind kostenpflichtig. -
Seite 18: Mögliche Fehler
Mögliche Fehler Im Folgenden werden Ihnen mögliche Fehler, ihre Ursachen und die Behebung aufgezeigt. Fehler Mögliche Ursache Behebung Fernsteuerung (2) reagiert nicht. Fernsteuerung (2) ist Fernsteuerung (2) einschalten. ausgeschaltet. Batterien (4) falsch eingelegt. Batterien (4) richtig einlegen. Batterien (4) sind leer. Batterien (4) austauschen. -
Seite 19: Package Contents
Technical data Congratulations! Batteries power supply: With this purchase you have opted for a high- 1.5V Battery type AAA, LR3 quality item. Familiarise yourself with the item before using it for the fist time. Rechargeable battery power supply: Read the following instructions for use 3.7V Li-Polymer 300mAh carefully. - Seite 20 • Caution! Risk of eye injuries. To prevent eye • Select a suitable location (open space) to injuries, do not use close to your face. operate the Quadrocopter. Do not fly in the fol- • Make sure weather conditions are suitable. The lowing areas: near overhead lines (e.g., power item must not get wet.
-
Seite 21: Battery Warning Indications
• In order to prevent damage to the Quadrocop- • Do not expose the batteries to extreme ter from crashing due to undervoltage or to the conditions (e.g., radiators or direct sunlight). battery due to exhaustive discharge, the light • Batteries must not be swallowed! However, if signals for the undervoltage indicator must be this does happen, you must see a doctor imme- strictly observed (see section “Undervoltage... -
Seite 22: Inserting The Batteries Into The Remote Control
• Never charge or store the battery near great Replacing the batteries heat sources or open fires, as this could result in CAUTION! Observe the following an explosion. instructions to avoid mechanical and • Never charge a battery that is bloated due to electrical damage. -
Seite 23: Suitable Flight Environment
Suitable flight environment Starting the flight For an optimum flight, the environment should fulfil Here are a few tips on controlling the Quadrocop- the following criteria: ter, before you start the flying: • Calm, windless, closed room. • Move the throttle (2d) back slightly, as soon as •... -
Seite 24: Hover Left/Right (Roll)
Hover left/right (roll) (Fig. K) Speed level 2 (2g) (beep sounds twice) If you want to perform a movement to the right or The speed indicator (2i) lights up in the middle left without rotating the Quadrocopter, i.e. hover area. sideways, then move the right control lever (2e) to For pilots with some experience. -
Seite 25: Cleaning, Repair And Storage
Cleaning, repair and storage Devices that are marked with the symbol shown here may not be disposed of with The Quadrocopter must always be kept dry and domestic waste. You are obliged to dispose free of possible dirt such as wool threads, hair, of these kinds of used electrical and electronic dust etc., after each flight. -
Seite 26: Possible Defects
Possible defects In the following you will be shown possible defects, their causes and how to rectify them. Defect Possible cause Remedy Remote control (2) does not Remote control (2) is switched Turn on remote control (2). respond. off. Batteries (4) incorrectly inserted. Insert the batteries (4) correctly. Batteries (4) are dead. -
Seite 27: Étendue De La Livraison
Caractéristiques techniques Félicitations ! Alimentation en énergie pile : Vous venez d‘acquérir un article de qualité. 1,5 V Type de pile AAA, LR3 Avant la première utilisation, familiarisez-vous avec son fonctionnement. Pour cela, lisez Alimentation électrique de l’accumulateur : attentivement le mode d‘emploi suivant. li-polymère 3,7 V 300 mAh Utilisez l‘article comme indiqué... - Seite 28 • Si vous n’avez pas encore suffisamment de • Prudence ! Ne démarrez pas le quadrirotor et connaissances sur le maniement de quadrirotors ne le faites pas voler lorsque des personnes, télécommandés, veuillez contacter un modéliste des animaux ou d’autres obstacles se trouvent expérimenté...
-
Seite 29: Avertissements Concernant Les Piles / L'accumulateur
• En cas de défaut ou de dysfonctionnement, éli- • Conservez toujours les piles hors de portée des minez la cause de la panne avant de redémar- enfants. rer le quadrirotor. • Les piles qui ne sont pas rechargeables ne •... -
Seite 30: Mise En Place Des Piles Dans La Télécommande
• Rechargez l’accumulateur uniquement s’il est • Ne transportez jamais l’accumulateur dans intact et ne présente aucun dommage. Si l’isole- une poche de pantalon ou dans un sac. Faites ment extérieur de l’accumulateur est endomma- attention aux objets pointus ou tranchants qui gé... -
Seite 31: Avertissement Relatif À La Sous-Tension
3. Le voyant de recharge situé sur l‘extrémité du • L‘espace doit faire au moins env. 10 x 6 x 3 m câble (5b) s‘allume. (Lo x La x H). Remarque : La recharge dure environ • Recherchez un vaste espace ouvert, sans obstacle, et faites en particulier attention aux 60 minutes. -
Seite 32: Pilotage Du Quadrirotor
• Tapotez très légèrement la manette de Avancer / reculer (tangage) (fig. L) commande (2e) dans le sens souhaité pour En actionnant la manette de commande de droite effectuer une courbe. (2e) vers l’avant ou vers l’arrière, le quadrirotor Remarque : Commencez toujours par allumer s’incline dans la direction correspondante. -
Seite 33: Voyants De Position À Led
Nettoyage, réparation et ran- Palier de vitesse 2 (2g) (le signal sonore retentit deux fois) gement L’affichage de vitesse (2i) s’allume au centre. Le quadrirotor doit toujours rester sec et les Pour les pilotes ayant une première expérience éventuelles souillures (par ex. fils de laine, de vol. -
Seite 34: Mise Au Rebut
Mise au rebut Vos droits légaux, tout particulièrement les droits relatifs à la garantie, ne sont pas limitées par Éliminez l‘article et le matériel d‘emballage cette garantie. En cas d‘éventuelles réclamations, conformément aux directives locales en vigueur. veuillez vous adresser à la hotline de garantie Le matériel d‘emballage tel que les sachets en indiquée ci-dessous ou nous contacter par e-mail. -
Seite 35: Article L217-12 Du Code De La Consommation
Article L217-5 du Code de la consommation Le bien est conforme au contrat : 1° S´il est propre à l‘usage habituellement atten- du d‘un bien semblable et, le cas échéant : • s‘il correspond à la description donnée par le vendeur et posséder les qualités que celui-ci a présentées à... -
Seite 36: Erreurs Possibles
Erreurs possibles Les erreurs possibles, leurs causes et la solution correspondante sont proposées ci-après. Erreur Cause possible Solution La télécommande (2) ne répond La télécommande (2) est Allumer la télécommande (2). pas. éteinte. Les piles (4) sont mal installées. Placer correctement les piles (4). -
Seite 37: Leveringsomvang
Technische gegevens Van harte gefeliciteerd! Stroomvoorziening batterij: Met uw aankoop hebt u gekozen voor een 1,5 V type batterij AAA, LR3 hoogwaardig artikel. Zorg ervoor dat u voor de ingebruikname met het artikel vertrouwd raakt. Energievoorziening accu: Lees de volgende gebruiksaanwijzing 3,7 V Li-polymeer 300 mAh zorgvuldig door. - Seite 38 • Indien u nog niet over voldoende kennis • Pas op! Start de quadrocopter niet en vlieg beschikt over de omgang met op afstand er niet mee wanneer zich personen, dieren of bestuurde quadrocopters, vraagt u dan advies andere obstakels binnen het vliegbereik van de aan een ervaren modelvlieger of neem contact quadrocopter bevinden.
-
Seite 39: Waarschuwingen Batterijen/Accu
• Stel de quadrocopter en de afstandsbediening • Haal oplaadbare batterijen uit het artikel voor- niet gedurende langere tijd bloot aan direct dat u ze oplaadt. zonlicht of hittebronnen. • De aansluitklemmen mogen niet worden kortge- • Bij een zware crash (bijvoorbeeld vanaf grote sloten. -
Seite 40: Batterijen In De Afstandsbediening Plaatsen
Batterijen in de afstandsbedie- • Beschadig nooit de buitenmantel van de accu. Snijd het folieomhulsel niet kapot. Steek niet met ning plaatsen (afb. D) scherpe voorwerpen in de accu. Er is een kans LET OP! Volg de volgende aanwijzingen op brand en explosies! op om mechanische en elektrische schade •... -
Seite 41: Waarschuwing Voor Onderspanning
Waarschuwing voor onder- • Vermijd te allen tijde de verboden gebieden (u vindt deze in het hoofdstuk „Veiligheidstips“). spanning Vliegen voorbereiden De lampjes (1b) gaan knipperen als de accu (3) bijna leeg is. Laad de quadrocopter op zodra u Let voordat u met de quadrocopter gaat vliegen dit opmerkt. -
Seite 42: Quadrocopter Besturen
3. De ledpositielampjes (1b) van de quadrocopter Aanwijzing: Houd er rekening mee dat de (1) branden. gashendel (2d) teruggaat naar de uitgangspositie 4. Beweeg de gashendel (2d) helemaal naar voren wanneer u deze loslaat. en vervolgens helemaal naar achteren (afb. I). 360°-salto (afb. -
Seite 43: Richting (Roll- En Nick-Trimmen)
Richting (roll- en nick-trimmen) (afb. Q) Rotorbladen verwisselen (afb. B) Als de quadrocopter voor- of achterwaarts be- Let op! Plaats altijd de met een A gemarkeerde rotorbladen op de met een weegt zonder dat u de stuurhendel bedient, dan kunt u dit corrigeren met nick-trimmen. Als de qua- A gemarkeerde rotorbescherming. -
Seite 44: Verwijderingsmaatregelen Batterijen
Verwijderingsmaatregelen batterijen In acht nemen a.u.b.: Omdat het bij batterijen om bijzonder afval gaat dat volgens de wet niet samen met het huisvuil afgevoerd mag worden. U kunt onbruikbare batterijen op de gemeentelijke inzamelpunten of in de handel afgeven. Hier staan speciale verzamelbakken ter beschikking. -
Seite 45: Mogelijke Fouten
Mogelijke fouten Hieronder worden mogelijke fouten, hun oorzaken en de oplossing weergegeven. Fout Mogelijke oorzaak Oplossing De afstandsbediening (2) De afstandsbediening (2) is Schakel de afstandsbediening reageert niet. uitgeschakeld. (2) in. De batterijen (4) zijn verkeerd Plaats de batterijen (4) correct. geplaatst. -
Seite 46: Obsah Balení
Technické údaje Srdečně blahopřejeme! Zdroj energie baterie: Nákupem tohoto dronu jste se rozhodli pro 1,5 V typ baterie AAA, LR3 kvalitní výrobek. Před prvním použitím se prosím seznamte s tímto výrobkem. Napájení akumulátoru: Přečtěte si pozorně následující návod k 3,7 V Li-Po 300 mAh použití. - Seite 47 • Pokud nemáte dostatečné znalosti týkající se • Pro bezpečné používání musí být volný prostor, manipulace s dálkově ovládanými quadrocop- v němž se bude quadrocopter používat, dosta- tery, obraťte se prosím na zkušeného modeláře tečně velký. nebo modelářský klub. • Nelétejte s quadrocopterem v oblastech, kde •...
-
Seite 48: Výstražná Upozornění Pro Baterie/Akumulátor
• V případě pádu stáhněte plyn ihned na nulu. • Baterie nevystavujte extrémním podmínkám Otáčející se rotory mohou být při kontaktu s (např. topným tělesům nebo přímému překážkami nebo při nárazu poškozeny. Před slunečnímu záření). dalším letem vždy zkontrolujte, zda nemají •... -
Seite 49: Vložení Baterie Do Dálkového Ovládání
• Akumulátor nikdy nenabíjejte a neskladujte v Výměna baterií blízkosti zdrojů nadměrného tepla nebo otevře- POZOR! Dodržujte následující pokyny, ného ohně, protože by mohlo dojít k požáru abyste předešli mechanickým a nebo explozi. elektrickým poškozením. • Nikdy nenabíjejte akumulátor, který se nafoukl Pokud baterie nefungují, vyměňte je způsobem, v důsledku přehřátí, pádu nebo přebití. -
Seite 50: Příprava Letu
• V blízkosti nesmí být žádné přístroje (např. Upozornění: Vždy zapněte nejprve dálkové klimatizace, ventilátory, atd.), které způsobují ovládání. Dbejte na to, že při zapnutí dálkového proudění vzduchu. ovládání je plynová páčka nastavená na nejniž- • Dbejte bezpodmínečně na svoje okolí, ve ším stupni (motory vypnuté)! kterém quadrocopter používáte. -
Seite 51: Pohyb Vpřed/Vzad (Sklon)
Pohyb vpřed/vzad (sklon) (obr. L) Upozornění: Při vypínání a znovuzapínání dál- kového ovládání se quadrocopter nachází znovu Přesunutím ovládací páčky (2e) dopředu nebo do- na rychlostním stupni 1. zadu se quadrocopter skloní příslušným směrem. Čím více vykloníte ovládací páčku do odpovídají- Poziční... -
Seite 52: Výměna Listů Rotoru
Pokyny k záruce a průběhu Výměna listů rotoru (obr. B) Pozor! Nasazujte vždy listy rotoru služby označené písmenem A s ochranou rotoru Produkt byl vyrobený s velkou pečlivostí a byl označenou A. průběžně kontrolovaný ve výrobní procesu. Postupujte tak také s dalšími listy rotoru Na tento produkt obdržíte tříroční... -
Seite 53: Možné Chyby
Možné chyby Níže jsou uvedeny možné chyby, jejich příčiny a odstranění. Chyba Možná příčina Odstranění Dálkové ovládání (2) Dálkové ovládání (2) je Zapněte dálkové ovládání (2). nereaguje. vypnuté. Baterie (4) vloženy nesprávně. Vložte baterie (4) správně. Baterie (4) jsou vybité. Baterie (4) vyměňte. -
Seite 54: Alcance De Suministro
Datos técnicos ¡Bienvenido! Alimentación de energía de la pila: Con su compra se ha decidido por un artículo de 1,5 V tipo de pila AAA, LR3 alta calidad. Familiarícese con el artículo antes de la primera puesta en marcha. Suministro de energía de la batería: Para ello, lea detenidamente las 3,7 V de polímero de litio de 300 mAh... - Seite 55 • Si todavía no dispone de conocimientos • ¡Precaución! No arranque ni vuele cuando suficientes acerca del manejo de cuadricópte- haya personas, animales u otros obstáculos en ros, diríjase a una persona con experiencia en la zona de vuelo del cuadricóptero. teledirigidos o a un club de teledirigidos.
-
Seite 56: Advertencias Sobre Las Pilas/ La Batería
• En caso de un defecto o mal funcionamiento, • Las pilas recargables solo se pueden cargar hay que solucionar la causa de la avería antes bajo la supervisión de un adulto. de volver a encender el cuadricóptero. • Hay que retirar la pilas recargables del artículo •... -
Seite 57: Colocación De Las Pilas En El Control Remoto
Colocación de las pilas en el • Nunca dañe la cubierta exterior de la batería. No corte la envoltura de lámina. No pinche la control remoto (Fig. D) batería con objetos afilados. ¡ATENCIÓN! Tenga en cuenta las ¡Existe peligro de explosión y de incendio! siguientes instrucciones para evitar •... -
Seite 58: Colocación De La Batería
Colocación de la batería (Fig. G) Preparación del vuelo Quite la tapa de la batería (1e) del Antes de empezar con el vuelo del cuadricóptero, compartimiento de la batería (1c) y coloque tenga en cuenta lo siguiente: la batería (3) con el conector enchufable (3a). 1. -
Seite 59: Control Del Cuadricóptero
3. Las luces de navegación LED (1b) del cuadri- Girar a la izquierda/derecha (virar) cóptero (1) se iluminan. (Fig. M) 4. Empuje la palanca de aceleración (2d) comple- Al accionar la palanca de aceleración (2d) tamente hacia delante y después completamen- hacia la izquierda o hacia la derecha, se gira el te hacia atrás (Fig. -
Seite 60: Luces De Navegación Led
Limpieza, reparación y alma- Nivel de velocidad 3 (2f) (el pitido suena tres veces) cenamiento El indicador de velocidad se ilumina en la zona El cuadricóptero siempre se debe mantener seco superior (2i). y después de cada vuelo se debe eliminar la Para pilotos muy experimentados. -
Seite 61: Indicaciones Para La Eliminación
Indicaciones para la eliminación El periodo de garantía no se verá prolongado por reparaciones en garantía, garantía legal o como Elimine el artículo y el material de embalaje servicio de la casa. Esto es válido también para conforme a la normativa legal local en la las piezas reemplazadas o reparadas. -
Seite 62: Errores Posibles
Errores posibles A continuación se le muestran los posibles errores, sus causas y la solución. Errores Causas posibles Solución El control remoto (2) no El control remoto (2) está Encienda el control remoto (2). reacciona. apagado. Las pilas (4) están mal Coloque las pilas (4) colocadas. -
Seite 63: Volume De Fornecimento
Dados técnicos Muitos parabéns! Alimentação de energia das pilhas: Com esta compra, optou por um produto de alta 1,5 V Tipo de pilhas AAA, LR3 qualidade. Antes de o utilizar pela primeira vez, familiarize-se com o produto. Alimentação de energia da bateria: Para o efeito, leia com atenção o 3,7 V Polímero de lítio 300 mAh... - Seite 64 • Se não tem conhecimento suficiente sobre • Cuidado! Não coloque o quadricóptero em como lidar com quadricópteros controlados funcionamento ou a voar se houver pessoas, remotamente, contacte um aeromodelista expe- animais ou outros obstáculos na área de voo riente ou um clube de aeromodelismo. do quadricóptero.
-
Seite 65: Aviso Relativo Às Pilhas/Bateria
• Não exponha o quadricóptero ou o teleco- • As pilhas recarregáveis devem ser removidas mando a luz solar direta ou calor elevado por do artigo antes de serem carregadas. longos períodos. • Os terminais de ligação não podem ser curto- •... -
Seite 66: Inserir As Pilhas No Telecomando
• Nunca danifique o invólucro da bateria. Não • Nunca tente adulterar, modificar ou reparar corte o revestimento de alumínio. Não perfure uma bateria. a bateria com objetos afiados. Existe perigo de Inserir as pilhas no telecoman- incêndio e de explosão! do (Fig. -
Seite 67: Aviso De Bateria Fraca
Aviso de bateria fraca • Certifique-se de que o ambiente em redor está seco e sem chuva. As luzes (1b) começam a piscar quando a bateria • A temperatura de funcionamento adequada é (3) está quase vazia. Carregue o quadricóptero de 10 °C a 45 °C. -
Seite 68: Controlar O Quadricóptero
Caso contrário, pode levar a reações imprevi- Movimentos de avanço/recuo (arfa- síveis do artigo e os rotores podem arrancar gem) (Fig. L) inadvertidamente! Se mover a alavanca de comando direita (2e) 1. Prima o interruptor de ligar e desligar (2a) do para a frente ou para trás, o quadricóptero incli- telecomando (2) (Fig. -
Seite 69: Luzes De Posição Led
Nível de velocidade 2 (2g) Nota: repita o processo de calibração se o qua- (o bip soa duas vezes) dricóptero continuar a voar de forma descontrola- O indicador de velocidade (2i) acende na parte da numa direção. central. Limpeza, reparação e armaze- Para pilotos já... -
Seite 70: Instruções Para A Eliminação
Instruções para a eliminação Atendê-lo-emos pessoalmente em cada caso. Segundo a DL 67/2003, com a troca do aparel- Elimine o artigo e os materiais da embalagem ho dá-se início a um novo prazo de garantia. de acordo com as normas locais atuais. Os Depois de expirada a garantia, eventuais repa- materiais da embalagem, como por ex. -
Seite 71: Possíveis Falhas
Possíveis falhas Abaixo, encontram-se listadas possíveis falhas, as respetivas causas e medidas de resolução. Falhas Possíveis causas Resolução O telecomando (2) não reage. O telecomando (2) está desligado. Ligar o telecomando (2). Insira as pilhas (4) corretamente. Pilhas (4) inseridas incorretamente. As pilhas (4) estão Substituir as pilhas (4).