HP LaserJet 3380 Inbetriebnahme
Vorschau ausblenden
Andere Handbücher für LaserJet 3380:
- Benutzerhandbuch (202 Seiten) ,
- Faxhandbuch (430 Seiten)
Quicklinks

Verwandte Anleitungen für HP LaserJet 3380


Inhaltszusammenfassung für HP LaserJet 3380
- Seite 1 LaserJet 3380 start démarrage inbetriebnahme avvio inicio startgids início lea esto primero...
- Seite 2 The following repairs can be done by the customer: Replace any original equipment The only warranties for HP products and services are set forth in the that came with the device. This includes the print cartridge, the express warranty statements accompanying such products and supports for trays and bins, the power cord, and the telephone cord.
- Seite 3 Device configuration. The HP LaserJet 3380 all-in-one comes The HP LaserJet 3380 all-in-one also includes a dual inline memory with a 250-sheet media input tray, a 10-sheet priority input tray, a module (DIMM) slot, parallel and universal serial bus (USB) 50-sheet automatic document feeder (ADF) input tray, a flatbed interface ports, and fax interface ports.
- Seite 4 Prepare the location. Place the device on a sturdy, level surface Regulate the environment. Do not place the device in direct in a well-ventilated area. Make sure that there is enough space sunlight or in an area that has abrupt temperature and humidity around the device so that the air vents are not blocked.
- Seite 5 6) bandeja de entrada del alimentador automático de documentos alimentación; 3) Guía de instalación inicial y folleto de asistencia (ADF); 7) Guía del fax; 8) cable de fax; 9) HP LaserJet 3380 all-in- técnica; 4) CD que incluyen software para el dispositivo y la Guía one; 10) placa frontal para el panel de control (si no está instalada).
- Seite 6 1) Guia dos primeiros passos, com as instruções iniciais de informações adicionais e solução de problemas; 4) Ajuda do configuração e definição; 2) Guia do fax, com instruções de software caixa de ferramentas HP, com instruções sobre como configuração e operação do fax. operar o dispositivo através do software.
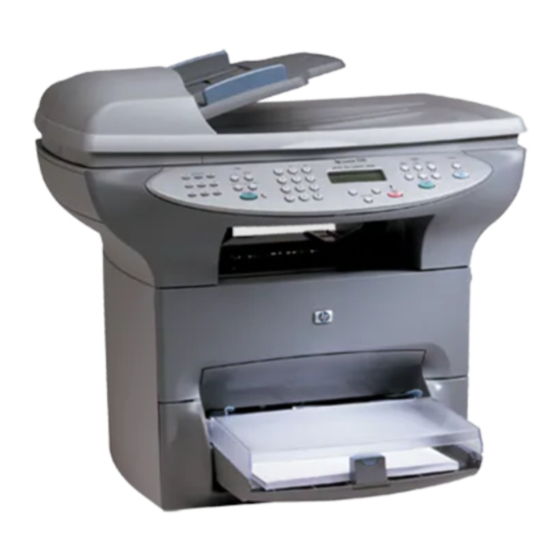
- Seite 7 Locate the device parts. 1) ADF input tray; 2) flatbed scanner lid; 8) left side panel; 9) left side panel latch; 10) fax interface ports; 3) control panel; 4) output bin; 5) print-cartridge door; 6) priority 11) USB port; 12) parallel port; 13) power socket; 14) power switch; input tray; 7) media input tray; 15) straight-through output door.
- Seite 8 Install the control panel faceplate (if not already installed). Note: Make sure that the faceplate is aligned correctly and is not 1) Align the tab in the center of the bottom of the faceplate with the pressing any buttons. The control panel includes the following slot on the device.
- Seite 9 Install the media input and priority input trays. 1) Slide the trays 3) Remove the priority input tray. 4) Slide out the media guides. in and down at an angle until they fit securely. 2) Remove any 5) Pull out the long-media support. shipping tape inside and outside of the trays. Installation des bacs d'alimentation de support et prioritaire.
- Seite 10 6) Place the media in the media input tray, and then adjust the Install the automatic document feeder (ADF) input tray. 1) Align media guides until they are flush with the media. Note: Do not fan the two tabs on the input tray with the two grooves in the ADF lid. the media before placing it in the tray.
- Seite 11 Install the print cartridge. 1) Make sure that the print-cartridge 2) Remove the print cartridge from its packaging, and then shake door is open. the cartridge gently five or six times. 3) Break the plastic tab at the end of the cartridge. 4) Remove the sealing tape from the cartridge. Installation de la cartouche d'impression.
- Seite 12 5) Hold the print cartridge by the handle and insert the cartridge as CAUTION: If toner gets on your clothing, wipe the toner off with a shown. 6) Close the print-cartridge door. The print cartridge clean cloth, wash the items in cold water, and air dry. Using hot engages when the door is closed.
- Seite 13 2) Connectez l'autre extrémité du cordon En effet, comme il ne s'agit pas de produits HP, HP n'a aucun d'alimentation à une prise de courant mise à la terre. Remarque : contrôle sur leur conception ou leur qualité.
- Seite 14 Connect a printer cable to the device. Note: If you are using the 3) Thread the cable through the left panel opening, and then close device as a standalone fax machine or copier, go to step 13. the panel. 4) Shut the print-cartridge door. 1) Open the print-cartridge door, and then open the left side panel.
- Seite 15 Note: Do not connect the cable to a computer or a network at this Connect to a telephone line. Note: If you are not using the device time. fax functionality, go to step 14. 1) Open the print-cartridge door. 2) Open the left side panel. 3) Connect the included fax cord to the device "line"...
- Seite 16 4) Close the left side panel (make sure that the fax cord is routed Turn on the device. Turn on the device by pressing the power through the upper notch in the panel). 5) Close the print-cartridge button next to the power socket on the back of the device. door.
- Seite 17 Tip: If the device has no power and no lights are lit on the control Set the control panel display language and location (if panel, make sure that the power cord is attached securely to both necessary). If prompted by the control panel, select your the device and a power outlet.
- Seite 18 Print a configuration report. 1) Press . 2) Press the < Tip: If the page that prints is totally blank, remove the print MENU ENTER > button to select Reports, and then press . 3) Press cartridge, make sure that the sealing tape is removed (see step 10), MENU ENTER <...
- Seite 19 Self-test the copier by using the automatic document feeder Tip: If the copy job produces a blank page, make sure that the (ADF) input tray. 1) Load the configuration report that you just original is loaded print-side up and that no jams exist in the ADF printed print-side up into the ADF input tray.
- Seite 20 Self-test the copier by using the flatbed scanner. 1) Open the Tip: If the copy job produces a blank page, make sure that the scanner lid, place the configuration report print-side down on the original is loaded print-side down on the flatbed scanner and that flatbed scanner, and then close the scanner lid.
- Seite 21 Complete your device setup. If you are using the device as a If you are connecting the device to a network, go to step 20. If you standalone copier, the setup is complete. If you are using the are connecting the device directly to a computer, go to step 21. If device as a standalone fax, see the Fax Guide to set the fax you are using all of the device functionality, see the Fax Guide to header and complete the device setup.
- Seite 22 Collegamento a una rete. Se si desidera collegare la periferica a Collegamento a un computer. Nota: per installare il software su una rete, consultare le istruzioni fornite con il server di stampa HP Macintosh, andare al punto 23. 1) Chiudere tutti i programmi in (non fornito con la periferica HP LaserJet All-in-One).
- Seite 23 3) Seleccione Instalar puerto apropiado del equipo o conecte el dispositivo a una red. software de HP Laserjet. 4) En el Asistente de conexión de la impresora, seleccione un tipo de conexión. Opmerking: u moet over beheerdersrechten beschikken om de 5) De software vraagt u om het apparaat op de computer aan te...
- Seite 24 Démarrer, puis cliquez sur Programmes. 2) Cliquez sur HP LaserJet All-in-One, puis cliquez sur Boîte à outils HP pour ouvrir la Boîte à outils. Utilisez la Boîte à outils pour exécuter de nombreuses fonctionnalités de votre périphérique à partir de votre ordinateur. Passez à l'étape 25.
- Seite 25 2) Cierre todos los programas que estén en ejecución en el equipo. al paso 25. 3) Inserte el CD de software en la unidad de CD-ROM. 4) En la carpeta del CD, haga doble clic en el icono del Instalador HP All-in- One. De Macintosh software installeren (OS 9). Opmerking: 5) Volg de instructies op het scherm en klik vervolgens op...
- Seite 26 Asistente de instalación de la HP All-in-One. 3) Inserte el CD de software en la unidad de CD-ROM. 4) En la carpeta del CD, haga doble clic en el icono del Instalador HP All-in- One. De Macintosh-software installeren (OS X). 2) Sluit de USB-kabel 5) Volg de instructies op het scherm en klik vervolgens op...
- Seite 27 HP.
- Seite 28 Support information. For customer support, see the support flyer Hewlett-Packard and its subsidiaries respect your privacy and are or see http://www.hp.com/support/lj3380 . committed to protecting it. Please see the HP privacy statement at the registration website. Vous pouvez inscrire votre périphérique sur le site http://www.hp.
- Seite 29 Congratulations! The device is ready to use. See the Toolbox (Windows 98, Millennium Edition (ME), 2000, or XP only) to open the electronic User Guide and to use the tools to solve problems. Félicitations ! Votre périphérique est prêt à être utilisé. Reportez- vous au logiciel Boîte à...
- Seite 32 © 2003 Hewlett-Packard Development Company, LP *Q2660-90938* www.hp.com/support/lj3380 *Q2660-90938* Q2660-90938...